Audicus Partner Mic User manual

Partner Mic
user guide

32
Contents
Welcome....................................................................... 2
Getting to know your Partner Mic .............................. 5
Device description ................................................. 6
Accessories............................................................ 7
Getting started............................................................. 8
Charging the device .............................................. 8
Switching on/off..................................................... 9
Pairing the Partner Mic to the hearing aids ...... 10
Streaming stability ............................................. 13
Daily use of the Partner Mic ..................................... 14
How to wear.......................................................... 14
Positioning of the Partner Mic............................ 15
Understanding the indicator light (LED)............ 16
Low battery warning............................................ 16
Adjusting the volume........................................... 17
Troubleshooting ......................................................... 18
Compliance information ........................................... 20
Information and description of symbols ................. 24
Important safety information .................................. 26
Welcome
Congratulations on choosing the Partner Mic, please
read this user guide carefully to discover how to
benefit from the features of your Partner Mic.
If you have any questions, please contact us at
www.audicus.com
CE mark applied: 2019

4 5
Getting to know your Partner Mic
The Partner Mic is worn by a speaking partner. It picks
up their voice and streams the sound directly into both
of your hearing aids.
Notes
Max 25 m
(80 feet)
Speaking
partner
Listener
Partner Mic

6 7
Partner Mic at a glance
1 Microphone openings
2 Charging input
3 Clip
4 Pairing button
5 Power switch On/Off
6 Indicator light
5
3
4
2
6
1
Accessories
• USB-C cable
•Lanyard
• Protective bag

8 9
Getting started
Charging thedevice
Partner Mic has a built-in, non-removable,
rechargeable battery.
When charging the Partner Mic for the first
time, let it charge for at least 2 hours, even if the
indicator light is not lit or turns green.
• Plug the power supply into a power socket
•Plug the USB plug into the Partner Mic charging
input
• The typical charging time is 2 hours
•Charging is complete when the indicator light
turns solid green
Partner Mic will be turned off while charging.
Switching on/off
Slide the power switch to turn the Partner Mic on
or off. Switch it off when not in use.

10 11
Pairing the Partner Mic to the hearing aids
Partner Mic needs to be paired to your hearing aids
before use. If the Partner Mic has not been paired to
ahearing aid before, it will automatically enter
pairing mode at start up and blink blue.
If you have received the Partner Mic and the
hearing aids in a set, they may already be paired.
• Make sure your hearing aid(s) are turned on
•Start the Partner Mic and hold it within 10 cm
(4inches) of the hearing aid
•Pairing is complete when the indicator light turns
green. You will also hear a confirmation beep in
your hearing aid(s).
You only have to pair the hearing aids once.
They will remain paired after being turned off
and on again.

12 13
To redo the pairing procedure you can manually
activate the pairing mode by pressing the pairing
button.
•Place the Partner Mic within 10 cm (4 inches) range
from the hearing aid
• Press the pairing button
•Pairing is complete when the indicator light turns
green
Once successfully paired, any previously paired
hearing aid will be unpaired.
Streaming stability
Partner Mic has a streaming range of up to 25 meters
(80 ft).
The range may be reduced when the signal is
obstructed by obstacles such as walls, furniture or
the human body.
If the hearing aids are out of range of the Partner Mic
the audio reception will be terminated. Once the
hearing aids are back into the range of the Partner
Mic, the audio reception will automatically resume.

14 15
Daily use of the Partner Mic
How to wear
PartnerMic is worn by the speaking partner, attached
with the clip or hanging on a lanyard.
With a clip:
• Gently press to open the clip
•Ensure the Partner Mic is clipped securely to
clothing
With a lanyard:
• Attach the Partner Mic to the lanyard with the clip
•Put the lanyard around the neck
• Adjust the length by pulling the loose ends
Positioning of the Partner Mic
•Foroptimal performance, place thePartner Mic
20cm (8”) below the wearer’s mouth
•A distance of 50 cm (20”) should not be exceeded
•Avoid tilting the Partner Mic beyond 45°
•If the clip cannot be fastened to clothing use the
supplied lanyard
•To prevent scraping sounds, do not cover the
Partner Mic with clothing during use

16 17
Understanding the indicator light (LED)
During operation
During charging
Solid green 3 sec Switching on
Blinking red Low battery (~30min left)
Blinking blue Pairing mode
Solid red 5 sec Pairing failed
Staying solid red Device error
Blinking green Charging
Staying solid green Charging complete
Adjusting the volume
The volume of the Partner Mic can be adjusted with
the multi-function button on your hearing aid or from
the Remote Control functions within the app,
available for both Android and iOS.
Low battery warning
When the Partner Mic has approximately 30
minutes of battery time left you will hear two beeps
every 10minutes and the indicator light will blink
red.

18 19
Troubleshooting
Cause What to do
Issue: I don‘t hear any sound from the Partner Mic
Partner Mic is
switched off
Make sure the device is turned
on and fully operational
Partner Mic is not paired
with the hearing aids
Pair the Partner Mic to
the hearing aids
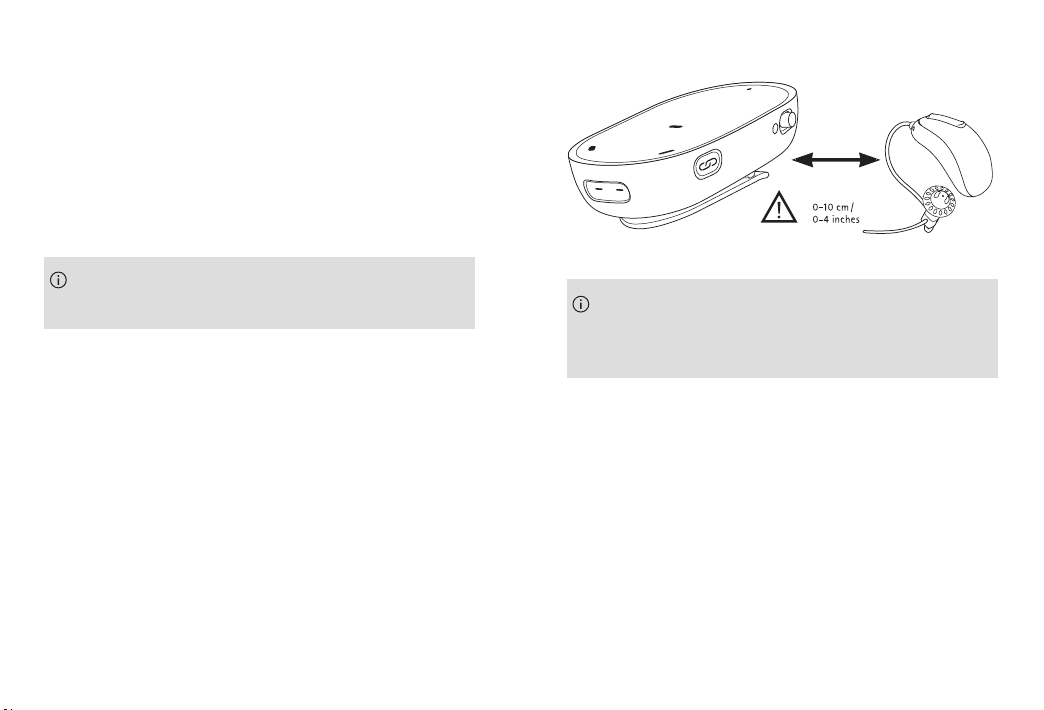
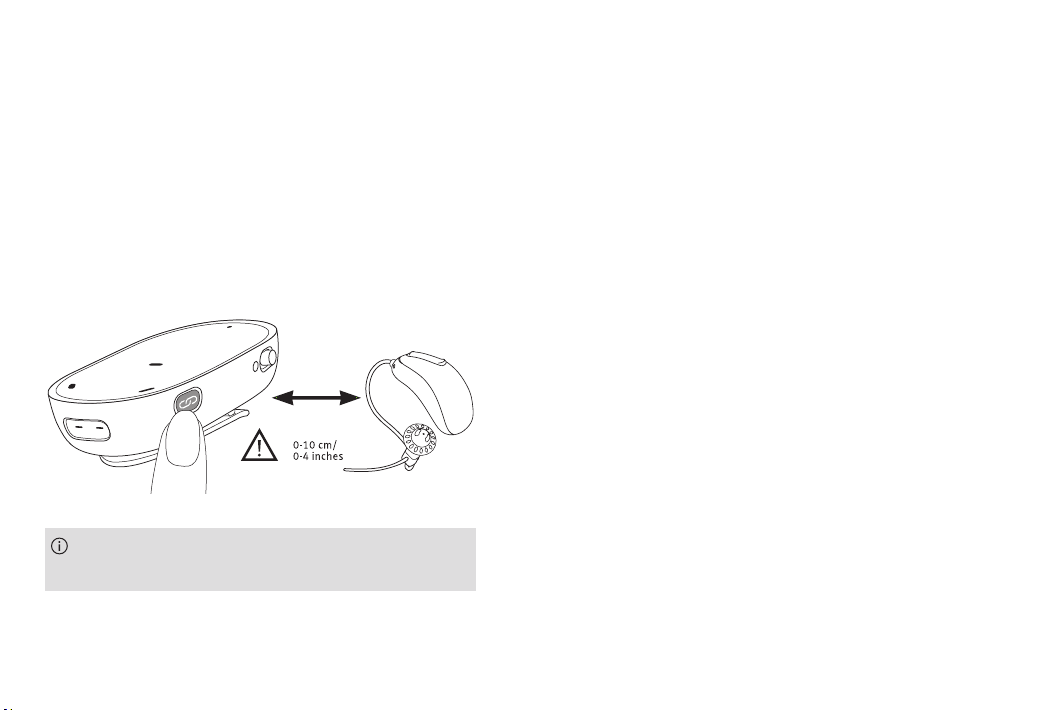
The distance between
the Partner Mic and the
hearing aids is too great
Bring the devices closer to each
other
An obstacle is
preventing transmission
Depending on the material (e.g.
the human body), line of sight
may be necessary
Issue: I hear drop-outs during audio transfer
Partner Mic is too far
away from the hearing
aid or shielded by an
obstacle (e.g.,human
body)
Do not exceed the maximum
distance and adjust the device
orientations
Cause What to do
Issue: The volume during streaming is not
comfortable (too low or too high)
The volume levels are
not set correctly
Adjust the volume using the
multi-function button on your
hearing aid or the Remote
Control functions within the
app.
Issue: There is too much noise, I cannot understand
the speaker
Your hearing aid
microphones are set
too high
Reduce the hearing aid volume
by a pressing the multi-function
button on your hearing aid
Partner Mic is not
worn correctly
Place the Partner Mic closer to
the mouth of the speaker (20
cm / 8”) and make sure it is not
tilted beyond 45°. Clothing
should not cover the Partner Mic
The settings of your
hearing aids are not
right
Please ask your hearing care
professional to finetune your
hearing aids

2021
Notice 1:
This device complies with Part 15 of the FCC Rules
and with Industry Canada‘s license – exempt RSSs.
Operation is subject to the following two conditions:
1) this device may not cause harmful interference,
and
2) this device must accept any interference received,
including interference that may cause undesired
operation.
Notice 2:
Changes or modifications madeto this device not
expressly approved by Audicus may void the FCC
authorization tooperate this device.
Notice 3:
This device has been tested and found to comply with
the limits for a Class B digital device, pursuant to
Part15 of the FCC Rules and ICES-003 of Industry
Canada. These limits are designed to provide
reasonable protection against harmful interference in
a residential installation. This device generates, uses
Compliance information
Europe:
Declaration of Conformity
This product is in compliance with the essential
requirements of the Radio Equipment Directive
2014/53/EU.
Operation frequency: 2400 - 2483.5 MHz Power
level: <20 mW conducted power
Australia/New Zealand:
Indicates a device’s compliance with
applicable Radio Spectrum Management’s
(RSM) and Australian Communications and
Media Authority (ACMA) regulatory
arrangements for the legal sale in New
Zealand and Australia.
The compliance label R-NZ is for radio
products supplied in the New Zealand market
under conformity level A1.

2223
and can radiate radio frequency energy and, if not
installed and used in accordance with the
instructions, may cause harmful interference to radio
communications. However, there is no guarantee that
interference will not occur in a particular installation.
If this device does cause harmful interference to radio
or television reception, which can be determined by
turning the equipment off and on, the user is
encouraged to try to correct the interference by one
or more of the following measures:
• Reorient or relocate the receiving antenna
• Increase the separation between the device and
receiver
• Connect the device into an outlet on a circuit
different from that to which the receiver is
connected
• Consult the dealer or an experienced radio/TV
technician for help
Notice 4:
Japanese Radio Law Compliance
This device is granted pursuant to the Japanese
Radio Law (電波法). This device should not be
modified (otherwise the granted designation number
will become invalid).
Notice 5:
FCC/Industry Canada RF Radiation Exposure Statement
This equipment complies with FCC/Industry Canada
RF radiation exposure limits set forth for an
uncontrolled environment.
This transmitter must not be co-located or operating
in conjunction with any other antenna or transmitter.

2425
Information and description of
symbols
The CE symbol is confirmation that this
product is in compliance with the Radio
Equipment Directive 2014/53/EU.
This symbol indicates that it is important for
the user to read and take into account the
relevant information in this user guide.
Indicates the device manufacturer.
This symbol indicates that it is important for
the user to pay attention to the relevant
warning notices in this user guide.
Important information for handling and
product safety.
Operating
conditions
The device is designed such that
it functions without problems or
restrictions if used as intended, unless
otherwise noted in this user guide.
Indicates the Authorized representative in the
European Community.
Temperature transport and storage:
–20° to +60° C (–4° to +140° F).
Temperature operation:
0° to +45° C (+32° to +113° F).
Keep dry.
Humidity during transportation and storage:
<90% (non-condensing).
Humidity operation:
<95% (non-condensing).
Atmospheric pressure:
50 kPa to 106 kPa.
This symbol on the product or its packaging
means that it should not be disposed of with
your other household waste. It is your
responsibility to dispose of your waste
equipment separately from the municipal
waste stream. The correct disposal of your old
appliance will help prevent potential negative
consequences for the environment and human
health.

2627
Please read the information on the following pages
before using your device.
Hazard warnings
This device is not for children below 36 months. It
contains small parts that can cause choking, if
swallowed by children. Keep out of reach of
children, individuals with cognitive impairment,
and pets. If swallowed, consult a physician or
hospital immediately.
The device may generate magnetic fields. If any
influence of the Partner Mic on the Implantable
Device (e.g. pacemakers, defibrillators, etc.) is
experienced, stop using the Partner Mic and
contact your doctor and /or the manufacturer of
the Implantable device for advice.
Use only hearing aids that have been specially
programmed for you by your hearing care
professional.
Important safety information
Dispose of electrical components in accordance
with your local regulations.
Changes or modifications to any of the devices
that were not explicitly approved by Audicus are
not permitted.
External devices may only be connected if they
have been tested in accordance with the relevant
standards IEC 60601-1, IEC 60065, IEC 60950-1,
IEC 62368-1 or other applicable safety standards.
Only use accessories approved by Audicus.
For safety reasons, only use chargers supplied by
Audiucs.
Do not use the device in explosive areas (mines or
industrial areas with danger of explosions, oxygen
rich environments or areas where flammable
anesthetics are handled) or where electronic
equipment is prohibited.

2829
Opening the device might damage it. If problems
occur which cannot be resolved by following the
remedy guidelines in the troubleshooting section
of this user guide, consult your hearing care
professional.
Lanyard shall not be used if there is a risk of
getting stuck, e.g. in a machine or other objects.
Product safety information
Protect the device connectors, plugs, power
supply from dirt and debris.
Do not use excessive force when connecting your
device to its different cables.
Protect the device from excessive dust, moisture
(bathing or swimming areas) and heat sources
(radiator). Protect the device from excessive shock
and vibration.
Clean the device using a damp cloth. Never use
household cleaning products (washing powder,
soap, etc.) or alcohol to clean them. Never use a
microwave or other heating devices to dry the
device.
X-ray radiation, CT or MRI scans may destroy or
adversely affect the correct functioning of the
device.
If the device has been dropped or damaged, if it
overheats, has a damaged cord or plug, or has
been dropped into liquid, stop using your device
and contact an authorized service centre.
Other important information
High-powered electronic equipment, larger
electronic installations and metallic structures
may impair and significantly reduce the operating
range.

Table of contents