audio ease A53 User manual

User Guide

IMPORTANT INFORMATION: Audio Ease, the Speakerphone logo and SPEAKERPHONE are trademarks
of Audio Ease BV the Netherlands. All other product names, trademarks, or trade names are the names of
their respective owners, which are in no way associated, connected nor afliated with Audio Ease or the
SPEAKERPHONE product and which have not endorsed Audio Ease’s SPEAKERPHONE product. These
marks and names are used solely for the purpose of describing certain amplier, megaphone, radio or phone
tones produced using Audio Ease’s modelling technology so as to electronically emulate the performance of the
original product studied. The result of this process is subjective and may not be perceived by a user as produc-
ing the same effects as the original products studied.

Audio Ease | Speakerphone
User Guide 3
1
Contents
2 Introduction 4
3 Basic Operation 7
4 Reference 9
Help Feature 9
Presets - Select modify and save presets here. 10
Automation Presets - Single click store and recall (automatable) 10
Wet / Dry control. 10
Speaker - Selection of the speaker impulse response. 11
Mic - Selection of the microphone impulse Response 13
Room - Convolution reverb. 13
Cover - Cover up the source with blankets boxes etc,. 13
Distortion - Emulate a speaker’s or amplier’s over modulation. 11
Equalizer section - 5 types of frequency lters. 14
Telecom - (Cellular) phone connection protocol simulation. 14
Gate - Mutes or attenuates the signal when it’s below the threshold level. 15
Compressor - Dynamic compression controls. 15
Delay - mono or stereo feedback delay with lter. 16
Crush - word length reduction and sampling rate reduction. 16
Mod - Tremolo, Chorus, Phaser, Flanger or Vibrato. 17
Leslie - Rotating speaker effect. 17
Phono - Gramophone effects simulator. 18
Tuning - Radio receiver tuning. 18
LFO - Multi LFO and Envelope followers. 19
Sample bay - A library of samples for instant playback by mouse clicks. 20
5 Speaker Impulse Responses 21

Audio Ease | Speakerphone
User Guide
4
2
Introduction
Welcome to Speakerphone.
A bad GSM connection on a busy sidewalk, bullhorn with feedback and helicop-
ters overhead, or a 1952 rockabilly guitar amp in a recording studio’s live room,
Speakerphone gives you authentic speakers of any size together with their natural
environments.
Speakerphone, powered by Altiverb, combines a wealth of effects including a
convolution engine that uses actual samples of hundreds of original speakers, a
radio receiver tuning dial, record player scratch and static generator, GSM cell
phone data compression, distortion, tremolo, delay, a variety of EQ and dynamics,
bit crushing, sample rate reduction, a full blown convolution reverb, and a library
of samples to combine into entire environments.
An impulse-response based speaker emulator, a convolution reverb and a sample
player all in one: Speakerphone can produce complete scenery where any speaker
is involved.
Operation is extremely simple and quick: you just call up one of hundreds of care-
fully crafted and archived presets. If you’re a tweaker just click ‘show controls’
and the whole dashboard slides out, at your disposal, with the most minute detail.

Audio Ease | Speakerphone
User Guide 5
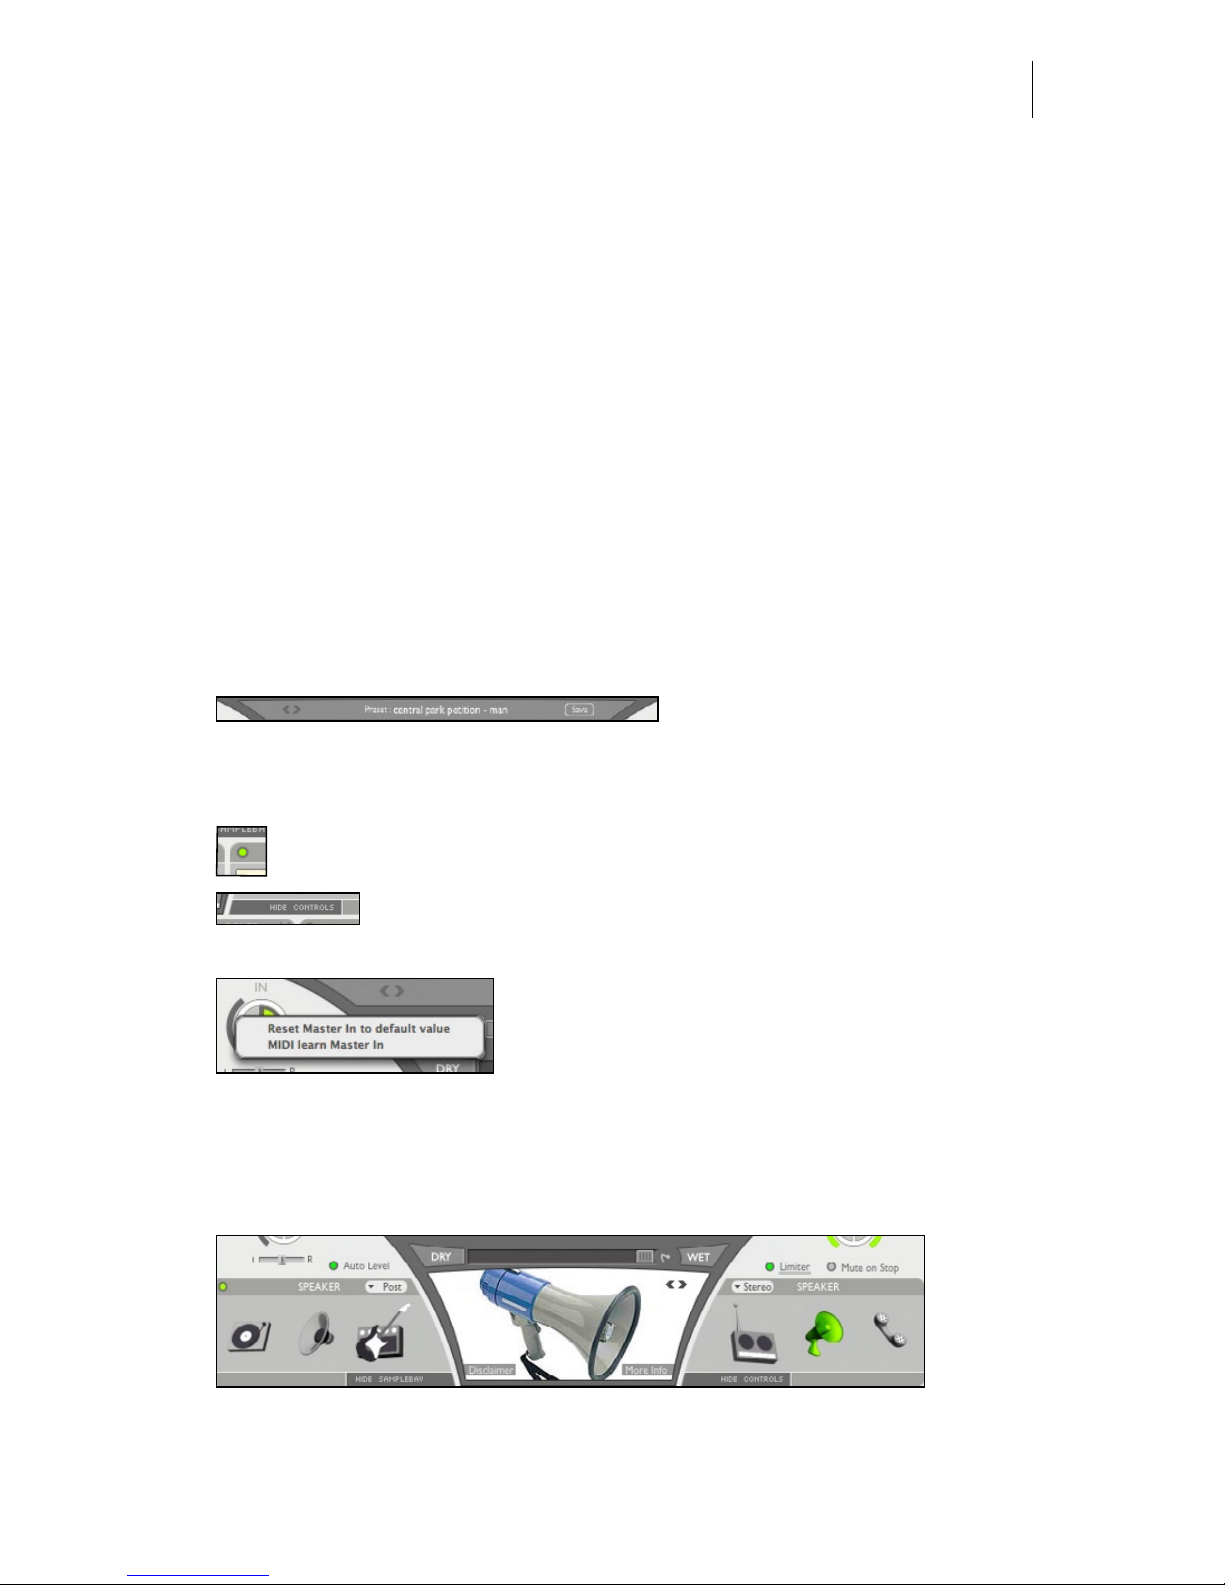
An obvious application for Speakerphone is television- and lm audio Post
production. Speakerphone will give you all the walkie talkies, distant transistor
radios, upstairs TV sets, bullhorns and cell phones you’ll ever need. It will add
dial tones, operators and static, and you can select from a wealth of environments
on either the caller’s or receiver’s end. It’ll make your voice sound through a
distorted megaphone suspended from the ceiling of a station hall, while mixing
in passenger’s footsteps around you. And you can simply drag anything from the
sample bay right to your Pro Tools track and vise versa.
But there are also many uses for Speakerphone in music production. You want
to make the artist rap through a cell phone? Rather than pull up an eq and some
distortion, why not make him rap through an actual cell phone? Perhaps in an
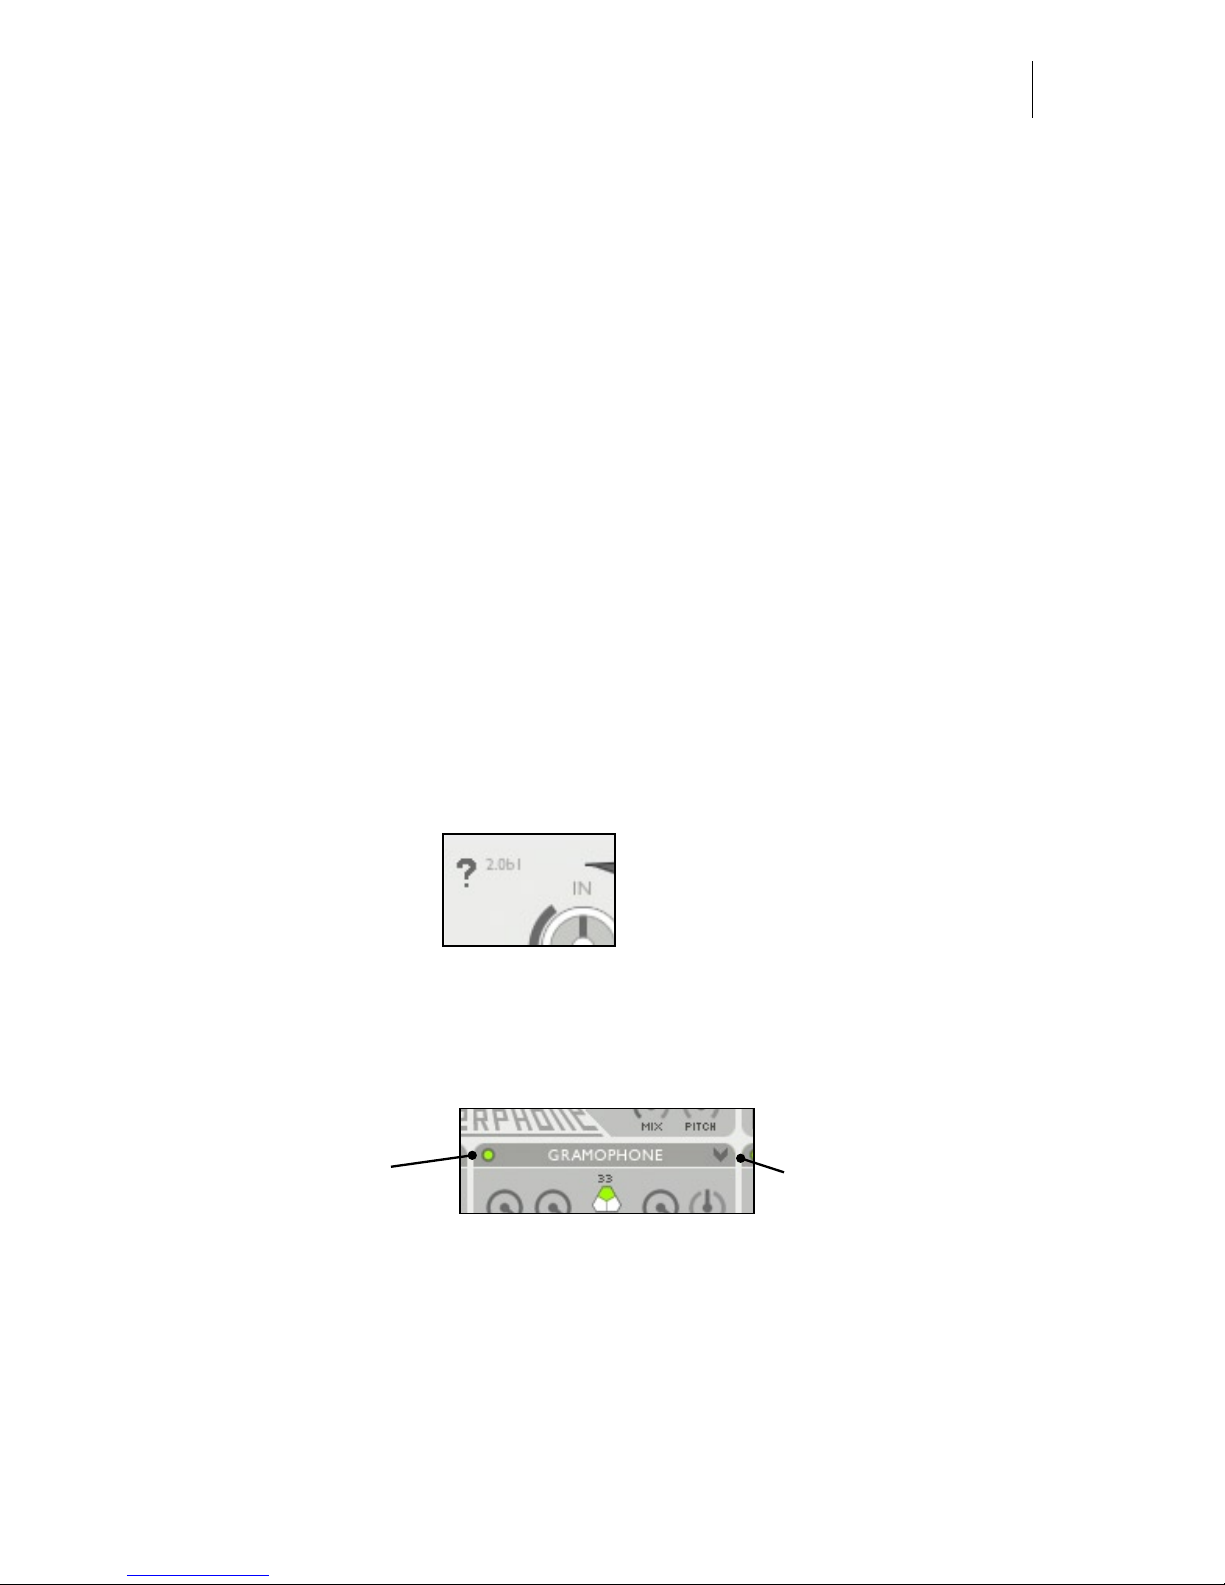
idling car, at a gas station ? You want your mix to start out on a gramophone ?
Choose one of the antique gramophones at hand. Tweak the ticks and crackle
controls, trigger stylus up and down samples, and if you prefer an off-center hole
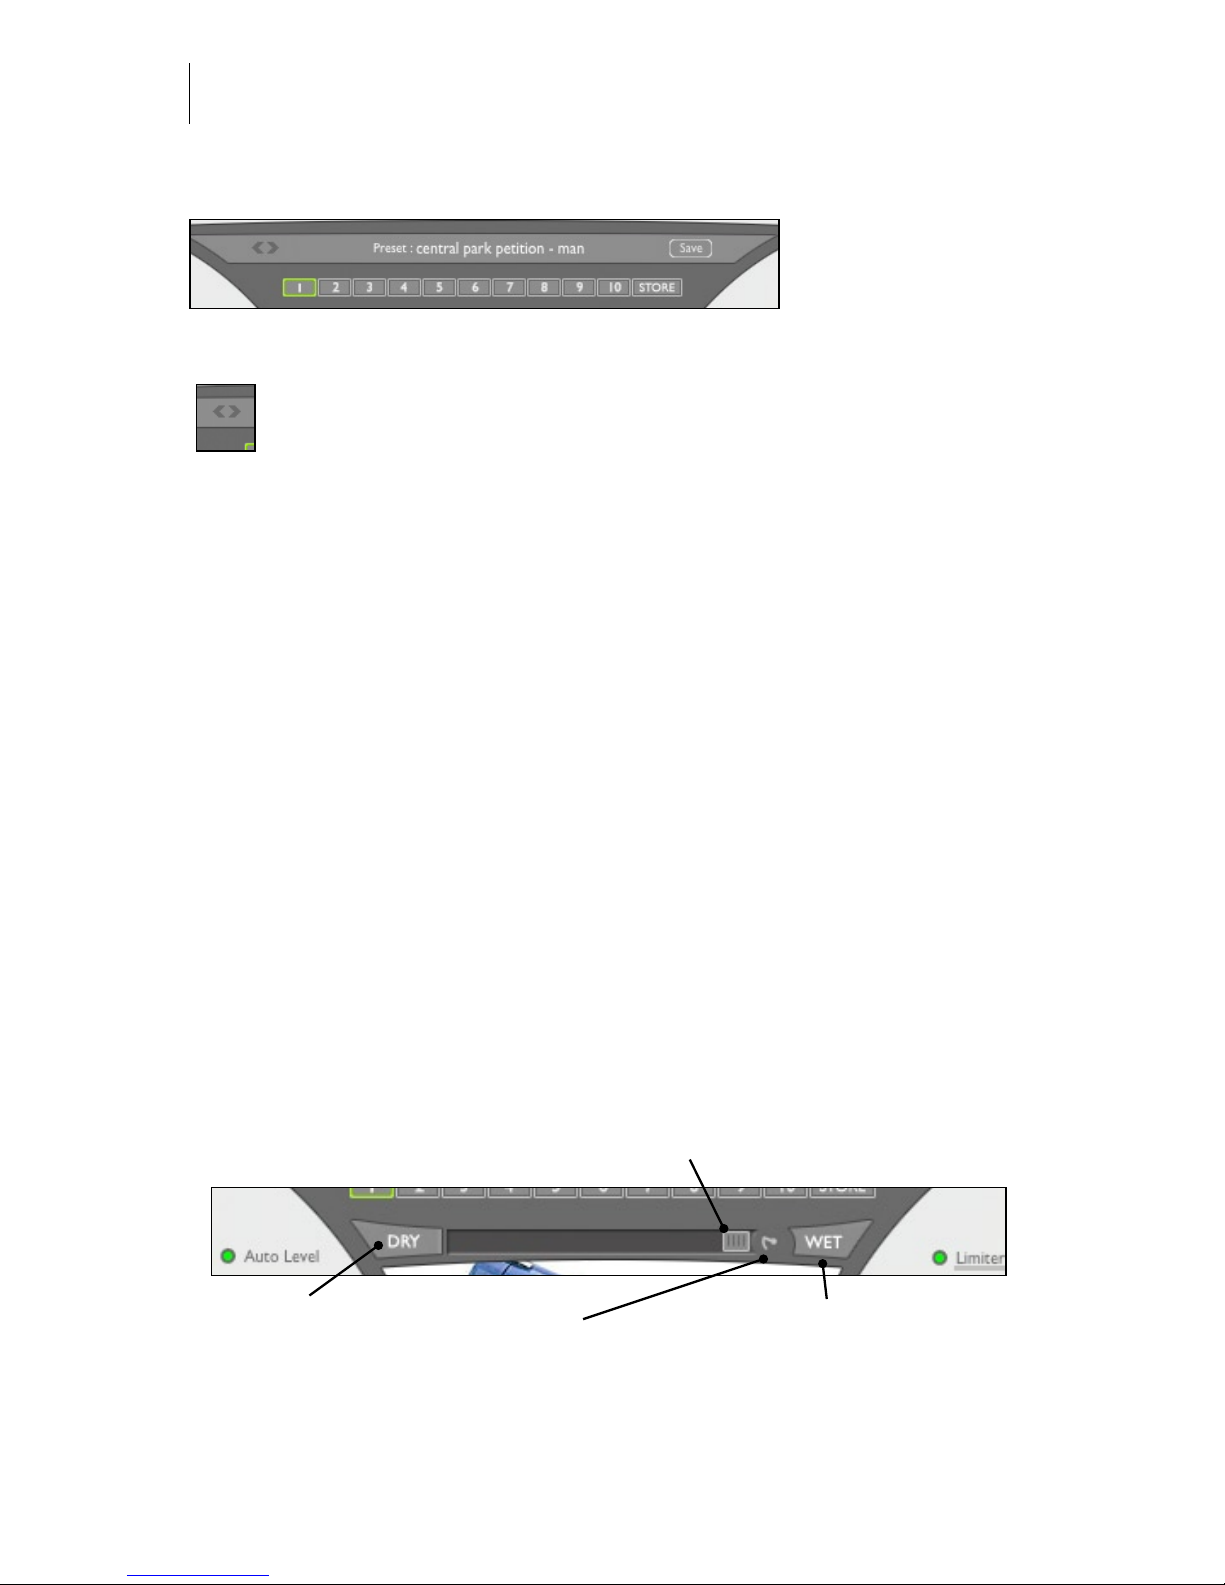
in the record then just put it there. Then give the Wet-Dry Slider a kick and have
Speakerphone smoothly morph from gramophone to neutral by interpolation of
all its parameters. Plus there’s a host of classic guitar amps, complete with tailor
made distortion, spring reverbs, and everything else to build guitar tone like
you’ve never heard from a plug-in.
The end-all speaker simulator plug-in, with a host of environments to put them in.
Speakerphone is speakers done the Audio Ease way.
Speakerphone 2
Just over a year has passed since the introduction of Speakerphone. Speakerphone
has quickly become a household name in audio post production and music stu-
dios. Speakerphone version 2 has a new cleaner look, new features, many newly
sampled guitar amp cabinets, antique phones, toys, answering machines and
megaphones. Added is a microphone simulation module that hosts microphones
ranging from Royers to toy mics.
Among the new modules in Speakerphone 2 is one that’s called ‘Coverup’.
Coverup can place any sound inside tin cans, cardboard boxes, under blankets or
in the closed trunk of a car. Speakerphone 2 adds presets that switch via automa-
tion, an extensive LFO and envelope following section for controlling virtually all
parameters of Speakerphone, and a Leslie speaker module.

Audio Ease | Speakerphone
User Guide
6

Audio Ease | Speakerphone
User Guide 7
3
Basic Operation
Insert Speakerphone on a track of your sequencer or editor, and playback speech,
or speak live through the track.
Click on the large preset name in
the preset bar. A browser is pre-
sented. You can select a preset from one of the many categories in the browser.
If you found something close, but you need it a bit different start tweaking
the controls. A module is active when its power control lights green. Each
module is described in the next chapter. If you see no controls you
can show them by clicking the show/hide controls tab.
CTRL or right -click on a control, such as a knob, to
bring up a menu that allows you to attach a param-
eter to a MIDI controller. The knob will blink until
a controller is sent on channel 1, after which it is
attached. The other option in this contextual menu resets the value to its default.
The heart of the preset is the Speaker module. Click on the phone icon to select
one of many phones, or on the radio icon to select a radio .

Audio Ease | Speakerphone
User Guide
8
The background ambiences that you hear in many
presets come from the Sample Bay at the bottom. Click
on a sample to start it, on the fader handle to adjust its
volume, on the green-lit triangle to stop, and on the
rotary control to adjust panning. Click on the name of a
sample pack (“kids” in this example) to select another
sample pack.
Suppose the voice (or your complete mix) now sounds from a radio. If you play
back stereo music through this setting then perhaps at some point you want to
slowly ‘open up’ the sound to your full bandwidth stereo input sound. Click
the DRY button to make the slider move from wet to dry, from treated audio to
untreated audio. Or drag the WET/DRY slider manually.
You can drag les between the Finder/Windows, the sample
bay and your tracks, so if you like the ambience sounds, or
any other sample from the sample bay, but you’d rather have
it on your track than coming from Speakerphone, you can
click it, hold it for a second and then drag the sound from
the sample bay to the track.
Use the large Input and Output controls to adjust the volumes of incoming and
outgoing audio of Speakerphone. Next to the OUT control there is a limiter that
you can switch on or off, and next to the IN control there is ‘auto level’, which is
an automatic leveler to ensure that the input is just loud enough for the presets to
sound good. ‘Mute on stop’ means playback of samples from the sample bay will
be paused when your sequencer is not playing.

Audio Ease | Speakerphone
User Guide 9
4
Reference
Help Feature
Clicking the ‘?’ will turn the help feature on and off. If the help feature is on you
can hover the cursor over a module to make an explanation appear.
Many modules have
their own preset menu,
bring it up by clicking
this arrow.
With this circular
button you switch a
module on or off.

Audio Ease | Speakerphone
User Guide
10
Presets
Click on the preset name. A browser shows up. You can select another preset now.
Selects the previous or next preset.
Automation presets
A preset can also be stored in one of 10 numbered slots below the preset bar. Do
this by clicking ‘store’, followed by a click on the desired slot. Recall a preset by
clicking on the slot. ‘automation preset index’ is an automatable parameter. You
can therefore invoke switches using your workstation’s parameter automation. In
Pro Tools this also works in case ‘automation preset index’ is the only parameter
that is automation enabled. The contents of all automation preset slots are in turn
saved in a single (Pro Tools) Preset, as well as in the Session le.
Wet / Dry control
The Wet Dry control gradually moves between processed and unprocessed (By-
passed) sound in an elaborate way. A movement from WET to DRY will gradually
open up lters, including the speaker IR, and diminish the effects of modules like
Distortion and Telecom each in a unique way. The overall result of a movement
from WET to DRY is a seamless ‘opening’ up of the sound from the complete
preset to unprocessed sound.
This dry button
starts to move the
WET/DRY Slider
gradually from wet
to dry
This WET button
starts to move the
WET/DRY Slider
gradually from dry
to wet
This controls how
fast the WET/DRY
slider will move
once the DRY or
WET buttons are
clicked
The WET DRY SLIDER changes
all parameters from their current
setting to ‘through’

Audio Ease | Speakerphone
User Guide 11
If, for instance, you have your mix sounding from a jukebox in the back of a bar,
you can slowly ‘open up’ the sound to full stereo by dragging the WET/DRY
slider. Or click the DRY button to make the slider move from wet to dry, auto-
matically, at a speed determined by the rotary control to the right of the slider.
Speaker - Selection of the speaker impulse response.
At the heart of the speaker simulator lies a library of recordings of different
speakers, often referred to as Impulse Responses, or IR’s. These impulse
responses by themselves capture many characteristics, both in frequency and
time, of the sampled speaker. The speaker module lets you select a speaker
impulse response, and it shows its corresponding photograph. Double click the
photograph to get additional info on the selected Impulse Response.
Speaker Category Icons - When you click a speaker category icon, like the phone
or the radio, a browser window appears that lets you select a speaker in that
category. Chapter 5 lists the speakers you can select from these categories, and of-
fers some background info on them. To make auditioning as quick as possible, the
sounding selection is continually updated while you navigate the browser.
The Picture - Shows the actual speaker that was sampled. If you double click the
picture, a larger picture and additional info on the speaker and the recording are
displayed.
Pre/Post -Selects one of two positions in the signal chain where the convolu-
tion module can be inserted. The graph below shows both positions. Suppose a
selected speaker has a frequency range up to 5000 Hz. Using pre-convolution
Distortion and crunch will add harmonics above 5000 Hz in the end result. If you
want those to be cut-off by the IR, use post-convolution, shown in the connection
of modules below.
auto level + inputgain > sample bay (if pre) > phono > tuning > telecom >
speaker (if pre) > crush > gate > compressor > distortion > mod > delay > mic >
speaker (if post) > Leslie > cover > room > eq > sample bay (if post) > out > limiter
Stereo/mono - in stereo mode the IR will be used twice to treat the input: one for
the left input channel, and the other for the right. In mono mode, input channels

Audio Ease | Speakerphone
User Guide
12
will be summed before they enter the speaker module. This way you can set up a
mono tube-radio patch and run your stereo mix through it. When you use the dry/
wet slider above, the signal will go from mono to stereo as well as from tube radio
to neutral.
Mic - Selection of the microphone impulse response.
Similar to the speaker selector, but here a microphone
impulse response can be selected. The available
microphone impulse responses capture time and
frequency characteristics of the microphones depicted,
and therefore make it sound as if the selected micro-
phone was used in the result. Use it to make an
announcer speak through a typical announcer micro-
phone, or to pick up a guitar cabinet using a classic
microphone for the purpose, for instance a Royer.
DEGRADE - in old (mainly telephone) carbon micro-
phones a particular type of degradation is simulated with
this knob. Turn to right for the crackly effect, turn left to
leave the microphone in top condition.
Room - Convolution reverb for room, outdoor space, hall, resonant enclo-
sure, and reverb gear simulation.
Room creates reverb based on recordings of
actual spaces ranging from a railway station hall
to the cockpit of a MIG ghter plane. Samples of
spring- and plate reverbs are available as well.
Click on the photograph to select a different
acoustic space to place the speaker in.
MIX - turn to the right to get more reverb, or to
the left to add more dry audio.
DECAY - turned all the way clockwise the decay, or reverb tail length, is com-
plete. Turn it counter clockwise to shorten the reverb tail.

Audio Ease | Speakerphone
User Guide 13
Cover - cover up the source sound with blankets, boxes, trunks etc
A variety of objects can cover a sound source. Blankets,
suitcases, boxes, glass cups, car trunks are just few. Click
on the picture to select such a cover. All of these are actual
impulse response recordings in Speakerphone.
MIX - turn to the right to get more of the cover’s character-
istics, or to the left to add more dry audio.
PITCH - often the covers have very distinct resonances.
Tune them using this knob. Try it on a wine or beer bottle.
Distortion - Emulate a speaker’s or amplier’s over modulation.
In the distortion module audio is rst passed
through the Pre EQ. If you engage it by
clicking its on/off button you can control
both a parametric EQ and a low pass lter
with resonance in the same graph.
Bandwidth, or Q, for the Parametric EQ can
be adjusted with the small rotary control.
Next, the signal hits the PRE gain, which
typically amplies so the waveform will
become more or less distorted in the next
module: the Distortion Type.
The actual distortion model is selected in the ‘TYPE’ popup. Some are amp mod-
els, others are wave shapers, all of them are further controlled using the CURVE
graph at the bottom of the distortion module.
POST-gain controls the distortion’s output volume. You can also
click the connection-button in between PRE and POST to have
post gain automatically decrease when pre gain increases and vise
versa.
Finally you can Mix the distorted signal with the undistorted input signal using
the MIX control.
The effects of Distortion are different when it sits before or after the Speaker
module. The position of the Speaker module can be adjusted by the Speaker’s
PRE/POST control (see next section).

Audio Ease | Speakerphone
User Guide
14
Equalizer section - 5 types of frequency lters.
A lter can be turned on or off by clicking its
name.
Low and High shelving lters - Click on a
cross in the graph and move it up to amplify, ,
down to attenuate and left-right to change the
cut-off frequency.
High pass lter and low pass lter with
separate resonators - Click and drag in the
graph to move the cross hairs. Left and right
adjusts cut-off frequencies, up and down adjusts resonance amount. Resonance is
a means of emphasizing the cutoff frequencies themselves. The high pass and low
pass lter’s frequency responses do not atten out like the shelving lters, making
them the more dramatic choice of the two.
Two bands of parametric Equalization - Horizontal movement adjusts the posi-
tion of the notch or peak. The amount of amplication or attenuation is controlled
by vertical movement. The width (q-factor) of the peak or the notch is adjusted
with the rotary knob.
Telecom - (Cellular) phone connection protocol (degradation) simulation.
By applying actual telecommunication industry standard
audio data compression such as ‘GSM’, this module
faithfully reproduces the typical audio artifacts found in
bad phone connections. Repetitions, underwater effects, it
will all sound very familiar. As a side effect of the LPC
coder/decoder the Telecom module doubles as a classic
robot-harmonizer. You can build synthetic voice effects using LPC xed pitch, or
even send it MIDI notes on channel 3 to play pitches.
POPUP MENU - choose the encoding/decoding type of data compression that is
used in actual (cellular) phone connections. Some of them may introduce latency
(delay) in the same way actual telephone lines do. The ‘Liquid’ degradation types
introduce the smallest delay.
SRATE- changes the sampling rate of the phone data transmission.
QLTY - quality - simulates the effects of a bad connection. Most notably dropped
(and therefore repeated) time-slices. In Fixed Pitch mode the QLTY knob controls
pitch of the robot voice.

Audio Ease | Speakerphone
User Guide 15
Gate - Mutes or attenuates the signal when it’s below the threshold level
TRESH - Threshold - the gate mutes or attenuates the
signal when it drops below this threshold level.
REL - release - how quickly the gate returns to no-gain-
reduction once the input level gets above the threshold.
MUTE vs ATTENUATE - Select in this popup menu wether the gate completely
mutes or just attenuates the signal.
Compressor - Dynamic compression controls.
The horizontal meter - continually displays
the amount of gain reduction. The dynamics
section is completed by the limiter near the
‘OUT” control at the right top.
TRESH - Threshold - the compressor reduces
the dynamic range of the incoming audio signal if it becomes louder than this
threshold.
RATIO - The amount of gain reduction. 4:1 means 4 dB of additional input cre-
ates just 1 dB of additional output level
ATK - attack - how fast the compressor responds to changes in input level.
REL - release - how quickly the compressor returns to no-gain-reduction once the
input level falls below the threshold.
GAIN -Volume of the output of the gain.

Audio Ease | Speakerphone
User Guide
16
Delay - mono or stereo feedback delay with lter.
STEREO MONO - in mono mode the delay
output is summed to mono
TIME L - left channel delay time.
TIME R - right channel delay time.
FDBCK - amount of the delay output that is fed back into the delay input.
LP/HP - an optional low pass and high pass lter in the feedback path. Turn to
left to attenuate high frequencies or to the right to attenuate lows .
XFD - Cross feed determines how much of the left channel signal gets fed into
the right channel delay path.
MIX - determines the mix between the delayed signals and
the input signal.
FREE mode lets you adjust delay times in milliseconds, while
SYNC mode locks the timing of the delay to the host se-
quencer’s tempo. The delay time rotary knobs are exchanged
by notes, and clicking on the note brings up a note-value
selector box.
Crush - word length reduction and sampling rate reduction.
Drag the cross hair down to reduce word length (reduce from
32 bit input to 2 bit output). Move to the left to reduce
sampling rate. To maximize aliasing effects the most crude of
sample rate conversion algorithms lies beneath the Crush
module.

Audio Ease | Speakerphone
User Guide 17
Mod - Tremolo, Chorus, Phaser, Flanger or Vibrato.
Mod offers 5 types of classic modulation effects, available in
the top left popup.
DEPTH - Controls the amount of the modulation effect.
SPEED - Controls how fast the modulation oscillates. Speed
can either be set in FREE mode or in SYNC mode. SYNC ties speed to the host
sequencer’s tempo and displays it with a note value (as is shown above in the
DELAY module) , while FREE offers a rotary knob.
Leslie - Emulation of the classic rotating speaker
This module emulates a Leslie speaker,
typically associated with Hammond organs.
A Leslie speaker, on the inside, rotates a horn
speaker for the mid to high frequencies, and
it rotates a horizontal bafe below a downward facing low frequency woofer. The
result is rich rotating sound.
For authentic results rst select from the speaker module (page 12) a
Leslie speaker. You’ll nd it in the miscellaneous speakers section
(speaker icon on the left) . Then use the following Leslie controls to
rotate it:
The HI AND LO KEYS switch the rotating elements between
two speeds. The corresponding speeds can be set using the LO
AND HI KNOBS. The rotation can be stopped using the BR
switch (brake).
LAZY - determines the the time the rotation speed needs to reach HI or LO.
WIDTH - Controls the stereo width of the rotation effect.
AMT - Amount controls the intensity of the Leslie’s effect. Together with ‘Width’
it would in reality be achieved by microphone positioning.

Audio Ease | Speakerphone
User Guide
18
Phono - Gramophone eects simulator.
WOW AMT- The hole in a record can be off
center. The further the groove is from the
hole, the faster it will be moved beneath the
stylus, causing the pitch to swing up and
down. AMT controls how far the hole is off
center.
CURVE- A pitch curve also occurs when the record is not at. You can change
the shape of the pitch curve from a perfect sine (result of an off-center hole) to a
steep peak every turn (result of a steep bump in the record).
33/45/78 - RPM - The number of record rotations per minute. Inuences the speed
of the curve as well as the speed of repetitions in the TICKS parameters
TICKS - The density of the layer of crackles and ticks.
GAIN - The gain of the layer of crackles and ticks.
Tuning - Radio receiver tuning.
Simulates the various effects of a radio receiver dial.
STEREO MONO - in mono mode the
tuner’s output is summed to mono
VERTICAL MOVEMENT - changes the
frequency of inter-modulation side tones.
HORIZONTAL MOVEMENT- when the cross hair is moved out of the center
reception of the signal worsens (increasingly adds distortion and noise).
MONO/STEREO - in stereo mode both the band-noise and the swooshes are dif-
ferent on the left and right output channel.
RADIO BAND SELECTOR POPUP (FM/AM) - Different radio bands give dif-
ferent types of band-noise, modulation and distortion effects. Select the type radio
band here.

Audio Ease | Speakerphone
User Guide 19
Multi LFO - 4 Low Frequency Oscillators and 2 envelope followers for
automated parameter control.
Connecting an LFO and adjusting shape speed and range.
Click and hold the black dot before a line that says ‘LFO’, in this example LFO
4. Then drag towards any on screen control, such as Leslie AMT. Then release the
mouse knob. You have now connected lfo 1 to Leslie AMT. Adjust the minimum
and maximum value that the LFO reaches by dragging the red limitation points
around the Leslie AMT knob. Further adjust the shape of the lfo by selecting a
shape from the shape popup (where it says ‘sine’), and use the shape turning knob
to distribute the movement to the far ends of the cycle, or to the middle. Speed
(lfo frequency) can be set freely, or locked to the beat, in which case notes pop
up.
(left) LFO 4 gets connected to parameter Gramophone Ticks (centre) minimum and maximum of
Ticks are set. LFO 4 will swing it between these values. (right) shape and speed of LFO 4 are set in
the LFO module.
Connecting and adjusting an envelope follower
Connecting is done similar to an LFO. An
envelope follower increases the value of
the connected parameter according to the
level of incoming audio. It starts reacting
when audio exceeds the lo-threshold, and it
will not increase further when the level
exceeds hi-threshold. Attack and release determine how quick the envelope
follower reacts.
Disconnecting an LFO or envelope follower
This is done by right clicking (or CTRL
clicking) the parameter it controls, and
selecting “off” such as in the picture to the
left. This pop up menu also offers the
alternative way of connecting a parameter
to an LFO or envelope follower.

Audio Ease | Speakerphone
User Guide
20
Sample bay - A library of samples for playback by mouse clicks or MIDI
You can build complete environments for the speakers here. Several gigabytes of
samples and music are installed with Speakerphone, free for use in your produc-
tion. 5 tables of twelve samples are accessible at a time for playback via mouse
clicks or MIDI. The samples range from extras like knobs and closing car doors
to ambiences and music, and they are used throughout the presets that come with
Speakerphone.
MIDI - consult the manual of your sequencer to nd out how to send MIDI notes
from your MIDI keyboard or sequencer tracks to a plug-in. The sample Bay
receives MIDI notes and volume control on Channel 2. The rst sample-table runs
from MIDI note number 24 (c-2) to 35 (b-2) The next table is triggered by the
next octave and so on.
(Alt) drag samples from sample bay to tracks and the other way around. You can
also drag samples to and from the Finder/Windows, or between slots within the
samplebay.
You can move the samples folder to another drive, but after that you will have to
reconnect Speakerphone by selecting ‘choose samples folder’ from the arrow in
the top right of the sample bay.
One table of 12 audio sam-
ples is called a Sample Pack.
Select wether the sample is
played before (PRE) or after
(POST) effects. So here you
decide wether we receive a
call IN a car, or we receive a
call FROM a car.
Click on a sample to
play. Many of them
are seamless loops.
Drag the horizontal
fader to change
gain.
Click on the
heading name of
a Sample Pack to
select one of many
sample packs
Besides the size-
able speaker-
phone sample
library you can
drag your own
samples from the
Finder or your
sequencer tracks
into these slots
A sample can be dragged to the
Finder (where it will appear as a
sound le) or to the tracks of your
sequencer.
Command (Apple) click on
a sample slot to bring up
a selection dialog. You can
place a single sample this
way, or a complete folder of
With these you
adjust panning
of a sample
Table of contents