Audio Note IQ-II Technical manual
!
IQ-II
!
MOVING MAGNET CARTRIDGE
!
OWNER’S INFORMATION
!
1) CE DECLARATION OF CONFORMITY
DISPOSAL
2) INTRODUCTION
3) OVERVIEW AND UNPACKING
4) INSTALLATION AND STYLUS REPLACEMENT
7) TECHNICAL SPECIFICATIONS
8) WARRANTY INFORMATION
9) CONTACT INFORMATION
CONTENTS
!

CE DECLARATION OF CONFORMITY
DISPOSAL
This product must not be disposed of as normal household waste. To
prevent possible harm to the environment please separate the product
from other waste to ensure that it can be recycled in an environmentally
safe manner. Please contact your retailer or the appropriate local
government office for collection facilities.
!
We declare under our sole responsibility that this product is in conformity
with the following standards or standardized documents:
BS EN 60065 in accordance with the regulations 73/23/EEC, 89/336/EEC
(from 1 January 1997)
CE 94
Audio Note (UK) Limited
Viscount House
Star Road, Star Trading Estate
Partridge Green
West Sussex
RH13 8RA
United Kingdom
Tel: +44 (0)1273 830 800
Fax: +44 (0)1273 731 498
e-mail: info@audionote.co.uk
!

Thank you for purchasing this Audio Note (UK) product. With the correct care it
should give you many years of pleasure and enjoyment.
Please take the time to read all of the information in this manual before connecting
your new component to an electrical supply or your system, to ensure both your
safety and satisfaction.
Please note that due to our desire to continually improve products, specifications are
subject to change without notice. Therefore it is important to refer to the manual that
is supplied with your product for the most accurate information; manuals downloaded
from our website or obtained from other sources may no longer fully apply to your
product.
If you have any questions regarding the information contained within this document
or your new component, please feel free to contact us: -
Audio Note (UK) Limited
Viscount House
Star Road, Star Trading Estate
Partridge Green
West Sussex
RH13 8RA
United Kingdom
Tel: +44 (0)1273 830 800
Fax: +44 (0)1273 731 498
e-mail: info@audionote.co.uk
INTRODUCTION

UNPACKING
Congratulations on your purchase of the Audio Note (UK) IQ-II Moving Magnet
cartridge.
It features a rigid yet lightweight body made from Pocon, which is equipped with
integral threaded inserts for easy installation in the tonearm head-shell. This
mounting system greatly improves mechanical coupling between the cartridge body
and head-shell in comparison to the traditional nut & bolt fixing.
The internal coils are made from extremely fine copper wire, and the cantilever is
formed from a specific grade of hardened aluminium tube. You may also notice that
the suspension is more stiff than usually seen in Moving Magnet cartridges of this
type.
The stylus is an Audio Note Type II, and the complete assembly is removable,
making replacement or upgrade a very simple and cost effective process. In fact, all
of the IQ stylus assemblies are interchangeable, meaning that you could start with an
IQ-1, and eventually replace the stylus assembly with the vastly superior version
used in the IQ-III.
It has been designed to be used with a Moving Magnet compatible phonostage, with
an input impedance of 47K Ohms.
Please take care when unpacking your IQ-II. Choose a clean, clear location to
unpack your cartridge. We recommend that you retain and carefully store all of the
original packing materials, in case transportation / shipping is required at a later date.
Open the external cardboard packaging, and carefully remove the clear acrylic box
containing the cartridge. It is shipped with the removable stylus and stylus guard
installed.
You should also find two mounting bolts and an appropriately sized hex head
wrench.
Carefully remove the cartridge from the surrounding packing sponge, paying
particular attention not to touch the delicate cantilever area.
Once the cartridge, mounting bolts and wrench have been removed, place the
packaging to one side. Once installation has been completed, return the wrench to
the packaging and store safely for later use.
You are now ready to mount your IQ-II in your tonearm’s head-shell.
IQ-II MOVING MAGNET CARTRIDGE
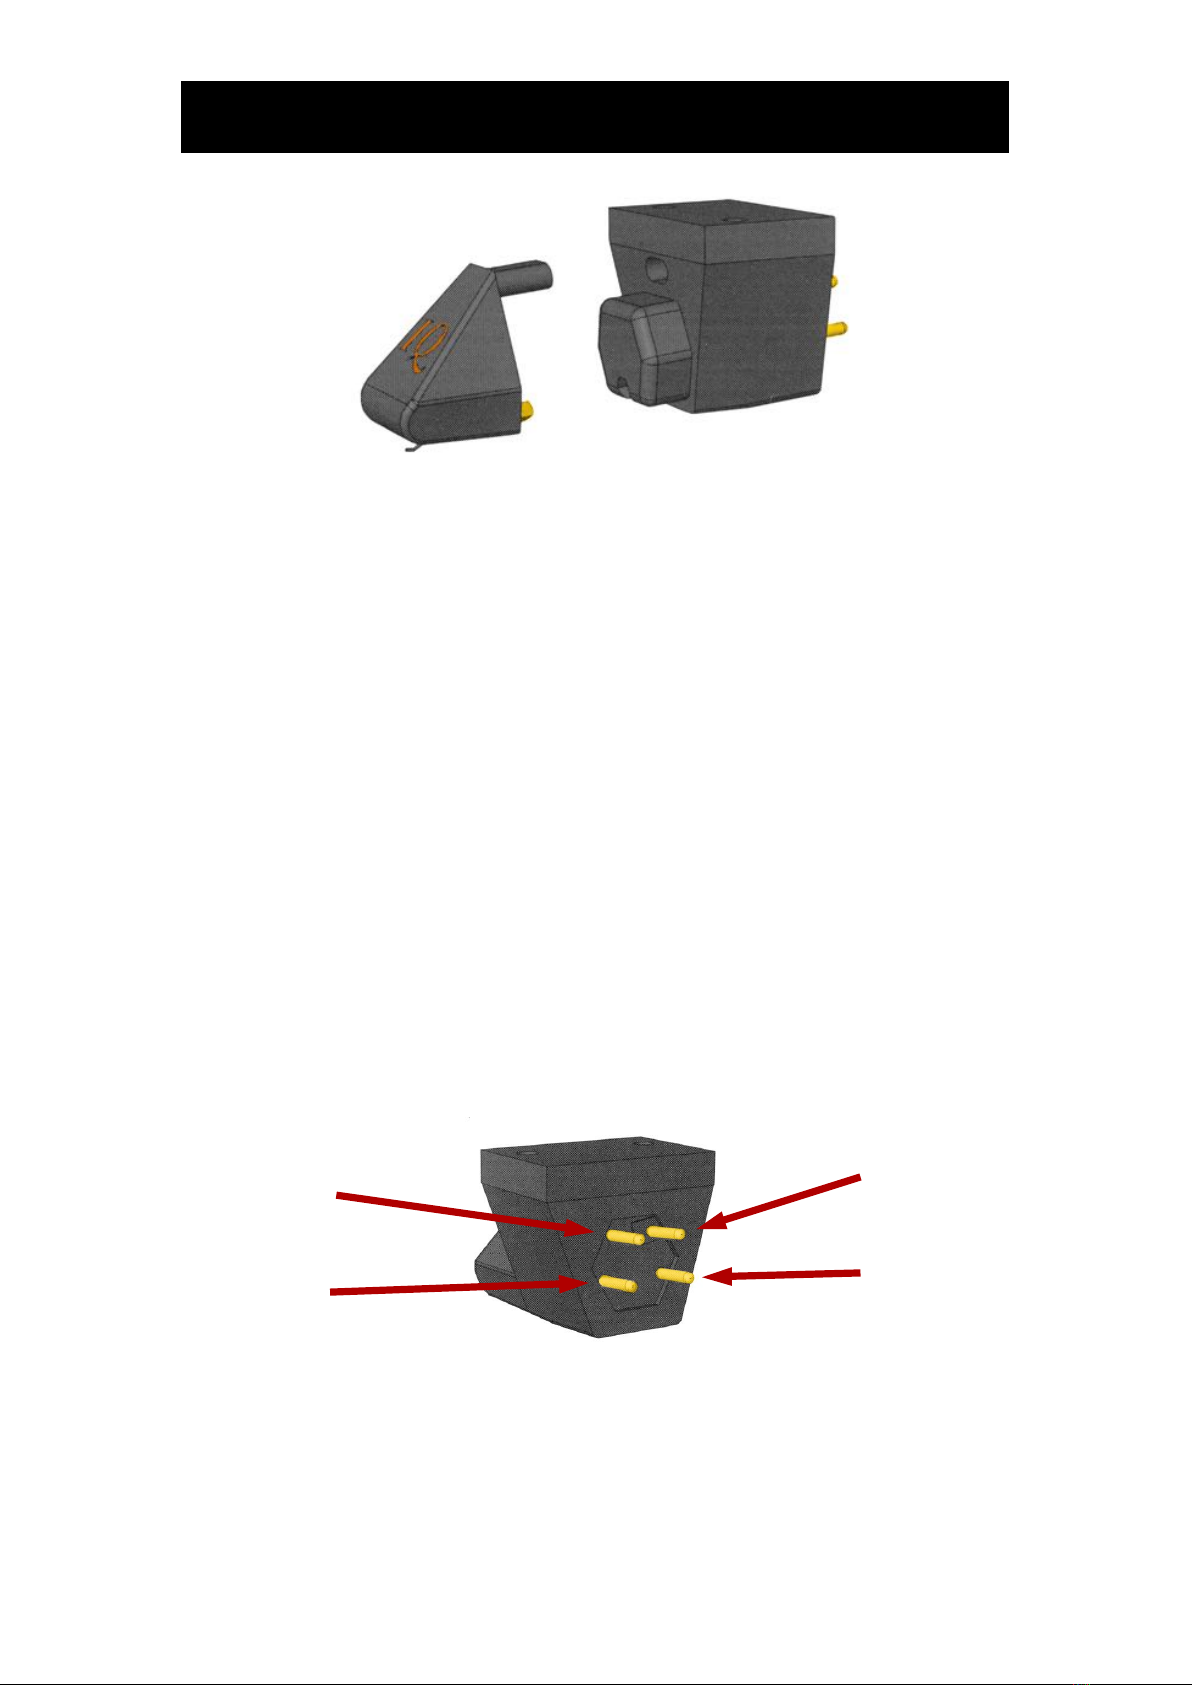
To protect the stylus from damage during installation, we recommend removing the
stylus assembly from the cartridge body, as in the above illustration.
To do this, first remove the clear acrylic stylus guard. Next, firmly but gently grasp
either side of the black stylus assembly with one hand (the component with the ‘IQ’
logo on its front face, on the left of the above image), and with your other hand, grasp
the cartridge body (the black component to the right in the above image).
BE VERY CARFUL, AND DO NOT TOUCH THE CANTILEVER OR STYLUS!
Gently ease the two parts away from each other; they should separate relatively
easily.
Once the stylus has been removed, store it in a safe place, with the cantilever facing
upwards. Do not store the cartridge or stylus assembly with the cantilever facing
down, and under no circumstances should any object or material be allowed to touch,
press against or exert any weight or pressure upon the stylus / cantilever assembly.
It is often easier to connect the tonearm wires to the connection pins located at the
rear of the cartridge body before it is mounted in the head-shell. The pins are colour
coded according to the International Standard Colour Code. Connect the four
tonearm wires to the corresponding cartridge pins: -
UNDER NO CIRCUMSTANCES SHOULD THE HEAD-SHELL WIRES BE
SOLDERED DIRECTLY TO THE CONNECTION PINS OF THE CARTRIDGE
BODY. HEAT APPLIED TO THE CONNECTION PINS WILL CAUSE
IRREPARABLE DAMAGE.
INSTALLATION
RIGHT
NEGATIVE
‘GREEN’
RIGHT
POSITIVE
‘RED’
LEFT
NEGATIVE
‘BLUE’
LEFT
POSITIVE
‘WHITE’
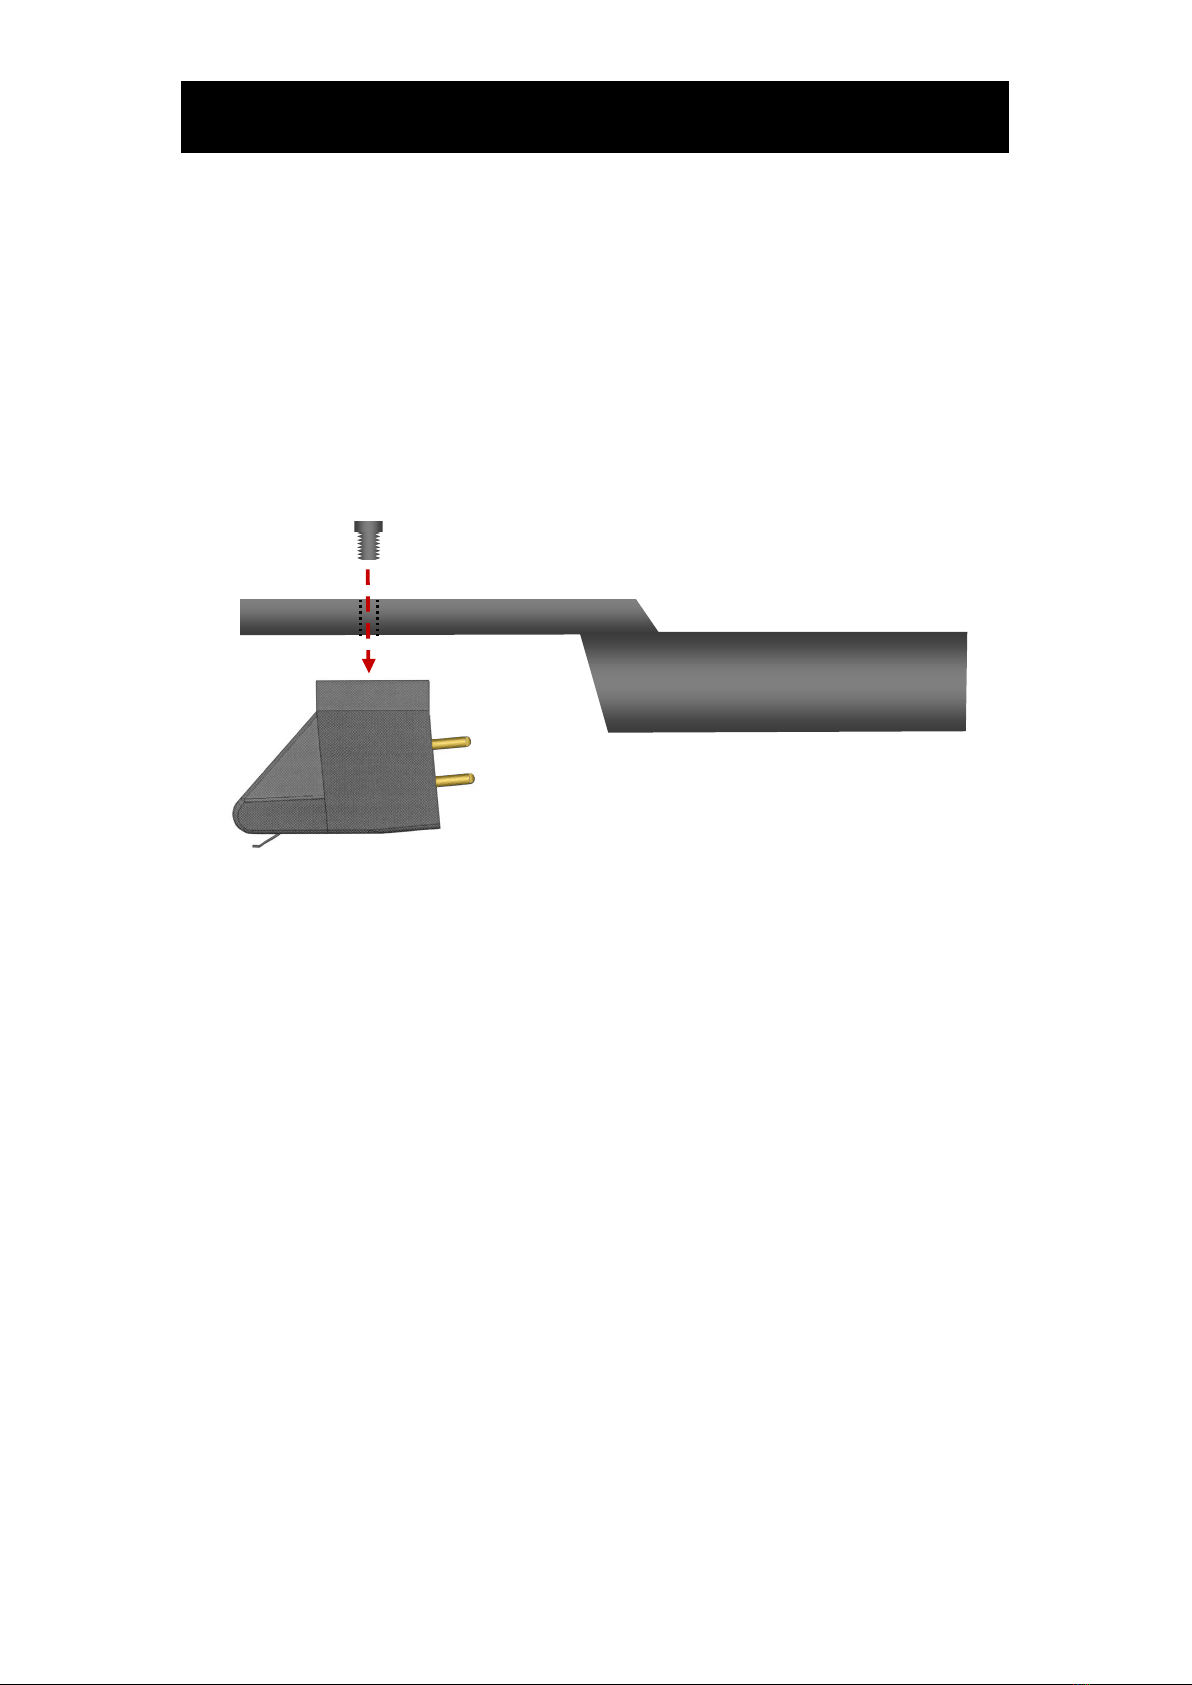
INSTALLATION CONTINUED…
The cartridge body is equipped with integral threaded inserts, to make the mounting
procedure easier and more secure. They are spaced 12.7mm apart, which is the
industry standard distance.
A pair of high quality hex head bolts and an appropriately sized wrench are provided
for mounting the cartridge body to the head-shell.
Pass the bolts down (from above) through the mounting holes in the head-shell, and
align them with the threaded inserts in the top surface of the cartridge body.
Gently tighten the bolts to hold the cartridge securely in place. Do not fully tighten the
bolts until all cartridge alignment procedures have been completed.
Once the cartridge is in place, set the correct tracking weight. Do this BEFORE the
final adjustments are made for cartridge alignment, as this will help to ensure the
cantilever is not damaged due to excessive tracking force. Once final alignment
adjustments have been made, it will be necessary to check the tracking weight again,
as any movement of the cartridge body will change the tracking weight.
The optimum tracking weight for the IQ-II is 1.75g. Remember to remove the clear
acrylic stylus guard before setting the tracking weight!
To achieve correct cartridge alignment, it will be necessary to use the alignment
protractor provided with your tonearm. If in doubt, contact your tonearm
manufacturer, or contact you Audio Note (UK) dealer, who will be able to advise you.
It is also important to make sure that the top surface of the cartridge is mounted
parallel to the surface of the record, when viewed from the front and side. These
adjustments –referred to as Azimuth and Stylus Rake Angle –will have a noticeable
effect on tonal and channel balance, and every effort should be made to accurately
adjust these settings.

Once the final cartridge alignment adjustments have been completed, check the
tracking weight again, to ensure that it is correctly set at 1.75g.
You are now ready to enjoy your record collection!
INSTALLATION CONTINUED…
TOP SURFACE OF CARTRIDGE BODY SHOULD BE PARALLEL WITH RECORD
SURFACE, WHEN VIEWED FROM THE FRONT AND SIDE.

Cleaning The IQ2 requires no special maintenance or cleaning.
UNDER NO CIRCUMSTANCES SHOULD ANY LIQUID OR
SOLVENT-BASED CLEANING SOLUTIONS BE APPLIED
TO THE DIAMOND OR CANTILEVER. DAMAGE CAUSED
TO THE CARTRIDGE BY THE USE OF LIQUID BASED
CLEANING SOLUTIONS WILL NOT BE COVERED UNDER
WARANTY.
Build up of dust of fluff can be gently blown away, and only in
very extreme circumstances should a small, soft artist’s brush
be used to clean the diamond of cantilever, moving the brush,
slowly, gently and extremely carefully from back to front, never
in the opposite direction or from side to side.
Cartridge Life The operational life of a cartridge can be affected by a variety
of factors, such as frequency of use, ambient temperature,
humidity, quality of vinyl being played etc. Our approximate
estimates for the lifespan of the IQ2 is within the region of 1000
to 3000 hours, depending on and not limited to the factors
mentioned above.
Replacement As described in the installation process, all Audio Note (UK) IQ
cartridges are equipped with removable stylus assemblies, to
facilitate replacement and upgrade.
If you require a replacement stylus assembly, please consult
your Audio Note (UK) dealer, or alternatively please feel free to
contact us direct at the address below: -
Audio Note (UK) Limited
Viscount House
Star Road, Star Trading Estate
Partridge Green
West Sussex
RH13 8RA
United Kingdom
Tel: +44 (0)1273 830 800
Fax: +44 (0)1273 731 498
e-mail: inf[email protected]
CLEANING AND SERVICING

LOAD RESISTANCE
47K Ohms
LOAD CAPACITANCE
150 –200pF
INTERNAL INDUCTANCE
570mH
INTERNAL RESISTANCE
660 Ohms
FREQUENCY RESPONSE
20Hz to 20KHz, +/-2dB
CARTRIDGE WEIGHT
6.3g
FIXING CENTRES
12.7mm / 0.5”
TRACKING FORCE / WEIGHT
1.5g –2.5g (1.75g nominal)
CHANNEL BALANCE
2dB @ 1KHz
CHANNEL SEPARATION
25dB @ 1KHz
SENSITIVITY
6.5mV +/-1.5dB
1KHz @5cm/sec
STATIC COMPLIANCE
24mm/N lateral
16mm/N vertical
EQUIVALENT TIP MASS
0.45mg
VERTICAL TRACKING ANGLE
24 degrees
NOTE
Due to Audio Note (UK)’s ongoing research and
development program, specifications are subject to
change without notice.
TECHNICAL SPECIFICATIONS

Audio Note (UK) warrants this product to be free from defects in materials and
workmanship for one year from the original date of purchase from an appointed
Audio Note (UK) dealer, and agrees to covers the cost of parts and associated labour
required to correct such defects, subject to terms & conditions.
This Warranty is offered to the first purchaser only.
If the product fails in normal domestic use and during the Warranty period due to the
above described faults or defects, Audio Note (UK) will,at its discretion, repair or
replace the item free of charge within a reasonable time once it has been returned to
Audio Note (UK) or an appointed Audio Note (UK) dealer or service engineer.
Audio Note (UK) is not liable for any shipping charges incurred whilst transporting the
product to or from Audio Note (UK) or an appointed Audio Note (UK) dealer or
service engineer, should the item require service or repair during or after the
Warranty period.
If the product must be shipped, please use the original packaging materials and
include a copy of the original sales receipt along with a note explaining, in as much
detail as possible, the problems you are experiencing with the unit.
Only use a reputable Courier Service or Shipping Agent, and ensure that your
product is insured during transit.
Any servicing, repairs or modificationsnot authorized by Audio Note(UK), or
carried out by persons other than appointed Audio Note (UK) service
engineers will invalidate any warranty.
This Warranty does NOT cover: -
Damage sustained whilst in the possession of a shipping agent, retailer or consumer
and not caused as a direct result of defects in materials or workmanship.
Damage caused by normal wear and tear.
Damage or defects caused by abnormal or unreasonable use.
Damage caused by accident, acts of nature, misuse or neglect.
Damage caused by a failure to follow the operating and installation instructions
supplied with the product.
Damage caused by improper or careless cleaning.
Audio Note (UK) reserves the right to refuse warranty for any component of which
the serial number has been removed, defaced or tampered with.
WARRANTY INFORMATION
Audio Note (UK) Limited
Viscount House
Star Road, Star Trading Estate
Partridge Green
West Sussex
RH13 8RA
United Kingdom
Tel: +44 (0)1273 830 800
Fax: +44 (0)1273 731 498
e-mail: info@audionote.co.uk
CONTACT INFORMATION
If in the future your Audio Note (UK) product
requires servicing, or if you require technical support
or have any questions regarding this or any of our
other products, please contact your local Audio Note
(UK) dealer.
Alternatively, please feel free to contact us directly: -!
This manual suits for next models
1
Table of contents
Other Audio Note Music Equipment manuals


