Audiofilia AF speakers User manual

it
en
1

it
en
2 3
Grazie per aver acquistato i diffusori Audiofilia AF-Speakers.
Siete ora in possesso di un sistema di diffusori di alto livello
realizzati con componentistica di elevata qualità e finiture
e lavorazione dei cabinet di raffinata ebanisteria italiana.
Questi diffusori, realizzati singolarmente a mano con la
massima cura, rappresentano lo stato dell’arte della ripro-
duzione hi-fi domestica, saranno in grado di portare a casa
vostra una delle più alte esperienze d’ascolto possibili.
La naturalezza d’emissione, la trasparenza e la neutralità
sonica di questi diffusori trovano in sorgenti e amplificazioni
di alta qualità i loro partners ideali.
DISIMBALLARE I DIFFUSORI
Disimballate con cura i vostri nuovi diffusori evitando di
graffiare il mobile e danneggiare gli altoparlanti estraendoli
dagli imballi. Fatevi aiutare da una seconda persona in caso
di diffusori floorstanding. Se avete il sospetto di possibili
danni subiti dal prodotto durante il trasporto, riferiteli im-
mediatamente al vostro rivenditore. Conservate il cartone e
gli altri materiali d’imballo per eventuali trasporti futuri.
PIEDINI PIATTI
Forniamo i nostri diffusori con piedini studiati per assecon-
dare la peculiarità della filosofia di progetto che contradi-
stingue i diffusori Audiofilia. Il diffusore, inteso come unità
deve essere libero di vibrare esattamente al pari di un qual-
siasi strumento musicale quando questi viene sollecitato.
I piedini forniti e normalmente montati nei nostri diffusori
sono autolivellanti e si autoadattano a qualsiasi superfice.
Un leggero traballamento del diffusore una volta posto
nellasua posizione d’ascolto definitiva è naturale e voluto
in fase progettuale.
Sconsigliamo di interporre tra il diffusore ed il pavimento
basette di marmo, vetro, legno etc… In quanto andrebbero
ad inficiare e/o alterare la risposta in frequenza del diffu-
sore nella regione delle basse frequenze.
PIEDINI APPUNTITI
Generalmente sconsigliamo questo genere di piedini ma se
per qualsivoglia ragione decidiate di montarli, procedete
appoggiando con delicatezza il diffusore lateralmente (non
sulla parte anteriore o posteriore) su una superficie mor-
bida e non abrasiva. Avvitate i piedini nel foro filettato di
ciascun diffusore. Accertatevi che le quattro punte siano
avvitate completamente per ottenere la massima stabilità.
ATTENZIONE!
Non trascinate MAI i diffusori da pavimento (floorstan-
ding) per spostarli, questa operazione comporterebbe
il danneggiamento dei piedini metallici e/o del mobile
stesso. Sollevate sempre i diffusori e trasportateli nella
loro posizione definitiva. I diffusori da pavimento hanno
un baricentro molto alto e possono divenire instabili e
ribaltarsi se urtati o posizionati impropriamente.
it
en
4 5
POSIZIONAMENTO DEI DIFFUSORI
STEREO
I diffusori Audiofilia hanno un angolo dispersivo del suono
molto ampio. Nonostante questo, consigliamo di posizio-
narli nell’ambiente angolati verso la posizione d’ascolto
e in modo che la larghezza che intercorre tra un diffuso-
re e l’altro sia la stessa che intercorre tra quest’ultimi e
l’ascoltatore, formando tra i diffusori e l’ascoltatore un
triangolo equilatero virtuale (Fig. 1), dove l’ascoltatore si
trova all’interno di tale triangolo. Inoltre, per ricreare un
palcoscenico sonoro (soundstage) credibile consigliamo d’
interporre una distanza tra i due diffusori non inferiore a
un paio di metri e lontani il più possibile dalle pareti di
fondo e laterali del vostro ambiente d’ascolto.
HOME THEATER
I sistemi home theater AF sono progettati per una espe-
rienza d’ascolto profonda, d’ impatto ed estremamente
coinvolgente. Qualsiasi configurazione decidiate di avere a
6 o a 8 canali, avrete la certezza di rivivere nel vostro am-
biente d’ascolto la stessa e a volte maggiore, esperienza
sonora 3D di una sala cinematografica.
Per una maggiore scena sonora 3D posizionate un diffu-
sore sulla sinistra ed uno sulla destra della linea ideale
in cui è posizionato il televisore o il monitor TV. Posizio-
nate il canale centrale sotto lo schermo TV. I diffusori
AF sono schermati magneticamente, potete quindi posi-
zionarli vicini al televisore senza preoccuparvi di even-
tuali distorsioni dell’immagine TV.
Posizionate i diffusori dei canali surround anterio-
ri e posteriori, su dei piedistalli e i diffusori del ca-
nale posteriore alle spalle della posizione di ascolto.
Il posizionamento finale dipende dall’ acustica dell’am-
biente, dalla disponibilità di spazio e dalle vostre prefe-
renze di ascolto. (Figure 2 e 3).
Posizionate il subwoofer possibilmente lontano dagli an-
goli per evitare un eccessivo offuscamento e/o rimbombo
delle basse frequenze.
left right
Figura 1

it
en
6 7
left right
center
surr left surr right
TV
Figura 2. Questa vista dall’alto mostra una tipica instal-
lazione home theater. I canali posteriori sinistro/destro si
riferiscono ad un sistema a 6 canali.
Figura 3. Questa illustrazione mostra una configurazione
alternativa, che può rivelarsi adatta a determinati am-
bienti. I canali posteriori sinistro/destro si riferiscono ad
un sistema a 8 canali.
surr-back left surr-back right
sub
left right
center
surr left surr right
TV
sub
SUBWOOFERS
I subwoofers amplificati AF aggiungeranno, oltre alla pu-
rezza del suono sulle basse frequenze, realismo e un note-
vole impatto sia alla musica, alle colonne sonore e agli ef-
fetti speciali contenuti nei film. Posizionate possibilmente
il subwoofer lontano dagli angoli, per evitare un eccessivo
offuscamento e/o rimbombo delle basse frequenze.
Consigliamo di collegare il vostro subwoofer AF alla vostra
unità con cavi dedicati di alta qualità. Contattate il vostro
rivenditore Audiofilia per maggiori informazioni e suggeri-
menti sui cavi da scegliere per collegare il vostro subwoofer.
COLLEGAMENTO DEI DIFFUSORI
Per usufruire in pieno delle elevate caratteristiche soni-
che dei vostri nuovi diffusori AF consigliamo di inserirli
in sistemi hi-fi con sorgenti e amplificazioni e cavetteria
di alta qualità.
ATTENZIONE!
Assicuratevi che tutti gli apparecchi siano spenti prima
di effettuare qualsiasi collegamento.
Per i collegamenti dei diffusori, impiegate un cavo di alta
qualità con codice di polarità. Il lato del cavo con una
striscia o di colore rosso o altra codifica, viene normal-
mente considerato come quello di polarità positiva (+).
I diffusori hanno terminali che accettano differenti solu-
zioni di terminazione del cavo.
NOTA: Se lo desiderate, consultate il vostro rivenditore
Audiofilia per suggerimenti sui cavi da scegliere e sulle
opzioni di cablaggio.

it
en
8 9
Rosso = +
Nero = -
Contrassegno = +
Nessun
contrassegno = -
Figura 4. Questa illustrazione mo-
stra come collegare il cavo spellato
ai terminali.
1) Allentare il terminale.
2) Inserire il cavo spellato e
serrare il terminale
Onde assicurare che i diffusori funzionino con la corret-
ta polarità, collegate ciascun terminale + sul pannello po-
steriore dell’amplificatore o dell’amplificatore al rispettivo
terminale + ( rosso) di ciascun altoparlante. (fig.5)
Collegate i terminali – (nero) nella stessa maniera.
Consultate il manuale utente allegato al vostro amplifi-
catore, ricevitore e al televisore per avere conferma delle
procedure di collegamento.
ATTENZIONE!
Non invertite le polarità (+ e - o rosso e nero)
nell’effettuare i collegamenti. Così facendo ottere-
ste un’immagine sonora qulitativamente povera e
una gamma bassa indebolita.
COLLEGAMENTO STANDARD
Il diagramma di cablaggio mostra i collegamenti in corretta
polarità per un canale di un sistema stereo o home theater.
Amplificatore Diffusore
Un solo canale illustrato
1) Allentare i terminali e rimuovere
i ponticelli.
2) Inserire i cavi di potenza per le alte
frequenze nella coppia superiore di
terminali e quindi serrarli.
3) Inserire i cavi di potenza per le bas-
se frequenze nella coppia inferiore
di terminali e quindi serrarli.
COLLEGAMENTO BI-WIRING
Il pannello esterno dei connettori e il crossover interno di
divisione delle frequenze sono progettati in maniera tale che
al trasduttore delle basse frequenze e a quelli delle medie e
alte frequenze, possano essere collegati a due set separati
di cavi di potenza. Tale configurazione è chiamata bi-wiring.
Il bi-wiring può fornire una serie di vantaggi sonori come
una maggiore trasparenza del messaggio sonoro, un sound-
stage più ampio e profondo e una considerevole maggiore
flessibilità nella selezione dell’amplificazione di potenza.
COLLEGAMENTO BI-AMPING
Per collegamento bi-amping si intende il collegamento a
due amplificatori stereo separati, mediante due set di cavi
di potenza ai connettori posteriori dei vostri diffusori.

it
en
10 11
BIAMPING ORIZZONTALE
Al primo amplificatore andrà collegato il canale left (si-
nistra) alla sezione alti di un diffusore e il canale right
(destro) alla sezione alti dell’altro diffusore. Ripetendo lo
stesso collegamento con il secondo amplificatore con la
sezione bassi dei due diffusori. Con questa configurazio-
ne il primo amplificatore alimenterà la sezione alti e il
secondo amplificatore la sezione bassi dei diffusori.
- +
- + -+- +
-+-+ - +
- +
Amp1
Amp2
Diffusore
Sinistro
Diffusore
Destro
BIAMPING VERTICALE
Al primo amplificatore andrà collegato il canale left
(sinistra) alla sezione alti e il canale right (destro)
alla sezione bassi della morsettiera posteriore di un
singolo diffusore. Ripetendo lo stesso collegamen-
to con il secondo amplificatore e il restante diffusore.
Con questa configurazione ogni amplificatore alimenterà
la sezione alti e la sezione bassi del relativo diffusore.
- +
- +
- +
- +
Amp1
Amp2
Diffusore
Sinistro
Diffusore
Destro
-+
-+
-+
-+

it
en
12 13
CURA DEI VOSTRI DIFFUSORI
Il mobile dei diffusori Audiofilia sono finiti a mano con
cere o laccature di alta qualità e non richiedono alcuna
manutenzione di routine. Ove necessario usate un panno
morbido per rimuovere eventuali impronte digitali o pol-
vere dal mobile.
NOTA: Non impiegare alcun prodotto detergente o luci-
dante sul mobile. Usate un pennello morbido di tanto in
tanto per spolverare i drivers dei diffusori.
MESSA A PUNTO
Controllate la qualità della riproduzione dei diffusori.
Prima di tutto impostate al minimo il controllo di volume
del sistema, quindi accendetelo. Ponete in riproduzione
un brano musicale o un segmento video che vi sia parti-
colarmente familiare ed regolate il controllo del volume
sino ad un livello che vi risulti piacevole ed appagante.
NOTA: Dovete poter ascoltare una riproduzione audio bi-
lanciata entro l’intera gamma di frequenze. Se così non
è controllate tutti i cablaggi o consultate il rivenditore
autorizzato Audiofilia dal quale avete acquistato il si-
stema in modo che vi fornisca aiuto e delucidazioni.
La quantità udibile di basse frequenze e la qualità
dell’immagine stereo, possono essere determinate da
una serie di fattori, tra i quali le dimensioni e la forma
della stanza, i materiali con cui questa è stata costrui-
ta, la posizione d’ascolto. Ascoltate una buona varietà di
brani musicali e fate attenzione al livello della gamma
bassa. Se ritenete che il basso risulti un pò “gonfio” o
eccessivo, allontanate i diffusori dalle pareti adiacenti.
Conseguentemente, avvicinando i diffusori alle pareti si
avvertirà una maggiore quantità di basse frequenze.
Il suono di tutti i diffusori migliora con il tempo, le pre-
stazioni ottimali si ottengono dopo alcune decine di ore
di ascolto.
SPECIFICHE TECNICHE E GARANZIA
Vedi foglio allegato.
Tutte le caratteristiche e le specifiche dei
nostri diffusori sono soggette a modifiche senza preavviso.

it
en
14 15
Thank you for purchasing the Audiofilia’s speakers. You are
now the owner of a of high-level speaker system made
with high quality components, finishes and workmanship
of the cabinets of fine italian cabinetry. These speakers
manufactured individually by hand with the utmost care,
represent the “state of the art” of the domestic hi-fi re-
production, will be able to bring in your home one of the
highest listening experience possible.
The naturalness of emission, transparency and sonic
neutrality of these speakers meet in high-quality sources
and amplifications their ideal partners.
UNPACKING THE SPEAKERS
Carefully unpack your new speakers as not to scratch
the cabinet and damage the speakers by extracting them
from the packaging. Get help from a second person in the
event of floorstanding speakers. If you suspect possible
damage to the product during transit, report it immedia-
tely to your dealer. Keep the shipping carton and packing
materials for future shipping and transportation.
FLAT FEET
We provide our speakers with feet designed to agree the
peculiarities of the project philosophy that characterizes
Audiofilia speakers.
The speaker, intended as a unit, must be free to vibra-
te exactly as any musical instrument when it’s solicited.
The feets supplied normally mounted in our speakers are
self-leveling and automatically adapting to any surface.
A slight wobble of the speaker once in its listening position
place, is natural and desired in the final design phase.
We recommend to not interpose between the speaker and
the floor, bases of marble, glass, wood etc. inasmuch this
affect and / or alter the speaker frequency response in the
low frequencies region.
SPIKED FEET
Generally we do not recommend this kind of feet but if for
any reason you decide to mount it, to proceed gently placing
the speaker side (not on the front or back) on a soft and
non-abrasive surface. Screw the spiked feet into the thre-
aded hole of each speaker. Make sure that the four spiked
feet are screwed in completely for maximum stability.
CAUTION!
NEVER drag the speaker to move it, as this will dama-
ge the spikes, the feet and/or the wood cabinet itself.
Always lift the speaker and carry it to its new loca-
tion. The floorstanding loudspeakers have a high cen-
ter of gravity and may become unstable if rocked, tip-
ped or improperly positioned.

it
en
16 17
PLACEMENT THE SPEAKERS
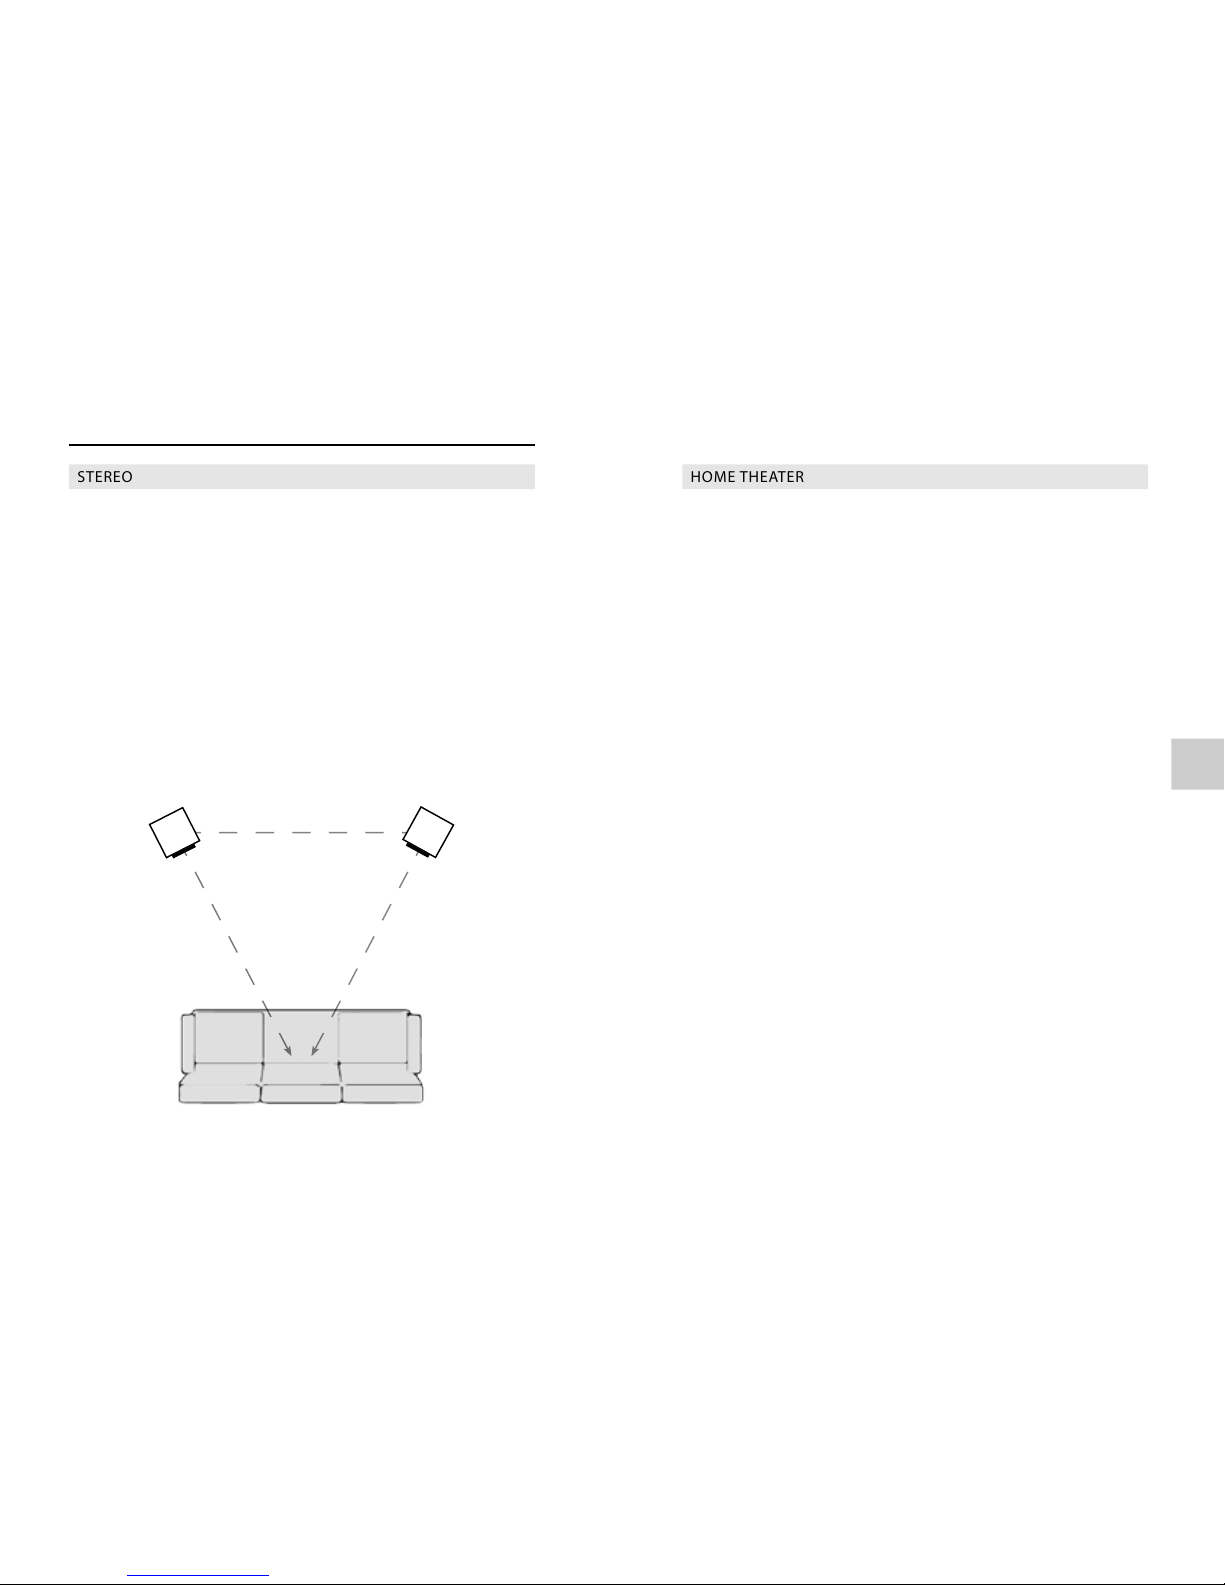
STEREO
The Audiofilia speakers have a very wide dispersive sound
angle. Despite this, we recommend placing them in the
listening room, angled towards the listening position so
that the width between a speaker and the other is the
same as that between the latter and the listener. Forming
between the speaker and the listener a virtual equilateral
triangle (Fig. 1), where the listener is inside the triangle.
Also, to recreate a believable soundstage we recommend
interpose a distance between the two speakers at least of
a couple of meters and as far away as possible from the
back and side walls of your listening room.
HOME THEATER
The AF home theater systems are designed for a profound,
of impact and extremely addictive listening experience.
Any configuration you decide to have 6 or 7 channels, you
are sure to relive in your listening room the same and so-
metimes greater, 3-D sound experience of a movie theater.
For a more 3D soundstage, place one speaker on the left
and one on the right side of the imaginary line that is po-
sitioned the TV or the TV monitor. Place the center chan-
nel below the TV screen. The AF speakers are magnetical-
ly shielded so you can place them close to the TV, without
worrying about the distortion of the TV picture.
Place the surround channel speakers front and rear, on
stands and rear channel speakers behind the listening
position. Final placement depends on the room’s acou-
stics, availability of space and your listening preferences.
(Figures 2 and 3).
Place the subwoofer away from the corners as possible, to
avoid excessive blurring and / or low-frequency rumble.
left right
Figure 1

it
en
18 19
left right
center
surr left surr right
TV
Figure 2. This overhead view shows a typical home the-
ater system. The rear channels left / right refers to a
6-channels system.
Figure 3. This illustration shows an alternative configura-
tion, which may prove suitable for some rooms. The rear
channels left / right refers to a 8-channels system.
surr-back left surr-back right
sub
left right
center
surr left surr right
TV
sub
SUBWOOFERS
The amplified AF subwoofers add, purity of sound on low
frequencies, as well as the realism and a strong impact on
the music, soundtracks and special effects of the movies.
Place the subwoofer away from the corners as possible, to
avoid excessive blurring and / or low-frequency rumble.
We recommend connecting your AF subwoofer to your
unit with dedicated high quality cables.
Contact your Audiofilia dealer for more informations and
suggestions on the cable to connect your subwoofer.
WIRING THE SYSTEM
To take fully advantage of the high sonic characteristics
of your new AF speakers, we recommend placing them
into hi-fi systems with sources and amplifiers and wiring
of high quality.
CAUTION!
Make sure all units are turned off before making any
connection.
For speaker connections, use a high quality cable with
polarity coding. The part of the cable with a stripe or colored
red or other coding is usually considered positive polarity (+) .
The speakers have terminals that accept a variety of wi-
res connectors.
NOTE: If you desired, consult your Audiofilia dealer for
advice on speaker cables and connection options.
it
en
20 21
Red = +
Black = -
Stripe = +
No Stripe = -
Figure 4. This illustration shows how to
connect bare wires to the terminals.
1) Loosen terminal
2) Insert bare end and tighten
terminal
In order to ensure that the speakers are working with the
correct polarity, connect each + terminal on the rear pa-
nel of the amplifier to the respective + (red) terminal on
each speaker. As shown in Figure 5.
Connect the terminals - (black) in the same manner. See
the user manual that came with your amplifier, receiver
and television to confirm connection procedures.
CAUTION!
Do not reverse polarities (+ and - or red and black)
when making connections. Doing so, there will a poor
sound quality and a weaker low range.
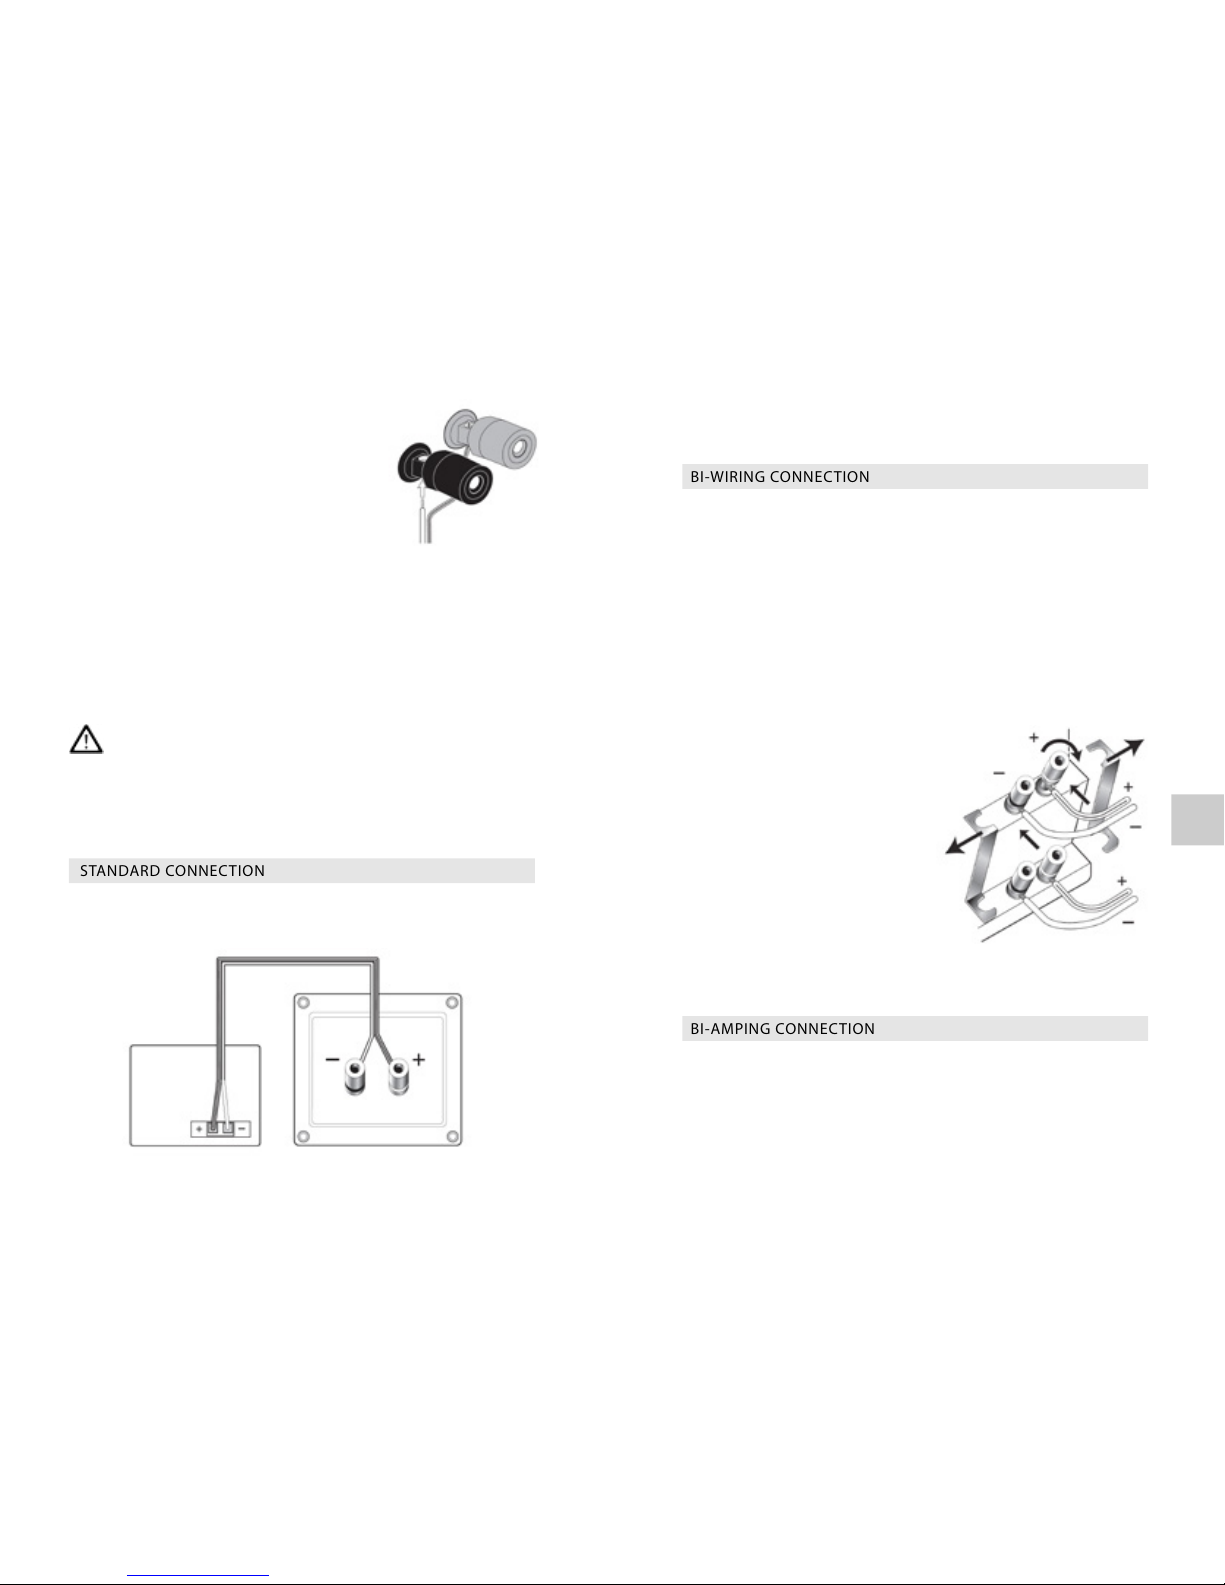
STANDARD CONNECTION
Wiring diagram shows polarity connections for one channel
of a stereo or home theater system.
Amplifier Speaker
Single channel shown
1) Loosen the terminal and remove
strapping bars.
2) Insert the speaker wire for the
high frequencies into the top set
of terminal and tighten.
3) Insert the speaker wire for low
frequencies into the bottom set of
terminals, and tighten.
BI-WIRING CONNECTION
The outer connection panel and internal crossover fre-
quency division are designed in such a way that the low
frequency transducer and midrange / high frequen-
cies can be connected to two separate sets of cables.
This is called bi-wiring. Bi-wiring can provide several
sonic advantages such as greater transparency of the
sound message, a wider and deeper soundstage and a
considerable flexibility in the power amplifier selection.
BI-AMPING CONNECTION
For bi-amping is intending the connection of two separate
stereo amplifiers, through two sets of cables to the rear
connectors of your speakers.

it
en
22 23
BI-AMPING HORIZONTAL
The first amplifier will be connected the left channel (left)
to the high section of a speaker and the right channel (ri-
ght) to the high section of the other speaker. Repeating the
same connection with the second amp with bass section of
the two speakers. With this configuration, the first amplifier
will power the high section and the second amp the bass
section of the speakers.
- +
- +
-+-+
-+-+
- +
- +
Amp1
Amp2
Left
Speaker
Right
Speaker
BI-AMPING VERTICAL
To first amplifier will be connected the left channel (left) to
the high section and the right channel (right) to the bass
section of the rear terminal block of a single speaker. Repe-
ating the same connection with the second amplifier and the
remaining speaker. With this configuration, each amplifier
will power the high section and the bass section of the cor-
responding speaker.
- +
-+
- +
- +
- +
-+
- +
Amp1
Amp2
Left
Speaker
Right
Speaker
-+

it
en
24 25
CARE OF YOUR SPEAKER SYSTEM
The cabinets of Audiofilia’s speakers are hand finished
with high quality wax or lacquer and do not require any
routine maintenance. When needed, use a soft cloth to re-
move any fingerprints or dust from the cabinet.
NOTE: Do not use any cleaning products or polishing on
the cabinet. Use a soft brush occasionally to wipe the dri-
vers of the speakers.
FINAL ADJUSTMENTS
Control the playback quality of your speakers. First of all,
set the volume control to the minimum of the system, then
turn it on. Place in playing a piece of music or a video seg-
ment that is particularly familiar and adjust the volume
control to a level that result pleasant and rewarding.
NOTE: You should hear balanced audio reproduction across
the entire frequency spectrum. If not, check all wiring con-
nections or consult the authorized Audiofilia dealer from
whom you purchased the system for more help.
The amount of bass you hear and the stereo-image quality
will be affected by a number of different factors, inclu-
ding the room’s size and shape, the construction mate-
rials used to build the room, the listener’s position relati-
ve to the speakers, and the position of the speakers in the
room. Listen to a variety of music selections and note the
bass level. If there is too much bass, move the speakers
away from nearby walls. Conversely, if you place the spe-
akers closer to the walls, there will be more bass output.
The sound of all speakers improves with time, the best
performance is obtained after several hours of listening.
TECHNICAL SPECIFICATIONS AND WARRANTY
See attached sheet.
Features, specifications and appearance
are subject to change without notice.

it
en
26 27
Note

28
Audiofilia S.n.c., Via Adriatica 48/b, 47838, Riccione (RN), Italy
www.af-speakers.com
Table of contents
Languages:


