Audiola AHB 0231 User manual

AHB 0231 MP3/USB/SD
INSTRUCTION MANUAL
PORTABLE CD/MP3/USB/SD CARD PLAYER
WITH STEREO RADIO
1
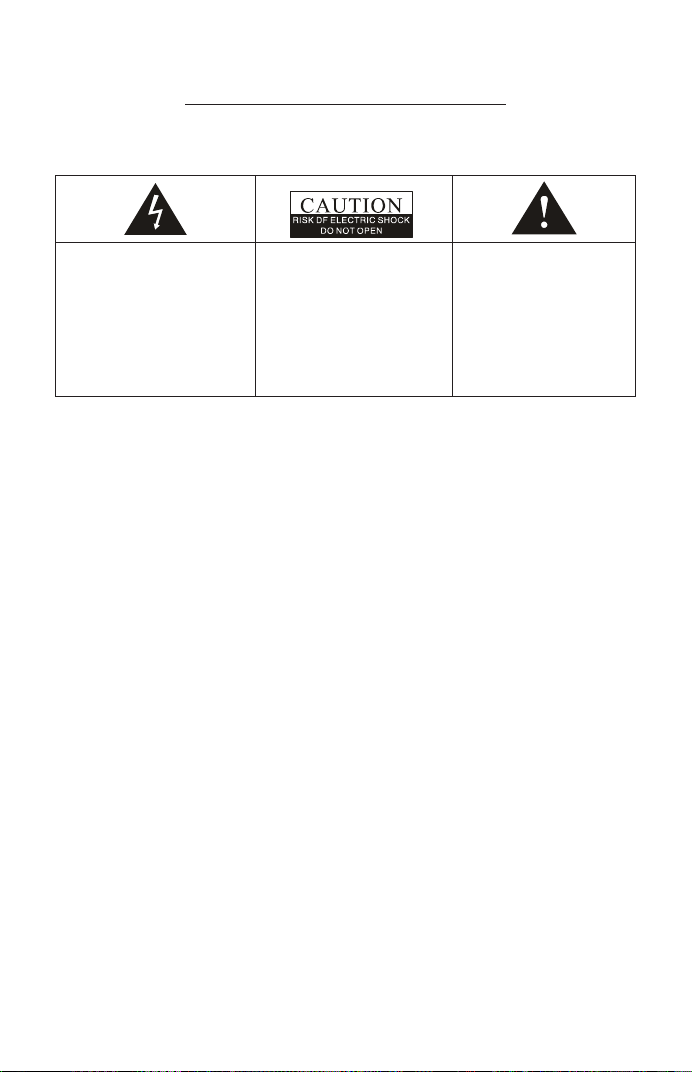
IMPORTANT SAFETY INSTRUCTIONS
WARNING:
TO PREVENT FIRE OR SHOCK HAZARD. DO NOT EXPOSE THIS APPLIANCE TO RAIN OR
MOISTURE.
This lightning flash with
arrowhead symbol, within an
equilateral triangle, is intended
to alert the user to the
presence of insulated
dangerous voltage within the
products enclosure that may
be of sufficient magnitude to
constitute a risk of electric
shock presents.
Warning: to reduce the risk of
electric shock, do not remove
cover (or back ) no user -
serviceable part inside.
Refer servicing to qualified
service personnel.
The exclamation point
within an equilateral triangle
is intended to alert the user
to the presence of important
operating and maintenance
(servicing) instructions in
the literature accompanying
the appliance.
1. Read these instructions.
2. Keep these instructions.
3. Heed all warnings.
4. Follow all instructions.
5. Do not use this apparatus near water.
6. Clean only with dry cloth.
7. Do not block any ventilation openings.
8. Do not install near any heat sources such as radiators, heat registers, stoves, or other
apparatus (including amplifiers) that produce heat.
9. Protect the power cord from being walked on or pinched particularly at the plugs,
convenience receptacles, and at the point where it exits from the apparatus.
10. Unplug the apparatus during lightening sorts or when unused for long periods of time.
11. Refer all servicing to qualified personnel.
12. This appliance should not be exposed to dripping or splashing water and no objects filled
with liquids such as vases should be placed on apparatus.
13. The AC socket it is used to unplug the unit power cord and it must be easily accessible
every time it is necessary.
14. No flames objects, like candles, must be placed on the unit.
15. Ventilation warning: The normal ventilation of the product shall not be impeded for
intended use. Make sure there is enough space above and besides the holes. Install the
unit in a place with suitable ventilation openings (around 7cm).

2
IMPORTANT FOR LASER PRODUCTS
REPRODUCTION OF LABELS
1. CLASSIFICATION LABEL, PLACED ON REAR ENCLOSURE.
2. WARNING LABEL
3. CAUTION: Do not open the unit. There are no user serviceable parts inside the unit; consult
all servicing to qualified authorized service personnel.
POWER SOURCE
This unit is designed to be operated on AC and DC.
AC OPERATION
Plug the smaller end of AC power cord into AC jack on unit and the other bigger end into AC
230V ~ 50Hz wall outlet. The batteries will be automatically disconnected.
DC OPERATION
Open the BATTERY COMPARTMENT DOOR. Install 8 pcs 1.5V UM-2/C size batteries (not
included) into compartment. Please follow correct polarities as indicated.
NOTE:
1. The AC line cord must be removed for battery operation.
2. To avoid damage which may result from leaking batteries, remove the batteries when they
become weak or when the unit is not to be used for long period of time.
BASIC FUNCTION
SWITCHING ON THE UNIT
zConnect the power cable to the main socket and the other end to the product.
zSet the FUNCTION SWITCH to CD/MP3/USB/SD/AUX or RADIO position.
zThe device will enter in STANDBY mode after 15 minutes of inactivity. To restart position the
FUNCTION switch to OFF and then on RADIO / CD or press the STANDBY (22).
TO ADJUST VOLUME
Rotate the VOLUME CONTROL right or left to increase or decrease volume.
HEADPHONES
For private listening, plug the headphones/earphones (not included) into PHONES jack (3.5 mm
diameter).
CAUTION: Long time listening with headphones/earphones at high volumes may cause harmful
damage to users’ ears.

3
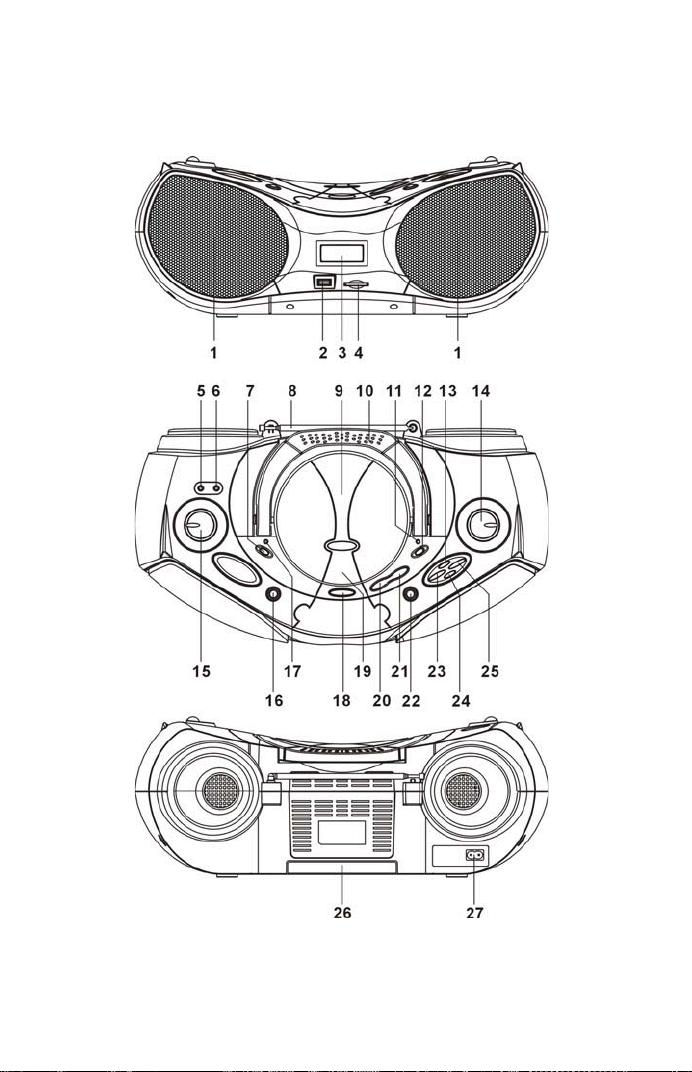
LOCATION OF CONTROLS

4
NAME OF CONTROLS
1. SPEAKERS
2. USB PORT
3. LCD DISPLAY FOR CD
4. SD/MMC CARD SLOT
5. AUX IN JACK
6. PHONES JACK
7. FUNCTION SWITCH
8. FM TELESCOPIC ANTENNA
9. CD COMPARTMENT
10. HANDLE
11. FM STEREO INDICATOR
12. BAND SELECTOR
13. PROG./P-MODE BUTTON
14. TUNING CONTROL
15. VOLUME CONTROL
16. EQ BUTTON
17. STANDBY INDICATOR
18. CD DOOR OPEN BUTTON
19. CD DOOR PUSH CLOSE AREA
20. CD STOP/USB BUTTON
21. CD PLAY/PAUSE/SD BUTTON
22. STANDBY BUTTON
23. CD/SEARCH DOWN BUTTON
24. +10 MP3/ALBUM BUTTON
25. CD/SEARCH UP BUTTON
26. BATTERY DOOR
27. AC SOCKET
USING THE RADIO
TUNING IN RADIO STATIONS
1. Slide the FUNCTION switch to "RADIO" position, press "STANDBY" button to turn on the
unit.
2. Slide the BAND switch to select the desired wave band: AM/FM ST.
3. Tune to required station by rotating the TUNING KNOB.
4. Rotate the VOLUME CONTROL to comfortable volume level.
5. Extend the TELESCOPIC ANTENNA to its full length if you are listening to FM broadcasting.
Gently rock the unit back and forth to get the best reception when you are listening to AM
program, or place the unit in an open place.
Note: The FM STEREO indicator will be on if you are receiving FM stereo program.
6. Turn off the radio, Set the FUNCTION switch to CD/MP3/USB/SD/AUX or OFF operation .
USING THE CD/MP3
Discs for Playback
This system can playback all digital audio CD, MP3 finalized digital audio CD-Recordable
(CD-R) discs, finalized digital audio CD-Rewritable (CD-RW) discs and CD-DA format digital
audio CD/CD-R/CD-RW discs.
PLAYING A CD
1. Set the FUNCTION switch to CD/MP3/USB/SD/AUX position, press "STANDBY" button to
turn on the unit.
2. Open the CD door. “ OPEN ” will be shown on the display.
3. Place an audio CD into the tray with the label side facing up.
4. Close the CD door, “ CD reading ” appears on the display. after several seconds,
The total number of tracks and whole playing times will show on the display. then the
playback starts from track 001, the play time starts from 00:00 and “PLAY” is shown on
the display.
5. To interrupt playback, press the PLAY/PAUSE/SD button. The “PAUSE” shown on the
display and the playing time will flash on the display.
6. To stop playing, press the STOP/USB button. The “STOP” and total tracks’ number and
whole playing times will be shown on the display.
7. To remove the CD, press to open CD compartment button, grasp the CD by its edges, and

5
carefully take it out.
MP3-CD PLAYBACK
This player is capable of MP3-CDs. It takes longer time for this player to read an MP3-CD than it
does CD-DA. Wait patiently while it is reading. After an MP3-CD is successfully read, the icon of
“MP3” shows on the display with the total number of albums and tracks. And a second later,
playback begins from the first track of the first album.
Note:
zTo ensure good system performance; wait until the disc tray completely reads the disc
before proceeding.
zIf no disc is loaded into the compartment, or the disc is placed upside down, the display will
show “ NO DISC ”.
SELECTING A DESIRED TRACK/PASSAGE
To select a desired track
Press the SKIP UP /DOWN button repeatedly in the stop mode or during play until the desired
track appears on the display.
To search for a particular passage during playback (track scanning at high speed)
Press and hold the SKIP UP /DOWN button to scan the current playing track at high speed until
desired point passage, and then release the button.
Playback will start again from this point.
To select a song which track number exceeds 10 (for MP3 disc only)
To select a song/track which number exceeds 10, Press the +10MP3/ALBUM button each time
to skip forward 10 tracks, then press the SKIP UP /DOWN button to select desired track.
To Select A Desired Folder (for MP3 disc only)
(if the MP3 disc contains more than one folder)
Press and hold the +10MP3/ALBUM button more than 2 second, the album number will flash,
press SKIP UP/DOWN to select the desired album then press PLAY/PAUSE/SD button to begin
playing the first track of the selected album ; press the SKIP UP/DOWN button to select the
exact track you are going to listen to.
PROGRAMMED TRACKS
Programmed tracks of disc are possible when playback is stopped. Up to CD 20 tracks /MP3 99
tracks can be stored in the memory in any order.
1. In the stop mode,with CD disc, press the PROG./P-MODE button, the Ā000āwill flash and
the P01 will shown on the display.
2. Press the CD SKIP UP/DOWN button to select the first desired track to be programmed.
3. Press the PROG./P-MODE button to enter. The display changes to show P02.
4. With MP3 disc, press the CD SKIP UP/DOWN button to select the desired album, press the
PROG./P-MODE button to enter; Press the CD SKIP UP/DOWN button to select the first
desired track to be programmed.
5. Repeat steps 2 & 3 to store other desired tracks for CD until all tracks are programmed.
Repeat steps 3 & 4 for MP3.
6. Press the PLAY/PAUSE/SD button to start playback from the first programmed track.
7. Press the STOP/USB button to stop program playback.
To Erase the Memory (Program)
To clear the program, you have two options:
1. Press the STOP/USB button when the disc is stopped, or
2. Open the CD compartment lid, program will be erased.

6
REPEAT PLAY
CD Repeat: Repeat the current track, repeat all tracks, Intro, Random.
MP3 Repeat: Repeat the current track, Folder, Intro, Random.
To Repeat a Single Track
1. Press the PROG./P-MODE button once in play mode, “ ” will shown on the display. The
current track will be played repeatedly until the STOP button is pressed
2. To cancel Repeat function, press the PROG./P-MODE button, until the “ ” disappear on
the LCD display.
To repeat all the Tracks
1. Press PROG./P-MODE button 2 times for CD and 3 times for MP3 in play mode,
“ ALL” shows on the display, all tracks on the disc will be played repeatedly until the
STOP button is pressed.
2. To cancel Repeat function, press the PROG./P-MODE button, until the “ ALL” disappear
on the LCD display.
To repeat current Directory (for MP3 only)
1. Press PROG./P-MODE button 2 times in play mode, “ DIR” shows on the display, the
current directory will be played repeatedly until the STOP button is pressed.
2. To cancel Repeat function, press the PROG./P-MODE button, until the “ DIR” disappear
on the LCD display.
INTROSCAN PLAY
Press the PROG./P-MODE button in play mode till the “INTRO” shows steady on the display,
the unit will start to play the first 10 seconds of music of each track, until all tracks are played
over and then stop.Press the PROG./P-MODE button once to cancel ,The “ INTRO ” disappear
on the LCD display.
RANDOM PLAY
Press the PROG./P-MODE button in play mode till the “RAN ” shows steady on the display, the
random play will start from any one track (or press SKIP UP button), until all tracks are played
over and then stop. Press the PROG./P-MODE button once to cancel, The “ RAN ” disappear
on the LCD display.
EQ SELECTION
Press EQ button continuously during disc playback mode to select EQ sound effects among
DBB, POP, CLASSIC, JAZZ, ROCK and NORMAL.
LISTENING TO USB/SD/MMC CARD
USB PLAYBACK
The USB input jack is compatible with a data flash memory key, it is not guarantee the
compatibility with MP3 players with proprietary software.
1. Set the FUNCTION switch to CD/MP3/USB/SD/AUX position, press "STANDBY" button to
turn on the unit. Then press and hold the STOP/USB button to select USB playing mode.
2. Connect the USB flash disk device into the USB port.
3. If the USB is readable, The LCD will display the total number of albums and tracks stored
inside the USB. Then the playback to start playing.
4. Press the PLAY/PAUSE/SD button to temporarily stop. The play time will flash.
5. Press the STOP/USB button to stop playing. The display will show total number of albums
and tracks.
6. The function are the same as per MP3 playback.

7
SD/MMC CARD INSTALLATION AND REMOVE
Press the card towards the SD/MMC CARD slot until it reaches the terminal. To remove the
SD/MMC card, hold the edge and take it out.
SD/MMC CARD PLAYBACK
1. Set the FUNCTION switch to CD/MP3/USB/SD/AUX position, press "STANDBY" button to
turn on the unit. Then press and hold the the PLAY/PAUSE/SD button to select SD playing
mode.
2. Connect the SD/MMC card to the SD/MMC CARD INPUT slot. The LCD will display the total
number of albums and tracks stored inside the card.Then the playback to start playing.
3. Press the PLAY/PAUSE/SD button to temporarily stop. The play time will flash.
4. Press the STOP/USB button to stop playing. The display will show total number of albums
and tracks.
5. The function are the same as per MP3 playback.
AUX-IN OPERATION
This unit has provided special AUX-IN jack, through this jack other audio sources can be
connected to this unit and be amplified.
1. Set the FUNCTION switch to CD/MP3/USB/SD/AUX position, press "STANDBY" button to
turn on the unit
2. Connect the audio cable into the AUX jack and the other end connect to the AUDIO OUT
jack of the external audio source. The unit will change to AUX mode automatically.
3. Press PLAY of the external audio source (eg. MP3 player) to start playback.
4. Adjust the volume by the VOLUME control of this unit.
COMPACT DISC MAINTENANCE
1. Always use a compact disc bearing the mark as shown.
2. Notes on handling discs
zRemoving the disc from its storage case and loading it.
zDo not touch the reflective recorded surface.
zDo not stick paper or write anything on the surface.
zDo not bend the disc.
3. Storage
zStore the disc in its case.
zDO not expose discs to direct sunlight or high temperatures, high humidity or dusty
places.
HANDLE DISC ONLY AS SHOWN

8
CORRECT
FROM THE CENTRE TO THE EDGE
INCORRECT
DO NOT STORE NEAR HEAT
4. Cleaning a disc
zShould the disc become soiled, wipe off dust, dirt and fingerprints with a soft cloth.
zThe disc should be cleaned from the center to the edge.
zNever use benzene, thinners, record cleaner fluid or anti-static spray.
zBe sure to close the CD door, so the lens is not contaminated by dust.
zDo not touch the lens.
SPECIFICATIONS
GENERAL
Power Requirement AC 230V ~ 50Hz
DC 12V UM-2 /ĀCāSIZE x 8 PCS(Not included)
Power consumption 21 Watts
Off mode power: < 0.5 Watts
Weight Approx. 2.5 kg
Dimension Approx. 44.7 (L) x24.3 (W) x 17.3 (H) cm
Operation Temperature +5 °C - + 35 °C
RECEIVER SECTION
Receiving Bands AM / FM
Tuning Range AM: 526 - 1606 KHz
FM: 87.5 - 108 MHz
Antenna: FM rod antenna, AM built-in ferrite bar
COMPACT DISC SECTION
Optical Pickup 3-Beam Laser
Frequency Response 100Hz – 16 KHz
AUDIO SECTION
Power Output 2.5 W x 2(RMS)
Headphone Impedance 32 Ohms
Note: Specifications are subject to change for continuous improvement without prior notice.

9
Remark:
In case of malfunction due to electrostatic discharge, just reset the product (reconnect of power
source may be required) to resume normal operation.
“CE” marking states that the product is compliant to European Directives:
2006/95/EC Low Voltage Directive
2004/108/EC EMC Directive
2009/125/EC ErP II Directive Regulation (EC) n°1275/2008
2011/65/EU RoHS II Directive
It is possible to request a full copy of Declaration of compliance to:
New Majestic S.p.A. Via Rossi Martini,41 – 26013 Crema (CR) Italy
AHB 0231 MP3/USB/SD
MANUALE D’ISTRUZIONI
LETTORE CD/MP3 PORTATILE
CON USB CARD READER
RADIO AM/FM STEREO
La New Majestic SpA dichiara che il prodotto è
rispondente al D.M. 548 del 28.08.95 ed in
particolare a quanto indicato nell’art. 2 comma 1
1
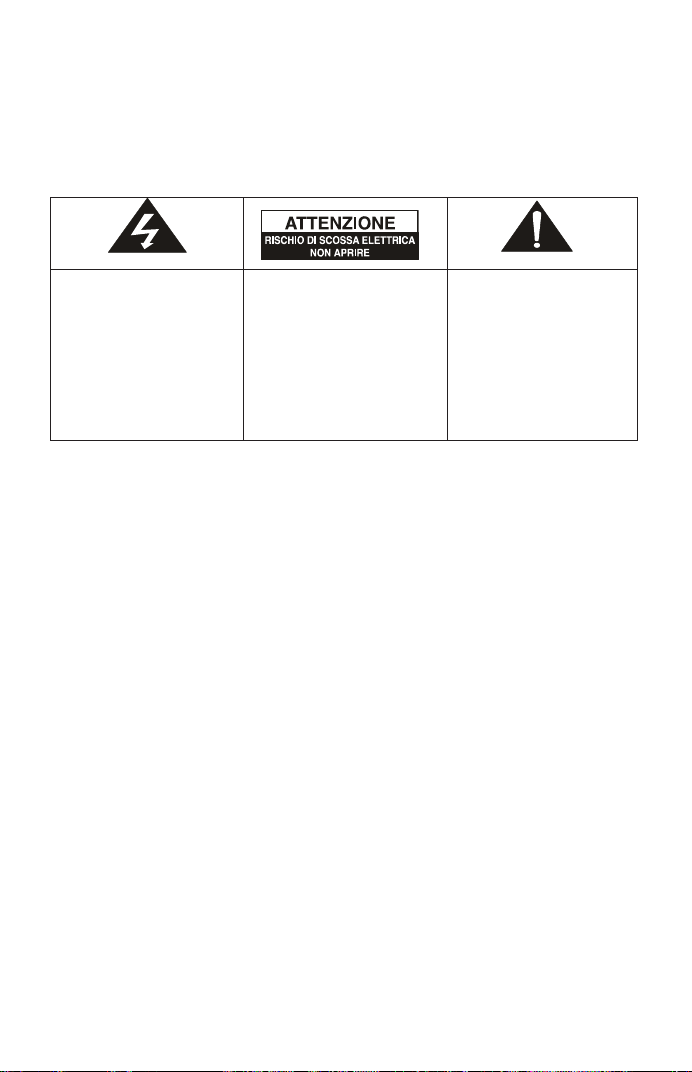
ISTRUZIONI IMPORTANTI DI SICUREZZA
AVVERTENZA:
AL FINE DI PREVENIRE IL RISCHIO DI SCOSSE ELETTRICHE SI RACCOMANDA DI NON
ESPORRE L’APPARECCHIO ALLA PIOGGIA O ALL’UMIDITA’.
1. Leggere attentamente le istruzioni
2. Conservare il seguente manuale d’istruzioni per un utilizzo futuro.
3. Rispettare le avvertenze
4. Seguire le istruzioni
5. Non usare l’apparecchio vicino all’acqua
6. Pulire l’apparecchio usando un panno morbido
7. Non ostruire le aperture di ventilazione
8. Non installare l’apparecchio vicino a fonti di calore come termosifoni, stufe, o altri
apparecchio (inclusi gli amplificatori) che producono calore.
9. Proteggere il cavo alimentazione dall’essere calpestato e prestare attenzione al punto da
dove fuoriesce dalla presa di corrente.
10. Scollegare l’apparecchio durante i temporali o sen non viene utilizzato per lungo tempo.
11. Rivolgersi esclusivamente al personale di servizio autorizzato/qualificato.
12. Non esporre l’apparecchio alla pioggia e all’umidità e non posizionare alcun oggetto
contenente liquido , come vasi o bicchieri, vicino all’apparecchio stesso.
13. La presa di rete AC viene utilizzata per scollegare l’apparecchio e deve essere facilmente
accessibile in qualsiasi istante.
14. Nessuna sorgente di fiamma nuda, quali candele accese, deve essere posta
sull’apparecchio, poiché potrebbe causare pericolo.
15. Ventilazione : Non impedire la normale ventilazione dell’apparecchio. Accertarsi che c’è
abbastanza spazio attorno ai fori di ventilazione. Installare l’apparecchio in luogo dotato di
adeguate aperture (7 cm circa).
La freccia lampeggiante
all’interno di un triangolo
equilatero intende avvertire
l’utente della presenza di
voltaggio pericoloso
all’interno del prodotto di
portata tale da poter
causare rischio di scosse
elettriche.
Avvertenza: al fine di ridurre
il rischio di scosse elettriche,
non rimuovere alcun
coperchio; non si segnala la
presenza di parti utilizzabili
all’interno dell’apparecchio.
Rivolgersi esclusivamente al
personale di servizio
qualificato.
Il punto esclamativo
all’interno del triangolo
equilatero intende avvertire
l’utente della presenza di
istruzioni importanti che
accompagnano
l’apparecchio.

2
INFORMAZIONI IMPORTANTI PER I PRODOTTI LASER
ETICHETTA
1. ETICHETTA DI CALSSIFICAZIONE, POSIZIONATA SUL RETRO DELL’APPARECCHIO
2. ETICHETTA DI AVVERTENZA
3. Avvertenza: Non aprire l’apparecchio. Non si segnala la presenza di parti utilizzabili
all’interno dell’apparecchio; rivolgersi solo al personale di servizio autorizzato qualificato.
ALIMENTAZIONE
L’apparecchio funziona con alimentazione AC e alimentazione DC
OPERAZIONI AC
Inserire il finale del cavo alimentazione AC nella presa AC dell’apparecchio e l’altra estremità
nella presa di corrente domestica AC 230V ~ 50Hz. Le batterie si scollegheranno
automaticamente.
OPERAZIONI DC
Aprire lo scomparto batterie e inserire 8 batterie 1,5V UM-2 tipo C (non incluse) all’interno dello
scomparto, rispettando la corretta polarità.
NOTA:
1. Lo spinotto AC collegato al prodotto deve essere rimosso durante l’utilizzo delle batterie.
2. Al fine di evitare danni causati dalla perdita di batterie, rimuovere le batterie quando stanno
diventando deboli oppure se l’apparecchio non viene utilizzato per lungo tempo.
FUNZIONI BASE
ACCENSIONE DELL’APPARECCHIO
Collegare il cavo alimentazione alla presa di corrente domestica e l’altro capo al prodotto.
Impostare l’interruttore FUNCTION sulla modalità CD/MP3/USB/SD/AUX oppure RADIO
l’indicatore STANDBY si accenderà.
L’apparecchio entrerà in modalità STANDBY dopo 15 minuti di inattività. Per riavviare
posizionare l’interruttore FUNCTION su OFF quindi su RADIO/CD oppure premere il tasto
STANDBY (22) .
REGOLAZIONE VOLUME
Ruotare il comando VOLUME a destra o sinistra per aumentare o diminuire il volume.
CUFFIE
Per un ascolto privato, inserire il cavo cuffie/auricolari (non inclusi) nella presa cuffie (3,5mm di
diametro).
Attenzione: un ascolto della musica con le cuffie/auricolari per lungo tempo ad un volume
elevato potrebbe causare seri danni all’udito.
3
POSIZIONE DEI COMANDI

4
COMANDI
1. ALTOPARLANTI
2. INGRESSO USB
3. DISPLAY LCD per CD
4. INGRESSO CARD SD/MMC
5. INGRESSO AUX
6. USCITA CUFFIE
7. INTERRUTTORE FUNZIONI
8. ANTENNA TELESCOPICA FM
9. SCOMPARTO CD
10. IMPUGNATURA PER IL TRASPORTO
11. INDICATORE FM STEREO
12. SELETTORE BANDE RADIO
13. TASTO PROG./P-MODE
14. COMANDO SINTONIA
15. COMANDO VOLUME
16. TASTO EQ
17. INDICATORE STANDBY
18. TASTO APERTURA VANO CD
19. PUNTO CHIUSURA VANO CD
20. TASTO ARRESTO CD
21. TASTO PLAY/PAUSE/SD CD
22. TASTO STANDBY
23. TASTO CD/RICERCA -
24. TASTO ALBUM/MP3/+10
25. TASTO CD/RICERCA +
26. VANO BATTERIA
27. PRESA AC
USO DELLA RADIO
SINTONIZZARE LE STAZIONI RADIO
1. Fare scorrere l’interruttore FUNCTION sulla posizione RADIO, premere il tasto STANDBY
per accendere l’apparecchio.
2. Fare scorrere l’interruttore BAND per selezionare la banda radio desiderata: AM/FM ST.
3. Sintonizzarsi sulla stazione radio desiderata usando il comando sintonia
4. Ruotare il comando VOLUME su un livello d’ascolto desiderato.
5. Estendere l’antenna telescopica FM nella sua lunghezza se si sta ascoltando una stazione
radio in FM. Ruotare l’apparecchio per ottenere invece una ricezione ottimale in AM,
oppure posizionare l’apparecchio in un luogo aperto.
Nota: l’indicatore FM STEREO sarà acceso quando si sta ricevendo un programma in
modalità FM Stereo.
6. Spegnere la radio impostando l’interruttore FUNCTION sulla posizione
CD/MP3/USB/SD/AUX oppure su OFF.
USO DEL CD/MP3
Dischi per la riproduzione
Questo apparecchio può riprodurre tutti i CD Audio Digitali, gli MP3, i dischi registrabili CD-R, i
riscrivibili CD-RW i dischi in formato audio digitale CD-DA CD/CD-R/CD-RW.
RIPRODUZIONE DISCO CD
1. Impostare l’interruttore FUNCTION sulla posizione CD/MP3/USB/SD/AUX, premere il tasto
STANDBY per accendere l’apparecchio.
2. Aprire il vano CD , la scritta OPEN apparirà sul display
3. Inserire un disco CD audio nell’apposito vano con l’etichetta rivolta verso l’alto.
4. Chiudere il vano CD. La scritta “CD READING” apparirà sul display. Dopo alcuni secondi,
il numero totale delle tracce e la durata di riproduzione appariranno sul display, quindi la
riproduzione avrà inizio partendo dalla traccia 001, la durata di riproduzione partirà da
00:00 e “ PLAY ” apparirà sul display.
5. Per interrompere la riproduzione, premere il tasto PLAY/PAUSE/SD , “PAUSE” apparirà sul
display e il tempo di riproduzione lampeggerà sul display.
6. Per arrestare la riproduzione, premere il tasto STOP/USB. L’indicatore STOP e il numero
totale delle tracce appariranno sul display.
7. Per rimuovere il disco, premere il coperchio del vano CD, estrarre il disco prendendolo dai
bordi, ed estrarlo.

5
RIPRODUZIONE Disco MP3
Questo apparecchio riproduce dischi CD-MP3. Questo apparecchio necessita di più tempo per
leggere un disco MP3 che un CD normale. Attendere con pazienza la lettura del disco. Dopo
che il disco è stato letto con successo, l’icona “MP3” appare sul display con il numero totale
degli album e delle tracce contenute all’interno del disco stesso. Quindi, la riproduzione avrà
inizio partendo dalla prima traccia
Nota:
Per accertarsi una performance ottimale, attendere che il disco sia completamente letto
dall’apparecchio prima di procedere con l’ascolto.
Se nessun disco è inserito nello scomparto, oppure se un disco è stato caricato al contrario, il
display mostrerà la scritta “NO DISC”.
SELEZIONARE UNA TRACCIA/PASSAGGIO DESIDERATI
Per selezionare una traccia desiderata
Premere ripetutamente il tasto CD SKIP UP/DOWN in modalità stop oppure durante la
riproduzione, fino a che la traccia apparirà sul display.
Ricerca di un punto particolare della traccia (scansione ad alta velocità)
Premere e tenere premuto il tasto CD SKIP UP/DOWN durante la riproduzione fino al punto
desiderato. La riproduzione avrà inizio partendo da questo punto.
Per selezionare un brano il cui numero di traccia superi il n. 10 (solo per dischi MP3)
Per selezionare un brano/traccia il cui numero superi il 10, premere il tasto +10 MP3 /ALBUM
ogni volta per saltare avanti di 10 tracce, quindi premere il tasto CD SKIP UP/DOWN per
selezionare la traccia desiderata.
Per selezionare una cartella desiderata (solo per dischi MP3)
(se il disco MP3 contiene più di 1 cartella).
Tenere premuto il tasto +10 MP3/ALBUM per più di 2 secondi, il numero dell’album lampeggerà,
premere il tasto SKIP UP/DOWN per selezionare l’album desiderato, quindi premere il tasto
PALY/PAUSE per dare inizio alla riproduzione partendo dalla prima traccia dell’album
selezionato; premere il tasto SKIP UP/DOWN per selezionare la traccia esatta che si vuole
ascoltare.
PROGRAMMAZIONE TRACCE
E’ possibile programmare le tracce del disco quando l’apparecchio è in modalità Stop.
E’ possibile programmare fino a 20 tracce per il CD e 99 tracce per l’MP3 in qualsiasi ordine.
1. In modalità Stop, premere il tasto PROG./P-MODE, l’indicatore 000 lampeggerà e la
scritta P01 apparirà sul display.
2. Premere il tasto CD SKIP SKIP UP/DOWN per selezionare la prima traccia che si
desidera programmare.
3. Premere di nuovo il tasto PROG/P-MODE, il display cambierà su P02.
4. Con disco MP3, premere il tasto CD SKIP UP/DOWN per selezionare l’album desiderato,
premere il tasto PROG./P-MODE per dare l’invio; premere il tasto CD SKIP UP/DOWN
per selezionare la prima traccia che si desidera programmare.
5. Ripetere i passaggi 2 & 3 per memorizzare altre tracce fino a programmare tutte le tracce.
Ripetere i passaggi fino al punto 4 per l’MP3.
6. Premere il tasto PLAY/PAUSE/SD per dare inizio alla riproduzione partendo dalla prima
traccia programmata.
7. Premere il tasto STOP/USB per arrestare la riproduzione.

6
Per cancellare la memorizzazione (programmazione)
Per cancellare la programmazione, ci sono due opzioni:
1. Premere il tasto STOP/USB quando il disco è fermo, oppure
2. Aprire il vano CD, la programmazione verrà cancellata.
RIPETIZIONE
Ripetizione CD : ripete la traccia corrente, ripete tutte le tracce, Intro riproduce i primi 10
secondi di ogni traccia, Random ricerca casuale.
Ripetizione MP3: ripete la traccia corrente, Folder ripete le tracce all’interno della
cartella, ripete tutte le tracce, Intro riproduce i primi 10 secondi di ogni traccia, Random
ricerca casuale
Per la ripetizione di una traccia singola
1. Premere il tasto PROG/P-MODE durante la riproduzione, fino a che l’icona “ ”
lampeggerà sul display. La traccia corrente verrà ripetuta in continuazione fino a che
viene premuto il tasto STOP/USB.
2. Per cancellare la funzione premere il tasto PROG/P-MODE fino a che l’icona “ ”
scomparirà.
Ripetizione di tutte le tracce
1. Premere il tasto PROG/P-MODE durante la riproduzione, fino a che l’icona “ ALL ”
apparirà fissa sul display, tutte le tracce contenute nel disco verranno riprodotte
ripetutamente fino a quando il tasto STOP/USB viene premuto.
2. Per cancellare la ripetizione della riproduzione, per cancellare la funzione premere il tasto
PROG/P-MODE fino a che l’icona “ ALL ” scomparirà.
Ripetizione della Directory corrente (solo per dischi MP3)
1. Premere il tasto PROG/P-MODE durante la riproduzione, fino a che l’icona “ DIR ”
apparirà sul display, tutte le tracce contenute nella cartella verranno riprodotte
ripetutamente fino a quando il tasto STOP/USB viene premuto.
2. Per cancellare la ripetizione della riproduzione, per cancellare la funzione premere il tasto
PROG/P-MODE fino a che l’icona “ DIR ” scomparirà.
INTROSCAN
Premere il tasto PROG/P-MODE durante la riproduzione, fino a che l’icona “INTRO” apparirà
fissa sul display, l’apparecchio riprodurrà i primi 10 secondi di ogni traccia, fino a che tutte le
tracce verranno riprodotte e poi l’apparecchio si arresterà. Per cancellare la funzione premere il
tasto PROG/P-MODE fino a che l’icona “ Intro” scomparirà.
RIPRODUZIONE CASUALE (RANDOM)
Premere il tasto PROG/P-MODE durante la riproduzione fino a che l’icona “ RAN ” apparirà
fissa sul display, la riproduzione casuale inizierà partendo dalla traccia successiva
automaticamente (oppure premere il tasto CD Skip Forward), quando tutte le tracce saranno
riprodotte, l’apparecchio si arresterà. Per cancellare la funzione premere il tasto
PROG/P-MODE fino a che l’icona RAN scomparirà.
SELEZIONE EQ
Premere il tasto EQ in continuazione durante la riproduzione del disco per scegliere l’effetto
sonoro desiderato, tra DBB, POP, CLASSIC, JAZZ, ROCK, NORMAL.

7
ASCOLTO DA USB/SD/MMC CARD
Riproduzione USB
La presa ingresso USB è compatibile con un dispositivo USB a memoria flash archiviazione dati,
non è garantita la compatibilità con lettori MP3 con software proprietario.
1. Impostare l’interruttore FUNCTION sulla modalità CD/MP3/USB/SD/AUX, premere il tasto
STANDBY per accendere l’apparecchio. Tenere premuto il tasto STOP/USB per
selezionare la modalità USB quando l’interruttore FUNCTION si trova sulla posizione
CD/MP3/USB/SD/AUX.
2. Collegare il dispositivo USB alla porta USB.
3. Se l’USB è leggibile, il display LCD mostrerà il numero totale degli album e delle tracce
all’interno dell’USB. Quindi la riproduzione avrà inizio
4. Premere il tasto PLAY/PAUSE/SD per arrestare temporaneamente la riproduzione. Il
display mostrerà il tempo di riproduzione lampeggiante.
5. Premere il tasto STOP/USB per arrestare la riproduzione. Il display mostrerà il numero
totale delle tracce e degli album.
6. Le funzioni sono le stesse della riproduzione MP3.
Installazione e rimozione della SD/MMC card
Inserire la card nel vano SD/MMC CARD, una volta inserita si udirà un suono “click”. Per
rimuovere la card dal vano è sufficiente tirarla verso di sé.
Riproduzione SD/MMC CARD
1. Impostare l’interruttore FUNCTION sulla modalità CD/MP3/USB/SD/AUX, premere il tasto
STANDBY per accendere l’apparecchio. Tenere premuto il tasto PLAY/PAUSE/SD per
selezionare la modalità riproduzione SD mentre l’interruttore FUNCTION è impostato sulla
posizione CD/MP3/USB/SD/AUX.
2. Inserire una card SD/MMC nel vano ingresso SD/MMC. Il display LCD mostrerà il numero
totale delle tracce e degli album contenuti nella card. Quindi la riproduzione avrà inizio.
3. Premere il tasto PLAY/PAUSE/SD per arrestare temporaneamente la riproduzione. La
durata di riproduzione lampeggerà.
4. Premere il tasto STOP/USB per arrestare la riproduzione. Il display mostrerà il numero
totale delle tracce e degli album.
5. Le funzioni sono le stesse della riproduzione MP3.
OPERAZIONI AUX-IN
L’apparecchio è dotato di una presa speciale AUX-IN, attraverso questa presa si possono
collegare fonti audio esterne all’apparecchio e il suono fuoriesce dagli altoparlanti
dell’apparecchio stesso.
1. Impostare l’interruttore FUNCTION sulla posizione CD/MP3/USB/SD/AUX. Premere il
tasto STANDBY per accendere l’apparecchio.
2. Collegare alla presa AUX la fonte Audio esterna. L’apparecchio cambierà sulla modalità
AUX automaticamente.
3. Premere il tasto PLAY della sorgente audio esterna (per esempio un lettore MP3) per dare
inizio alla riproduzione.
4. Regolare il volume usando il comando VOLUME dell’apparecchio.

8
CORRETTO
DAL CENTRO VERSO IL BORDO
ERRATO
MANUTENZIONE COMPACT DISC
1. Usare sempre un disco con il seguente marchio:
2. Come maneggiare i dischi:
Rimuovere il disco dalla custodia e posizionarlo nell’apposita posizione.
Non toccare la superficie riflettente.
Non incollare adesivi o altro sulla superficie.
Non piegare il disco
3. Conservazione dischi
Conservarli solo nelle custodie apposite.
Non esporre i dischi alla luce diretta del sole o alle alte temperature, all’umidità e alla
polvere.
4. Pulizia del disco
Se il disco è sporco, polveroso, con impronte, pulire con un panno morbido.
Il disco deve essere pulito partendo dal centro verso il bordo.
Non usare benzene, diluenti, fluidi per dischi o spray anti-statici.
Accertarsi di chiudere il vano CD, così che non entrerà la polvere sulla lente.
Non toccare la lente.
SPECIFICHE TECNICHE
GENERALI
Alimentazione: AC 230V ~ 50Hz
Alimentazione Batteria: DC 12V (8 x 1,5V) UM-2/C (batterie non incluse)
Consumo di corrente: 21W
Consumo in modalità Standby < 0.5Watts
Peso: 2,5Kg.Circa
Dimensioni: 44,7(L)x24,3(P)x17,3(H)cmcirca
Temperatura operativa: +5°C - +35°C
MANEGGIARE IL DISCO NEL MODO INDICATO
NON POSIZIONARE VICINO A FONTI DI CALORE
RADIO
Bande riceventi : AM/FM
Gamma di frequenza: AM 526 – 1606 KHz
FM 87,5 – 108 MHz

9
Antenna: Antenna direzionale FM, Antenna in ferrite incorporata AM
SEZIONE CD
Pick up ottico: 3 raggi laser
Risposta di frequenza: 100Hz – 16KHz
SEZIONE AUDIO
Potenza d’uscita : 2,5W x 2 (in RMS)
Impedenza cuffie: 32 Ohms
Le specifiche possono essere soggette a variazione senza preavviso.
Nota:
In caso si malfunzionamento dovuto a scariche elettrostatiche, resettare l’apparecchio
(scollegare e ricollegare il cavo alimentazione) al fine di riprendere le funzioni normali.
INFORMAZIONE AGLI UTENTI DI APPARECCHIATURE DOMESTICHE
La marcatura “CE” indica che il prodotto è conforme alle Direttive Europee:
2006/95/CE direttiva basso voltaggio
2004/108/CE Direttiva EMC
2009/125/EC Direttiva ErP II (CE) n°1275/2008
2011/65/EU Direttiva RoHS II
E’ possibile richiedere una copia completa della Dichiarazione di Conformità a:
New Majestic S.p.A. Via Rossi Martini,41 – 26013 Crema (CR) Italy
Table of contents
Languages:


