audiophony WebRadio 130T User manual

Webradio, DAB, FM and multimedia player with AUX input and remote control
USER GUIDE
10183 - May 2014 Version 1.0

WEBRADIO130T - Webradio, DAB, FM and multimedia player with AUX input and remote control
Page 2

AUDIOPHONY PUBLIC ADDRESS
Page 3
English
1 - Please read carefully :
We strongly recommend to read carefully and understand the safety instructions before
attempting to operate this unit.
2 - Please keep this manual :
We strongly recommend to keep this manual with the unit for future reference.
3 - Operate carefully this product :
We strongly recommend to take into consideration every safety instruction.
4 - Follow the instructions:
Please carefully follow each safety instruction to avoid any physical harm or property
damage.
5 - Avoid water and wet locations :
Do not use this product in rain, or near washbasins or other wet locations.
6 - Installation :
We strongly encourage you to only use a fixation system or support recommended
by the manufacturer or supplied with this product. Carefully follow the installation
instructions and use the adequate tools.
Always ensure this unit is firmly fixed to avoid vibration and slipping while operating
as it may result in physical injury.
7 - Ceiling or wall installation :
Please contact your local dealer before attempting any ceiling or wall installation.
8 - Ventilation :
The cooling vents ensure a safe use of this product, and avoid any overheating risk.
Do not obstruct or cover these vents as it may result in overheating and potential
physical injury or product damage. This product should never been operated in a
closed non-ventilated area such as a flight case or a rack, unless cooling vents are
provided for the purpose .
9 - Heat exposure :
Sustained contact or proximity with warm surfaces may cause overheating and product
damages. Please keep this product away from any heat source such as a heaters,
amplifiers, hot plates, etc...
Sound levels
Our audio solutions deliver important sound pressure levels
(SPL) that can be harmful to human health when exposed
during long periods. Please do not stay in close proximity of
operating speakers.
1 - Safety information
Important safety information
Symbols used
Any maintenance procedure must be performed by a CONTEST
authorised technical service. Basic cleaning operations must tho-
roughly follow our safety instructions.
This product contains non-isolated electrical components. Do not
undertake any maintenance operation when it is switched on as
it may result in electric shock.
This unit is intended for indoor use only. Do not use it in a wet,
or extremely cold/hot locations. Failure to follow these safety ins-
tructions could result in fire, electric shock, injury, or damage to
this product or other property.
WARNING : This unit contains no user-serviceable parts. Do not open the housing or attempt
any maintenance by yourself. In the unlikely even your unit may require service, please contact your
nearest dealer.
In order to avoid any electrical malfunction, please do not use any multi-socket, power cord extension
or connecting system without making sure they are
perfectly isolated and present no defect.
10 - Electric power supply :
This product can only be operated according to a very specific voltage. These
information are specified on the label located at the rear of the product.
11 - Power cords protection:
Power-supply cords should be routed so that they are not likely to be walked on or
pinched by items placed upon or against them, paying particular attention to cords at
lugs, convenience receptacles and the point where they exit from the fixture.
12 - Cleaning precautions :
Unplug the product before attempting any cleaning operation. This product should be
cleaned only with accessories recommended by the manufacturer. Use a damp cloth
to clean the surface. Do not wash this product.
13 - Long periods of non use :
Disconnect the unit’s main power during long periods of non use.
14 - Liquids or objects penetration :
Do not let any object penetrate this product as it may result in electric shock or fire.
Never spill any liquid on this product as it may infiltrate the electronic components
and result in electric shock or fire.
15 - This product should be serviced when :
Please contact the qualified service personnel if :
- The power cord or the plug has been damaged.
- Objects have fallen or liquid has been spilled into the appliance.
- The appliance has been exposed to rain or water.
- The product does not appear to operate normally.
- The product has been damaged.
16 - Inspection/maintenance :
Please do not attempt any inspection or maintenance by yourself. Refer all servicing
to qualified personnel.
17 - Operating environment :
Ambient temperature and humidity: +5 - +35°C, relative humidity must be less than
85% (when cooling vents are not obstructed).
Do not operate this product in a non-ventilated, very humid or warm place.
Recycling your device
• As HITMUSIC is really involved in the environmental cause,
we only commercialise clean, ROHS compliant products.
• When this product reaches its end of life, take it to
a collection point designated by local authorities. The
separate collection and recycling of your product at the time
of disposal will help conserve natural resources and ensure
that it is recycled in a manner that protects human health
and the environment.
This symbol signals an important safety precaution.
The CAUTION symbol signals a risk of product deterioration.
The WARNING symbol signals a risk to the user’s physical integrity.
The product may also be damaged.
Instructions and recommendations

WEBRADIO130T - Webradio, DAB, FM and multimedia player with AUX input and remote control
Page 4
- Webradio giving you access to more than 20.000 stations, broadcasts and podcasts
- USB supports or shared libraries multimedia player
- Compatible with AAC/AAC+, MP3, WMA and WAV
- Allows you to play files from your computer via DRM
- Compatible with the digital radio protocols DAB and DAB+
- FM Tuner RDS compatible (Radio Data System)
- AUX input allowing you to connect your devices (e.g. MP3 player)
- Wide display giving you access to the different menues and many information about the radio stations or tracks
you are currently playing
- Supplied with an infrared remote control
- The clock can be automatically synchronised and features an alarm system
- Alarm function with Sleep/Snooze mode
- Several network protocols to help you configuring your device easily
- Network access via ethernet cable or WiFi
- Random and repeat modes
- Folder/track selection and search within a track
- Select and save your favourite stations
- Mute function
2 - Main characteristics

AUDIOPHONY PUBLIC ADDRESS
Page 5
English
3 - Description
Button Function
CONTROL SELECT
Allows you to browse through the functions of each menu.
When a function has been selected, it appears on a white background. Press this button to
confirm your choice.
STAND BY
Activates or deactives the pause mode. When paused, the display will indicate the current
date and hour.
Cancels the Sleep function.
SLEEP Allows you to determine the amount of time after which the unit goes into sleep mode and
temporarily stops the alarms.
ALARM Allows you to configure the alarms, or stop them when they sound. When in sleep mode,
pressing this button will switch from an alarm to the other.
MENU Allows you to enter a menu.
MODE Allows you to switch from one mode to the other: Internet Radio, Music Player, DAB, FM and
AUX in.
MUTE Momentarily stops the audio output.
BACK Allows you to go back to the previous menu.
MAIN VOLUME Allows you to adjust the volume.
PRESET
Gives you access to the radio stations you saved.
Presets are only available in DAB and FM modes.
You can save up to 10 stations per modes.
INFO Gives you extra information about the current station or track. Press this button several times
to scroll through the information.
PREV Allows you to skip to the previous track.
When held down, allows you to rewind.
NEXT Allows you to skip to the next track.
When held down, allows you to fast forward.
Plays/pauses the current track or station.
REPEAT Repeats the current track.
SHUFFLE Activates the random playback within the current playlist.
USB Allows you to connect a USB storage device such as USB keys or HDD.
Does not allow you to connect an MP3 player.
AUX INPUT Line level input allowing you to connect MP3 players, phones, CD players, etc.
PHONE Headphones output.
3-1 - Front panel

WEBRADIO130T - Webradio, DAB, FM and multimedia player with AUX input and remote control
Page 6
3-2 - Remote control
Button Function
Activates or deactivates the Pause mode. When paused, the
display indicates the current date and hour.
Cancels the Sleep function.
SLEEP Allows you to determine the amount of time after which the
unit goes into sleep mode and temporarily stops the alarms.
ALARM
Allows you to configure the alarms, or stop them when they
go on. When in sleep mode, pressing this button will switch
from an alarm to the other.
MODE Allows you to switch from one mode to the other: Internet
Radio, Music Player, DAB, FM and AUX in.
1 Saves or plays presets 1 or 6.
2 Saves or plays presets 2 or 7.
3 Saves or plays presets 3 or 8.
PRESET
Gives you access to the radio stations you saved.
Presets are only available in DAB and FM modes.
You can save up to 10 stations per modes.
4 Saves or plays presets presets 4 or 9.
5 Saves or plays presets 5 or 10.
SHIFT
Gives you access to extra presets. For instance, button 2
gives you access to preset no 7 by simultaneously pressing
SHIFT.
MENU Allows you to enter the current menu.
Allows you to browse through menus or lists of stations.
INFO Gives you extra information about the current station or track. Press this button several times to scroll
through the information.
Back: goes back to the previous menu.
REPEAT Repeats the same track.
Allows you to browse through menus or lists of stations.
SHUFFLE Activates the random playback within the current playlist.
Play / Pause / Stop : Plays, pauses or stops the current track..
Increases or decreases the volume output.
MUTE Momentarily stops the audio output.
Allows you to go back to the previous track or skip to the next track.
Rewind and fast forward.
AUDIOPHONY PUBLIC ADDRESS
Page 7
English
The display will give you access to several menus, dialogue boxes and information described below.
There are 6 basic types of information:
• Stand-by: displays the date and hour.
• Modes: Internet Radio, Music Player, ...etc.
• The current track/radio station.
• Dialogue boxes.
• Information or error messages.
• Menus.
The second part of a text will be slowly displayed after the first part when too long for the display.
4-1 - More information about the display status
4 - Display
When switching from one source to the other with the MODE
button, the display indicates a start-up page for each source
during one second. The webradio will then activate the selected
source and try to connect to the last station or last track played.
If this last station or track cannot be accessed, the webradio will
search the network, the connected supports or radio stations.
The dialogue boxes allow you to change some parameters.
Their variable complexity goes from a simple YES/NO
confirmation to a password interface.
The selected function or answer will appear on a white
background.
The current settings are labeled by an asterisk (*).
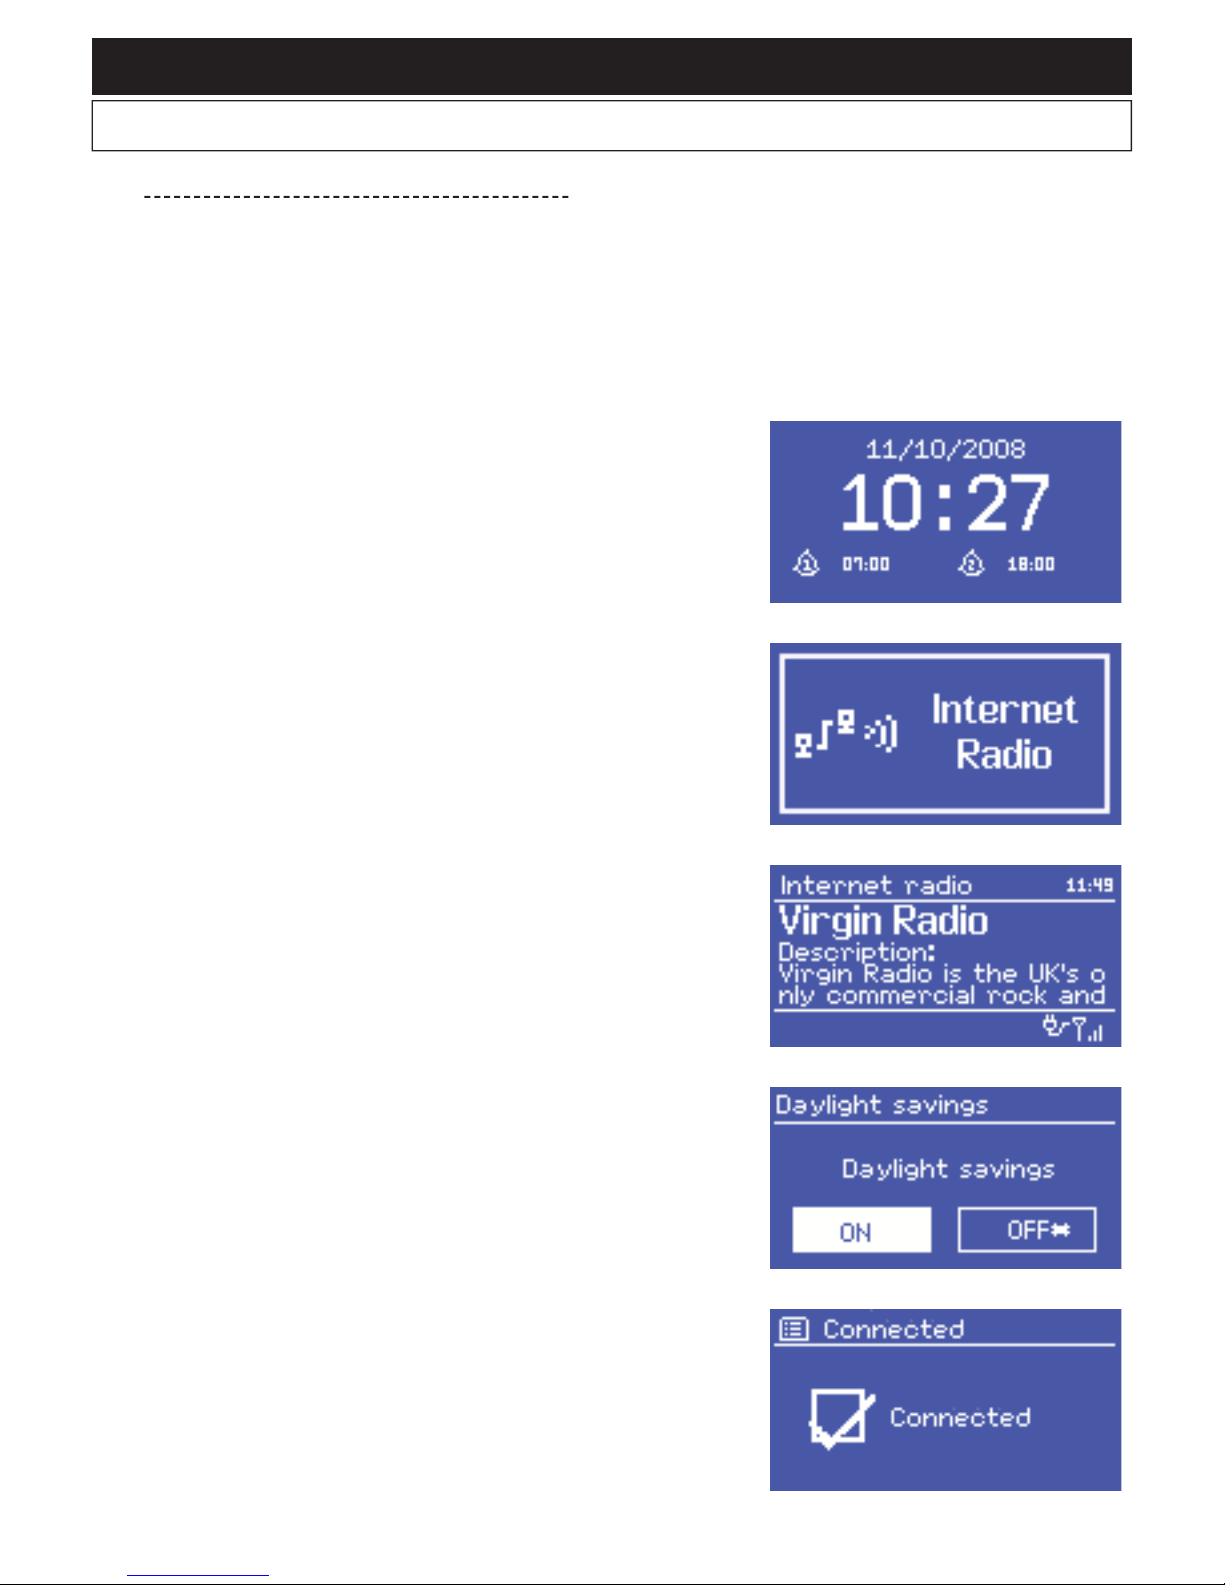
The current track/radio station display gives you plenty of
information (when available) about what you are playing.
The information screens give you more specific details for a few
seconds before disappearing.
The Stand-by screen indicates the current date and hour, plus the
alarms activated.

WEBRADIO130T - Webradio, DAB, FM and multimedia player with AUX input and remote control
Page 8
4-2 - Menus
The webradio features three kinds of menu.
Use the CONTROL SELECT knob to navigate and select the
options you want.
A drop-down menu will appear if the screen cannot display
enough lines.
Each mode has its own menu.
For instance, the FM mode has only two options:: Scan setting
andAudio Setting.
In addition to the two specific modes, you have access to two
menus: System Settings and Main Menu.
System settings gives you access to information about the
network, hour, language and internal software updates.
Main Menu gives you access to all the modes, plus the alarms
and clocks.

AUDIOPHONY PUBLIC ADDRESS
Page 9
English
5-1 - Setup wizard
5-2 - Configuring the date and hour
When starting for the first time, the installation wizard invites you
to configure the hour and network parameters.
NOTE : If need to change these settings later on, press the MENU
button, then select System Settings.
Pour relancer l'assistant d'installation, appuyez sur MENU puis
sélectionnez System Settings > Setup wizard.
To launch the setup wizard press Yes.
If you decide to skip these steps, the system will ask you again
the next time you turn on the webradio.
NOTE : If the unit is turned off during the installation process, the
setup wizard will restart the next time you turn on the webradio.
5-2-1 - Automatic settings
The automatic configuration are based on information delivered
by DAB/FM stations or Internet. As the date and hour will be set
according to each mode aforementioned, we strongly recommend
to base your settings on the mode you are the most likely to use
daily.
The DAB and FM modes use the information delivered by radio
stations.
The network mode uses information delivered by the Frontier
Silicon website.
The date and hour can be manually or automatically configured. When configured automatically, the date
and hour will be synchronised via an external server. Using the automatic settings allows a more accurate
configuration.
5 - Initialisation
Proceed as follows to configure the webradio during the first use:
1 - Place it properly.
2 - Connect the power cord the an electrical outlet.
3 - Connect the supplied antenna if you want to receive DAB and FM radio stations.
The setup wizard will launch automatically.

WEBRADIO130T - Webradio, DAB, FM and multimedia player with AUX input and remote control
Page 10
1 - Select one of the configuration modes.
2 - If choosing the network mode, please indicate your time zone.
3 - If your country is subject to the daylight saving time Daylight saving. Notez que cette option est sans
effet sur les modes DAB et FM.
4 - Your webradio will update automatically once information are available.
5-2-2 - Manual settings
If you chose the manual option (No update), the system will ask
you to set the date and time.
Use the CONTROL select knob to configure each value.
Select WLAN region/country > WiFi network (SSID), and choose
one of the available networks.
If using a wired connection, choose [Wired] and make sure the
webradio is connected via an ethernet cable.
5-3 - Network
The webradio is compatible with all the standard network and encryption protocols, including the Wi-Fi Protected
Setup (WPS).
Here are the two differents methods to connect the webradio to your network:
• Using a wired router and an ethernet connection (RJ 45 cable).
• Using a WiFi router with password (if a password has been configured via the router).
5-3-1 - Network with standard encryption system
Use the CONTROL SELECT knob to enter the network key and
move the cursor onto each character you need, then select it.
The key you entered appears at the top of your screen.
5-3-2 - Network with WPS encryption
The WPS encrypted networks are identified by the [WPS] prefix.
There are 3 identification and connection methods.
Choose one of these three methods and follow the steps.
AUDIOPHONY PUBLIC ADDRESS
Page 11
English
For more details about the configuration of a WPS-encrypted network, please refer to the user guide of
your router.
The webradio automatically tries to reconnect in case of disconnection.
5-3-3 - Finalising your network configuration
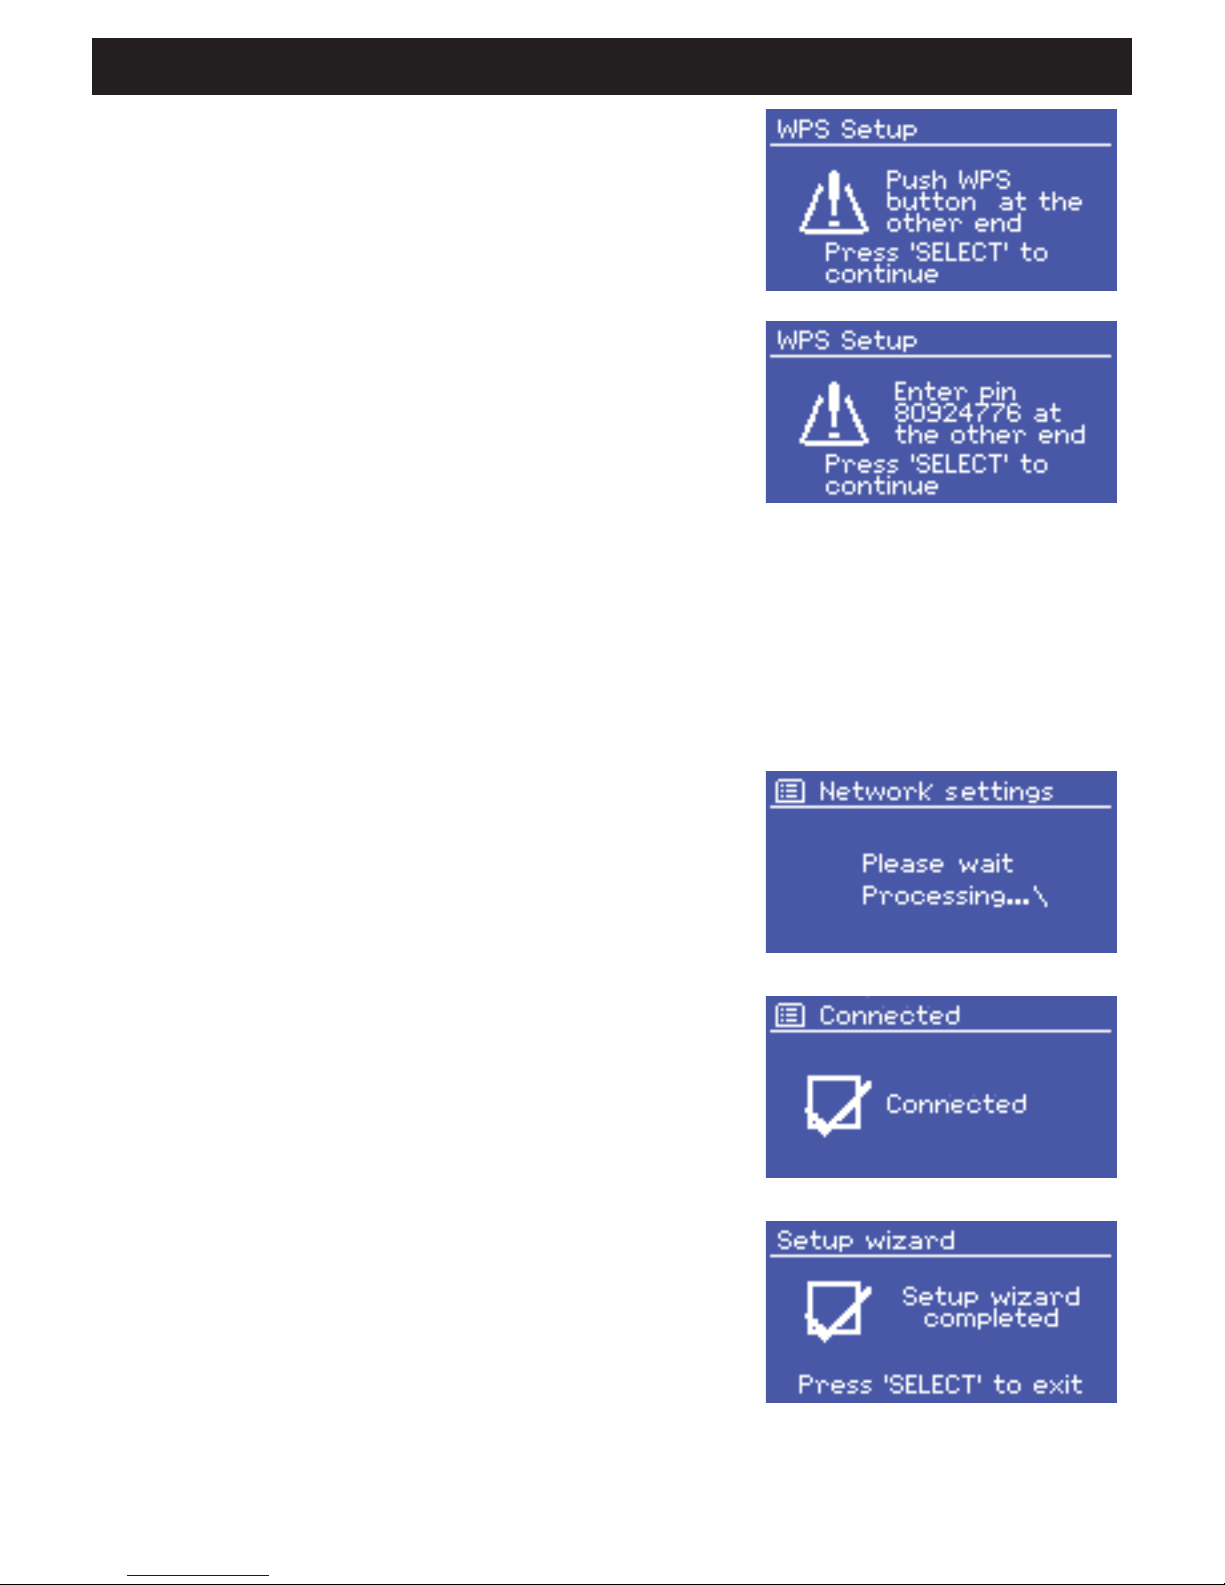
The webradio will try to connect to the selected network.
In the event of failure, the webradio goes back to the previous
menu to try new attempt.
The webradio will display the opposite message if the connection
is successful:
It will then display the following confirmation:
• Push Button > method
The webradio will require you to press the identification button
of your router. It will then sweep the network to try and find the
router and establish the connection.
• Pin > method (digital code)
The webradio generates a 8-digit code you must retrieve and
enter into the interface of your router.
• Skip WPS > method
Enter the key for standard networks as previously described.
WEBRADIO130T - Webradio, DAB, FM and multimedia player with AUX input and remote control
Page 12
5-4 - Basic settings
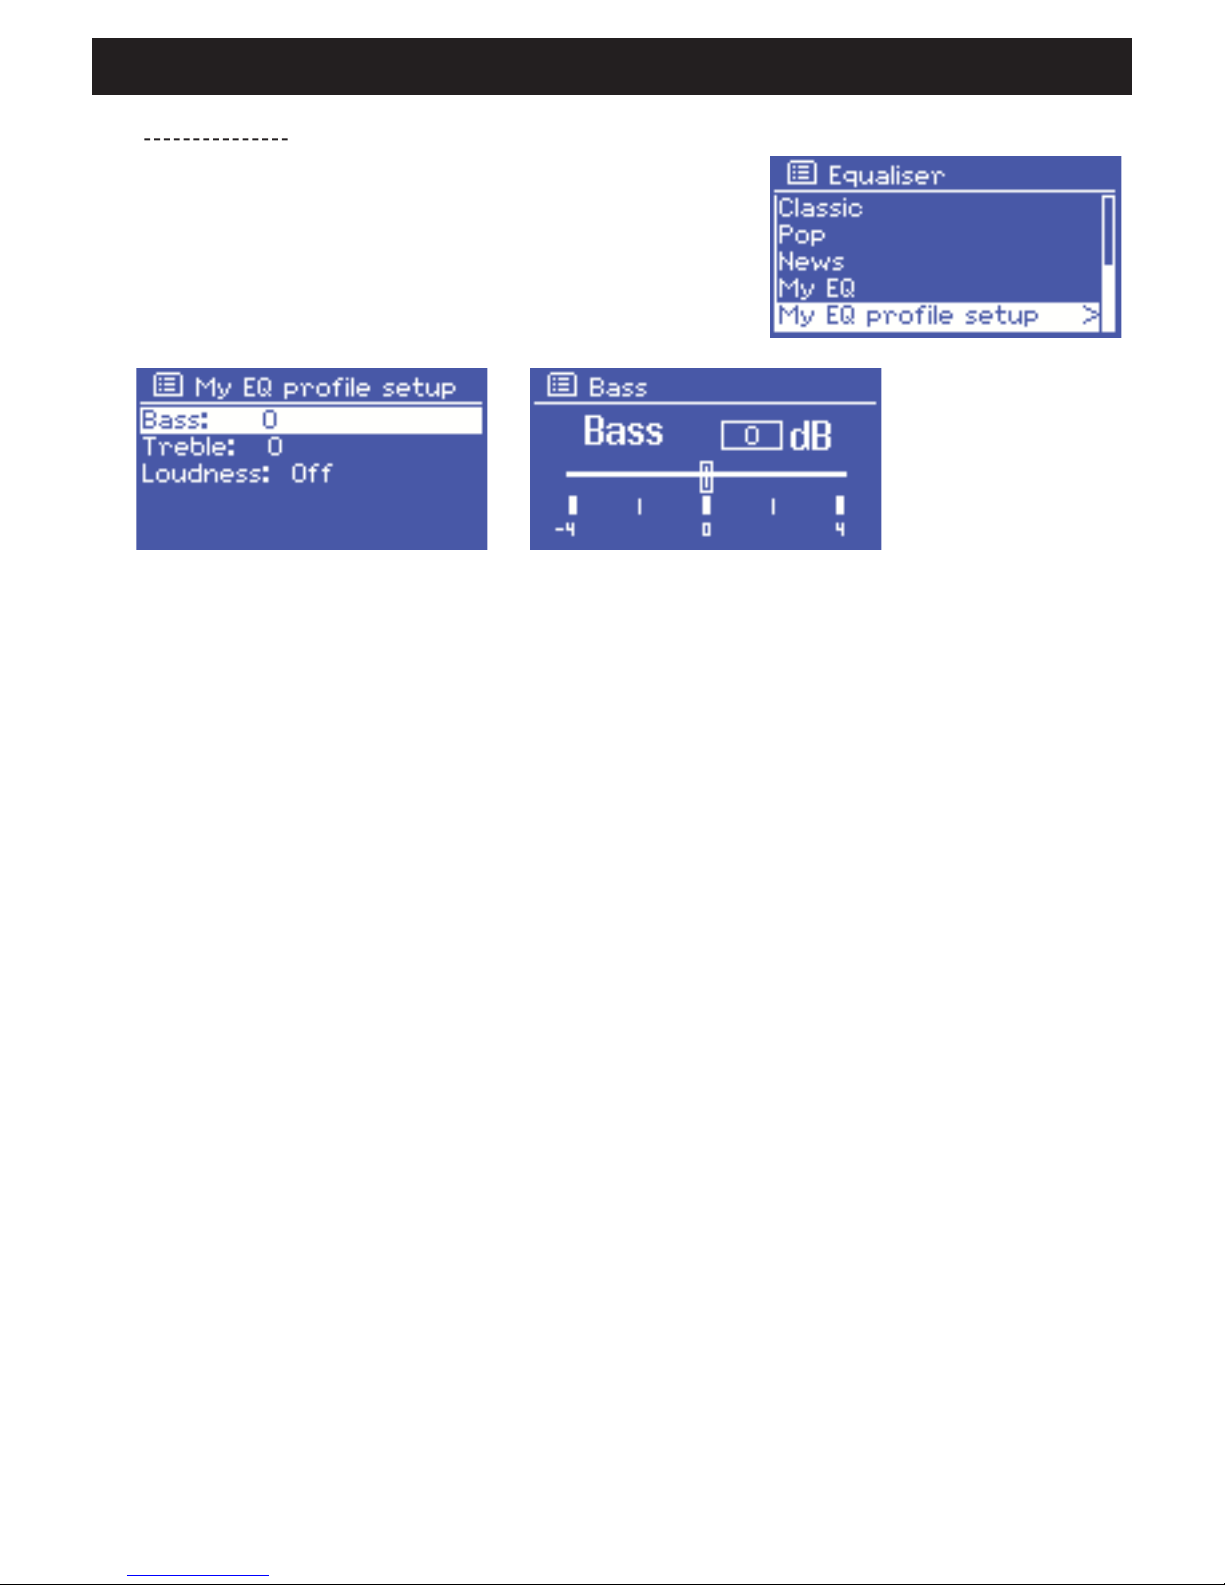
5-4-1 - Equalizer
The webradio offers three equalizer presets and one user profile.
Press System Settings then Equalizer to access the equalizer.
5-4-2 - Network
Your device will recognise the last 4 wireless networks used and will automatically try to reconnect.
The list of the 4 most recent networks available can be accessed via System settings > Network >
Network profile.
You can delete these networks by selectioning them with the CONTROL SELECT knob.
The System settings > Network menu allows you to visualise information about the network parameters
or manually configure the network accesses.
5-4-3 - Language selection
English is the default language.
However, 5 languages are available and can be activated via the System settings > Language menu.

AUDIOPHONY PUBLIC ADDRESS
Page 13
English
To register, switch to the Internet radio mode and download the
access code available in the Station list > Help > Get access
code menu.
Write down this code, which will allow you to register on the
website.
NOTE : Do not confuse the website registration code with the
identifier available in the System settings > Info menu.
5-4-4 - Registering on the webradio portal
The Frontier Silicon website allows you to organise your favourites and listen to webradios from your
computer.
Go on the Frontier Silicon website at the following address: www.wifiradio-frontier.com.
On your first visit, you will be asked to create an account by detailing the information below:
• The registration code aforementioned.
• A valid email address.
• A password.
• The model of your webradio (Jupiter 6.2 in your case).
Once your account has been created and your favourite stations added, you can access them through the
Station list > My Added Stations menu.
The same applies for the Station list > My favourites > "Nom du groupe" > "Nom de la station" menu,
allowing you to retrieve the stations you saved from the website.

WEBRADIO130T - Webradio, DAB, FM and multimedia player with AUX input and remote control
Page 14
5-4-5 - Configuring a media server
In order to play tracks from a network computer, .
The UPnP media sharing protocol allows devices connected to your network to access shared audio files
libraries. You are then able to search by Artist, Album or Genre.
The webradio can directly access shared playlists via computers using compatible systems such as
Windows Media Player (WMP).
Sharing medias with Windows Media Player
The most commonly used UPnP server is Windows Media Player (version 10 and above).
There are many more systems for several platforms.
Proceed as follows to configure WMP in order to share medias:
1 - Please make sure your computer is connected to your network.
2 - Make sure the webradio is ON and connected to your network.
3 - In WMP, add the audio files to the library.
4 - Still in WMP, authorise media sharing.
You can make sure the webradio has access to shared medias by selecting the webradio and the list and
click on "Authorise".
Your computer is now ready to share music via the webradio.
The UPnP server works in the background so you do not have to launch WMP to access tracks from your
webcradio.
AUDIOPHONY PUBLIC ADDRESS
Page 15
English
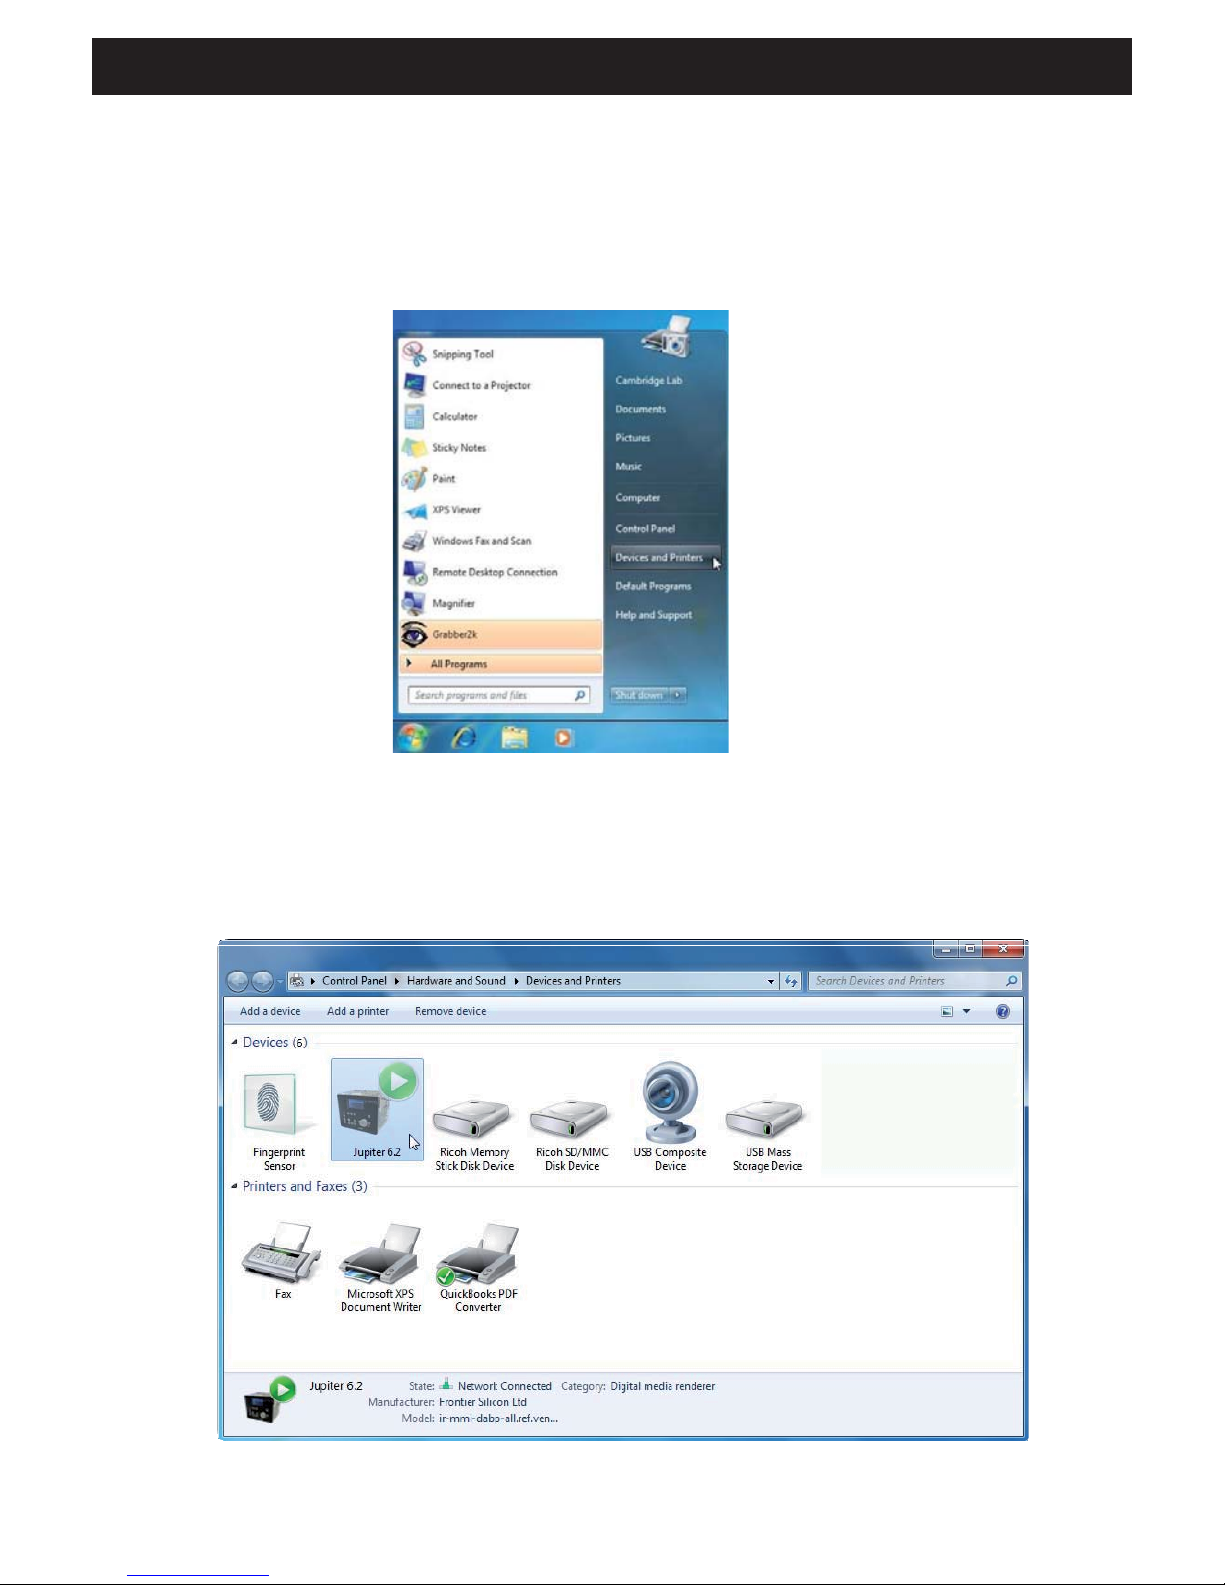
5-4-6 - Installing the webradio to control it from Windows 7
Proceed as follows to configure the webradio in order to control it and play files from a computer with
Windows 7 and Windows Media Player:
1 - Make sure your computer is connected to your network.
2 - Make sure the webradio is ON and connected to the same network. The webradio must be in Radio
Internet mode in order to be detected by the computer.
3 - Open the Start Menu, then Devices and Printers.
4 - Click on Add a device on the top left corner and follow the instructions.
The webradio should appear in the list of your devices by the end of the installation.
You are now able to play music on the webradio from your computer.

WEBRADIO130T - Webradio, DAB, FM and multimedia player with AUX input and remote control
Page 16
6 - The Internet radio mode
The webradio can access hundreds of radios and podcasts
worldwide via a broadband Internet connection.
When activating the Internet radio mode, the webradio will try
to reach out to the Frontier Silicon's website in order to retrieve
the list of available stations. Stations can be sorted out by genre,
country, ... etc.
The webradio automatically connects to the station selected.
From Frontier Silicon's website, via the Stations list menu:
• Bookmark list
• Search by genre, country, popularity, new tracks
• Search by keyword
• List of added stations
Frontier Silicon's website also allows you to manage your favourite tracks and add your own stations.
If you are in possession of several webradios from Frontier Silicon, you can register them all under the
same account and enjoy your favourite tracks on each one of them.
To activate the Internet radio mode, press the MODE button until the display indicates Internet radio or
by selecting Main menu > Internet radio.
NOTE : The stations list is generated by Frontier Silicon's website and can only be accessed when your
webradio is connected to the Internet.
There are several ways to select stations.
Directly from your webradio:
• The last station used (Last listened)
• The presets (your favourite stations)
If you are already listening to a station, you can go still go back in the in the menu tree and find the radio
list you had selected.
When restarting the Internet radio mode or turning your webradio off, the Last listened menu will give you
access to the last stations listened to. The most recent station will be at the top of the list.
Your bookmarks are stored on Frontier Silicon's website.
Your favourites will only be accessible by your webradio as long as you do not have created an account
on www.wifiradio-frontier.com. Once your account has been created, your bookmarks will gathered
together in a single list accessible via all your webradios.
To add a new stations to your favourites, press and hold the CONTROL SELECT knob until the display
indicates "Favourite added". The station will then appear on your list.
To play one of your favourite station, go to > Station list > My Favourites >.
6-1 - Last listened
6-2 - My Favourites
AUDIOPHONY PUBLIC ADDRESS
Page 17
English
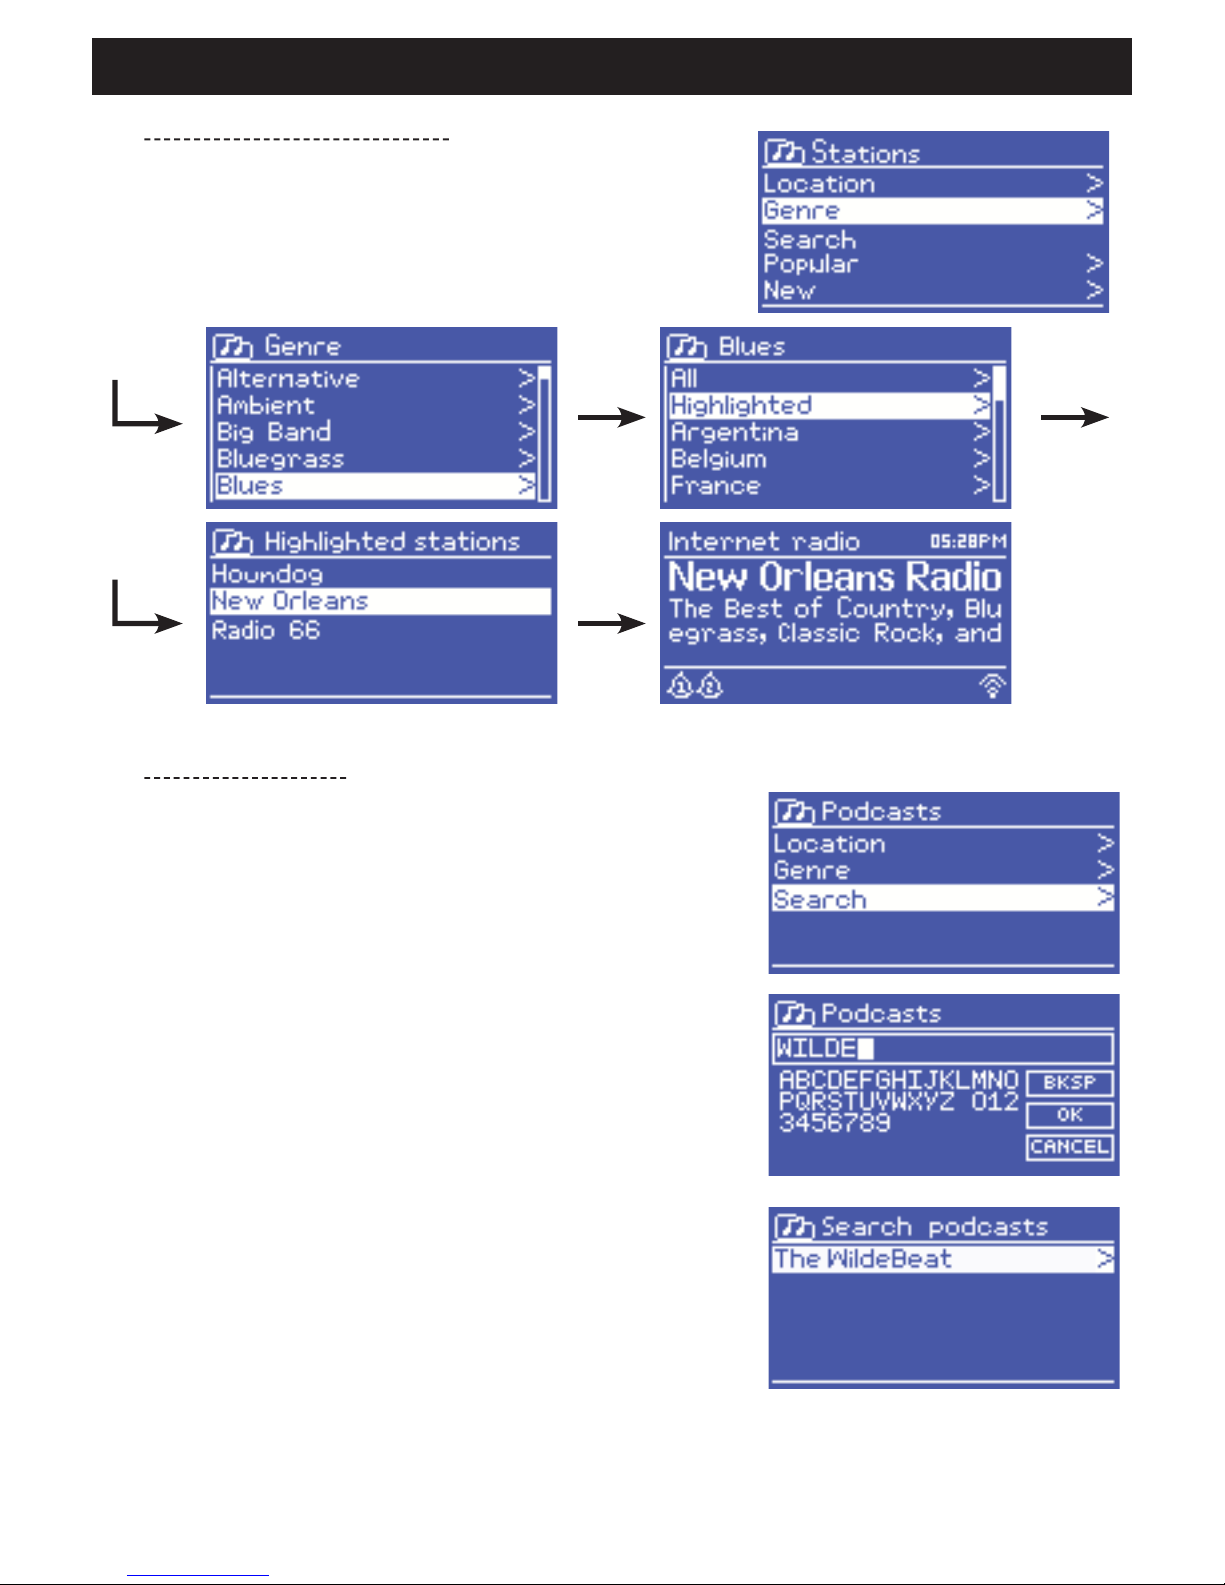
Press MENU, then select Station list, then Stations or Podcast.
Use the CONTROL SELECT knob to navigate and find the station
or podcast you want.
You can also search stations or podcasts by keyword.
Press MENU, then select Station list, then Stations or Podcast.
Select Search.
Type a keyword by using the CONTROL SELECT knob to select
characters.
Choose a radio or podcast among the list.
6-3 - Browsing through station lists
6-4 - The search function

WEBRADIO130T - Webradio, DAB, FM and multimedia player with AUX input and remote control
Page 18
6-5 - Accessing stations added via Frontier Silicon's website
6-6 - Information about the current station
Although Frontier Silicon's website features thousands of stations, you can also add your own stations via
your user interface.
These stations can be accessed via the > Station list > My added stations > [Station] menu.
When playing a podcast or station, the name and description will be displayed. If available, the track and
name of the artist will also be displayed.
To access extra information, press INFO.
You can access different information described above each time you press this button:
• The name of the artist and current track
• A description of the station
• The genre of the station and its location
• The signal quality
• The type of codec used and sampling rate
• Le niveau de mise en cache
• The current date
AUDIOPHONY PUBLIC ADDRESS
Page 19
English
7-1 - Playing files via your network
Select > Shared media >.
Once your media server has been configured, a new line should appear in the list, indicating
<Name of the computer> : <Name of the media server>.
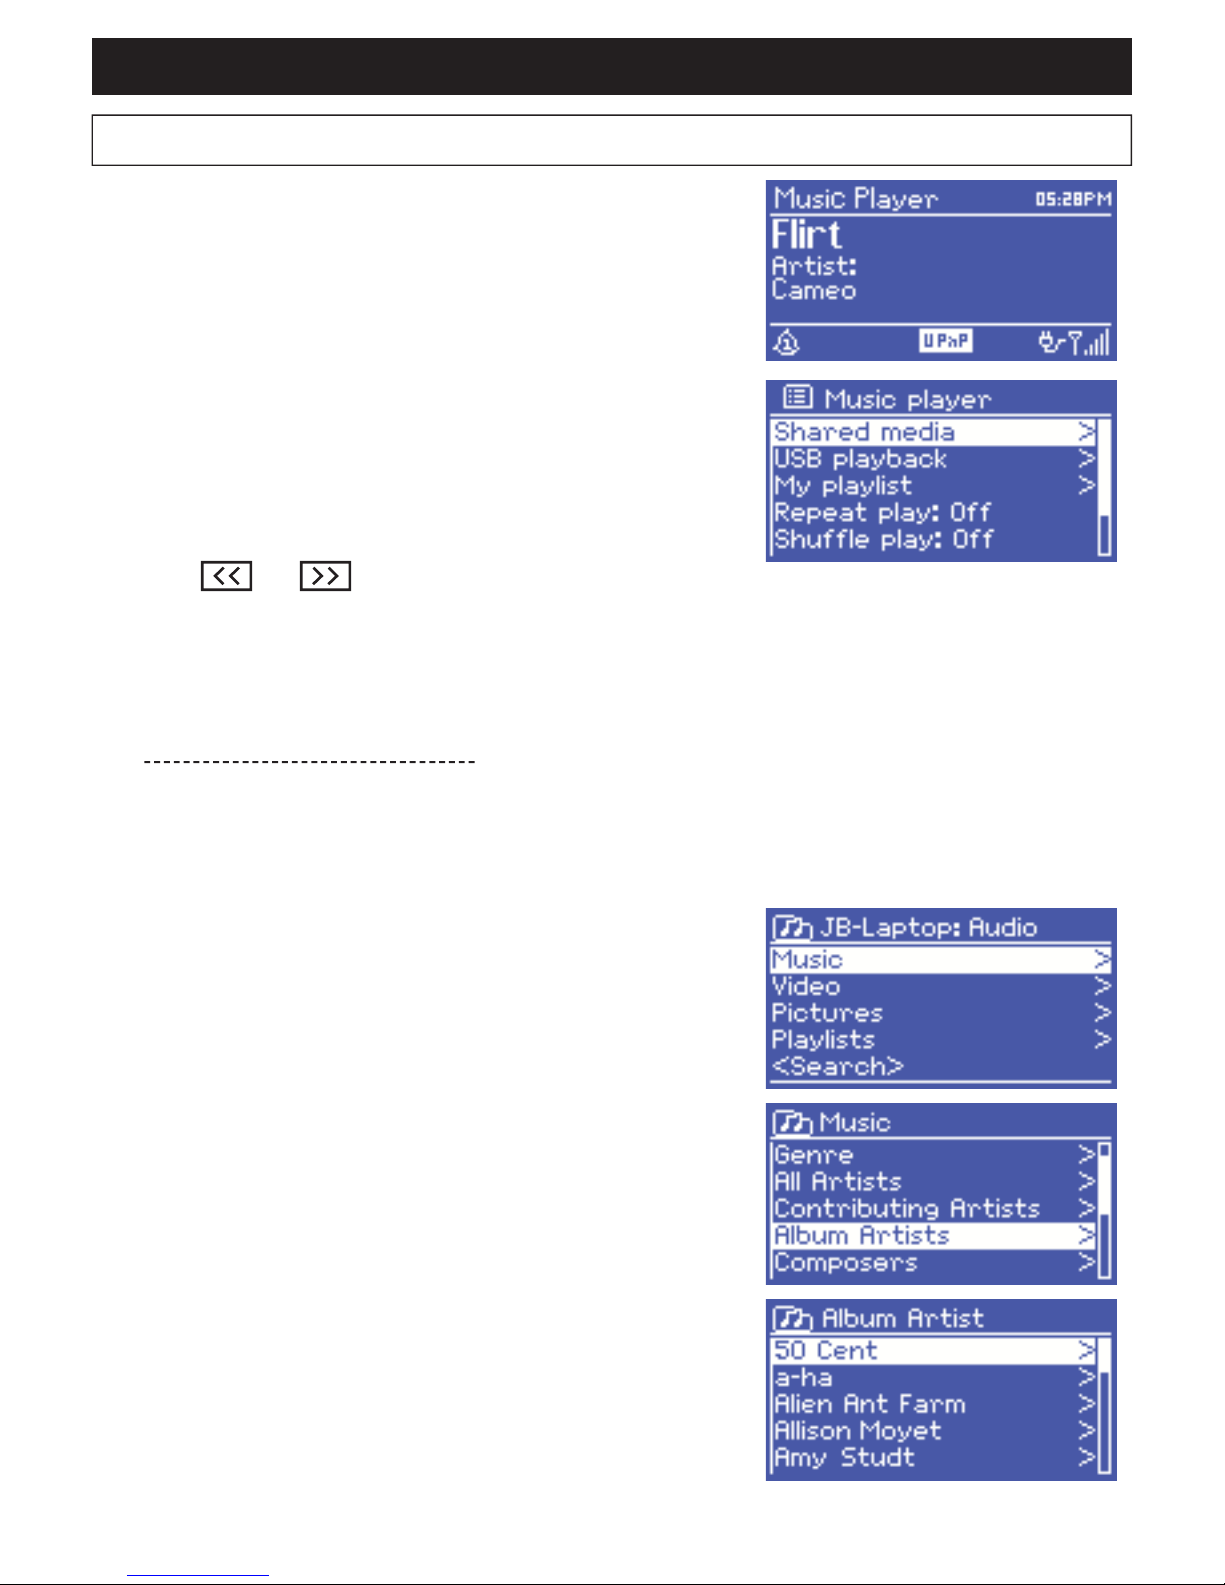
7 - The Music Player mode
The music player mode allows you to play audio files in different
formats such as MP3, AAC, WMA or FLAC. These audio files can
be stored on your local network or USB support such as a key or
HDD.
To activate this mode, press the MODE button until the display
indicates "Music player" or select Main menu > Music player.
Once this mode has been activated, press the MENU button and
either select files via your network or USB input.
If you are already listening to a track, you can easily go back in
the tree to find the tracks you selected.
Use the and buttons to switch from a track to another
or keep one of this button pressed to rewind/fast forward.
Once selected, the media server will generate the menu: the
Windows Media Player tree will appear.
Note: the webradio can only play audio files.
The search function remains the same.
There are several ways to find a track:
• By genre
• By artist
• By album
• By composer
• By ranking
Press the CONTROL SELECT knob to play a track.
A short press will play the track immediately with a long press
adds the track to your playlist.
You can also add a whole album to your playlist.

WEBRADIO130T - Webradio, DAB, FM and multimedia player with AUX input and remote control
Page 20
7-1-1 - Wake-on-LAN
7-1-2 - Prune servers
7-2 - Playing files from a USB support
If > Shared media > has been selected, a list of available media servers.
If a question mark appears next to a server name, that means the server had previously been detected by
the network and features the "Wake-On-LAN" function but is not accessible at the moment.
By selecting this server, the webradio will try to "wake up" the server and connect to it.
It may prove useful to delete the interrogation mark servers once in a while:
For instance, if your webradio is moved onto another network or a server has been deleted from the
network.
This function is called Prune servers and can be accessed via the MENU button, by selecting
> Prune servers >.
To play > USB playback >.
The menu tree of your USB support will appear on the display
upon selection of your USB support.
To browse through files and folders, use the CONTROL SELECT
knob and BACK button.
The display will indicate the name of the files and repertories, not
the title of the tracks.
Once you found the track you want, use the CONTROL SELECT
knob to play it.
A short press will play the track immediately with a long press
adds the track to your playlist.
You can also add a whole album to your playlist.
Table of contents
Other audiophony Media Player manuals

Popular Media Player manuals by other brands


Philips
Philips GoGear SA2VBE08 quick start guide

Innovative Technology
Innovative Technology ITVS-200 instruction manual

ZyCast
ZyCast HDIP-8000 User guide and installation manual

Huawei
Huawei EC6108V6 user manual

DANE-ELEC
DANE-ELEC SO ROAD MOVIE CAR PACK quick start guide

Fantec
Fantec 4KS7000 quick start guide