Cisco DMP-4400G-K9 User manual

Q
UICK
S
TART
Quick Start Guide for
Cisco Digital Media Player 4400G
DMP-4400G-K9
Checking the Package Contents
Finding a Suitable Location to Set Up Yo
Participating in a DHCP Network
Connecting to a DMP Display
Connecting to a 120V–240V AC
Checking the LEDs
Logging in to DMPDM and Ch
Configuring Video Output
Setting Up Centralized Ma
Product Documentation, Support, an

2
Revised: April 28, 2008
78-18567-01
Contains Macromedia® Flash™ technology by Adobe Systems, Inc. Copyright 1995-2003 Adobe Systems, Inc. All Rights
reserved. Macromedia, Flash, Macromedia Flash, and Macromedia Flash Lite are trademarks or registered trademarks of Adobe
Systems, Inc. in the United States and other countries.

3
Glossary
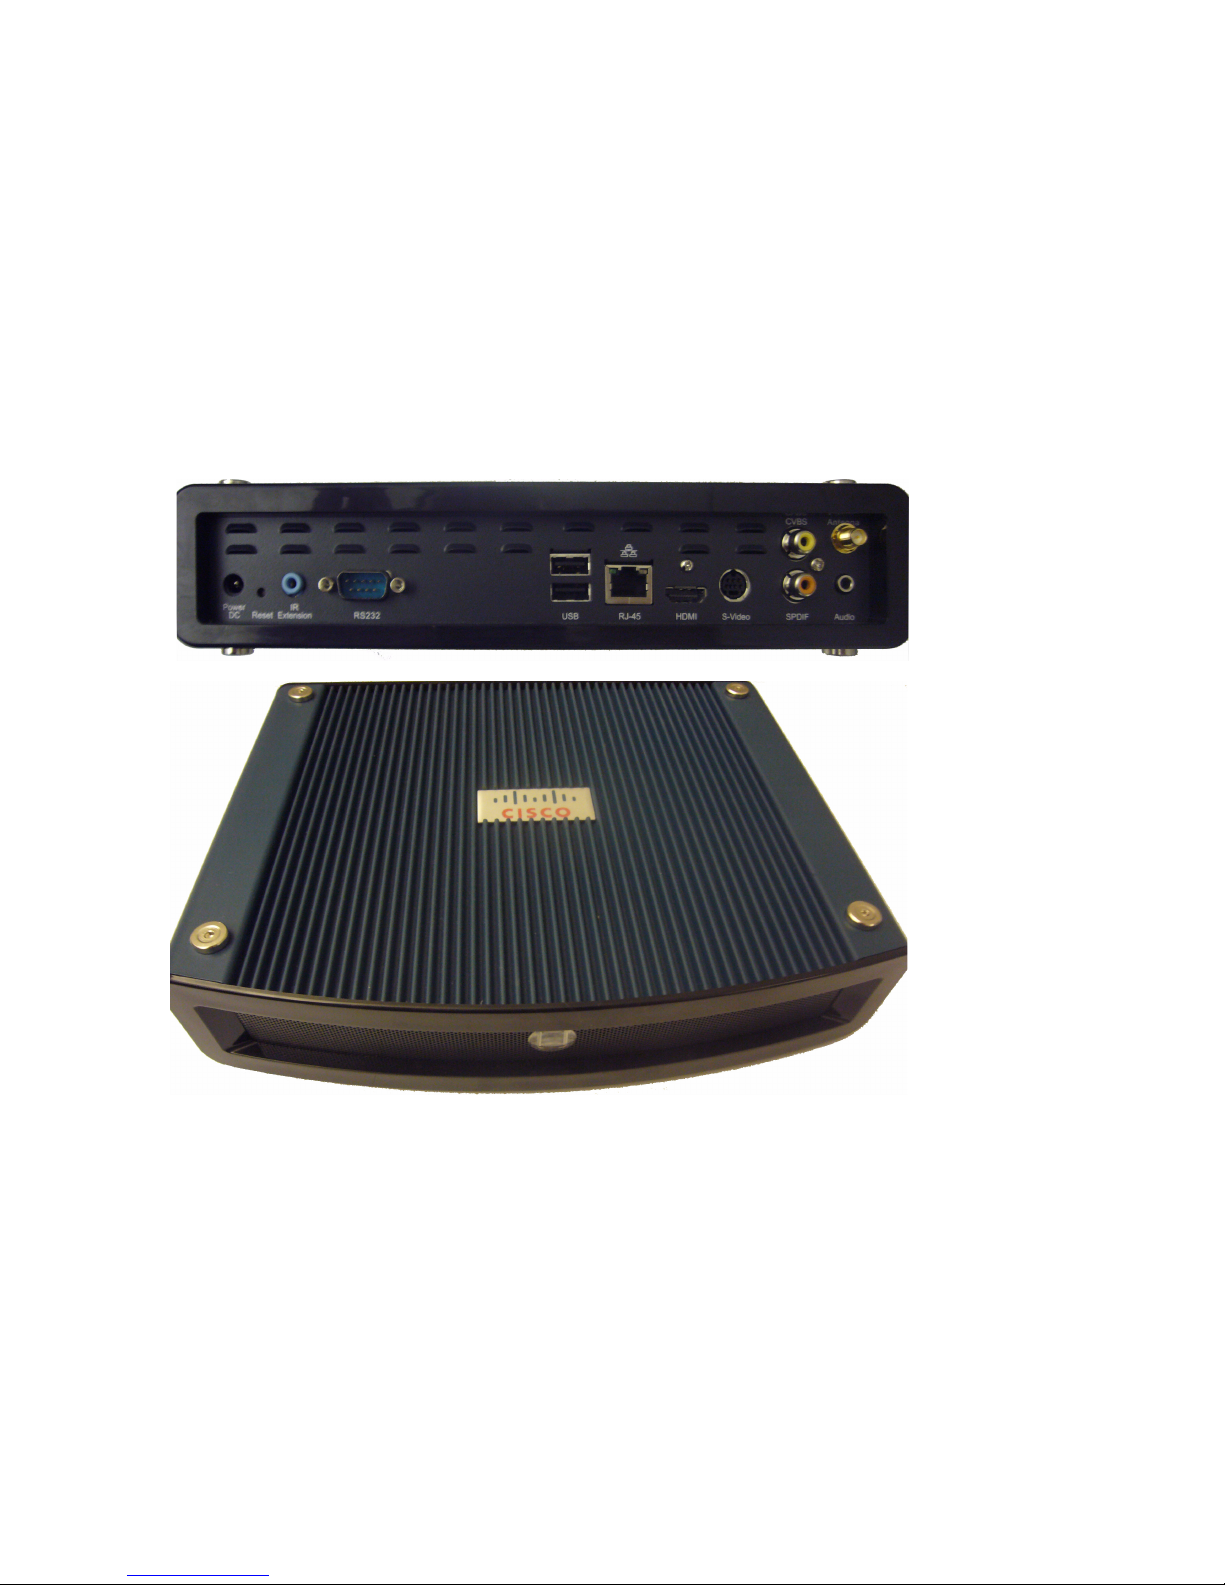
Cisco Digital Media Player 4400G (DMP) is a compact, solid
state, addressable network device that delivers digital signage
content to a DMP display that you attach.
Cisco Digital Media Player Device Manager (DMPDM) is a
web-based graphical user interface to configure one DMP during
its initial setup, to manage one DMP in isolation, and to deliver
content to one DMP display. DMPDM is served from the DMP that
it manages.
A DMP Display is any television screen or other kind of monitor
or projector that is attached directly to a DMP and that shows
digital signage content to an audience. The display might be analog
or digital and might be standard-definition or high-definition.
Cisco Digital Media Manager – Digital Signage Module
(DMM-DSM) is a web-based graphical user interface that system
administrators, content managers, and graphic designers use to
centrally manage a network of DMP devices, organize and bind
together the elements for signage, design layouts for signage, and
deliver content to any number of DMP displays. DMM-DSM is
served from a specially configured Cisco Media Convergence
Server appliance.
Cisco Digital Media System (Cisco DMS) is a family of products
and technologies for digital media, including products that this
guide describes.

4
Learn More
To learn more about DMS products, related technologies, and
Cisco in general:
Description Go To
Cisco DMS overview
http://www.cisco.com/go/dms
User documentation
for Cisco video
products and content
networking products
http://www.cisco.com/en/US/products/ps6
681/products_documentation_roadmaps_li
st.html
Cisco DMS FAQs and
troubleshooting
information
http://www.cisco.com/en/US/products/ps6
681/prod_troubleshooting_guides_list.htm
l
My Tech Support
(registration required)
http://www.cisco.com/en/US/support/tsd_
my_tech_support.html
Cisco Service Contract
Center
http://www.cisco.com/web/partners/servic
es/resources/cscc/index.html
Cisco Security
Advisories
http://www.cisco.com/en/US/products/pro
ducts_security_advisories_listing.html

5
Cisco Academy of
Digital Signage
http://www.cisco.com/go/dms/ads
1
Checking the Package Contents
The product package for one DMP 4400G should contain all of the
following:
• One AC adapter (12V, 3A).
• One power cord.
• One battery-powered remote control (CR2025 lithium battery,
3V).
• One IR extension cable.
• Three signal cables:
–
HDMI (version 1.1).
–
Composite/RCA (video).
–
Composite/RCA (audio — 3mm jack; red and white
RCA plugs).

6
• One HDMI-to-DVI adapter.
• One S-Video-to component adapter.
If anything is missing from the package or appears to be defective,
contact the technical support team trained to support DMS
products at: dms-softwarekeys@cisco.com.
Interface Description
Chassis Front Panel
LED
There are three LEDs:
• Green —
• Red —
• Yellow —
IR Receiver
Chassis Back Panel
Antenna
Audio
CVBS
HDMI

7
IR Extension
Power DC
12V DC input jack into which you plug the DC
barrel connector from your power adapter. 3A.
Reset
Resets your DMP to factory-default settings
when pressed.
RJ-45
10/100/1000 Ethernet with dual LEDs. Supports
wake-on-LAN.
RS232
S-Video
SPDIF
USB
Two USB 2.0
3
Finding a Suitable Location to Set
Up Your DMP
The site where you set up a DMP must be within 6 feet of an AC
electrical outlet (socket), with voltage that is standard in your
locale, between 120V and 240V. To understand the supported

8
lengths for different video cable types, see the
Connecting
to a DMP Display
.
Environmental Tolerance Ranges
The DMP 4400G is intended for indoor use.
US Customary Unit Modern Metric Unit
Temperature
1
Min. Max. Min. Max.
Operating —
long-term or
short-term
41ûF 104ûF 5ûC 40ûC
Nonoperating
or storage –4ûF 140ûF –20ûC 60ûC
Relative Humidity
2
Min. Max.
1
Ambient.
2
Noncondensing; ambient.

9
Operating,
nonoperating,
and storage
20 percent 85 percent
4
Participating in a DHCP
Network
The factory default for a DMP 4400G is to obtain its IP address
automatically from a DHCP server. If you will deploy your DMP
at a physical location that does not have a DHCP server, see User
Guide for Cisco Digital Media Player Device Manager 5.0 on
Cisco.com to learn how to configure your DMP to use a static
IP address.
Tip If a network security policy restricts DHCP address
assignments to network interface cards with known MAC
addresses, read the sticker that is affixed to the bottom of
your DMP chassis, then provide your security policy
administrator with the MAC address.
Step 1 Plug one end of an ordinary Ethernet cable into the
Ethernet 10/100 port on the back of the DMP chassis.

10
Step 2 Plug the other end of the Ethernet cable into a network
hub, network switch, or router that participates in a DHCP
network.
5
Connecting to a DMP Display
We recommend that you use a digital display, not analog. For the
type of digital display, we recommend LCD, not plasma.
Digital signage uses static images more often than it uses
full-motion video. Most often, content is web-based or animated in
Flash. The nature of these media types means that some pixels are
not updated frequently in digital signage. Given that LCDs are less
susceptible to burn-in than plasma displays are, LCD displays are
the superior choice for digital signage.
Even though image persistence is sometimes a problem on LCD
displays, it is almost always self-correcting and is unlikely to occur
if you follow manufacturer guidelines for managing your displays
correctly.

11
You can use displays from any manufacturer, as long as your
displays comply with all of the relevant international standards.
If NEC is your preferred manufacturer for LCD displays, we
recommend these NEC models:
• 32" — MultiSync® LCD3210
• 40" — Either of these:
–
MultiSync® LCD4010
–
MultiSync® LCD4020
• 46" — MultiSync® LCD4610
• 57" — MultiSync® LCD5710
The maximum supported length for a video cable is:
• 10 feet — Composite/RCA and S-Video
• 16 feet — HDMI

12
To attach a digital display to your DMP, we recommend that you
use the provided HDMI cable for video and audio. However, to
attach any of the recommended NEC display models to your DMP,
you must combine the HDMI cable with the provided
HDMI-to-DVI adapter for video, and use the provided
composite/RCA audio cable for audio. The only exception to this
rule is the NEC MultiSync® LCD4020, which supports HDMI for
both video and audio.
To attach an analog display to your DMP, we recommend that you
use the provided composite/RCA cable for both video and audio.
Step 1 On the back of your DMP chassis, do one of the
following:
• If you will connect your DMP to a digital display that
has an HDMI interface, plug the male end of the
HDMI cable into the HDMI interface on your DMP.
• If you will connect your DMP to one of the
recommended NEC display models that does not have
an HDMI interface, do all of the following:
–
Plug the male end of the HDMI cable into the
HDMI interface on your DMP, then connect an
HDMI-to-DVI adapter to the other end of
the HDMI cable.
–
Plug the 3mm jack on the RCA audio cable into
the AUDIO interface on your DMP.

13
• If you will connect your DMP to an analog display,
do all of the following:
–
Plug one yellow jack on the RCA video cable
into the CVBS interface on your DMP.
–
Plug the 3mm jack on the RCA audio cable into
the AUDIO interface on your DMP.
Step 2 Connect the other end of the cable (or cables) to the
corresponding interface (or interfaces) on your
DMP display.
Step 3 If the DMP display is not already turned on, turn it
on now.
6
Connecting to a 120V–240V
AC Socket
Warning
Use only the supplied power cable and adapter.
Step 1
Connect the DMP power cable to the AC adapter.
Step 2
Connect the DC barrel connector to the 12V DC power
supply on the DMP chassis.

14
Step 3
Connect to a 120V–240V AC electrical outlet that you
know is grounded.
To protect your DMP from electrical surges, we recommend that
you use a surge protector or an uninterruptable power supply from
a reputable manufacturer.
7
Checking the LEDs
The DMP chassis contains a green LED and a red LED. After you
attach your DMP to its AC power source, you should see light
from both LEDs through the DMP front grille.
The LEDs tell you if your DMP has power and if it has obtained an
IP address.
•
A solid green LED indicates that a power source is available.
•
A solid red LED indicates that your DMP is trying to obtain an
IP address. After your DMP has an IP address, it turns off the
red LED.
The LEDs do not blink ordinarily but might do so if your DMP is
exposed to interference from an infrared signal.

15
8
Logging in to DMPDM and
Changing its Passwords
Step 1
When your DMP display shows the Cisco logo and shows
an IP address for your DMP, write down the IP address.
Tip
To reconfigure this splash screen in the future to persist
for less than or more than the factory-default duration of

16
30 seconds, select
Settings > Browser
, then enter a new
duration in milliseconds in the
Splash Screen Display
Time (milliseconds)
field. Next, select
Administration >
Save Configuration
, then click
Save
.
Step 2
Point your browser to the IP address that you wrote down.
Step 3
At the login prompt for DMPDM, to log in as the “DMP
Web Account” user, enter the username
admin
and the
password
default
.
Caution
Security in your network might be compromised
unless you change the factory-default passwords in
DMPDM for both of these:
•
The DMP Web Account
user.
•
The DMP Service Account
user.
To protect your network against this vulnerability,
you
must
complete the rest of this procedure.
If you have very few DMPs and will manage each of them in
isolation, you can change their DMP Web Account and DMP
Service Account passwords manually in DMPDM. The relevant
features are available from this DMPDM area:

17
Alternatively, if you have many DMPs and will manage them
centrally, you can use the fully licensed DMM-DSM software on
your DMM appliance to change both of these passwords globally
for all of the DMPs that you have added to a DMP group. Before
you can use DMM-DSM in this way, however, you must first
complete the
Setting Up Centralized Ma
for each of your centrally
managed DMPs.
Note
When you use DMM-DSM to change a password on your
DMP, the text string that you enter in DMM-DSM must
use the correct syntax for URI encoding. The syntax in
URI encoding for submitting a string requires that you
enter a plus sign (
+
) instead of a space wherever the value
for a queryable object should contain a space. For
example, if the queryable object is “user” and its value is
“John Smith,” you would enter “user=John+Smith” in
your string. If any values in the string should contain an
actual plus sign, you must encode the plus sign explicitly
as
%2B
.
Exclamation points (
!
), question marks (
?
), ampersands
(
&
), and asterisks (
*
) are forbidden in values.
To understand URI encoding and its recommended syntax
for submitting query strings, see RFC 1630 at
http://tools.ietf.org/html/rfc1630.

18
Step 4
To change the DMP Web Account password on one DMP
by using DMPDM, select
Administration > DMP Web
Account
. Enter your new password in the Password field,
enter it again in the Repeat Password field, then click
Apply
. Next, select
Administration > Save
Configuration
, then click
Save
.
Alternatively, you can use DMM-DSM to change the
password simultaneously on multiple DMPs in your
digital signage network:
a.
Select
Digital Media Players > Advanced Tasks >
System Tasks
, then click the blank page icon to create a
new system task.

19
b.
Enter a name and description for the new task, then
select
Set
from the Request Type list.
c.
In the Request text box, use the correct syntax for URI
encoding and enter
mibifc.user=admin&mibifc.password=
new_password
&mib.save=1
, where new_password is exactly the
password that you want to assign to the DMP Web
Account user.
d.
To save the task so that it becomes available for your
use, click
Submit
.
e.
To send the password changing instruction
simultaneously to multiple DMPs in your digital signage
network, do the following:
–
Select
Schedules > Immediate Deployment
.
–
Select a group from the DMP Groups object
selector.

20
–
Select the check box for each DMP where the
DMP Web Account password should change.
–
Select from the Actions list the system task that
you named in Step 4b.
–
Click
Go
.
Step 5
To change the DMP Service Account password on one
DMP by using DMPDM, select
Administration > DMP
Service Account
. Enter your new password in the
Password field, enter it again in the Repeat Password field,
then click
Apply
. Next, select
Administration > Save
Configuration
, then click
Save
.
Alternatively, you can use DMM-DSM to change the
password simultaneously on multiple DMPs in your
digital signage network:
a.
Select
Digital Media Players > Advanced Tasks >
System Tasks
, then click the blank page icon to create a
new system task. (For reference, see the figure that
follows Step 4a.)
b.
Enter a name and description for the new task, then
select
Set
from the Request Type list.
c.
In the Request text box, use the correct syntax for URI
encoding and enter
init.FTP_password=
new_password
&mib.save=1
,
where new_password is exactly the password that you
want to assign to the DMP Service Account user.
This manual suits for next models
1
Table of contents
Other Cisco Media Player manuals

Cisco
Cisco 4400G User manual

Cisco
Cisco 4305G User manual

Cisco
Cisco 4305G User manual

Cisco
Cisco 4400G User manual

Cisco
Cisco DMS-DMP-4300G User manual

Cisco
Cisco 4310 User manual

Cisco
Cisco DMP 4305G User manual

Cisco
Cisco Edge 340 Series User manual

Cisco
Cisco Digital Media Player 4300G 4300G Original instructions

Cisco
Cisco StadiumVision SV-4K Quick reference guide