AudioSonic TL-3470 User manual

EN Instruction manual
NL Gebruiksaanwijzing
FR Mode d’emploi
DE Bedienungsanleitung
ES Manual de usuario
PT Manual de utilizador
PL Instrukcja obsługi
IT Manuale utente
SV Bruksanvisning
CS Návod na použití
SK Návod na použitie
Tablet 7 inch
D u a l C o r e - 8 G B TL-3470

2

3
ENInstruction Manual
OUTLOOK DESCRIPTION
1. Front-facing Camera
2. Power button
3. Headphone connector
4. Micro USB connector
5. DC connection
6. Micro SD Card slot
7. HDMI connection
8. Speaker
9. Reset button

4
Instruction Manual
POWER BUTTON USAGE
• Turn On: Press the power button and hold for 3 seconds.
• Turn Off: Press the power button and hold for 3 seconds, →tap Power off →tap OK.
• Screen lock and Unlock: Press the power button quickly to lock and try again to
unlock .
• Force Shutdown: If the device does not respond, press and hold the power
button for 7 seconds. (Note: If it is not necessary, we don’t suggest to use Force
Shutdown. You should follow the Turn Off steps to perform the shutdown. Force
shutdown may lead to unpredictable system errors)
TOUCH-SCREEN NAVIGATION
The touch-screen allows for quick, easy and convenient navigation.
You can use the touch-screen refer to the following method through the user guide.
• Tap: Quick tap & release on an item on the screen.
• Finger slide: Touch & slide your finger across the screen and then release.
• Touch & hold: Touch and hold in place approx 2 seconds, and then release to
display an options window.
• To avoid scratching or crushing, do not place objects on the touch screen surface.
USING MICRO SD CARD
The device supports a maximum 32GB micro SD card.
• Insert your card into the micro SD slot until it clicks into place.
• Remove micro SD Card: Close all applications or documents which have been
opened on the card.
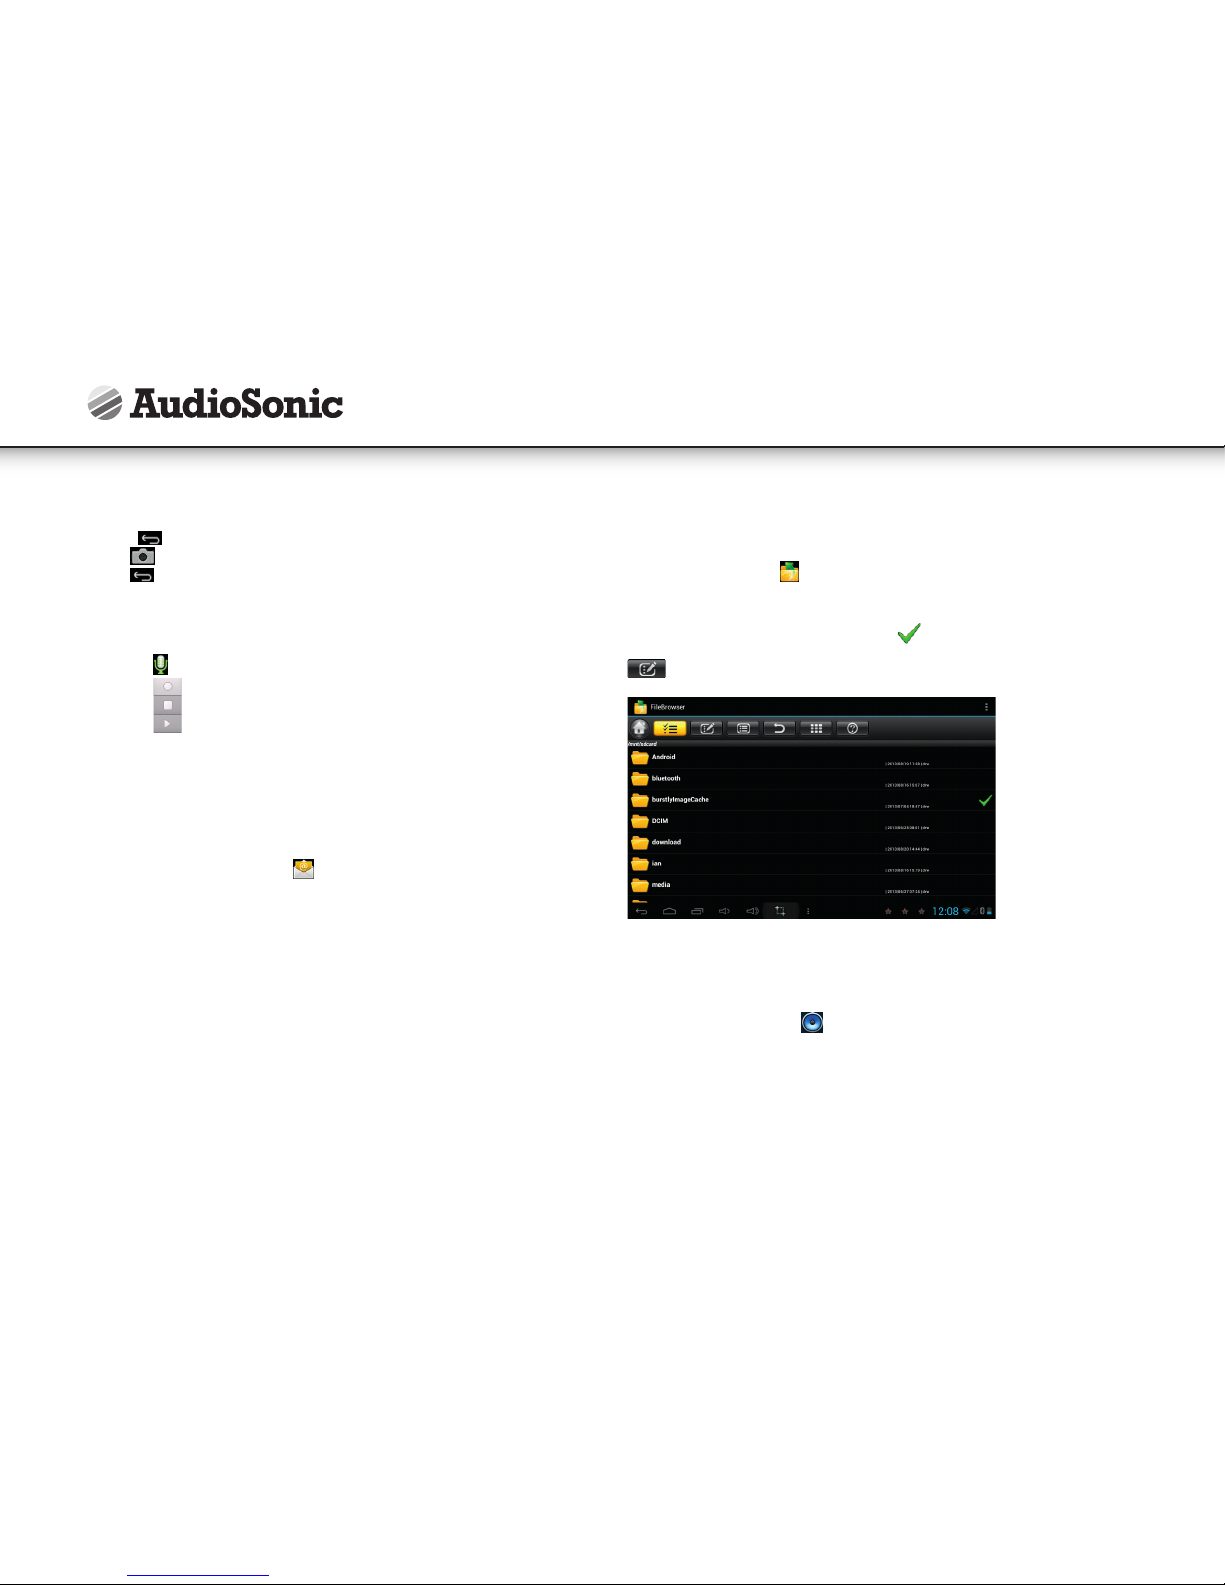
Tap → Settings →Storage →Uninstall SD card. Press the card slightly; it is
partially ejected allowing you to pull the card out
• Don’t insert and remove the U-disk repeatedly in a short time, as this may cause
damage to the card.
• We recommend using major brands of memory cards to avoid incompatibility.
GETTING STARTED
Charging the device
• You can charge the battery using the included adapter.
• You can use the device while the battery is charging, although the charging time
is longer when operating and charging at the same time.
• Plug the power adapter into an electrical wall outlet, and then connect it to the
device to charge the battery. ( Fully charged in about 5 hours).
Turn the device on
Press the power button and hold for 3 seconds.
Wi-Fi Network Setup
Since many features require a Wi-Fi connection, we recommend you set up your
Wi-Fi network now.
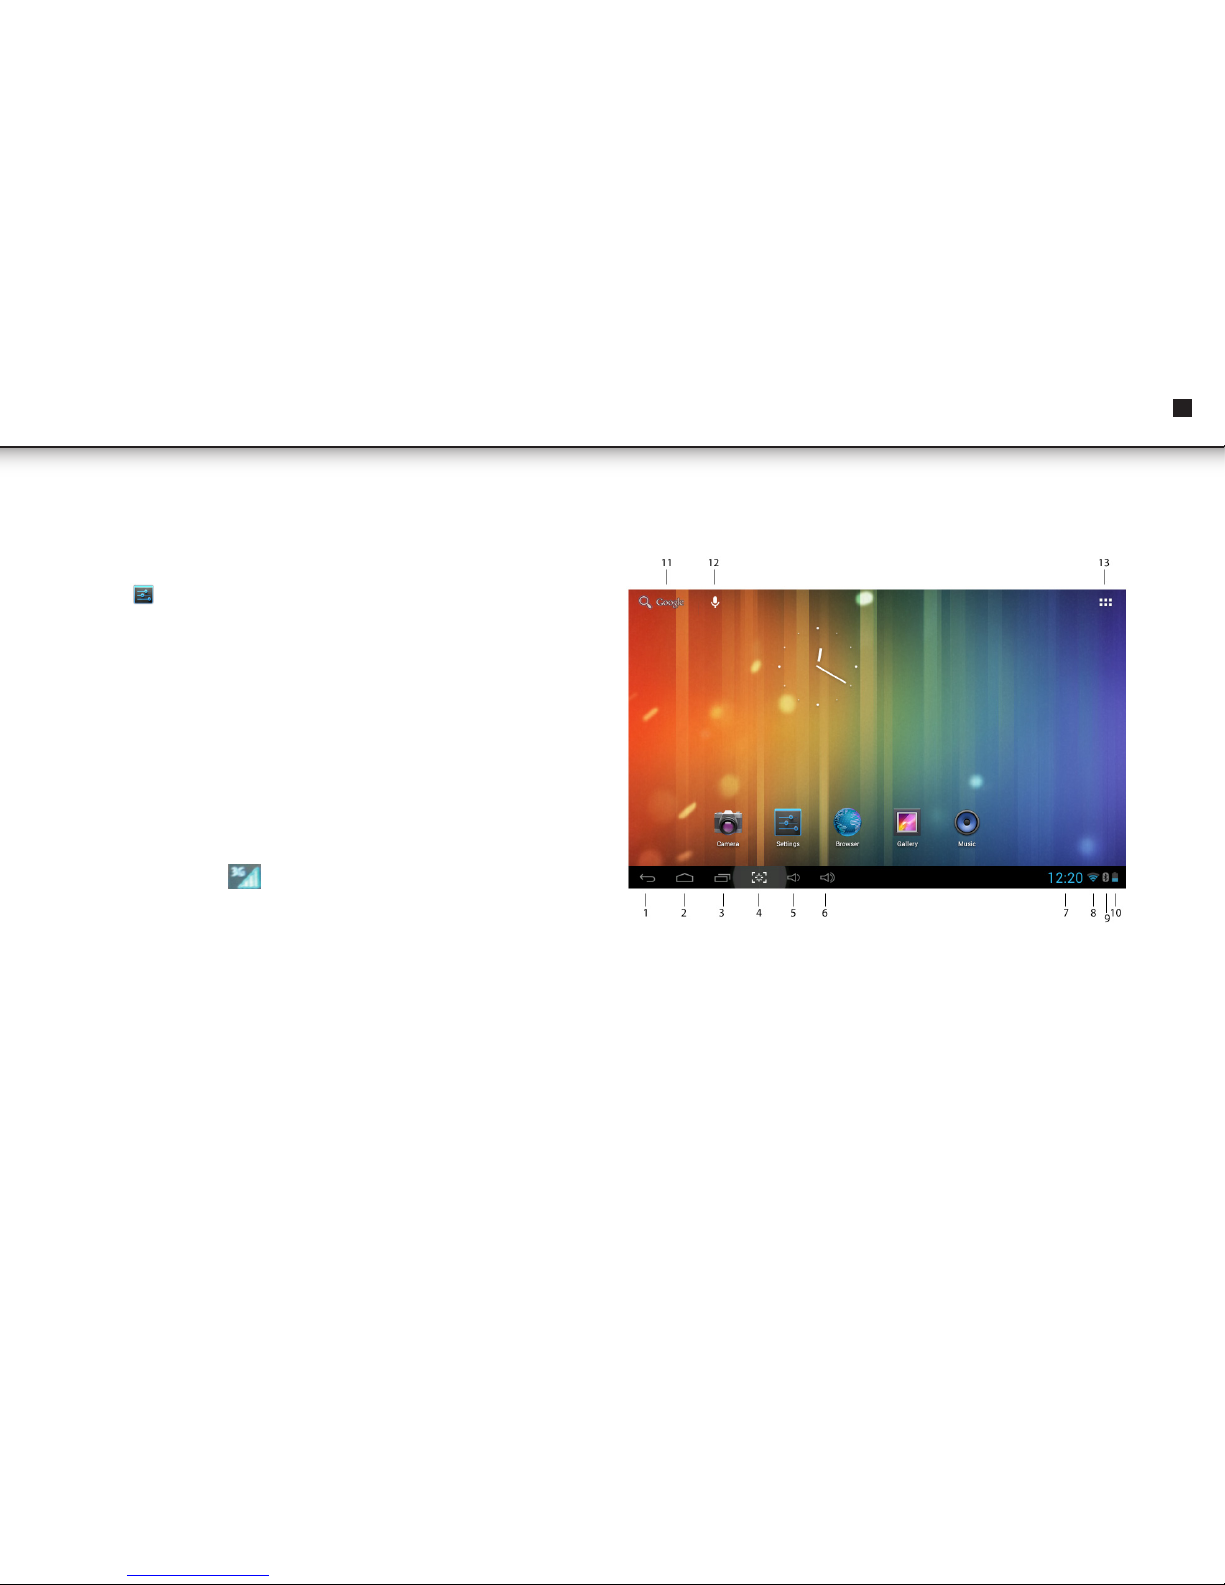
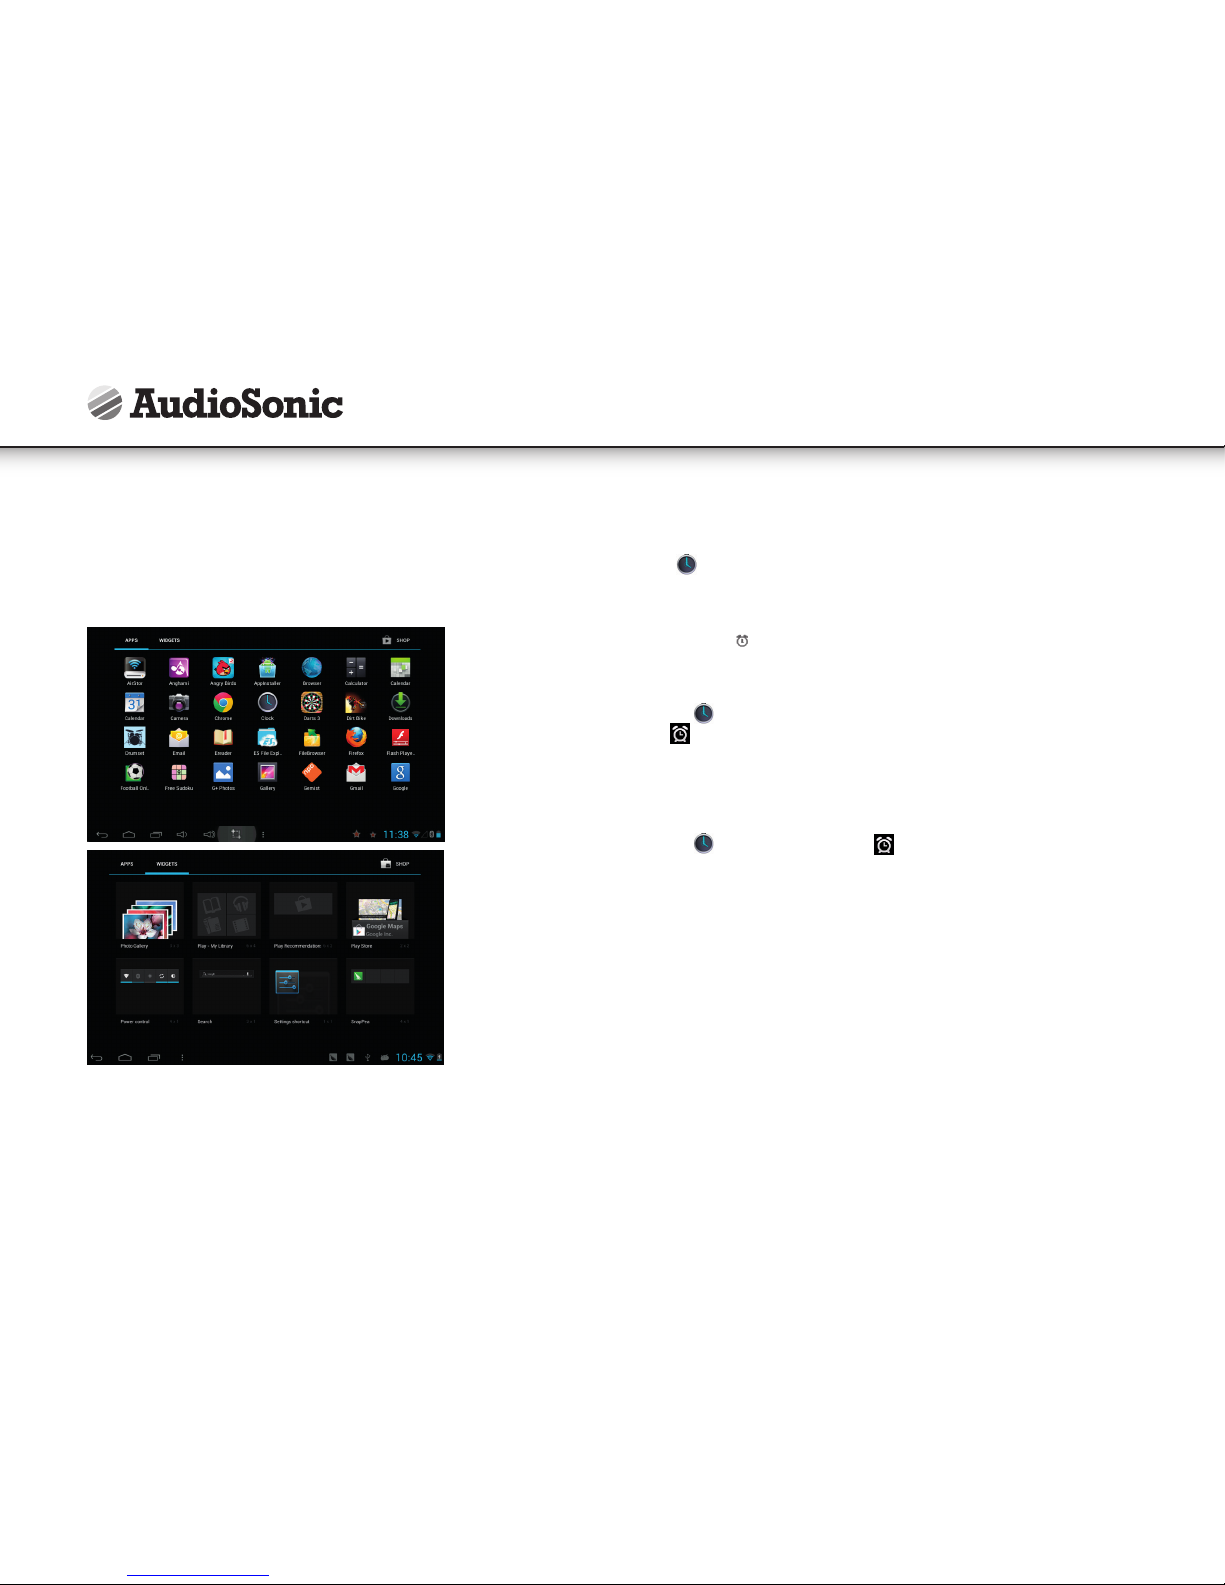
1. Tap , →Settings, →Wireless & network.
2. Select Wi-Fi to turn on.
The device automatically scans and lists all local Wi-Fi Network found.
A indicates secure networks that require login name/password to connect.
3. Tap the desired network which you want to connect, →enter the Network
Password if applicable, →tap Connect.
4. Tap to return to the Desktop screen.

5
ENInstruction Manual
Ethernet connection settings*:
1 Micro Interface connect to the OTG cable, the other side interface connect to the
Ethernet adapter and connect to the network cable.
2 Tap → Setting →More →Ethernet.
3 Check the ”Use Ethernet”.
4 Click the "Advanced Configure", you can choose to check the "dynamic allocation",
the default network automatically assigns IP addresses, check on and you can
connect Ethernet; you can also uncheck the "dynamic allocation", by manually
entering IP address, subnet mask, default gateway, DNS server, and other
information can also be connected to Ethernet.
5 After the Ethernet connection is successful, it will appear the Ethernet connection
symbol in the lower-right corner.
3G network settings*:
1 Micro Interface connect to the OTG cable, the other side interface connect to the
3G dongle and plug in the effective 3G card.
2 The system automatically senses the 3G network, while 3G network the
connection is successful, will appear in the lower-right corner of the 3G
connection symbol “ ”.
* Only available when the separately available adapter is connected (not included).
DESKTOP
1. Back icon
2. Return to Desktop from other apps
3. Recently used applications
4. Screenshot icon
5. Volume -
6. Volume +
7. Current time
8. Wifi strength indicator
9. Bluetooth connection status
10. Battery charge status
11. Google Search
12. Voice Search
13. Tap to view the applications screen

6
Instruction Manual
Widget
Touch the applications button (13) and then touch the "widgets" tab to get to the
available application widgets. From here you can select icons that can be placed as
shortcut on the home page, so you can quickly start the program.
• Tap on any application or widget icon to launch it.
• Touch, hold and then slide the icon to any position on the desktop to create a
short cut.
• Touch, hold and slide an icon onto “× ” to remove it from the desktop screen.
CLOCK
Tap the Clock application icon. You can see the time, date and set an alarm.
Alarm
• You can use your device as an alarm clock with the possibility to set multiple alarms.
• This clock icon displayed at the bottom of the screen indicates that one or more
alarms have been set and are active.
Add Alarm
1 Tap the Clock application icon.
2 Tap → Add alarm.
3 Set up your alarm as desired.
4 Tap “Turn alarm on” with“√”.
5 Tap "Done".
Delete Alarm
1 Tap the Clock application icon, →
2 Tap on the alarm you want to delete.
3 Tap "Delete alarm".
APP MARKET
The App Market has many applications that you can quickly and easily download and
install onto your tablet.
Download Applications
Follow these steps to add an existing Google Account to your device or create a new
Google Account to add to your device.
From your application screen, touch the Google Play Store app.
• If you haven't added an account to your device, you'll be asked to add a Google Account.
• Follow the instructions on the device, which will walk you through signing in to an
existing Google Account or creating a new Google Account.

7
ENInstruction Manual
• Once logged-in you can select different applications from the various tabs, pre
selected categories or search for apps by name.
• Tap on a application to see more detailed information and if desired touch the
install button after which you can follow the instructions on the device, which will
guide you through the installation process.
• Upon completion a notification will pop up on the bottom right corner and a
short cut to launch the application will be placed on your desktop.
• The installation is now completed and the application is ready for use.
BROWSER
Users can connect to the Internet through an internet browser.
Click the browser icon on the Desktop , and the Web browser will open.
CALENDAR
Tap the Calendar application icon.
When your tablet is not yet connected to a Google account, you need to add an
Exchange account in order to use the calendar. Enter the desired accounts email
address and password. Click Next and follow the prompts to complete the account
configuration. Now you can use the Calendar (Note: we generally recommend to use
a Gmail account. Google’s exchange server address is: m.google.com)
Add Event
1 On the Calendar screen, tap and hold the date on which you want to add an event.
2 Tap on new event, →Fill in the desired fields with event information.
3 Tap Done and the event will be added to your calendar.
CAMERA
Tap the Camera application icon.
1 In Camera →tap to take the picture.
2 The picture will be saved.
3 Tap the picture thumbnail in the top right corner to see an overview of your
photo’s and video’s.
4 Tap and slide from left to right to select different photo’s or video’s.
5 Press to return to the Camera.
6 Tap again to exit the Camera and return to the Desktop.
Take Videos
1 In Camera tap to switch to video mode.
2 Tap icon to start recording and tap icon again to stop recording.
3 The video will be saved automatically.
4 Tap the video thumbnail in the top right corner to see an overview of your photo’s
and video’s.
5 Tap and slide from left to right to select different photo’s or video’s.
6 When a video is selected, tap icon to playback the selected video.

8
Instruction Manual
7 Press to return to the Camera
8 Tap switch back to camera mode.
9 Tap to exit the Camera and return to the Desktop.
RECORDER
1 Tap the recorder icon.
2 Tap the record icon to start recording.
3 Tap the stop icon to stop record.
4 Tap the play button to playback the recording.
E-MAIL
• POP3, SMTP and IMAP e-mail accounts are supported.
• In order to setup your E-mail you need to have access to a network / internet
connection.
• Tap the e-mail application icon to enter the ‘E-mail’ client. The first time it’s
required to configure your e-mail using account information from the e-mail
address you want to setup.
• For your e-mail’s most current server address and settings, we advise you to
contact your e-mail service provider. They can provide you with the necessary
information to setup your email account.
FILE BROWSER
Tap the File Browser icon to enter the file Management Interface, tap【Local
Disk】or【External Storage Card】to open their root directory folders. From here
you can navigate between the different files and folders. Tap a file or folder to
selected it, when selected the following icon will appear on the right side of
the screen. When you’ve selected the desired file(s), you can tap the following icon
to Cut, Copy, Paste, Delete, Share or Rename files or folders.
MUSIC
• Audio file formats supported: mp3, aac, wma, rm, flac, Ogg
• Tap the music player icon to enter the music player. When there are no music
files loaded in the playlist, the system will automatically search for music files from
a micro SD card and then will load them automatically in the playlist.

9
ENInstruction Manual
• You can also load audio files by synchronizing the tablet with a computer or
laptop trough USB. You can also download audio files directly on the tablet from a
local network or the internet.
• Select the desired tab icon, to arrange the music files by "Artist", "album" or
"songs". Tap the desired song to start playback.
VIDEO
• Video file formats supported: MKV, WMV, MPG, MPEG, DAT, AVI, MOV, ISO, MP4,
RM, JPG
• Picture file formats supported: JPG, JPEG, BMP, GIF, PNG
Play Video
• Tap the video player icon to enter the “Video” interface. You will be prompted
to select a folder “Local Disk” or “External Storage Card” from where to play video
files from.
• Browse through the different directories until you reach the folder where you’ve
stored the compatible video files.
• Tap the desired video file to load it in the video player and start playback. You can
choose “Pause”, "Play", "Stop," "fast forward", "rewind", "progress bar" and several
other keys to control the playback progress.

10
Instruction Manual
SETTINGS
Wireless & networks • Wi-Fi
• Bluetooth
• 3G/Ethernet
• Data usage
• more
• Turn On / Off Wi-Fi.
• Turn On / Off Bluetooth.
• Only available when the separately available adapter is connected (not included).
• A current overview of internal memory usage.
• Airplane mode, VPN, Bluetooth tethering, Proxy settings.
Sound • Volumes
• Default notification
• Touch sounds
• Screen lock sounds
• To adjust the Media, Notifications and Alarm volume.
• You can select the default notification of your preference.
• Enable or disable the playback of sounds when touching the screen.
• Enable or disable the playback of sound when locking and unlocking the screen.
Display • Brightness
• Wallpaper
• Gravity calibration utility
• Sleep
• Font size
• Tap & slide the slider to adjust the screen brightness as desired.
• You can choose dynamic wallpaper, wallpaper and super clear player set wallpaper.
• Recalibrate the Gyro sensor.
• Selected the desired time of inactivity before the tablet has to enter sleep mode.
• Choose the font size.
Storage • Total space, Available space
• Unmount SD card
• Erase SD Card
• Gives you an overview of the available space on the internal storage memory and if inserted, the
external SD card.
• When the Micro SD card is inserted, tap it to safety remove it.
• Erase all data on SD card
Battery • (Dis)charging
• On battery
• Shows the actual percentage of battery power.
• Shows how long your battery has lasted and which items are responsible for draining it.
Apps • downloaded
• On SD card
• Running
• All
• Display and manage all the applications that you’ve downloaded and installed on the internal memory.
• Display and manage all the applications that you’ve downloaded and installed on an external SD card.
• Displays all the applications that are currently active.
• Display and manage all the applications that you’ve downloaded and installed.
Location services • Google’s location service
• Location & Google Search
• Allow Google to collect anonymous location data.
• Allow Google to use your location to improve your search results.

11
ENInstruction Manual
Security • Screen lock
• Owner info
• Make password visible
• Device administrators
• Unknown sources
• Trusted credentials
• Install from SD card
• Select if you want the lock screen to use a Pattern lock, PIN code, Face lock or no lock at all.
• Show owner info on lock screen,
• Choose to make your passwords visible or not.
• View or deactivate device administrators.
• Allow installation of apps from unknown sources.
• Display trusted CA certificates.
• Install certificates from SD card.
Language & Input • Language
• Spell checker
• Personal dictionary
• Android keyboard
• Voice Search
• Text-to-speech output
• Pointer speed
• Select your desired language.
• Enable or disable the spelling checker.
• You can add words, that may not be included in the standard dictionary, into a personal dictionary.
• Onscreen keyboard settings
• Set up the desired language for voice searches.
• Select the desired Text to speech engine.
• Adjust the pointer speed.
Back up and reset • Back up my data
• Factory data reset
• Select to automatic or manual back up your data.
• Select to erase ALL DATA and restore the device to its initial factory state.
Google • Accounts • View the current registered Google account.
Add account • Add an account • Add a second or several other accounts to your device.
Date & time • Automatic Date & time
• Set date
• Select time zone
• Set time
• Use 24-hour format
• Select date format
• Use the by the network provided time.
• Set the date.
• Select the time zone.
• Set the time.
• Choose to use between the 24-hour or 12-hour format.
• You can select the date format.

12
Instruction Manual
Accessibility • Date & time
• Large Text
• Auto-rotate screen
• Speak passwords
• Text-to-speech output
• Touch & hold delay
• Enhance web accessibility
• Enable or disable talk back function.
• Enable or disable large text.
• Enable or disable auto rotation of the display.
• Enable or disable spoken passwords.
• Select the desired Text to speech engine.
• Set the desired touch and hold delay.
• Enable or disable apps to install scripts from Google to make their web content more accessible.
Developer Options • On/Off • Only enable development options if you are an experienced user and know what you are doing.
About tablet • System Update
• Status
• Legal information
• Model number
• Android version
• Kernel version
• Build number
• Search for and/or update your device with the latest firmware.
• Shows you the actual device status.
• Shows the open source legal information.
• Displays your devices model number.
• Displays the current Android version.
• Displays the current kernel version.
• Displays the current firmware buildnumber

13
ENInstruction Manual
FREQUENTLY ASKED QUESTIONS
Android
Q: What Android OS version is on my device?
A: 4.1.1
Basic Device Functionary
Q: Do I have to charge the battery before use?
A: You should charge the battery for at least 4 hours, but you can use the device
while it’s charging. Use the include power adapter or an USB cable, that’s
connected to a power supply, to charge
E-mail
Q: Can I use any of my personal e-mail addresses to send/receive e-mail?
A: The device supports POP3, SMTP and IMAP accounts. Some free e-mail accounts
are not supported on mobile devices. Check with your e-mail provider to see if
you account is supported.
Media Cards
Q: Which media cards are compatible with my device?
A: Micro SD cards up to size of 32GB.
Music
Q: How do I add music files to my device?
A: Copy the music files from your computer onto a SD card or USB storage device,
and then use the File Browser application to copy the files onto the device.
Photos
Q: How do I add photo files to my device?
A: Copy the photo files from your computer onto a SD card or USB storage device,
and then use the File Browser application to copy the files onto the device.
Wi-Fi
Q: Do I need a Wi-Fi adapter to connect to the Internet?
A: No. The Wi-Fi adapter is built-in to the device.
BATTERY MANAGEMENT
The battery is not fully charged out of the box, so it is recommended that you charge
the battery for at least 4 hours before you start to use the device for the first time.
The rechargeable battery is designed and manufactured to be recharged frequently.
As with all batteries, the capacity of the battery reduces each time it is charged/
depleted. However, you can try to prolong the battery’s lifetime by following the
suggestions below:
• Use your tablet frequently, at least once a week.
• Charge the battery regularly and fully.
• Never leave the battery fully discharged for a long period of time.
• Always keep the device and the battery away from heat.
• Don’t place the device in a hot environment. The highest operating temperature
is 37°C.
• Only use the product below the altitude of 2000 meters.
• Do not use the product in tropical conditions.
IMPORTANT SAFETY PRECAUTIONS
Always follow these basic safety precautions when using your tablet. This
reduces the risk of fire, electric shock and injury.
• Do not expose this product to rain or moisture.
• Keep the device out of direct sunlight and heat sources.
• Protect the power cord. Route power cords so that they are not likely to be
stepped on or pinched by items placed on or against them. Pay particular
attention to the point where the cord attaches to the device.
• Only use the AC adapter included with the device. Using any other power adapter
voids your warranty.
• Do not remove the cover. There are no user-serviceable parts inside.
Clean your device
Treat the screen gently. To clean fingerprints or dust from the screen, we recommend
using a soft, non-abrasive cloth such as a camera lens cloth.

14
UITERLIJK EN LOCATIE VAN DE BEDIENINGSELEMENTEN
1. Front-camera
2. Aan/Uit-knop
3. Hoofdtelefoonaansluiting
4. Micro USB aansluiting
5. DC-aansluiting
6. Micro SD-kaartslot
7. HDMI-aansluiting
8. Luidspreker
9. Reset-knop
Gebruiksaanwijzing

15
NL
GEBRUIK AAN-/UITKNOP
• Inschakelen: Druk op de aan-/uitknop en houd hem gedurende 3 seconden ingedrukt.
• Uitschakelen: Druk op de aan-/uitknop en houd hem gedurende 3 seconden
ingedrukt, →tap Uitschakelen →tap OK.
• Schermblokkering en deblokkering: Druk kort op de aan-/uitknop om het scherm
te blokkeren en druk nogmaals om het scherm te deblokkeren.
• Gedwongen uitschakelen: Als het toestel niet meer reageert, druk dan op de aan-/
uitknop en houd deze gedurende 7 seconden ingedrukt. (Opmerking: Als het niet
noodzakelijk is, bevelen wij niet aan om Gedwongen uitschakelen te gebruiken.
U dient de stappen zoals vermeld bij Uitschakelen te volgen om het toestel uit te
schakelen. (Gedwongen uitschakelen kan leiden tot onvoorspelbare systeemfouten)
NAVIGATIE VAN HET TOUCHSCREEN
Met behulp van het touchscreen kunt u snel en gemakkelijk navigeren.
Voor het gebruik van het touchscreen kunt u de onderstaande werkwijze door de
hele gebruiksaanwijzing toepassen.
• Tik: Tik kort op een onderdeel op het scherm.
• Vegen met een vinger: Raak het scherm aan, veeg uw vinger over het scherm en laat
het scherm weer los.
• Aangeraakt houden: Raak het scherm aan, houd uw vinger ongeveer 2 seconden op
het scherm tot er meer opties worden weergegeven.
• Plaats geen voorwerpen op het oppervlak van het aanraakscherm, om krassen of
beschadiging te voorkomen.
GEBRUIK VAN DE MICRO SD-KAART
• Het toestel ondersteunt een micro SD-kaart van maximaal 32GB.
• Steek de kaart in de sleuf voor de micro SD-kaart totdat deze vast klikt.
• Verwijderen van de micro SD-kaart: Sluit alle toepassingen of bestanden die vanaf
de SD-kaart zijn geopend.
Tik → Instellingen →Opslagruimte →SD-kaart ontkoppelen. Druk lichtje op
de SD-kaart; de kaart wordt gedeeltelijk uitgeworpen, waarna u de SD-kaart uit het
toestel kunt trekken.
• Het is niet goed om de kaart snel achter elkaar herhaaldelijk te plaatsen en te
verwijderen, omdat dit de kaart kan beschadigen.
• Om eventuele incompatibiliteit te voorkomen, bevelen wij aan om alleen
geheugenkaarten van gerenommeerde merken te gebruiken.
AAN DE SLAG
Het apparaat opladen
• U kunt de accu met behulp van de meegeleverde adapter of met behulp van de
USB aansluiting opladen.
• U kunt het toestel ook opladen met een USB-kabel die is aangesloten op een
voedingsbron.
• U kunt het apparaat gebruiken terwijl de accu op wordt geladen. Hierdoor zal de
laadtijd wel toenemen.
• Steek de voedingsadapter in een stopcontact en sluit deze vervolgens aan op het
apparaat om de accu op te laden. (Het apparaat is na ongeveer 5 uur volledig opgeladen).
Om het apparaat in te schakelen
Druk op de Aan/Uit-knop en houd deze 3 seconden ingedrukt.
Wi-Fi-netwerk instellen
Aangezien veel functies een Wi-Fi-verbinding vereisen, raden wij u aan om nu uw
WI-FI verbinding in te stellen.
1. Tik op de icoon →Instellingen →Draadloos & Netwerk.
2. Selecteer Wi-Fi “aan” om WI-FI in te schakelen. Het apparaat scant automatisch
en geeft vervolgens alle gevonden Wi-Fi-netwerken weer.
Een betekend dat het WI-FI netwerk beveiligd is en er een naam/wachtwoord
vereist is om verbinding te maken.
3. Tik op het netwerk waarmee u wilt verbinden en voer, indien van toepassing, het
netwerkwachtwoord in. Tik vervolgens op “Verbinden” om een draadloze netwerk
verbinding tot stand te brengen.
4. Tik op om naar het bureaublad terug te keren.
Gebruiksaanwijzing

16
Gebruiksaanwijzing
Instellingen Ethernetaansluiting*:
1 Sluit een kant van de USB-kabel aan op de micro USB aansluiting van de tablet en
sluit de andere kant aan op de ethernet adapter.
2 Tik →Instellingen → Draadloos en Netwerken →Ethernet.
3 Selecteer Ethernet “aan” om de ethernet adapter in te schakelen.
4 Tik op “Configure Ethernet device”.
Als uw netwerk DHCP ondersteund selecteert u “DHCP” als verbindingstype, waarna
het netwerk automatisch een IP-adres aan het toestel toe zal kennen. Als uw netwerk
geen DHCP ondersteunt kiest u Statisch IP als verbindingstype, waarna u handmatig een
IP-adres, subnetmasker, standaard gateway en DNS-server in dient te voeren om een
netwerkverbinding tot stand te brengen.
5 Als een ethernet verbinding tot stand is gebracht, zal het ethernet
verbindingssymbool rechts onder in de hoek verschijnen.
3G Netwerkinstellingen*:
1 Sluit een kant van de USB kabel aan op de micro USB aansluiting van het toestel
en sluit de andere zijde aan op de 3G-dongle.
2 Het systeem detecteert automatisch het 3G netwerk. Als er een verbinding met
het 3G netwerk tot stand is gebracht, verschijnt het symbool voor de 3G
aansluiting “ “ in de hoek rechtsonder.
* Alleen beschikbaar als de apart verkrijgbare adapter is aangesloten (niet inbegrepen).
BUREAUBLAD
1. Terug-pictogram
2. Terug naar bureaublad vanaf
andere apps
3. Recentelijk gebruikte toepassingen
4. Schermafdrukpictogram
5. Volume -
6. Volume +
7. Huidige tijd
8. WiFi sterkte-indicator
9. Bluetooth verbindingstatus
10. Oplaadstatus van de batterij
11. Google zoekmachine
12. Spraakgestuurd zoeken
13. Opent het toepassingenscherm

17
NLGebruiksaanwijzing
Widget
Tik op de knop Toepassingen (13) en tik dan het tabblad "widgets" om naar de
beschikbare widgets te gaan. Hier kunt u programma’s selecteren die als snelkoppeling
op het bureaublad geplaatst kunnen worden, zodat u het programma snel kunt starten.
• Tik op iedere willekeurig icoon van een app of widget om hem te starten.
• Raak een icoon aan, houd hem vast en sleep deze naar iedere gewenste positie op
het bureaublad om een snelkoppeling te creëren.
• Als u een icoon van het bureaublad wilt verwijderen; raak hem aan, houd hem
vast en sleep deze vervolgens naar de “×” aan de bovenkant van het bureaublad.
KLOK
Tik op het icoon voor de Klok app . U kunt de tijd en datum zien en een alarm
instellen.
Alarm
• U kunt uw toestel gebruiken als wekker met de mogelijkheid om meerdere
alarmen in te stellen.
• Het Klok-icoon , dat onderaan het scherm wordt weergegeven, geeft aan dat er
een of meer alarmen zijn ingesteld en dat ze actief zijn.
Alarm toevoegen
1 Tik op het icoon voor de Klok app .
2 Tik op → Alarm instellen om een nieuw alarm in te stellen of een bestaand
alarm te wijzigen.
3 Stel uw alarm naar wens in.
4 Tik op “Alarm inschakelen” met “√”.
5 Tik Gereed.
Verwijder alarm
1 Tik op het icoon voor de Klok app →
2 Tik op het alarm dat u wilt verwijderen.
3 Tik op Verwijder alarm.
APP MARKT
De App markt kent veel toepassingen die u snel en eenvoudig kunt downloaden en
op uw tablet kunt installeren.
Toepassingen downloaden
Ga als volgt te werk om een bestaand Google-account aan uw apparaat toe te voe-
gen of maak een nieuw Google-account aan om aan uw apparaat toe te voegen.
Tik op de“ Google Play Store ”-app vanuit uw toepassingenscherm.
• Als u geen account aan uw apparaat hebt toegevoegd, zal u worden gevraagd om

18
Gebruiksaanwijzing
een Google-account toe te voegen.
• Volg de instructies op het apparaat, die u door het aanmelden van een bestaand
Google-account of het aanmaken van een nieuw Google-account zullen helpen.
• Eenmaal ingelogd kunt u tussen de verschillende tabbladen en categorieën Apps
selecteren of met behulp van de zoekfunctie specifieke Apps zoeken op naam.
• Tik op een App om meer gedetailleerde informatie te zien en, indien gewenst, op
de installatieknop om tot het downloaden en installeren van de App over te gaan.
De instructies op het apparaat zullen u verder door het installatieproces helpen.
• Na voltooiing zal in de rechter benedenhoek een melding verschijnen en een
snelkoppeling om de toepassing te lanceren zal op uw bureaublad worden
geplaatst.
• De installatie is nu voltooid en de toepassing is klaar voor gebruik.
BROWSER
Gebruikers kunnen met behulp van de Internet browser toegang krijgen tot het
internet. Tik op het browser icoon op het bureaublad om de internet browser te
openen.
KALENDER
Tik op het icoon voor de Kalender app.
Als uw tablet niet is gekoppeld aan een Google account, dient u een (Google)
Exchange account toe te voegen om de kalender te kunnen gebruiken. Voer het
emailadres en wachtwoord in van het betreffende account. Tik op Volgende en
volg vervolgens de instructies op het scherm om de configuratie van het account
te voltooien. U kunt de Kalender nu gebruiken (Opmerking: wij bevelen aan om
een Gmail account te gebruiken. Het adres van de exchange server van Google is:
m.google.com)
Evenement toevoegen
1 Houd uw vinger in het Kalender scherm op de datum waarop u een evenement
wilt toevoegen.
2 Tik op nieuw evenement →en vul de gewenste informatie in in de velden.
3 Tik Gereed en het evenement wordt aan uw kalender toegevoegd.
CAMERA
Tik op het icoon voor de Camera app .
1 Tik in Camera op de →icoon om een foto te maken.
2 De foto wordt automatisch opgeslagen.
3 Tik op de thumbnail in de rechter bovenhoek, voor een overzicht van uw foto's en video's.
4 Tik en veeg naar links of naar rechts om tussen de verschillende foto’s en-/of
video's te bladeren.
5 Tik om terug te keren naar de Camera.
6 Tik nogmaals om de Camera te verlaten en terug te keren naar het
bureaublad.
Video's maken
1 Tik in Camera op de icoon om over te schakelen naar de videostand.
2 Tik het icoon om de opname te starten en tik nogmaals op het icoon om
de opname te stoppen.

19
Gebruiksaanwijzing NL
3 De video wordt automatisch opgeslagen.
4 Tik op de thumbnail in de rechter bovenhoek om een overzicht te zien van uw
video’s en foto’s.
5 Tik en veeg naar links of naar rechts om tussen de verschillende foto’s en-/of
video's te bladeren.
6 Wanneer een video is geselecteerd, tik op het icoon om de geselecteerde
video af te spelen.
7 Tik op om terug te keren naar de Camera
8 Tik op om terug te gaan naar de camerastand.
9 Tik op om de Camera te verlaten en terug te keren naar het bureaublad.
RECORDER
1 Tik op het icoon voor de recorder .
2 Tik op het icoon voor de recorder om de opname te starten.
3 Tik op het icoon stop om de opname te stoppen.
4 Tik op de afspeelknop om de opname af te spelen.
E-MAIL
• POP3, SMTP en IMAP e-mail accounts worden ondersteund.
• Om uw e-mail in te kunnen stellen dient u toegang te hebben tot een netwerk-/
Internetverbinding.
• Tik op het icoon voor de e-mail app om naar de 'E-mailclient' te gaan. De
eerste keer dient u uw e-mail te configureren met de accountinformatie van het
e-mailadres dat u wilt instellen.
• Voor de actuele account informatie van uw e-mailadres, adviseren wij u om
contact op te nemen met uw email provider. Deze kan u van alle benodigde
informatie voorzien om uw e-mailaccount succesvol in te stellen.
BESTANDSVERKENNER
Tik op het icoon voor de bestandsverkenner om naar de interface voor
bestandsbeheer te gaan, tik【Lokale schijf】of【Externe opslagkaart】om de op
de betreffende locatie opgeslagen data weer te geven. Vervolgens kunt u navigeren
tussen de verschillende bestanden en mappen op het interne en, indien er een micro
SD kaart is geplaatst, het externe geheugen. Selecteer een bestand of map door erop
te tikken. Rechts van de geselecteerde bestanden en-/of mappen verschijnt het icoon
. Na het selecteren van de gewenste items kunt u op het icoon tikken om
de betreffende bestanden en-/of mappen te knippen, kopiëren, plakken, verwijderen,
delen of hernoemen.
MUZIEK
• Ondersteunde bestandsformaten voor audio: mp3, aac, wma, rm, flac, Ogg
• Tik op het icoon om naar de muziekspeler te gaan. Als zich geen muziekbestanden
in de afspeellijst bevinden zal er automatisch naar muziekbestanden worden gezocht op
de micro SD kaart en zullen de op deze kaart aanwezig muziekbestanden automatisch
worden opgenomen in de afspeellijst.

20
Gebruiksaanwijzing
• Daarnaast kunt u muziekbestanden laden door de tablet via USB te synchroniseren
met een computer of laptop. Tevens kunt u audio bestanden downloaden vanaf
een lokaal netwerk of vanaf het internet.
• Selecteer het gewenste tabblad om de muziekbestanden te sorteren op “artiest”,
“album” of “nummer”. Tik op het gewenste nummer om het afspelen te starten.
VIDEO
• Ondersteunde bestandsformaten voor video: MKV, WMV, MPG, MPEG, DAT, AVI,
MOV, ISO, MP4, RM, JPG
• Ondersteunde bestandsformaten voor afbeeldingen: JPG, JPEG, BMP, GIF, PNG
Video afspelen
• Tik op het icoon om naar de “Video” speler te gaan. Vervolgens wordt u
gevraagd om een map “Lokale schijf” of “Externe opslagkaart” te kiezen, waarvan
de videobestanden moeten worden afgespeeld.
• Blader door de verschillende mappen totdat u de map bereikt waar u de
ondersteunde videobestanden hebt opgeslagen.
• Tik op het gewenste videobestand om deze in de speler te laden en het afspelen
te starten. U kunt kiezen uit “Pauze”, “Afspelen", "Stop," “snel vooruit", “achteruit",
“voortgangsbalk" en verschillende andere toetsen om het afspelen te bedienen.
Other manuals for TL-3470
1
Table of contents
Languages:
Other AudioSonic Tablet manuals