AudioSonic TL-3470 User manual

EN Quick start guide
NL Beknopte handleiding
FR Guide de démarrage rapide
DE Anleitung zum Schnellstart
ES Guía de inicio rápido
PT Manual de Início rápido
PL Instrukcja szybkiego uruchamiania
IT Guida rapida all’utilizzo
SV Snabbstartguide
CS Rychlý návod k obsluze
SK Stručná príručka
Tablet 7 inch
D u a l C o r e - 8 G B TL-3470
Download the full instruction manual from:
www.service.tristar.eu

2

3
ENQuick start guide
OUTLOOK DESCRIPTION
1. Front-facing Camera
2. Power button
3. Headphone connector
4. Mini USB connector
5. DC connection
6. Micro SD Card slot
7. HDMI connection
8. Speaker
9. Reset button

4
Quick start guide
GETTING STARTED
Charging the device
• You can charge the battery using the included adapter.
• You can use the device while the battery is charging, although the charging time
is longer when operating and charging at the same time.
• Plug the power adapter into an electrical wall outlet, and then connect it to the
device to charge the battery. ( Fully charged in about 5 hours).
Turn the device on
Press the power button and hold for 3 seconds.
Wi-Fi Network Setup
Since many features require a Wi-Fi connection, we recommend you set up your
Wi-Fi network now.
1. Tap , →Settings, →Wireless & network.
2. Select Wi-Fi to turn on.
The device automatically scans and lists all local Wi-Fi Network found.
A indicates secure networks that require login name/password to connect.
3. Tap the desired network which you want to connect, →enter the Network
Password if applicable, →tap Connect.
4. Tap to return to the Desktop screen.
DESKTOP
1. Back icon
2. Return to Desktop from other apps
3. Recently used applications
4. Screenshot icon
5. Volume -
6. Volume +
7. Current time
8. Wifi strength indicator
9. Bluetooth connection status
10. Battery charge status
11. Google Search
12. Voice Search
13. Tap to view the applications screen

5
ENQuick start guide
APP MARKET
The App Market has many applications that you can quickly and easily download and
install onto your Tablet.
Download Applications
Follow these steps to add an existing Google Account to your device or create a new
Google Account to add to your device.
From your application screen, touch the Google Play Store app.
• If you haven't added an account to your device, you'll be asked to add a Google
Account
• Follow the instructions on the device, which will walk you through signing in to an
existing Google Account or creating a new Google Account.
• Once logged-in you can select different applications from the various tabs, pre
selected categories or search for apps by name.
• Tap on a application to see more detailed information and if desired touch the
install button after which you can follow the instructions on the device, which will
guide you through the installation process.
• Upon completion a notification will pop up on the bottom right corner and a
short cut to launch the Application will be placed on your desktop.
• The installation is now completed and the application is ready for use.
FREQUENTLY ASKED QUESTIONS
Q. My internal memory is full.
A. For fast and easy access the Android operating system stores the apps you
download from the Google Play store in its internal flash memory. Since the capacity
of the internal memory is limited to 1Gb, it can easily fill up if you download too
many or too large apps.
You can clean up the internal flash memory by moving Apps to the storage memory.
To start this procedure tap settings and, once in the settings menu, select the Apps
tab. Once you’ve done this the below screen with an overview of your downloaded
and installed Apps will be shown:
As you can see the Angry birds App uses up 50,45 Mb of storage capacity. By tapping
on the Angry Birds icon you move to the following screen:
As shown in the example above, a tab mentioning “Move to SD card” is available.
By tapping this button you can move the Angry Birds App from the internal flash
memory to the storage memory, thus clearing space on the internal flash memory.
As you can see in the example below the Angry Birds App now only uses 3,66 Mb of
space on the internal flash memory, instead of the 50,45 Mb from before.

6
You can repeat this procedure until you’ve freed up enough space in the internal
flash memory.
IMPORTANT SAFETY PRECAUTIONS
Always follow these basic safety precautions when using your Tablet. This reduces
the risk of fire, electric shock, and injury.
• Do not expose this product to rain or moisture.
• Keep the device out of direct sunlight and heat sources.
• Protect the power cord. Route power cords so that they are not likely to be walked
on or pinched by items placed on or against them. Pay particular attention to the
point where the cord attaches to the device.
• Only use the AC adapter included with the device. Using any other power adapter
voids your warranty.
• Do not remove the cover. There are no user-serviceable parts inside.
Clean your device
Treat the screen gently. To clean fingerprints or dust from the screen, we recommend
using a soft, non-abrasive cloth such as a camera lens cloth
Quick start guide

7
NL
UITERLIJK EN LOCATIE VAN DE BEDIENINGSELEMENTEN
1. Front-camera
2. Aan/Uit-knop
3. Hoofdtelefoonaansluiting
4. Mini USB-aansluiting
5. DC-aansluiting
6. Micro SD-kaartsleuf
7. HDMI-aansluiting
8. Luidspreker
9. Reset-knop
Beknopte handleiding

8
Beknopte handleiding
AAN DE SLAG
Het apparaat opladen
• U kunt de batterij met behulp van de meegeleverde adapter of met behulp van de
USB aansluiting opladen.
• U kunt het apparaat gebruiken terwijl de batterij wordt opgeladen, hoewel de
oplaadtijd langer zal worden wanneer het apparaat op hetzelfde moment wordt
gebruikt en opgeladen.
• Steek de voedingsadapter in een elektrisch stopcontact en sluit het vervolgens op
het apparaat aan om de accu op te laden. (Volledig opgeladen in ongeveer 5 uur).
Om het apparaat in te schakelen
Druk op en houd de Aan/Uit-knop voor 3 seconden ingedrukt
Taal veranderen
De standaard taal van uw Tablet is Engels. U kunt de taal wijzigen door op het
bureaublad op Settings te tikken. Selecteer aan de linker kant van het settings
menu vervolgens de optie Language & input. Tik vervolgens in het rechts geopende
menu op de bovenste optie Language om het menu met alle beschikbare talen te
openen. Vervolgens kunt u de door u gewenste taal selecteren.
Wi-Fi-netwerk instellen
Aangezien veel functies een Wi-Fi-verbinding vereisen, raden wij u aan om nu uw
WI-FI verbinding in te stellen.
1. Tik op →Instellingen →Draadloos & Netwerk.
2. Selecteer “Wi-Fi” om in te schakelen. Het apparaat scant automatisch en geeft alle
gevonden lokale Wi-Fi-netwerken weer.
Een geeft veilige netwerken aan waarvoor een naam/wachtwoord nodig is om
verbinding te maken.
3. Tik op het gewenste netwerk waarmee wilt u verbinden, voer het
netwerkwachtwoord in indien van toepassing en tik op “Verbinden”.
4. Tik op om naar het bureaublad terug te keren.
BUREAUBLAD
1. Terug-pictogram
2. Terug naar bureaublad vanaf
andere apps
3. Recentelijk gebruikte toepassingen
4. Schermafdrukpictogram
5. Volume -
6. Volume +
7. Huidige tijd
8. WiFi sterkte-indicator
9. Bluetooth verbindingstatus
10. Oplaadstatus van de batterij
11. Google zoekmachine
12. Spraakgestuurd zoeken
13. Opent het toepassingenscherm

9
APP MARKT
De App markt kent veel toepassingen die u snel en eenvoudig kunt downloaden en
op uw tablet kunt installeren.
Toepassingen downloaden
Ga als volgt te werk om een bestaand Google-account aan uw apparaat toe te voe-
gen of maak een nieuw Google-account aan om aan uw apparaat toe te voegen.
Tik op de“ Google Play Store ”-app vanuit uw toepassingenscherm.
• Als u geen account aan uw apparaat hebt toegevoegd, zal u worden gevraagd om
een Google-account toe te voegen.
• Volg de instructies op het apparaat, die u door het aanmelden van een bestaand
Google-account of het aanmaken van een nieuw Google-account zullen helpen.
• Eenmaal ingelogd kunt u tussen de verschillende tabbladen en categorieën Apps
selecteren of met behulp van de zoekfunctie specifieke Apps zoeken op naam.
• Tik op een App om meer gedetailleerde informatie te zien en, indien gewenst, op
de installatieknop om tot het downloaden en installeren van de App over te gaan.
De instructies op het apparaat zullen u verder door het installatieproces gidsen.
• Na voltooiing zal in de rechter benedenhoek een melding verschijnen en een
snelkoppeling om de toepassing te lanceren zal op uw bureaublad worden geplaatst.
• De installatie is nu voltooid en de toepassing is klaar voor gebruik.
VEEL GESTELDE VRAGEN (FAQ)
V: Mijn interne geheugen is vol.
A: Voor een snelle en gemakkelijke toegang slaat het Android besturingssysteem de
apps die u downloadt van de Google Play store op in het interne flash-geheugen.
Doordat de capaciteit van het interne geheugen is beperkt tot 1 Gb, kan het gemak-
kelijk vol raken indien u te veel of te grote apps downloadt.
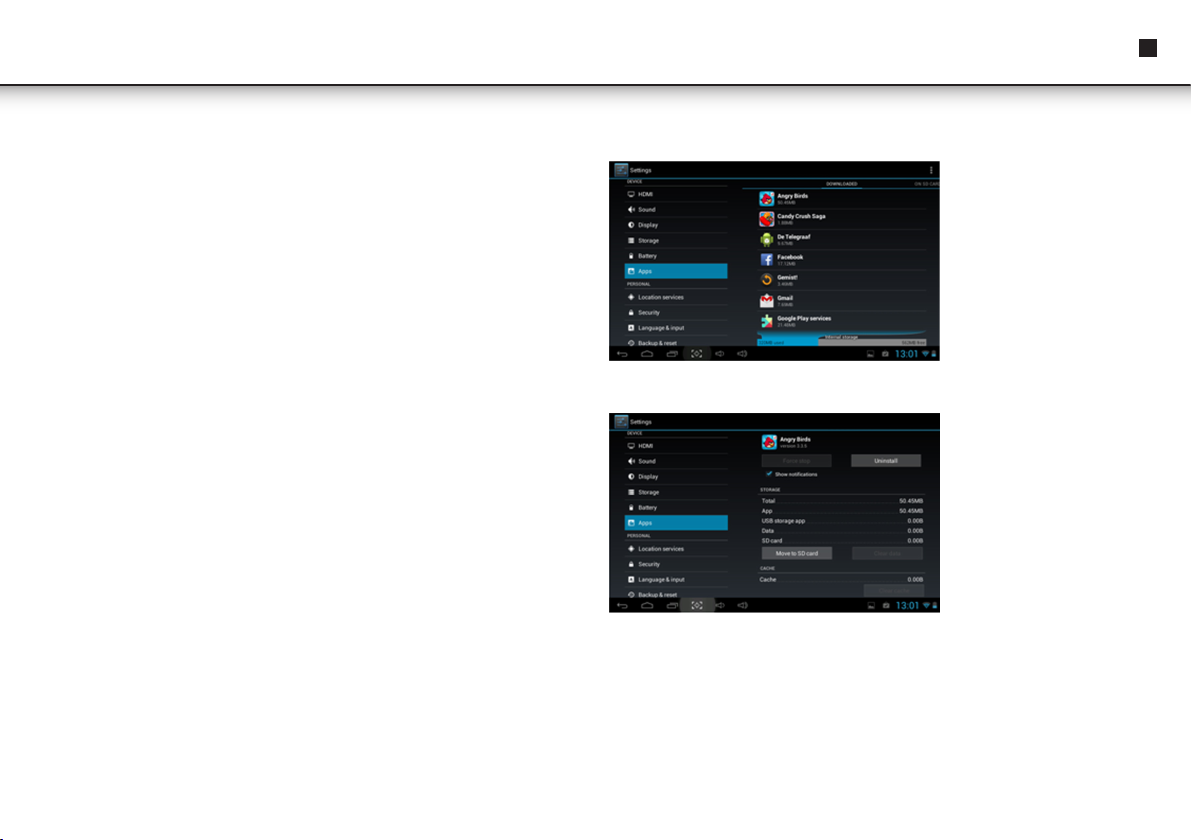
U kunt het interne flash-geheugen opschonen door apps naar het opslaggeheugen
verplaatsen. Tik voor het starten van deze procedure op“Instellingen”en selecteer in
het menu“Instellingen”het tabblad“Apps”. Hierna ziet u onderstaand scherm met een
overzicht van uw gedownloade en geïnstalleerde apps:
De Angry Birds app gebruikt, zoals u kunt zien, 50,45 Mb aan opslagcapaciteit. Door
op het Angry Birds pictogram te tikken gaat u naar het volgende scherm:
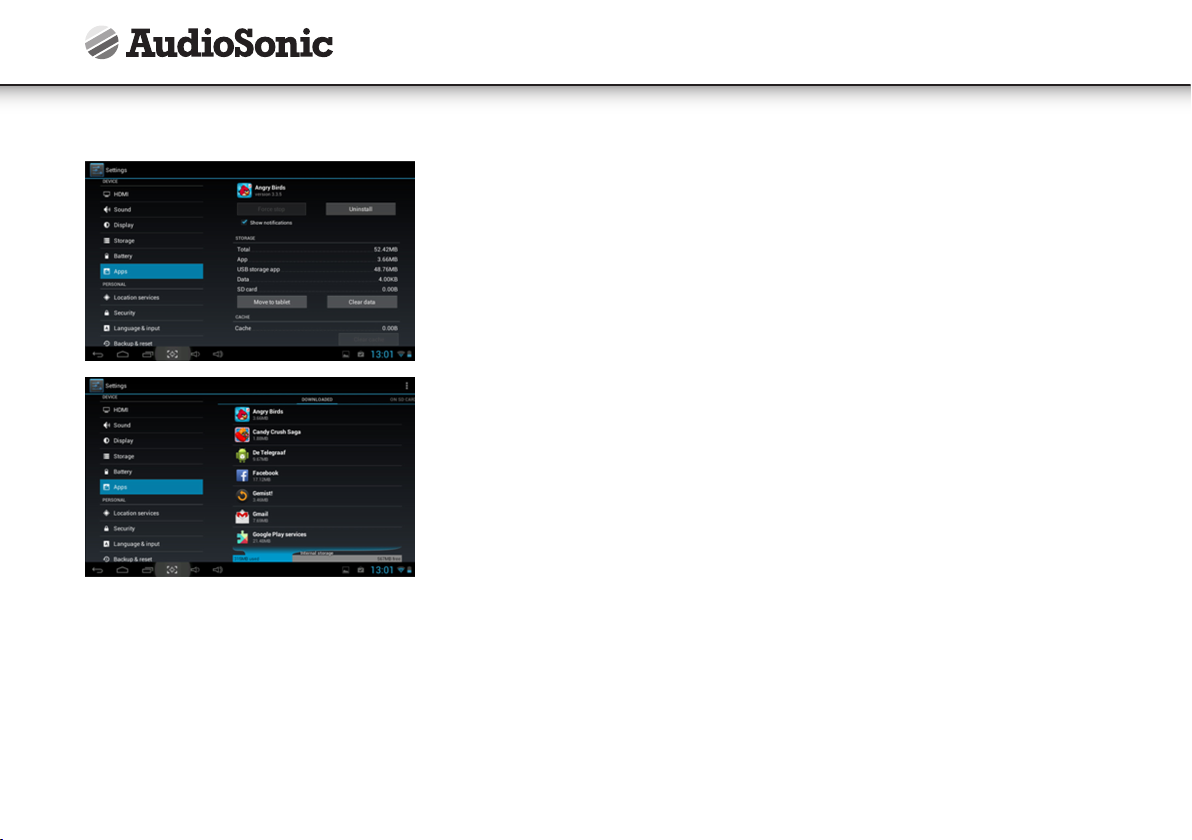
Er is, zoals u kunt zien in bovenstaand voorbeeld, een tabblad met de vermelding
“Verplaatsen naar SD-kaart”beschikbaar. Door op deze knop te tikken kunt u de An-
gry Birds app van het interne flash-geheugen verplaatsen naar het opslaggeheugen,
waarmee u vrije ruimte creëert op het interne flash-geheugen. De Angry Birds app
gebruikt, zoals u kunt zien in onderstaand voorbeeld, nu slechts 3,66 Mb (in plaats
van 50,45 Mb) aan ruimte op het interne flash-geheugen.
NLBeknopte handleiding

10
U kunt deze procedure herhalen totdat u genoeg ruimte heeft vrijgemaakt in het
interne flash-geheugen.
BELANGRIJKE VEILIGHEIDSMAATREGELEN
Volg altijd deze basis veiligheidsmaatregelen op bij het gebruik van uw tablet. Dit
vermindert het risico van brand, elektrische schokken en letsel.
• Stel het product niet aan regen of vocht bloot.
• Houd het apparaat uit de buurt van direct zonlicht en warmtebronnen.
• Bescherm het netsnoer. Leg netsnoeren zodanig dat er niet overheen kan worden
gelopen en niet door voorwerpen worden afgekneld die er op of tegenaan liggen.
Besteed bijzondere aandacht aan het punt waar het snoer aan het apparaat is
gekoppeld.
• Gebruik alleen de AC-adapter meegeleverd met het apparaat. Het gebruik van een
andere voedingsadapter maakt uw garantie ongeldig.
• Verwijder niet de afdekking. Er zijn geen door de gebruiker te repareren
onderdelen binnenin het apparaat aanwezig.
Uw apparaat schoonmaken
Behandel het scherm voorzichtig. Om vingerafdrukken of stof op het scherm te
reinigen, adviseren wij om een zachte, niet-schurende doek, zoals een lensdoek voor
de camera, te gebruiken.
Beknopte handleiding

11
FR
APERÇU EXTÉRIEUR
1. Caméra avant
2. Bouton d'alimentation
3. Prise casque
4. Mini prise USB
5. Connexion CC
6. Fente pour carte Micro SD
7. Connexion HDMI
8. Haut-parleur
9. Bouton de réinitialisation
Guide de démarrage rapide

12
PREMIERS PAS
Recharger l’appareil
• Vous pouvez recharger la batterie à l’aide de l’adaptateur inclus.
• Vous pouvez utiliser l’appareil lorsque la batterie est en cours de chargement, bien
que la durée de rechargement soit plus longue lors du chargement au cours de
l’utilisation.
• Branchez le transformateur électrique dans une prise murale, et puis connectez-le
à l’appareil pour recharger la batterie. (Pleine recharge en environ 5 heures).
Mettre l’appareil en marche
Appuyez sur le bouton d’alimentation et maintenez-le enfoncé pendant 3 secondes.
Configuration du réseau Wi-Fi
Comme de nombreuses fonctions nécessitent une connexion Wi-Fi, nous vous
recommandons de configurer à présent votre réseau Wi-Fi.
1. Cliquez sur , →Réglages, →Sans fil & réseau.
2. Sélectionnez Wi-Fi pour mettre l’allumer. L’appareil recherche automatiquement
les réseaux Wi-Fi et énumère tous les réseaux Wi-Fi disponibles.
Un indique les réseaux sécurisés qui nécessitent un nom d’utilisateur / mot de
passe pour se connecter.
3. Cliquez sur le réseau auquel vous souhaitez vous connecter, →entrez le Mot de
passe du réseau si nécessaire, →cliquez sur Connecter.
4. Cliquez sur pour revenir sur l’écran du Bureau.
BUREAU
1. Icône noire
2. Retour au bureau depuis d’autres
applications
3. Applications récement utilisées
4. Icône capture d'écran
5. Volume -
6. Volume +
7. Heure actuelle
8. Indicateur du signal WiFi
9. Etat de connexion Bluetooth
10. Etat de charge de la batterie
11. Recherche Google
12. Recherche vocale
13. Cliquer pour voir l'écran
d'application
Guide de démarrage rapide

13
FR
MARCHÉ DES APPLICATIONS
Le marché des applications a de nombreuses applications que vous pouvez rapide-
ment et facilement télécharger et installer sur votre tablette.
Télécharger des applications
Suivez ces étapes pour ajouter un compte Google existant à votre appareil ou pour
créer un nouveau compte Google à ajouter à votre appareil.
À partir de votre écran d’application touchez l’application Google Play Store.
• Si vous n’avez pas ajouté un compte e-mail sur votre appareil, un compte Google
vous sera demandé.
• Suivez les instructions sur l’appareil, qui vous expliqueront comment ouvrir une session
avec un compte Google existant ou comment créer un nouveau compte Google.
• Une fois que votre session est ouverte, vous pouvez sélectionner différentes
applications sur les onglets de catégories pré-sélectionnées ou rechercher les
applications par nom.
• Cliquez sur une application pour voir de plus amples informations et si vous le
souhaitez, touchez ensuite le bouton d’installation à partir duquel vous pouvez suivre
les instructions sur l’appareil, qui vous guideront dans le processus d’installation.
• Une fois cette opération terminée, une fenêtre contextuelle apparaitra en bas à
droite et un raccourci pour lancer l’Application sera placé sur votre bureau.
• L’installation est à présent terminée et l’application est prête à être utilisée.
FOIRE AUX QUESTIONS
Q: Ma mémoire interne est pleine.
A.:Afin d’y accéder rapidement et simplement, le système d’exploitation Android
enregistre les apps que vous téléchargez sur Google Play dans sa mémoire flash
interne. Comme la capacité de la mémoire interne est limitée à 1 Go, elle se remplit
facilement si vous téléchargez trop d’apps ou des apps trop grandes.
Vous pouvez vider la mémoire flash interne en déplaçant les Apps dans la mémoire
de stockage. Pour lancer cette procédure, touchez“Paramètres”puis, une fois dans le
menu“Paramètres”, sélectionnez l’onglet “Applications”. Une fois fait, l’écran suivant
avec un aperçu de vos Apps téléchargées et installées s’affiche :
Comme vous le constatez, l’App Angry Birds consomme 50,45 Mo de capacité de
stockage. En touchant l’icône Angry Birds, vous la déplacez dans l’écran suivant :
Comme illustré dans l’exemple précédent, un onglet mentionnant“Déplacer vers la
carte SD”est disponible. En touchant ce bouton, vous pouvez déplacer l’App Angry
Birds de la mémoire flash interne vers la mémoire de stockage, libérant ainsi de
l’espace dans la mémoire flash interne. Comme vous le constatez dans l’exemple
suivant, l’App Angry Birds App utilise désormais seulement 3,66 Mo d’espace dans la
mémoire flash interne au lieu de 50,45 Mo auparavant.
Guide de démarrage rapide

14
Vous pouvez répéter cette procédure pour libérer suffisamment d’espace dans la
mémoire flash interne.
IMPORTANTES PRÉCAUTIONS DE SÉCURITÉ
Suivez toujours ces instructions basiques de sécurité lorsque vous utilisez votre tab-
lette. Celles-ci réduiront les risques d’incendie, de choc électrique et de blessures.
• N’exposez pas ce produit à la pluie ou à l’humidité.
• Conservez cet appareil hors de portée des rayons du soleil et des sources de
chaleur.
• Protégez le cordon électrique. Acheminez les cordons électriques de manière à
ce qu’ils ne soient pas piétinés ou pincés par des articles placés dessus ou contre.
Soyez tout particulièrement attentif à l’endroit où le cordon est relié à l’appareil.
• Utilisez uniquement l’adaptateur CA inclus avec l’appareil. L’utilisation de tout
autre adaptateur annule votre garantie.
• Ne retirez pas le cache. Aucune pièce à l’intérieur ne peut être réparée par
l’utilisateur.
Nettoyer votre appareil
Manipulez soigneusement l’écran . Pour nettoyer les empreintes ou la poussière de
l’écran, nous recommandons d’utiliser un tissu doux et non abrasif tel un chiffon pour
objectif photo.
Guide de démarrage rapide

15
DE
BESCHREIBUNG DES AUSSEHENS
1. Nach vorn gerichtete Kamera
2. Ein-/Ausschalter
3. Kopfhöreranschluss
4. MINI-USB-Anschluss
5. DC-Anschluss
6. Micro-SD-Kartensteckplatz
7. HDMI-Anschluss
8. Lautsprecher
9. Rückstellungsbutton
Anleitung zum Schnellstart

16
Anleitung zum Schnellstart
ERSTE SCHRITTE
Das Gerät laden
• Sie können die Batterie mithilfe des beigefügten Adapters laden.
• Sie können das Gerät verwenden, während die Batterie geladen wird, obwohl sich
die Ladezeit verlängert, wenn das Gerät in Betrieb ist und gleichzeitig geladen wird.
• Stecken Sie den Netzstecker in eine elektrische Wandsteckdose, dann verbinden Sie
ihn mit dem Gerät, um die Batterie zu laden. (Vollständig geladen in ca. 5 Stunden).
Das Gerät einschalten
Den Ein-/Ausschalter drücken und 3 Sekunden halten.
Wi-Fi-Netzwerkeinrichtung
Da zahlreiche Funktionen einen Wi-Fi-Anschluss erfordern, empfehlen wir, Ihr Wi-Fi-
Netzwerkjetzt einzustellen.
1. Tippen Sie , →Einstellungen, → Drahlos & Netzwerk an.
2. Wählen Sie Wi-Fi, um es einzuschalten.
Das Gerät scannt automatisch und listet alle lokalen Wi-Fi-Netzwerke auf, die es
gefunden hat.
A zeigt sichere Netzwerke an, die einen Anmeldenamen/ein Passwort zum
Verbinden benötigen.
3. Tippen Sie das gewünschte Netzwerk an, mit dem Sie sich verbinden möchten,
→ geben Sie das Netzwerk-Passwort ein, wenn anwendbar, →tippen Sie
Verbinden an.
4. Tippen Sie an, um zum Desktop-Bildschirm zurückzukehren.
DESKTOP
1. Symbol Zurück
2. Zurück zum Desktop aus anderen
Apps
3. Kürzlich verwendete Anwendungen
4. Screenshot-Symbol
5. Lautstärke -
6. Lautstärke +
7. Aktuelle Zeit
8. Anzeige für Wi-Fi-Stärke
9. Bluetooth-Verbindungsstatus
10. Batterieladestatus
11. Google-Suche
12. Sprachsuche
13. Antippen, um den
Anwendungsbildschirm zu sehen

17
APPMARKET
Der App Market verfügt über zahlreiche Anwendungen, die Sie schnell und einfach
auf Ihren Tablet-PC herunterladen können.
Anwendungen herunterladen
Befolgen Sie diese Schritte, um ein vorhandenes Google-Konto zu Ihrem Gerät hinzu-
zufügen oder ein Google-Konto zu erstellen, um es zu Ihrem Gerät hinzuzufügen.
Auf Ihrem Anwendungsbildschirm berühren Sie die Google Play Store-App.
• Wenn Sie zu Ihrem Gerät kein E-Mail-Konto hinzugefügt haben, werden Sie
aufgefordert, ein Google-Konto hinzuzufügen.
• Befolgen Sie die Anweisungen auf dem Gerät, die Sie zur Hinzufügung zu einem
vorhanden Google- Konto oder zu Erstellung eines neuen Google-Kontos führt.
• Nach dem Einloggen können Sie unter den verschiedenen Tabs verschiedene
Anwendungen auswählen, Kategorien vorab auswählen oder Apps nach Namen suchen.
• Tippen Sie eine Anwendung an, um detaillierte Informationen zu sehen und,
wenn gewünscht, den Button Installieren berühren, wonach Sie den Anweisungen
auf dem Gerät folgen, die Sie durch den Installationsprozess führen.
• Bei Abschluss poppt eine Benachrichtigung in der oberen rechten Ecke auf, zusammen
mit einer Tastenkombination, Die Anwendung wird auf Ihrem Desktop platziert.
• Die Installation ist jetzt abgeschlossen und die Anwendung ist einsatzbereit.
HÄUFIG GESTELLTE FRAGEN
F: Mein interner Speicher ist voll.
A: Für einen schnellen und einfachen Zugriff speichert das Android-Betriebssystem
die Apps, die Sie vom Google Play Store herunterladen, in seinem internen Flash-
Speicher. Da die Kapazität des internen Speichers auf 1 Gb begrenzt ist, kann dieser
leicht voll werden, wenn Sie zu viele und zu große Apps herunterladen.
Sie können den internen Flash-Speicher bereinigen, indem Sie Apps in den
Massenspeicher verschieben. Um diesen Vorgang zu starten, tippen Sie auf
"Einstellungen". Wählen Sie nun im Menü "Einstellungen" die Registerkarte "Apps".
Sobald Sie dies durchgeführt haben, erscheint der unten aufgeführte Bildschirm mit
einer Übersicht Ihrer heruntergeladenen und installierten Apps:
Wie Sie sehen können, verbraucht die Angry Birds-App bis zu 50,45 Mb
Speicherkapazität. Durch Antippen des Angry Birds-Symbols gelangen Sie zu
folgendem Bildschirm:
Wie im Beispiel oben angegeben steht eine Registerkarte zur Verfügung, die "Auf
SD-Karte verschieben" beinhaltet. Durch Antippen dieser Schaltfläche können Sie die
Angry Birds-App vom internen Flash-Speicher in den Massenspeicher bewegen und
auf diese Weise Speicherplatz im internen Flash-Speicher bereitstellen. Wie Sie im
Beispiel unten sehen können, verbraucht die Angry Birds-App nun nur noch 3,66 Mb
Speicherplatz im internen Flash-Speicher anstatt 50,45 Mb wie vorher.
DEAnleitung zum Schnellstart

18
Sie können diese Schritte wiederholen, bis Sie genügend Speicherplatz im internen
Flash-Speicher bereitgestellt haben.
WICHTIGE SICHERHEITSVORKEHRUNGEN
Befolgen Sie immer die grundlegenden Sicherheitsvorkehrungen, wenn Sie Ihren
Tablet-PC verwenden. Dies verringert das Risiko von Feuer, Stromschlag und Verlet-
zung.
• Dieses Produkt nicht Regen oder Feuchtigkeit aussetzen.
• Das Gerät fern von direktem Sonnenlicht und Wärmequellen halten.
• Das Stromkabel schützen. Führen Sie Stromkabel so, dass es unwahrscheinlich
ist, dass auf ihnen gelaufen wird, oder dass sie von Gegenständen gequetscht
werden, die darauf oder daran platziert werden. Achten Sie besonders auf den
Punkt, an dem das Kabel mit dem Gerät verbunden ist.
• Verwenden Sie nur den AC-Adapter, der mit dem Gerät geliefert wird. Die
Verwendung eines anderen Netzkabelsmacht Ihre Garantie zunichte.
• Die Abdeckung nicht entfernen. Im Inneren sind keine Teile, die vom Nutzer
repariert werden können.
Reinigen Sie Ihr Gerät
Behandeln Sie das Gerät vorsichtig. Um Fingerabdrücke oder Staub vom Bildschirm
zu entfernen, empfehlen wir die Verwendung eines weichen, abriebfesten Tuchs wie
eines Kameralinsentuchs.
Anleitung zum Schnellstart

19
ESGuía de inicio rápido
DESCRIPCIÓN EN PERSPECTIVA
1. Cámara frontal
2. Botón de encendido
3. Conector de auriculares
4. Conector Mini USB
5. Conexión de CC
6. Ranura para tarjeta Micro SD
7. Conexión HDMI
8. Altavoz
9. Botón de reinicio

20
CÓMO EMPEZAR
Carga del dispositivo
• Puede cargar la batería utilizando el adaptador incluido.
• Puede utilizar el dispositivo mientras se está cargando la batería, aunque el tiempo
de carga será mayor si está en funcionamiento y en carga al mismo tiempo.
• Conecte el adaptador de corriente a una toma de pared, y, a continuación,
conéctelo al dispositivo para cargar la batería. (Completamente cargado
aproximadamente en 5 horas).
Encender el dispositivo
Pulse el botón de encendido y manténgalo pulsado 3 segundos.
Configuración de la red wifi
Dado que muchas de las funciones requieren una conexión a internet, le recomenda-
mos que configure su red wifi.
1. Toque , →Configuración →Inalámbrico y red.
2. Seleccione Wi-Fi para encenderla.El dispositivo explora automáticamente y
muestra una lista de todas redes Wi-Fi locales.
Un indica las redes seguras que requieren nombre de usuario y contraseña
para conectarse.
3. Toque en la red que desee conectarse, →introduzca la contraseña de red si
procede, → toque Conectar.
4. Toque para volver a la pantalla de escritorio.
ESCRITORIO
1. Icono volver
2. Vuelve al escritorio desde las
aplicaciones
3. Aplicaciones usadas recientemente
4. Icono de captura de pantalla
5. Volumen -
6. Volumen +
7. Hora actual
8. Indicador de intensidad wifi
9. Estado de conexión Bluetooth
10. Estado de carga de batería
11. Búsqueda Google
12. Búsqueda por voz
13. Tocar para ver la pantalla de
aplicaciones
Guía de inicio rápido
Other manuals for TL-3470
1
Table of contents
Languages:
Other AudioSonic Tablet manuals