Audiosystem Z HLC 2 Em User manual

HLC 2 Em

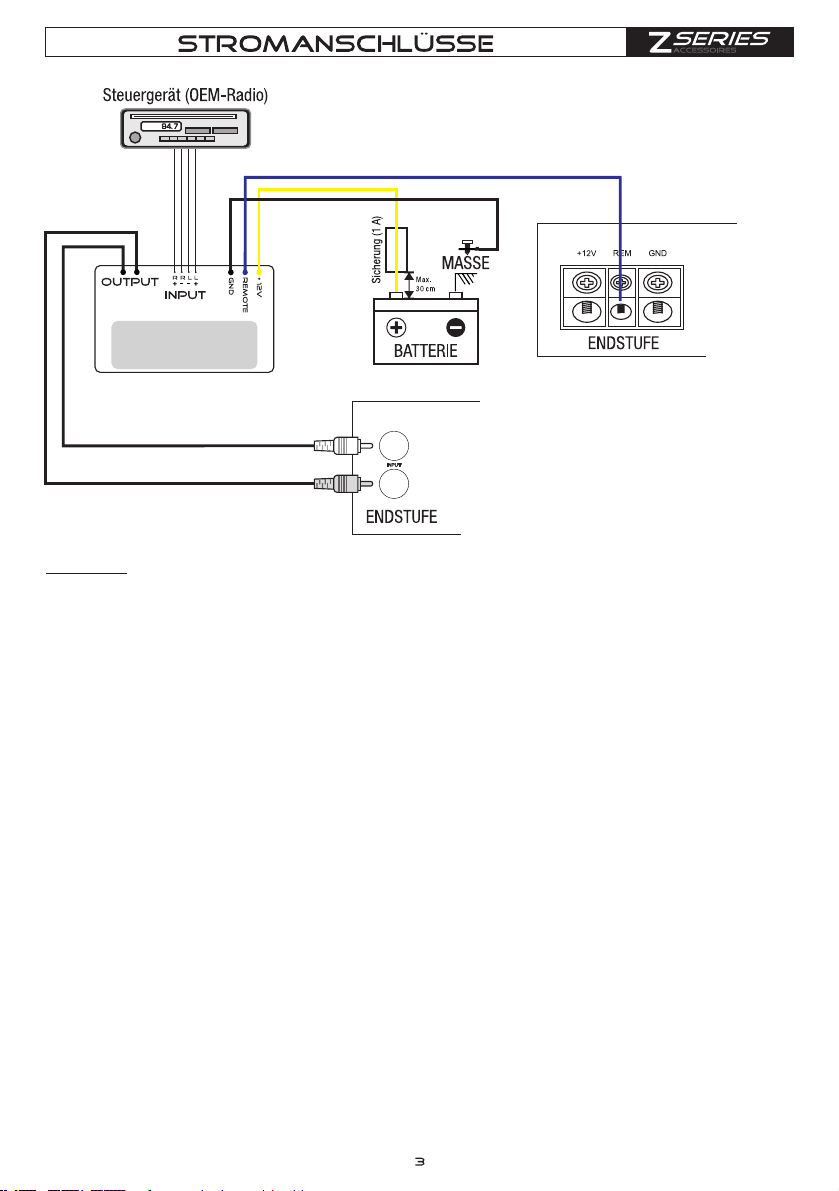
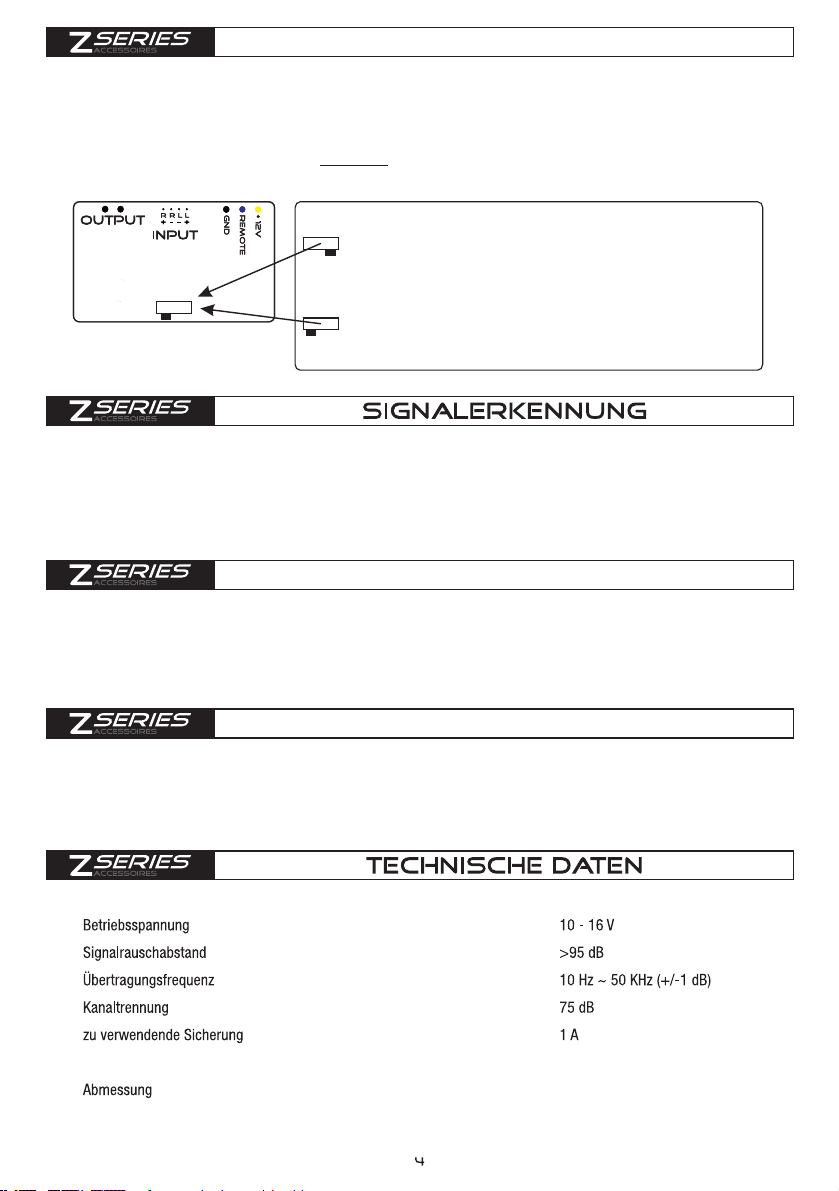
HLC 2 EM- 2-Kanal- High-Low-Adapter- Nutzbar für OEM-Verstärker bis zu 60 W RMS durch HPI-Technik- Anbindbar an alle OEM-Radios und OEM-Verstärker- Verhindert Störsignale und Einschaltgeräusche- Generiert ein Einschaltsignal (Remote) über BTL oder Signalerkennung (SE-Technik)- Integrierte Ausschaltverzögerung bei Signal Detect (SE)- Überragende Klangqualität durch Low-Noise-Op-Amps- 5-Volt Vorverstärkertechnik (Cinch-Kupplungen)- Offene Kabelenden mit Abzweigverbindern für einfache Montage- Sehr schnelle und korrekte Musikerkennung (SE und BTL-Technik)- Inklusive erweiterter Lautsprecher-Lastsimulation mit neuester PRS-SchaltungSorgen Sie für eine professionelle Befestigung. Achten Sie darauf, dass keine elektrischen Kabel,Benzintank, hydraulische Bremsleitungen oder andere Komponenten beschädigt werden.Schützen Sie den HLC 2 EM vor Flüssigkeiten, Nässe, Hitze und Fremdkörpern sowie vorweiteren äußeren Einflüssen.Der High-Low-Adapter ist nur in Kraftfahrzeugen mit einer 12 V Versorgungsspannung einzubauen.Die Stromversorgungskabel dürfen niemals mit anderen Zuleitungskabeln des KFZ, Benzinleitungen,Lüftermotoren, Brandkontrollmodulen etc. verlegt werden.Um Störungen im Musiksignal zu vermeiden, müssen die Signalkabel (Cinchkabel), sowie die Laut-sprecherkabel von den Stromkabel möglichst weit entfernt verlegt werden.Die Anschlusskabel Ihres HLC 2 EM sind so zu verlegen, dass keine Klemm-, Quetsch,- oderBruchgefahr besteht.

ACHTUNG:1. Trennen der StromversorgungKlemmen Sie zu allererst die Stromversorgung des Fahrzeuges ab. Dies geschieht am Besten, indem dasMassekabel von der Batterie entfernt wird.2. MasseanschlussVerbinden Sie den GND/Ground (schwarz) Anschluss des HLC 2 EM mit der Fahrzeugkarosserie. Ver-wenden Sie einen ausreichenden Querschnitt (0,75mm² - 2,5mm²). Stellen Sie sicher, dass die Verbindungmit der Karosserie farb-, schmutz- und staubfrei ist.3. +12 V StromsanschlussDer +12 V Anschluss (gelb) des High-Low-Adapters ist mit dem Versorgungskabel über eine Sicherung (1 A)direkt an +12 V anzuschließen. Die Sicherung schützt das Gerät und das Fahrzeug vor möglichen Kurz-schlüssen im Netzkabel.4. Remote AnschlussVerbinden Sie den Remote-Anschluss (blau) des HLC 2 EM mit dem Remote-Eingang des Verstärkers.Verwenden Sie hierfür ein 0,5 - 1,5 mm² Stromkabel. Nachdem ein Musiksignal am Eingang des High-Low-Adapters anliegt, wird der Verstärker automatisch eingeschaltet.5. EingangDer HLC 2 EM besitzt High-Eingänge, welche mit dem Lautsprecherausgang des OEM-Radios oderOEM-Verstärkers verbunden werden.6. AusgangDie RCA(Cinch)-Ausgänge des HLC 2 EM werden mit dem RCA(Cinch)-Eingängen des Verstärkersverbunden. Wichtig ist hierbei, dass die GAIN-Regler des angeschlossenen Verstärkers zunächst aufMinimum gestellt werden. Nur bei Bedarf können diese vorsichtig hochgedreht werden.AUDIO SYSTEM GERMANY empfiehlt Ihnen diesbezüglich Ihren Verstärker von einemFachbetrieb, Fachhändler oder einem Fachmann auf Ihre Bedürfnisse einstellen zu lassen.L+L-R+R-WEISSWEISS/SCHWARZGRAUGRAU/SCHWARZ

Der HLC 2 EM kann dank HPI-Schaltung an verschieden Ausgangsleistungen des OEM-Radios oder OEM-Verstärkers angepasst werden. Die Einstellung 20 W reicht für die meisten OEM-Radios und viele OEM-Verstärker. Einige spezielle Soundsysteme haben eine höhere Ausgangsleistung, dann ist der High-Low-Adapter auf 60 W einzustellen. Achtung: Wenn Sie sich nicht sicher sind, welche Einstellung für Sie die richtige ist, fragen Sie eine Fachmann oder einen Fachhändler!Der HLC 2 EM besitzt eine Ausschaltverzögerung wenn dieser über Signalerkennung (SE-Technik) ein-geschaltet wurde. Diese dient dazu, auch leise Passagen einer Quelle problemlos wiederzugeben.AUSSCHALT-ZEITVERZÖGERUNGDer HLC 2 EM besitzt in der Eingangssektion eine erweiterte Lautsprecher-Lastsimulation dank PRS-Schaltung. Diese wird bei aktuellen OEM-Radios und OEM-Verstärkern benötigt, um Fehlermeldungen und ein Abschalten der Lautsprecher zu verhindern.lautsprecher-lastsimulationDer HLC 2 EM besitzt eine automatische Signalerkennung (SE-Technik). Diese wird benötigt, wenn der OEM-Ausgang kein überlagerndes Gleichspannungssignal besitzt. Der High-Low-Adapter erkennt dieses vollautomatisch.anpassung der EINGANGSLEISTUNGPosition 20 W:OEM-Radios und OEM Verstärker mit maximal 20 W RMS AusgangsleistungPosition 60W:OEM-Verstärker mit maximal 60W RMS Ausgangsleistung43(W) x 13(H) x 35(L) mm60 W RMSMaximale Eingangsleistung

designed and engineered by audio system GermanyHIGH LOW CONVERTERMANUALHLC 2 Em

hlc 2 emCongratulation on your purchase of your new z Series Adapter. - Outstanding sound quality- Connectable to OEM-amplifiers up to 60 W RMS by HPI-technology- Integrated turn off for Signal Detect (SE)- 2-Channel High-Low-Adapter- Open wire ends with fast clip connectors for easy install- Prohibit disturb signal and power up noise- 5-Volt preamplifier technology (RCA couplings)- Very fast and correct music recognition (SE and BTL-technology)- Advanced speaker load simulation with forward-looking PRS-circuit- Generate a turn-on signal(Remote) over BTL or Signal Recognation (SE-circuit)Audio System Germany accepts no liability for hearing loss, bodily injury or property damage as a result of use or misuse of our products.ATTENTION: Pay attention to advices and instructions of the car manufacturer.IMPORTANT: Before installation of your High Low Converter, we recommend to read the owner´s manual carefully and to follow the instructions regarding connection and fitting exactly.Important: Your proof of purchase is evidence of warranty claim for repair or replacement. Keep your proof of purchase, manual and original packaging.ATTENTION: Use of sound components can impair your ability to hear necessary traffic sounds and may constitute a hazard while driving your automobile. We recommend installing the equipment by an authorized service center or dealer. A professional fitting and connection is the requirement for further warranty and perfect sound.features2zaccessoires d) Never install the power supply cable with other original wires of the vehicle (gas cables), fan motors, brand control moduls etc. e) Install the signal cable (cinch cable) as well as the speaker cable far away of the power cables to avoid troubles with the music signal. g) The cables of your HLC 2 Em have to be installed, so that there is no danger of binding, squeezing c) The High-Low Adapter is only to be built into vehicles with a 12 V DC power supply. a) Take care of a professional attachement. Pay attention, that no electrical cable, gas tank, hydraulic breakes or other components get damaged. or breaking. b) Protect your HLC 2 Em from fluids, wetness, heat and foreign material as well as from other influences. Please follow the instructions during the installation of your High-Low-Adapter:ATTENTION

3. +12 V Power connectionConnect the +12 V contact (yellow) of the High-Low adapter via a fuse (1 A) directly to +12 V. This fuse protects the amplifier and the vehicle against the possibility of a short circuit in the power cable.4. Remote connection 0.5 - 1.5 mm power cable. The amplifier turns on as soon as music signal is generated at the input of the High-Low Adapter.5. InputConnect the REM-terminal (blue) of the HLC 2 em to the remote-input of the amplifier. Therefore use a The HLC 2 em has High-Inputs, which have to be connected to speaker output of the head unit (OEM) or amplifier (OEM).6. OutputFirst disconnect the power supply of the vehicle. This works out the best by removing the ground cable of the battery.2. Ground connectionATTENTION:Connect the GND/ground (black) connection of the HLC 2 em with the car chassis. Use a suitable cross 2section (0.75 - 2.5 mm ). Make sure, that the connection with the vehicle chassis is free of paint, dirt and dust.1. Battery disconnectionThe RCA(Cinch)-outputs of the HLC 2 em have to be connected to the RCA(Cinch)-inputs of the amplifier. Important in this respect is, that first the gain-control of the connected amplifier is put to minimum. Turn up only if necessary. In this regard, AUDIO SYSTEM germany recommends to adjust your amplifier through a specialized service center, dealer or a specialist. 3
power connections
zaccessoiresBATTERYAMPLIFIERAMPLIFIERGROUNDHEAD UNIT (OEM)
FUSE (1 A)
Max.30 cm+12VREMGNDL+L-R+R-WhiteWhite/blackGreyGRey/black

Power Supply VoltageSignal to Noise RatioFrequency ResponseChannel SeparationFuse to useMaximum Input VoltageDimensions You can adjust the HLC 2 EM to different source power outputs of OEM stereo or OEM amplifier thanks to HPI-circuit. Position 20 W is suitable for most OEM stereos and most of OEM amplifiers. However, some specialOEM-amplifiers deliver more than 20 W RMS output. You have to switch to 60 W position in this case.Attention: If you are not sure about output power of you OEM system ask a dealer or specialist, please.If using signal detection to turn on,HLC 2 EM will switch off remote by a pre-defined time delay. This is neccessary to avoid switching off in low volume passages in music or speach.SWITCH-OFF Delay (SE)The HLC 2 EM uses an advanced speaker load simulation technology called PRS-technology. It is always present and is for avoiding fault code messages and switch off situations of speakers by OEM stereo due to error checking techniques of OEM-amplifier.advanced speaker load simulationThe HLC 2 EM has an automatic signal detection circuit (SE-technology). It is automatically used if OEM stereo doesn‘t use BTL amplifier topology.ADJUSTING TO INPUT POWER (HPI)Position 20 W:OEM-stereo and OEM-amplifier with up to 20 W maximumRMS power output.Position 60W:OEM-amplifier with up to 60 W maximum RMS poweroutput.43(W) x 13(H) x 35(L) mm60 W RMSsignal detection (SE)technical data
Table of contents
Languages:
Other Audiosystem Media Converter manuals