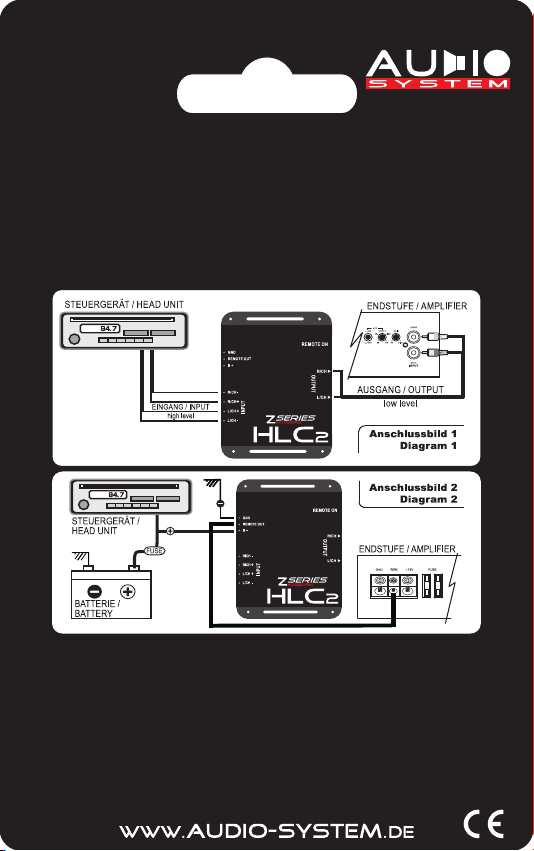
Klemmen Sie zu allererst die Stromversorgung (Batterie) des Fahrzeugs ab. Verbinden Sie die Lautsprecher-
ausgänge des Steuergeräts (Radio) mit den entsprechenden Eingängen [INPUT] am HLC2. Auf richtig Polung
achten..! Verbinden Sie die HLC2 Ausgänge [OUTPUT] via Cinchkabel mit den entsprechenden Eingängen
einer Endstufe oder eines Soundprozessors (Anschlussbild 1). Wenn Ihr Steuergerät über einen
Remoteausgang verfügt, schließen Sie die Endstufe direkt an diesen an. Falls dies nicht der Fall ist, verfügt
der HLC2 über eine Remote-Steuerung (Anschlussbild 2). Verbinden Sie zunächst den Pluspol [B+].
Nehmen Sie die 12 V Spannung unbedingt hinter einer Sicherung ab. Danach verbinden Sie den Minuspol
[GND] mit der Masse. Der REMOTE OUT des HLC2 wird mit dem Remote der Endstufe verbunden. Das
HLC2 schaltet nur die Endstufe ein, wenn an dem Lautsprechereingang ein Signal anliegt.
!.. ACHTUNG ..!
Bevor Sie die Stromversorgung wieder anschließen, vergewissern Sie sich, dass alle Kabel
dem Schaltbild entsprechend angeschlossen und ordnungsgemäß verlegt sind.
Sorgen Sie für eine professionelle Befestigung des HLC2.
First disconnect the power supply (battery) of the vehicle. Connect the speaker output from the head unit
(radio) to the „High Level“ INPUT of the HLC2. Pay attention for the right way of connection.
Afterwards transfer the HLC2 OUTPUT through cinch cables (RCA) to RCA-Input of the amplifier or to the
sond processor (diagramm 1). If the head unit provides a remote-output than please connect the amplifier
directly to the remote-terminal. Otherwise the HLC2 provides a remote control (diagramm 2).
First bond the positiv terminal [B+]. Important: Connect the + 12 voltage after a fuse. Afterwards, connect the
negativ terminal [GND] with the ground of the car chassis. The REMOTE OUT of the HLC2 has to be
connected to the remote-terminal of the amplifier. The HLC2 only turns on the amp if a loudspeaker is
installed.
!.. CAUTION ..!
Before reconnecting the power supply (battery) make sure that all cables are connected
and layed correctly accordingly to the circuit diagram. Take care of a professional
attachement for the HLC2.
BEDIENUNGSANLEITUNG / MANUAL
HLC2
the sound
since 1998


