AUDIOVECTOR QR Series User manual

MANUAL
QR SERIES
QR 5 / QR 3 / QR 1 / QR C / QR WALL

Congratulations on the purchase of your new Audiovector QR series
speakers. Your new Audiovector speakers will provide you with
endless hours of listening pleasure, either as part of a stereo or
surround sound system. Audiovector products are unique, not only
because of their unique concept for upgrades and inherent listenability.
Audiovector also receives excellent reviews form the international
hi-fi press with its exacting standards. And, best of all: Audiovector
owners praise the sound quality, reliability and build quality of their
investment.
1. AN IMPORTANT PART OF YOUR MUSIC SYSTEM
The loudspeakers are the most important part of any stereo/surround
sound system. Why? Because the loudspeakers transform electrical
energy to acoustical energy in a room, which interacts with the speakers
themselves. This interaction is very important. With Audiovector this
interaction is easy to optimize.
2. ENDLESS HOURS OF LISTENING PLEASURE
We congratulate you on your new loudspeakers and are sure that you
will be thrilled by their sound. Should you, however, eventually be
tempted to experience the Audiovector sound quality further, please
contact your dealer who will be able to inform of possible upgrades and
expansions.
3. UNPACKING
⚠
Caution: Please make sure not to damage the speakers whilst
unpacking them. Please retain cartons for possible later use.
4. CONNECTIONS
As no system is better than its weakest link, please choose your cables
carefully. In comparison with many other speaker cables, one run of
Audiovector ZERO cables has proven to be superior to two or three
runs of alternative ‘good’ sounding cables. You will get the best long
-term performance by using high quality 4 mm banana plugs. On all
Audiovector ZERO cables, the plugs are not soldered, but crimped
and airtight instead, in order to attain the best possible performance.
The most important parameters of a high-quality cable are a fast,
clean, open and natural sound. You may be aware that some cables
(and speakers, too) appear ‘slow down’ the speed of sound. This is a
type of distortion, which is best avoided. Please consult your
Audiovector dealer for additional information.
5. SPIKES AND DECOUPLING
All Audiovectors are supplied with spikes. Spikes are meant to penetrate
carpets and reach down to a solid material. The idea is that the speaker
should not wobble. For the highest level of precision and sound
reproduction, the membranes should move the air, not the cabinet.
Furthermore, spikes provide effective decoupling of resonance. This
results in a cleaner and more dynamic sound.
⚠
Caution: Please note that spikes are sharp!
6. GRILLES
All Audiovectors come with acoustically transparent grilles. The grilles
are held invisibly in place by magnets. If you wish to remove the
grilles, please carefully prize them away from the cabinet with the tips
of your fingers.
⚠
Caution: Do not try to lift or move the speakers with the grilles
fitted.
7. FIXING THE QR WALL TO A WALL
For safety reasons, if you are unsure of your ability to provide a secure
and safe fixing, please obtain the services of a competent person.
⚠
Caution: Make sure that the speakers are properly fixed to the wall.
8. BREAK-IN OF YOUR AUDIOVECTOR SPEAKERS
All loudspeakers need to be ‘broken in’. Your new Audiovectors will of
course sound very good on first listen, but with time they will improve
dramatically. Expect approx. 50 hours before the full potential of your
new Audiovector speakers is fully realized.
9. QR WALL SWITCH
With rear switch set to “OFF” The QR Wall can be used as a direct
mode speaker. In this mode, it works like a traditional loudspeaker,
with only the bass/midrange and the AMT treble driver working. This
makes the speaker ideal for a rear speaker surround sound for larger
rooms, and as a speaker in its own right.
When you switch to “ON”, the two small dome tweeters will be
engaged. They work in antiphase with the AMT, thus creating a diffuse
field. This makes it ideal as rear speaker for surround sound for rooms,
where the seats are quite close to the rear wall. And as a side speaker
for 7.1 systems.
10. ACCESSORIES
All bookshelf models can be mounted either on stands or on wall
brackets. These accessories should be bought in specialized audio
stores, as they will be able to guide you correctly in terms of
placement or mounting.
⚠
Caution: Make sure the speakers are properly set-up or fixed
to bracket and wall.
MANUAL FOR AUDIOVECTOR QR SERIES
QR 5 •QR 3 •QR 1 •QR CENTER •QR WALL
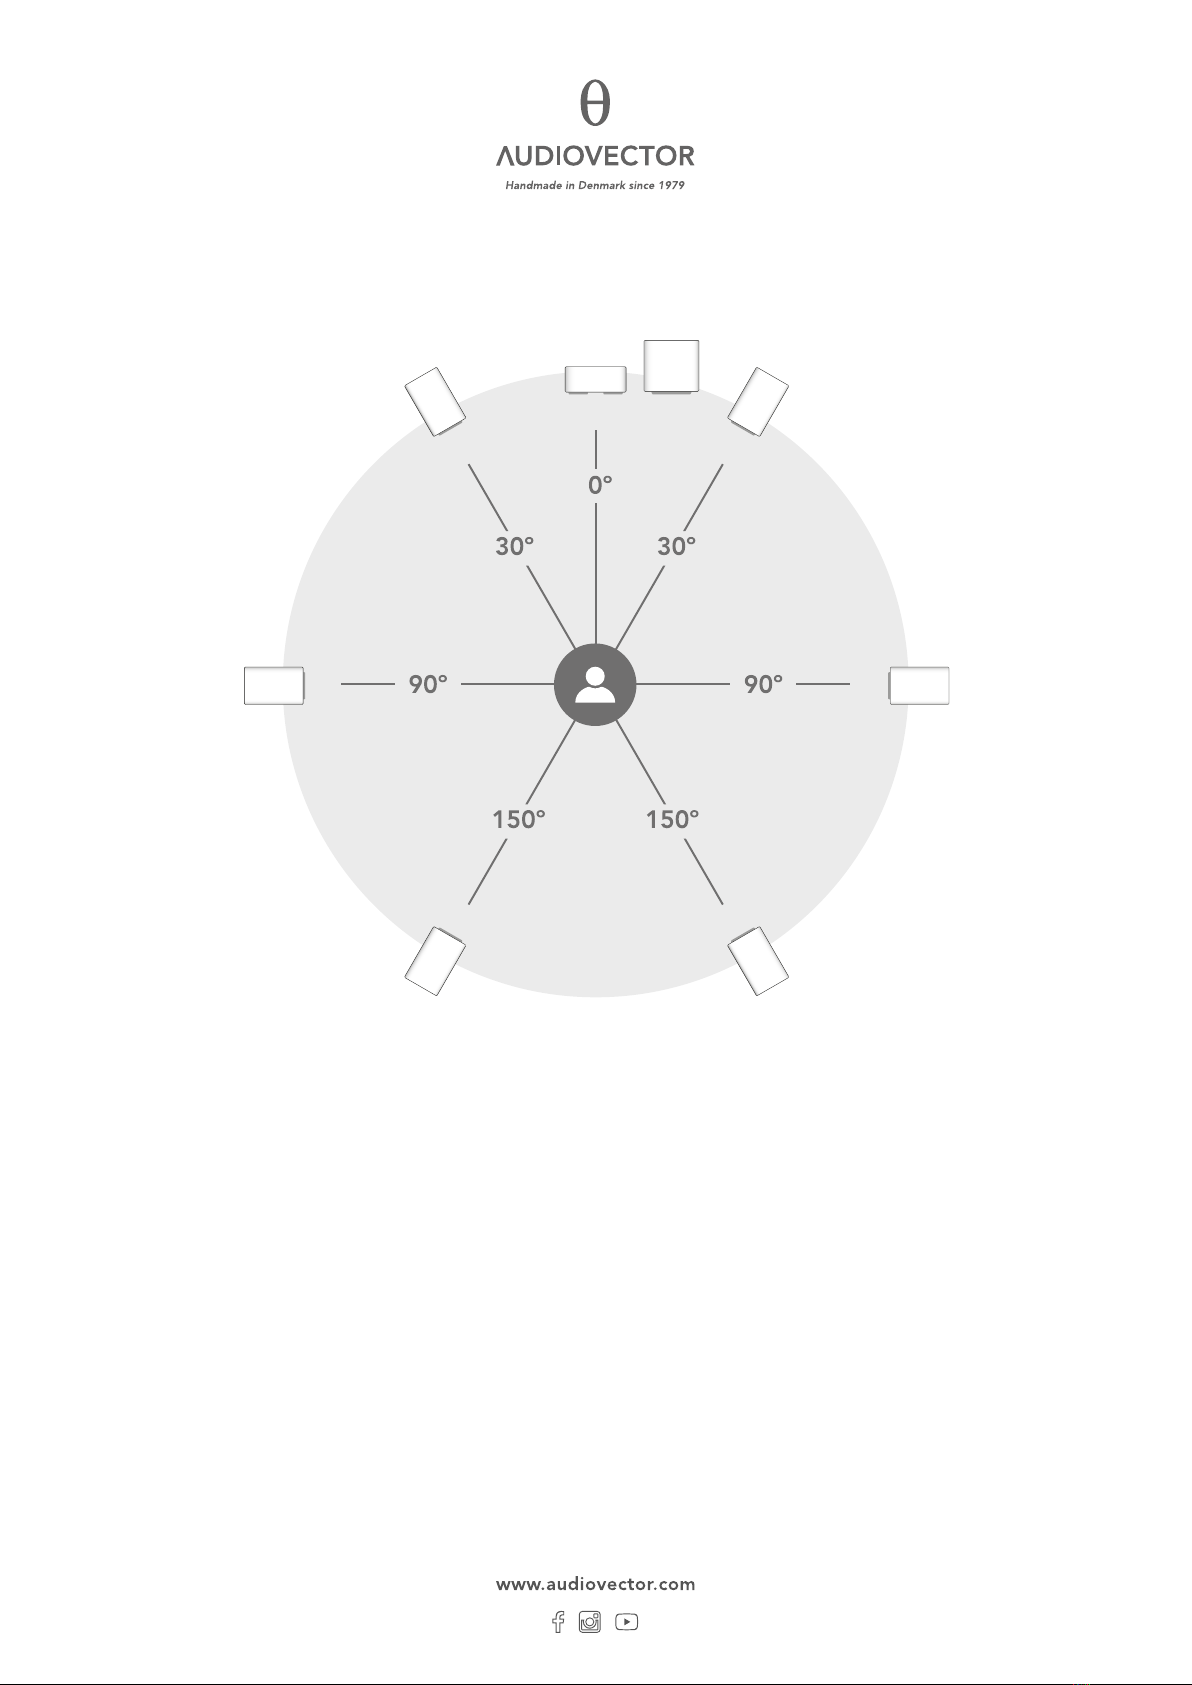
11. POSITIONING GUIDE
Models QR 5 QR 3 QR 1
Rear wall distance 50 - 10 cm 30 - 10 cm 15 - 5 cm
Recommended Degrees Toe in 2 - 5 2 - 5 2 - 5
12. POSITIONING ADVICE [ see page 3 ]
With all Audiovector floorstanding or standmount models, it will be
beneficial to first follow the above instructions. After that, move the
speakers a little bit more and listen again until you find your preferred
sound. Experimenting pays off!
13. POSITIONING FOR SURROUND SOUND [ see page 4 ]
Please use the same position for the front speakers as in a stereo
set-up. The center speaker can easily be adjusted for difference in
distance via your processor. This goes for rear speakers as well.
The subwoofer(s) can be placed in various positions in your room,
using the multiple available adjustments for fine tuning.
14. MAINTENANCE
If Iyou wish to clean your speakers, please use the microfiber cloth
included. Do not use solvents. In order to maintain optimum sound
quality, please remove the cable from the speakers every 3 months
and clean the connectors with a piece of soft cotton with a little
alcohol (or similar).
15. WARRANTY
Audiovector passive loudspeakers are subject to a 5-year factory
warranty, which covers all parts. Transportation cost is not included.
Please note that unauthorized opening or repair of your speakers will
invalidate the warranty. We wish you many hours of enjoyment with
your new Audiovector speakers.
Please direct all warranty and/or service issues to
F3/AUDIOVECTOR ApS
Mileparken 22A
DK-2740 Skovlunde, Denmark
Tel +45 35396060
info@audiovector.com
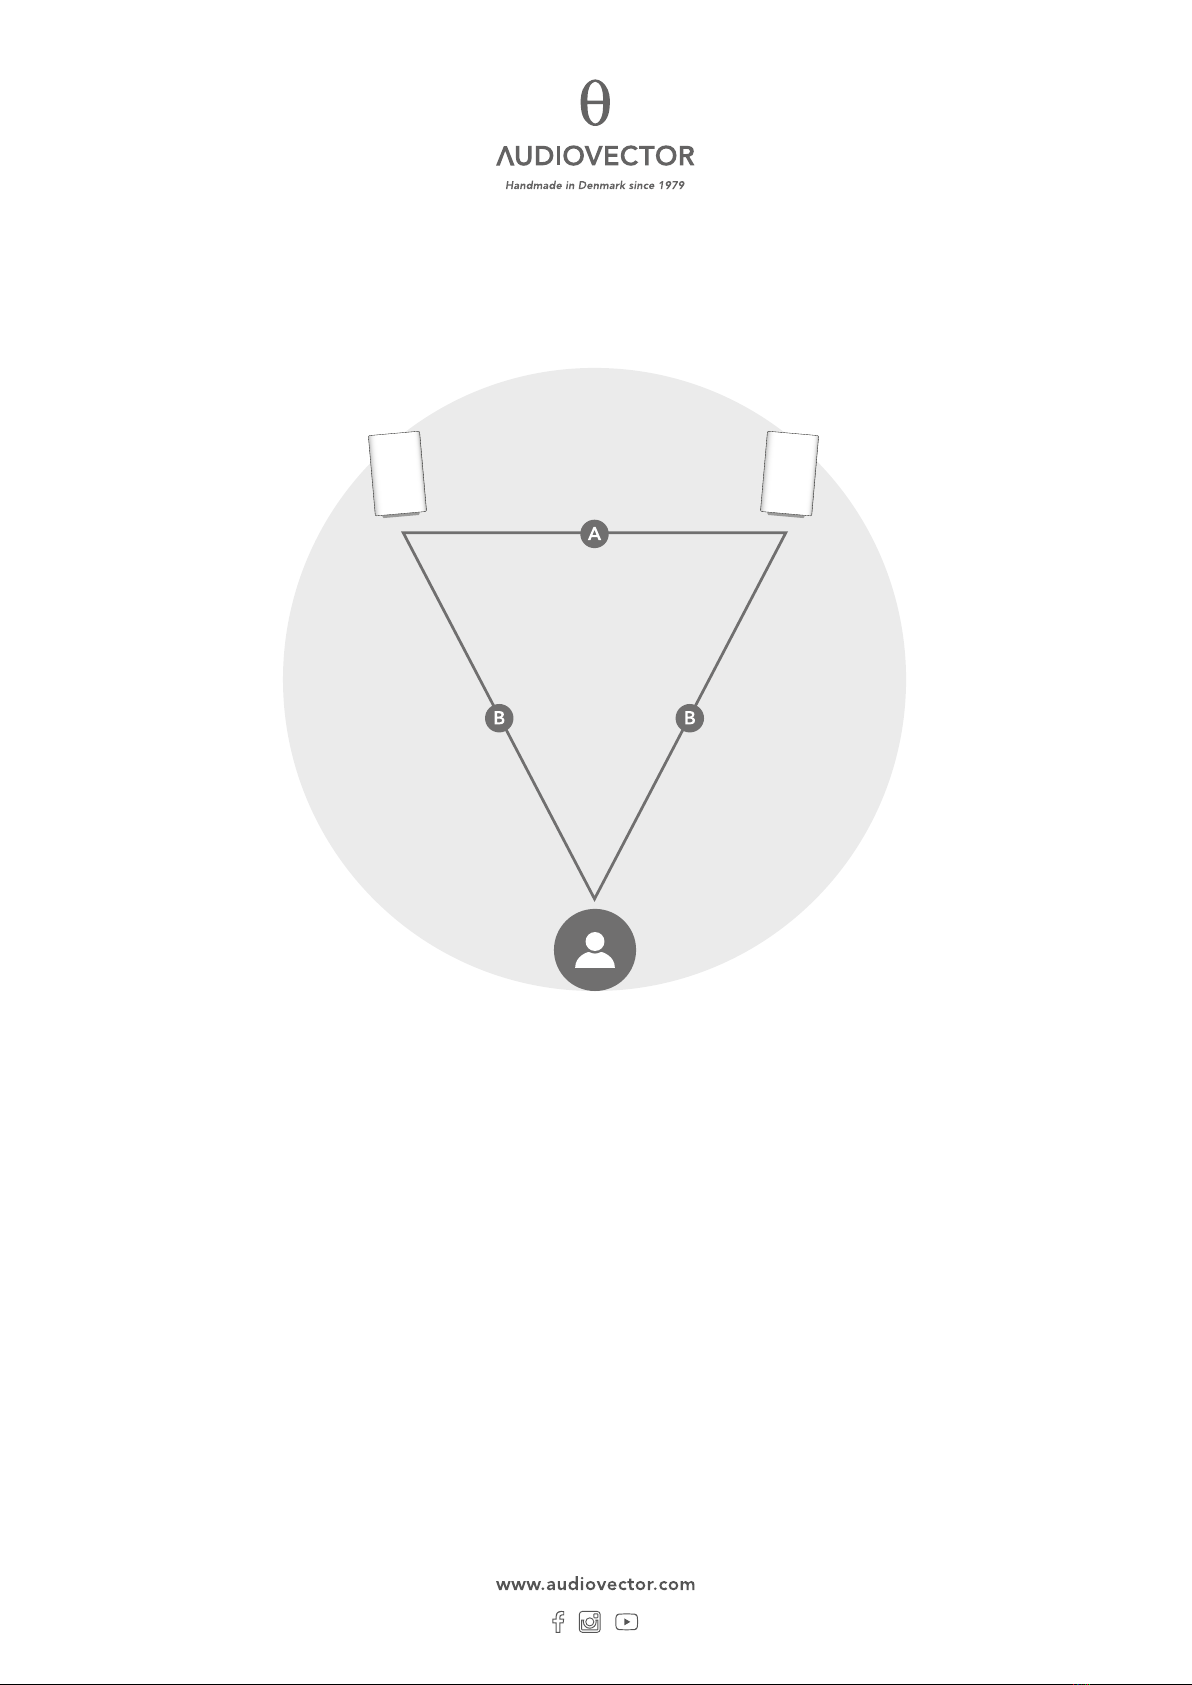
STEREO SET-UP
The distance between each loudspeaker and your listening position
should not be the same [B]. Try to achieve a triangle, where the
distance between the speakers is ¾ of the distance to the listener [A].
The closer the listening position is in relation to the loudspeakers, the
closer the speakers can be positioned to each other.
As a starting point, it is recommended that the speakers should be
about 2 - 3 meters apart from each other for the best results [A].
If the speakers are positioned too close to each other, the stereo
image will not seem realistic. If that distance is too wide, the image
may leave an acoustic ‘gap’ in the middle.
Paying attention to the sound image during listening tests will help
dictate optimum placement during experimentation and set-up.
MULTI-CHANNEL SET-UP
Note: Audiovector has developed various models suitable for multi-
channel applications: Compact and floor standing models with a
matching centre channel, all optimised for use with Audiovector active
subwoofers and Audiovector optional accessory products.
5.1: THE STANDARD MULTI-CHANNEL SETUP
with two side/surround speakers, preferably placed at the sides or
slightly behind the listening position
7.1: TWO REAR SPEAKERS ARE ADDED
directly behind the listening position, typically on the back wall
SUBWOOFER
Note: Most often a subwoofer will be utilized for the LFE signal,
especially in larger listening rooms. The optimal position of the
subwoofer depends on the size of the room and its acoustics. Please
refer to the Subwoofer manual.
MULTI-CHANNEL LOUDSPEAKER SET-UP
A complete multi-channel set-up consists of the following speakers:
1. Front (stereo) speakers
2. Center speaker
3. Side/Surround speakers
4. Rear speakers (as explained above)
5. Subwoofer (possible position)
As there are different set-up options (5.1 or 7.1 channel applications),
loudspeaker positioning will also depend on a given room’s shape.
Please consult your Audiovector dealer for special applications and
placement options.
Note: Audiovector loudspeakers are designed to offer the most
advanced performance in both stereo and multi-channel applications.
When connecting a loudspeaker to a multi-channel set-up, in general
the same guidelines as found in the previous section will apply.
This manual suits for next models
5
Table of contents
Other AUDIOVECTOR Speakers manuals


