Audiovox DV1100 User manual


E - 1
The lightning flash with an arrowhead
symbol, within the equilateral triangle, is
intendedtoalerttheusertothepresence
ofuninsulated"dangerousvoltage"within
the product's enclosure that may be of
sufficient magnitude to cause an electric
shock.
The exclamation point within the
equilateral triangle is intended to alert
the user to the presence of important
operating and maintenance (servicing)
instructions in this owner manual.
SAFETYPRECAUTION
WARNING:
TO PREVENT FIRE OR SHOCK HAZARD,DO NOT EXPOSETHIS APPLIANCE
TO RAIN OR MOISTURE.
CAUTION: TO PREVENT ELECTRIC SHOCK , MATCH WIDE BLADE OF PLUG TO WIDE
SLOT, FULLY INSERT.
WARNING: TO REDUCE THE RISK OF
ELECTRIC SHOCK, DO NOT REMOVE
COVER (OR BACK). NO USER-
SERVICEABLE PARTS INSIDE. REFER
SERVICING TO QUALIFIED SERVICE
PERSONNEL.
This product contains a
low power laser device.
Notes on Copyright
It is forbidden by law to copy, broadcast, show, broadcast on cable, play in public, rent
copyrighted material without permission.
Apparatus Claims of U.S. Patent Nos. 4,631,603; 4,577,216; 4,819,098 and 4,907,093
licensed for limited viewing uses only.
DVD video discs are copy protected, and any recordings made from these discs will be
distorted. This product incorporates copyright protection technology that is protected by
method claims of certain U.S. patents and other intellectual property rights owned by
MacrovisionCorporationandotherrightsowners.Useofthiscopyrightprotectiontechnology
must be authorized by Macrovision Corporation, and is intended for home and other limited
viewing uses only, unless otherwise authorized by Macrovision Corporation. Reverse
engineering or disassembly is prohibited.
On Placement
• Do not use the Unit in places which are extremely hot, cold, dusty, or humid.
• Place the Unit on a flat and even surface.
• Do not restrict the air flow of the Unit by placing it in a place with poor air flow, by covering
it with a cloth, or by placing it on carpeting.
FCC Information
This device complies with Part 15 of FCC Rules.
Operation is subject to the following two conditions:
(1) This device may not cause harmful interference, and
(2)This devicemustaccept anyinterference received,including interferencethatmay cause
undesirable operation.
On Safety
• Whenconnectingordisconnectingthe ACcord,griptheplug andnotthecorditself. Pulling
the cord may damage it and create a hazard.
• When you are not going to use the Unit for a long period of time, disconnect the AC power
cord.
On Condensation
• When left in a heated room where it is warm and damp, water droplets or condensation
may form inside the Unit. When there is condensation inside the Unit, the Unit may not
function normally. Let the Unit stand for 1 to 2 hours before turning the power on, or
gradually heat the room up and dry the Unit before use.
The symbol for
Class II (Double
lnsulation)
CAUTION
INVISIBLELASERRADIATIONWHEN
OPENANDINTERLOCKSDEFEATED.
AVOIDEXPOSURETOBEAM
WARNING:
• Should any trouble
occur, disconnect
the AC power cord
and refer servicing
to a qualified
technician.
• Do not place
anythingdirectlyon
the top of the Unit.
Damageto the Unit
can result.
WARNING

E - 2
1. ReadInstructions-Allthesafetyandoperatinginstructionsshouldbereadbeforetheappliance
isoperated.
2. RetainInstructions-Thesafetyandoperatinginstructionsshouldberetainedforfuturereference.
3. HeedWarnings-Allwarningsontheapplianceandintheoperatinginstructionsshouldbeadhered
to.
4. FollowInstructions-Alloperatinganduseinstructionsshouldbefollowed.
5. WaterandMoisture-Theapplianceshouldnotbeusednearwater-forexample,
neara bathtub, washbowl,kitchensink, laundrytub,in a wetbasement, or neara
swimmingpool,andthelike.
6. Carts and Stands - The appliance should be used onlywith a cart or standthat is
recommendedbythemanufacturer.
6A. An appliance and cart combination should be moved with care. Quick stops,
excessiveforce,andunevensurfacesmaycausetheapplianceandcartcombinationtooverturn.
7. Wall or Ceiling Mounting - The appliance should be mounted to a wall or ceiling only as
recommendedbythemanufacturer.
8. Ventilation-Theapplianceshouldbesituatedsothatitslocationorpositiondoesnotinterferewith
itsproperventilation.Forexample,theapplianceshouldnotbesituatedonabed,sofa,rug,orsimilar
surfacethatmayblocktheventilationopenings;or,placedinabuilt-ininstallation,suchasabook
caseorcabinet,thatmayimpedetheflowofairthroughtheventilationopenings.
9. Heat-Theapplianceshouldbesituatedawayfromheatsourcessuchasradiators,heatregisters,
stoves,orotherappliances(includingamplifiers)thatproduceheat.
10. PowerSources-Theapplianceshouldbeconnectedtoapowersupplyonlyofthetypedescribed
intheoperatinginstructionsorasmarkedontheappliance.
11. Grounding or Polarization - Precautions should betaken sothat thegrounding orpolarization
meansofanappliancearenotdefeated.
12. Power-Cord Protection - Power-supply cords should be routed so that they are not likely to be
walkedonorpinchedbyitemsplaceduponoragainstthem,payingparticularattentiontocordsat
plugs,conveniencereceptacles,andthepointwheretheyexitfromtheappliance.
13. Cleaning-Theapplianceshouldbecleanedonlyasrecommendedbythemanufacturer.
14. PowerLines -Anoutdoorantennashouldbelocatedawayfrompowerlines.
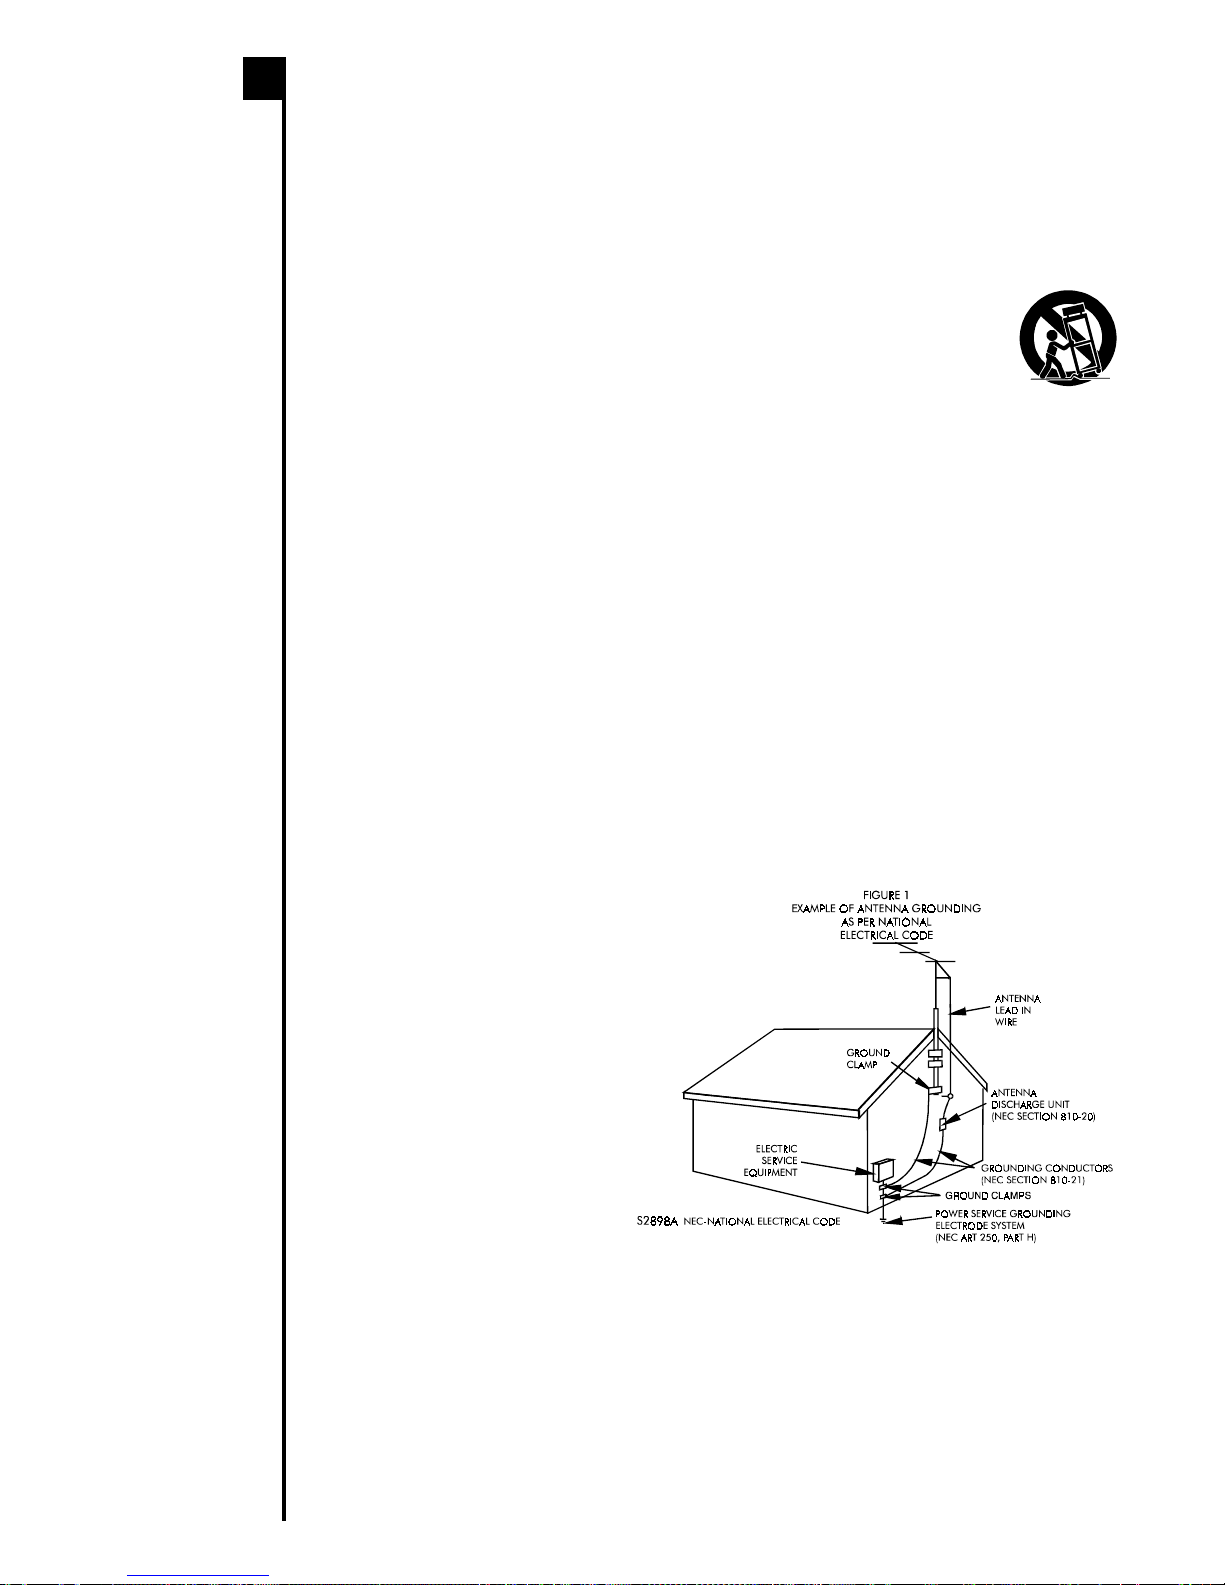
15. Outdoor Antenna Grounding - If an outside antenna is connected to the receiver, be sure the
antennasystemisgroundedsoastoprovidesomeprotectionagainstvoltagesurgesandbuiltup
staticcharges.Section810oftheNationalElectricalCode,ANSI/NFPANo.70,providesinformation
with respect to proper grounding of
the mast and supporting structure,
grounding of the lead-in wire to an
antenna discharge unit, size of
grounding conductors, location of
antenna-dischargeunit,connection
to grounding electrodes, and
requirements for the grounding
electrode.SeeFigure1.
16. NonusePeriods-Thepowercordof
theapplianceshouldbeunplugged
fromtheoutletwhenleftunusedfora
longperiodoftime.
17. Object and Liquid Entry - Care
shouldbetakensothatobjectsdonot
fall,andliquidsarenotspilled,intothe
enclosurethroughopenings.
18. Damage Requiring Service - The
applianceshouldbeservicedbyqualifiedservicepersonnelwhen:
A.Thepower-supplycordortheplughasbeendamaged;or
B.Objectshavefallen,orliquidhasbeenspilled,intotheappliance;or
C.Theappliancehasbeenexposedtorain;or
D.Theappliancedoesnotappeartooperatenormallyorexhibitsamarkedchangeinperformance;
or
E.Theappliancehasbeendropped,ortheenclosuredamaged.
19. Servicing - The user should not attempt to service the appliance beyond that described in the
operatinginstructions.Allotherservicingshouldbereferredtoqualifiedservicepersonnel.
IMPORTANTSAFETYINSTRUCTIONS

E - 3
TYPESOFDISCSTHATCANBE PLAYEDONYOUR
UNIT
The Unit can playback discs bearing any of the following marks:
Region Management Information
Region Management Information: This Unit is designed and manufactured to respond to the
Region Management Information that is recorded on DVD disc. If the Region number
described on the DVD disc does not correspond to the Region number of this Unit, this Unit
cannot play that disc.
The region number of this Unit is 1.
Disc Function or Operation that is Not Available
When the symbol appears on the TV screen, it indicates that the function or operation
is not available at this moment. This may occur for the following reasons:
• The disc manufacturer has imposed a restriction.
The specific functions on some DVDs are determined by the disc manufacturer. As this
Unit plays disc data in accordance with the guidelines of the disc manufacturer, some
functionsmaynotbeavailableonsome discs.Be suretoreadthedocumentation provided
with the disc.
• The function or operation may not be available for the current disc.
Thetypesoffunctionsand operationsthatcanbeused foraparticulardiscvary depending
on the features of that disc. Some disc functions and operations may differ from the
descriptions given in this Owner Manual. In this event, follow the instructions given on the
screen.
Icons Used on DVDs
Sample lcons
Notes:
• ThisUnit supports2-channel(L/R)audio and5.1ch (Multi-channel)MPEG Audio1/2(only
when the DIGITAL AUDIO OUT coaxial jack is used for connection). It does not support
7.1 channel MPEG Audio Version 2.0.
• Whenplayingbacka CD-G(Graphics)orCDEXTRAdisc,theaudioportionwillbe played,
but the graphic images will not be shown.
Title, Chapter and Tracks
• DVDs are divided into “titles” and “chapters”. If the disc has more than one movie on
it, each movie would be a separate “title”. “Chapters” are sections of titles.
Example: DVD
• Audio CDs are divided into “tracks”. A “track” is usually one song on an Audio CD.
Example: Audio CD
Note :
• Numbers identify each title, chapter, and track on a disc. Most discs have these numbers
recorded on them, but some do not.
Track 1 Track 2 Track 3 Track 4 Track 5
6
+D=FJAH +D=FJAH+D=FJAH +D=FJAH +D=FJAH!
DVDs
[8cm(3")/12cm(5”) disc] Audio CDs
[8cm(3")/12cm(5”) disc]
Notes on
Unauthorized
Discs
Youmaynotbeable
to play back some
DVD discs on this
Unit if they were
purchased from
outside your
geographic area or
made for business
purposes.
Language selections for audio
Language selections for subtitles
Screen aspect ratio
Multiple camera angles
Region code indicator
2
2
2
1. English
2. French
1. English
2. French

E - 4
IDENTIFICATIONOFCONTROLS
Front Panel
Rear Panel
1) Disc tray
Place disc in open tray. Open tray by
pushing OPEN/CLOSE button.
2) Remote sensor
Accepts the remote control signals.
3) Power indicator
When the Unit is turned on by pressing
the
I /
button, the light will illuminate.
4) Displaywindow
Displays system information.
5) VOLUME control
Adjust the VOLUME level.
6)
I /
button
Turns the power on and off.
7) SKIPbutton
Press to go back to previous chapters/
tracks.
8) SKIPbutton
Press to advance to chapters / tracks.
9) FUNCTIONbutton
Selectsthecomponent youwantto use.
10) STOPbutton
Stop playing a disc.
11) PLAYbutton
Press to start or resume playback.
12) PAUSE button
Press during playback to pause. And
duringpausestatus,eachtimeyoupress
PAUSE button, the picture advances
one frame.
13) OPEN / CLOSE button
Press to open and close the disc tray.
14) FM ANTENNA jacks
15) VIDEO OUT jack
16) Front speaker (R) terminals
17) Center speaker terminals
18) Front speaker (L) terminals
19) AM(MW) LOOP ANTENNA
terminals
20) S-VIDEO jack
21) DIGITAL AUDIO OUT jack
22) AUDIO OUT (L / R) jacks
23) AUX IN (R / L) jacks
24) REAR speaker (R) terminals
25) SUB-WOOFER speaker terminals
26) REAR speaker (L) terminals
27) Power cord

E - 5
CONNECTING TO A TV
Connecting to a TV
Use the VIDEO/AUDIO/S-VIDEO cable to connect your TV to the Unit.
Notes :
• When you connect the Unit to yourTV, be sure to turn off the power and unplug both units from
the wall outlet before making any connections.
• ConnecttheUnittoyourTVdirectly.If youconnect theDVD playertoaVTR,TV/VTRcombination
or video selector, the playback picture may be distorted as DVD discs are copy protected.
Turning on the Unit and TV
1)Press the
I /
button to turn the Unit ON.
2)Press the
I /
/POWER or FUNCTION button on the remote control to turn on the Unit or press
the PLAY button on the Unit.
3)Turn on the TV by pressing its POWER/OPERATE button.
4)Select the channel on yourTV corresponding to the video input you connected the appliance
to. See TV User guide for more information.
• If you have connected the appliance successfully, the DVD logo (start-up picture) will
appear on your TV screen.
Power cord connection
• Make sure that all the components and speakers are connected correctly.
To VIDEO
IN
To AUDIO OUTTo VIDEO OUT
To S video input
To S VIDEO OUT
S video cable (not supplied)
If the TV has S video input, connect
the Unit with an S video cable.
When using an S video cable, do not
connect the yellow video cable.
To AUDIO
IN
To wall outlet
(white)
(white)
(red)
(red)
(yellow)
(yellow)
Cautions
• To prevent
electrical shock,
match wide blade
ofplugtowideslot,
fully insert.
• Be sure the AC
power cord is
disconnected and
allfunctionsareoff
before making
connections.
• When you are not
going to use the
Unit for a long
period of time,
disconnecttheAC
power cord.

E - 6
LISTENING TO AN AUDIO SYSTEM
Use the coaxial cable (not supplied) to connect the DIGITAL AUDIO OUT jack and the
amplifier equipment's AUDIO INPUT jack.
LISTENING TO THE CONNECTED EQUIPMENT
1.Press the FUNCTION button to AUX.
2.Play the external source.
CONNECTINGTO ANAUDIO SYSTEM AND OTHER
EQUIPMENT
To wall outlet
(white)
(white)
(red)
(red)
To VIDEO
IN
To AUDIO
IN
(white)(red)(yellow)
To AUDIO OUTTo VIDEO OUT
(white)(red)(yellow)
VCR (not included)
To AUX IN
To AUX OUT
Notes:
• If the external equipment is a television and this audio system is closed to it, you may
experience interference if the tuner function is selected while the television is working.
• When you have selected TUNER function, the left/right front speakers and sub-woofer are
activated only.
To V IDEO
IN
To AUDIO OUTTo VIDEO OUT
To A UDIO
IN
To wa l l out l e t
(white)
(white)
(red)
(red)
(yellow)
(yellow)
To DIGITAL
AUDIO OUT jack
To COAX I AL
type digital
audio input
To coaxial cable
(not supplied
Amplifier equipped
with Digital Audio or
MPEG2 audio decoder
HA@ MDEJA

E - 7
ANTENNACONNECTION
For better reception
FM
Connect FM antenna to the FM ANTENNA jacks.
AM(MW)
Connect the loop antenna (supplied) to the AM(MW) LOOP ANTENNA terminals.
AM(MW)
LOOP ANTENNA
(SUPPLIED)
To w al l o u t l e t
FM antenna

E - 8
Speaker position instructions for better listening
Wall mountable surround (rear) speakers
1)Mark the correct mounting position on the wall.
2)Insert a fixing screw(s) at the marked position on the wall.
3)Align the slot hole(s) of the speaker over the screw and pull the speaker downward until it is
firmly hooked.
Surround
(rear) or
speaker
Surround Speakers Connections
EnsureineachcasethattheTRANSPARENT(+)wireisconnectedtothe(+)terminalofthesurround
speaker output and the TRANSPARENT (-) wire with black line is connected to the (-) terminal of
thesurroundspeakeroutput.Alsoensurethatthecorrectorientationforleftandrightmainspeakers
is observed.
Front
speaker Center
speaker Sub-
woofer Rear
speaker
SPEAKERCONNECTIONS
Note:
Connecting speakers
otherthanthe speakers
supplied with the Unit,
may damage the Unit.
Subwoofer Connection
ConnectthewireswiththeTRANSPARENT(+)wiretothered(+)terminalandtheTRANSPARENT
(-) wire with black line to the black (-) terminal.
SUB-
WOOFER
FRONT
RIGHT
IMPEDANCE
8 ohm ( )
Ω
REAR
RIGHT
IMPEDANCE
8 ohm ( )
Ω
CENTER IMPEDANCE
8 ohm ( )
Ω
IMPEDANCE
6 ohm ( )
Ω
FRONT
LEFT
IMPEDANCE
8 ohm ( )
Ω
REAR
LEFT
IMPEDANCE
8 ohm ( )
Ω
Subwoofer
Rear speaker ( L )
Rear speaker ( R )
Front speaker ( R ) Front speaker ( L )Center speaker
AC cord to
an AC OUTLET
AC
5
+
+

E - 9
ADJUSTINGTHESOUND
To adjust the surround sound balance while Pro Logic decoding is in effect
Use the remote control to make the following changes to speaker balance:
Front speaker (left)
• PresstheSOUND buttontodisplayLEFT,thenpressthe or CURSOR buttontoadjust
the sound level. It will show on the display of the Unit.
Front speaker (right)
• PresstheSOUNDbuttontodisplayRIGHT,thenpressthe or CURSORbuttontoadjust
the sound level. It will show on the display of the Unit.
Center speaker
• Press the SOUND button to display CENTRE, then press the or CURSOR button to
adjust the sound level. It will show on the display of the Unit.
Rear speaker (left)
• Press the SOUND button to display REAR L, then press the or CURSOR button to
adjust the sound level. It will show on the display of the Unit.
Rear speaker (right)
• Press the SOUND button to display REAR R, then press the or CURSOR button to
adjust the sound level. It will show on the display of the Unit.
Subwoofer
• Press the SOUND button to display WOOFER, then press the or CURSOR button to
adjust the sound level. It will show on the display of the Unit.
To adjust the sound quality
Press the SOUND button toselect an equalizationmode (BASS, MIDDLE, TREBLE).Press
the or CURSOR button to adjust the sound level.
BASS : the low range of sounds
MIDDLE : the mid range of sounds
TREBLE : the high range of sounds
Dolby Pro Logic is a decoding system that was developed to get a better sense of presence from
sources encoded with Dolby Surround. The feeling of position has been improved by the addition
of a separate center speaker channel. Look for this logo on your DVD Unit.
DolbyDigital
Dolby Digital is a sound system developed by Dolby Laboratories Inc. that gives movie theatre
ambience to audio output when the Unit is connected to a Dolby Digital 5.1 channel processor or
amplifier.
This Unit automatically recognizes DVDs that have been recorded with Dolby Digital.
Not all Dolby Digital sources are recorded with 6 channels.
SomesourcesmarkedDolbyDigitalmayberecorded inDolbySurround, a2channelsystem.Look
for this logo on your DVD Unit.
"DTS" and "DTS Digital Out" are trademarks of Digital Theater Systems, Inc.
This Unit does not decode DTS Digital Surround signal.
ToenjoyDTSDigitalSurroundTM playback,anexternal5.1channelDTSDigitalSurroundTM decoder
system must be connected to the DIGITAL AUDIO OUT jack of the Unit.
Manufactured under license from Dolby Laboratories.
'Dolby' , 'Pro Logic' and the double-D symbol are trademarks of Dolby Laboratories.
Notes:
• If you do not press
any button within a
few seconds, the
display will return to
normal.
• PresstheVOLUME+
control to right side
to increase the
volume. Press the
VOLUME- controlto
left side to decrease
thevolume.

E - 10
ANGLE indicator
Appears when
multiple camera
angles are recorded
in the section of the
DVD that is currently
playing.
TITLE indicator
WhenaDVDisloadedin
the Unit, this indicator
appears along with the
title number.
CHAPTER /TRACK indicator
WhenaDVDisloadedintheUnit,thisindicator
appears along with the chapter number.
When a Audio CD is loaded in the Unit, this
indicatorappearsalongwiththetracknumber.
REMAINTOTAL
indicator
Indicates the elapsed
playback time of the idsc.
Withsomediscs, thisarea
also shows the total play
time of the disc when
playback is stopped.
DOLBY DIGITAL
indicator
Displays while the
Dolby processing is
being performed.
OPERATION indicator
Indicates the operation status of the disc and Unit.
REPEAT playback
indicator
Displayed during
repeat playback.
DISPLAYWINDOW
DISPLAYINFORMATION
The DVD displays the information shown below on the TV screen and on the Unit's DVD
display depending on the operation status.
Display ExamplesDisplay Examples
Display Examples
Region (Local) Number Error Indicator
If the region (local) number of the disc that you attempt to play differs from the region number of the
Unit "Invalid Region" appears on the TV screen. (The disc cannot be played).
If no disc is loaded
when the Unit is
switched on.
Tray open
Tray closed
Loading
Stopped
Playing
Paused
Fast forward
Fast reverse
Slow
Repeat A - B
Remarks
"" appears when the tray is
closed and:
1)There is no disc in the tray.
2)ThedisctypeisnotDVDorAudioCD.
3)The disc is not loaded correctly
(upside-down, etc.)
The display changes to show
other indicators (total time, etc.)
Freezes the image on the screen or
pauses audio playback.
The display changes to show
other indicators (total time, etc.)
Does not function for Audio CDs.
Repeat a specific section. Does not
function for Audio CDs.
The operation is not permitted by the
DVD Unit or the disc.
TV Screen Unit Display
No Disc
Close
Eject
Stop
Play
Pause
x 2
x 2
x 1/2
/
Loading
...
A-B
A B

E - 11
REMOTECONTROLUNIT
1) POWER / button
Turns the Unit power on and puts it in standby
mode.
2) Number (0 - 9) and (+10) buttons
Use when creating programs, and entering a
parental level password. To select preset stations
over 9, press +10 button and then the second no.
for example, to enter 18, press +10 and then 8.
3) SOUND button
Selects an equalization mode.
4) VOLUME (+ / -) buttons
Adjust the volume to your desired level.
5) / CURSOR buttons
Use to highlight selections on a menu screen and
make adjustments of the Unit settings.
6) FUNCTION (FCN) button
Display the FUNCTION screen where you can
check or change various setting.
7) PAUSE button
Pause playback.
8) PREV / NEXT / - PRESET + buttons
Move reverse or forward through disc titles,
chapters or tracks on a disc.
Tune to the presetted stations.
9) REV / FWD / TUNING buttons
REV: Fast reverse playback.
FWD: Fast forward playback.
TUNING : Scan all available radio stations.
10) ANGLE button
Switch the camera angle of the video presentation
when scenes with multiple camera angles are
recorded on a DVD.
11) AUDIObutton
Select one of the audio soundtracks programmed
on a DVD or selects the audio output mode on a
AUDIO CD.
12) DISPLAY (DISP) button
Change the mode of the FUNCTION display.
13) MENU button
Open and close DVD's menu.
14) ZOOMbutton
Zoom into an image.
15) SUBTITLE button .....
Select one of the subtitle languages programmed
on a DVD.
(continued on next page)(continued on next page)
(continued on next page)
SOUND
ENT
FCN RETURN
PRESET
PRESET
SLOW SLOW
PAUSE
NEXT
PREV
ANGLE
DISP
ZOOM
AUDI O
MENU
SUBTITLE
CLEAR
GOTO SETUP
PLAY
TUNING
!
"
#
&
'
$
%
!
"
#
BANDFM MODE
A-B DISC
MEMORY
REPEAT

E - 12
16) / CURSOR buttons
Use to highlight selections on a menu screen
and make adjustments of the Unit settings.
17) ENTERbutton
Confirm selections on a menu screen.
18) RETURN button
Return to a previous menu screen on a DVD or
return to DVD playback from the DVD menu
screen.
19) SLOW buttons
Performslowreverse/forwardplaybackofDVDs.
20) STOPbutton
Stop playback.
21) PLAY button
Start playback.
22) MEMORYbutton
Enter the number of a selected chapter or track.
Enter the number of a selected station.
23) CLEAR button
Clear input selections and cancel certain
playback functions
24) SETUPbutton
Open and close the Unit's SET UP menu screen.
25) GOTObutton
Skip directly to a specific location on a DVD disc.
26) BAND / REPEAT-DISC button
Switches between AM or FM.
Perform repeat whole disc playback of CD or
DVD.
27) FM MODE / REPEAT A - B button
Set FM MODE to FM STEREO for FM stereo
sound or to FM MONO for mono sound.
Perform point-to-point repeat playback of DVD.
Perform repeat a current track playback of CD.
REMOTECONTROLUNIT
(continued)
&
'
%
!
"
#
$
%
SOUND
ENT
FCN RETURN
PRESET
PRESET
SLOW SLOW
PAUSE
NEXT
PREV
ANGLE
DISP
ZOOM
AUDIO
MENU
SUBTITLE
CLEAR
GOTO SETUP
PLAY
TUNING
BANDFM MODE
A-B DISC
MEMORY
REPEAT

E - 13
TO INSTALL BATTERIES
1.Open the battery door.
BATTERY REPLACEMENT
When batteries become weak, the operating distance of the Remote Control is greatly
reduced and you will need to replace the batteries.
Notes:
• IftheRemote Control is not going tobeused for a long time, removethebatteries to avoid
damage caused by battery leakage corrosion.
• Do not mix old and new batteries. Do not mix ALKALINE, standard (CARBON-ZINC) or
rechargeable (NICKEL-CADMIUM) batteries.
2.Insert two "AA" or UM-3 size batteries.
USING THE REMOTE CONTROL
• Point the Remote Control at the REMOTE SENSOR located on the Unit.
• When there is a strong ambient light source, the performance of the infrared REMOTE
SENSOR may be degraded, causing unreliable operation.
• The recommended effective distance for remote operation is about 16 feet (5 meters).
LOADINGTHEBATTERIES

E - 14
PLAYING A DISC
Basic
playback
BASIC PLAYBACK
Preparations
• When you want to view a disc, turn on theTV and select the video input connected to the Unit.
• When you want to enjoy the sound of discs from the audio system, turn on the audio system
and select the input connected to the Unit.
• Adjust theVOLUME or SOUND control to your desired level.(See ADJUSTINGTHE SOUND)
1.Press the
I /
button on the front panel, the indicator lights up.
2.Then press the /POWER or FUNCTION button on the remote to turn on the Unit, or press
the PLAY or FUNCTION button on the front panel to turn on the Unit.
3.Press the OPEN / CLOSE button.The disc tray opens.
4.Place the disc on the disc tray with the label (side 1 or side 2) side up .
5.Press the OPEN / CLOSE button.The disc tray closes.
6.Press the PLAY button.
It takes a short while for your Unit to load the disc. After loading, the Unit will automatically
start playback the disc.
To interrupt playback
Press the
II
PAUSE button and “
II
PAUSE”indicator displays on the screen.Press the PLAY
button to resume playback.
To stop playback
Press the STOP button at the location where you want to interrupt playback. To resume
playback at the position where the disc was stopped, press the PLAY button.
Press the STOP button twice, the Unit’s memory will be cleared.
DVD C
D
(continued on next page)(continued on next page)
(continued on next page)
Selecting the picture enhancement
1.Press the SETUP button during playback.
2.Use or button to Brightness, and then press the ENTER button to select On / Off.
On : Picture will be raised brightness to clarify details.
Off : Picture will be deepened colors.
3.Use or button to Edges and press theENTER button to select the Sharpen / Soften / Off.
Sharpen : Fine detail will be easier to see
Soften : Soft-focus effect.
Off : Picture will be returned to normal.
4.If you want to exit the SETUP MENU and return to the normal screen, press the RETURN
button.
Notes :
• Use the OPEN /
CLOSE button on
the front panel to
open or close the
disc tray. Do not
push the disc tray
or you may
damage the Unit.
• Let the disc tray
open completety
before removing
thedisc.Press the
OPEN / CLOSE
button to close the
disc tray after you
remove the disc.
Note:
• Actual effect to
pictures may
vary depending
on the TV.
This owner’s manual explains the basic instructions of this DVD Unit. Some DVD
discs are produced in a manner that allows specific or limited operation during
playback. As such, the DVD Unit may not respond to all operating commands.This
is not a defect in the DVD Unit. Refer to the instruction notes of discs.
“ ” may appear on the TV screen during operation. A “ ” means that the
operation is not permitted by DVD Unit or the disc.

E - 15
Basic
playback
DV
D
PLAYING A DISC
(continued)
(continued on next page)
Fast Forward/Fast Reverse
1.Press the FWD or REV button when a disc is playing.
• The disc begins fast scan at x2 speed.
• Four speeds are available. Each time FWD or REV button is pressed, the speed of
fast scan changes in the following sequence:
2.Press the PLAY button when you reach the desired point.
Slow-motion play
1.Press the SLOW or SLOW button in the play mode.
• Two speeds are available. Each time SLOW or SLOW button is pressed, the speed
of slow-motion playback changes in the following sequence:
2.Press the PLAY button to return to the normal playback speed.
SKIP (Forward / Reverse)
While you are playing a disc, press the NEXT button of the remote or SKIP button of
front panel to move to the beginning of the next chapter. Press the PREV button of the
remote or SKIP button of the front panel to move to the previous chapter and automatically
start playing that chapter.
Zooming into an image
While a disc is playing, press the ZOOM button.
• While an image is zoomed, you can use , , and button to shift the view and display the
part you want.
• If you are already at the far left side of the image, the display will not be shifted when you
press button.

E - 16
Basic
playback
DV
D
Angle selection
Some DVDs contain scenes which have been shot from a number of different angles. For
these discs, the same scene can be viewed from each of these different angles.(The recorded
angles differ depending on the disc used.)
1.While you are playing a DVD with different angles recorded, press the ANGLE button to view
the number of the current angle.
2.Press the ANGLE button repeatedly to change the scene to the next angle in those recorded.
• About two seconds later, playback continues from the new angle you selected.
• If no button is pressed within 10 seconds, playback continues without changing the current
angle.
Sequence of angle shots
(Example)
Audio selection
On some discs, the sound is recorded in two or more formats of multi-channel (5ch or 5.1ch).
Use procedure below to select the type of playback.
1.While a disc is playing, press the AUDIO button to show the current audio format number.
2.Press the AUDIO button repeatedly to select the desired audio format.
Subtitle selection
1.While a DVD is playing, press the SUBTITLE button to display the current language setting,
as shown in the example below.
2.Press the SUBTITLE button repeatedly to select the desired subtitle language.
Notes :
• If only one language is recorded, the language does not change.
• About two seconds later, playback continues with the new subtitle you selected.
• The number of languages recorded differs depending on the disc.
• If no button is pressed within 10 seconds, playback continues without changing the current
subtitle.
• This function can only be used for discs on which subtitles have been recorded in multiple
languages.
• On some DVDs, subtitles are activated from the main menu of the DVD. Press the MENU
button to activate the main menu.
PLAYING A DISC
(continued)
Notes:
• This function can
only be used for
discs on which
scenes shot from
multiple angles
have been
recorded.
•If only one
angle is
recorded, is
displayed.
Notes :
• If only one audio
formatis recorded,
the number does
not change.
• About two
seconds later,
playback
continues in the
new audio format.

E - 17
DVD PLAYBACK FOR SPECIAL FUNCTION
Basic
playback About the screen
Using DISPLAY, you can check and change the current settings of the following items:ANGLE,
AUDIO and SUBTITLE.
• While the disc is playing, press the DISP (DISPLAY) button to display the screen shown as
below.
Elapsed time: Elapsed time from the beginning of the chapter which is playing currently.
Remaining time: Remaining time of the title which is playing currently.
• Press the DISP (DISPLAY) button twice to display the screen shown as below.
• Press the ANGLE, AUDIO and SUBTITLE button to change the selected item.
Title skip
• The number of the title currently playing and total titles of disc.
• Press the GOTO button to set your desired title, then press the ENTER button to confirm.
Chapter skip
• The number of the chapter currently playing and total chapters of the currently played title.
• Press the GOTO button to set your desired chapter, then press the ENTER button to confirm.
Time skip
• Elapsed time from the beginning of the currently playing chapter and the remaining time from
the beginning of the currently playing title.
• Press the GOTO button to set your desired point to start playback, then press the ENTER
button to confirm.
Angle setting
• The current angle is displayed.When a disc with only one angle is played back, “
Angle 1
/1
” is
displayed.
• Press the ANGLE button to select the desired angle.
Audio setting
• The type of audio currently selected is displayed.
• Press the AUDIO button to select your desired type of audio.
Subtitle setting
• The subtitle number and language currently selected is displayed.When a disc with only one
subtitle is played back, “
1/1 En
g
” is displayed.
• Press the SUBTITLE button to select your desired language.
DV
D
GOTO function
This function allows you to skip directly to the beginning of any title or chapter while a disc is
playing.
(continued on next page)(continued on next page)
(continued on next page)
Note :
• Aftersettings,press
the DISP
(DISPLAY) button
to return to the
normal screen.
Elapsed Time Remaining Time
Chapter Time
Audio setting
Subtitle setting
Angle setting
Title

E - 18
Basic
playback
DV
D
Normally, DVD discs are divided into titles, and the title are sub-divided into chapters. Audio
CDs are divided into tracks.You can quickly locate any specific title, chapter or track.
Locating a specific title directly
If a DVD video disc contains title numbers, you can locate a specifc title by directly selecting a
title number.
1.In stop mode, press the GOTO button to search your desired title.
2.Press or button to highlight a specific title and press the corresponding number button(s)
for the title you want.
3.Press the ENTER button to confirm.The Unit will start playback about 3 seconds later.
Note :
• Pressing the CLEAR button resets the title number.
DVD C
D
Locating a specific chapter / track directly
If you know the chapter / track number you want to play, you can locate a specifc chapter / track
by directly selecting a chapter / track number.
1.Press the GOTO button to search your desired chapter / track.
2.Press or button tohighlight a chapter/trackand pressthecorresponding numberbutton(s)
for the chapter you want.
3.Press the ENTER button to confirm.The Unit will start playback about 3 seconds later.
Note :
• Pressing the CLEAR button resets the chapter / track number.
DVD PLAYBACK FOR SPECIAL FUNCTION
(continued)
DVD
CD
(continued on next page)(continued on next page)
(continued on next page)

E - 19
DVD C
D
Locating a specific time directly
You can locate a specific location by entering its corresponding time (hours, minutes, seconds)
1.Press the GOTO button to search your desired playing point.
2.Press or button to highlight time.
3.Press the corresponding number buttons for the setting point you want.
• The first two numbers you entered represent hours.
• The second two numbers you entered represent minutes.
• The third two numbers you entered represent seconds.
4.Press the ENTER button to confirm.The Unit will start playback about 3 seconds later.
Notes :
• Some discs may not respond to this process.
• Some scenes may not be located precisely as you specified.
• This method for accessing specific locations is available only within the current title of the
DVD disc or within the current track of the Audio CD.
• You can move through the menu by pressing the and buttons.
• Pressing the CLEAR button resets the time.
Basic
playback
DV
D
Angle setting
1.Press the DISP (DISPLAY) button twice. The FUNCTION menu display on the screen and
you can see how many angles are recorded on disc.
2.Press the ANGLE button repeatedly to select your desired angle.
3.The Unit will change to your desired angle about 3 seconds later.
4.Press the DISP (DISPLAY) button to resume the normal screen.
Audio setting
1.Press the DISP (DISPLAY) button twice. The FUNCTION menu display on the screen and
you can see how many audio formats are recorded on the disc.
2.Press the AUDIO button repeatedly to select your desired type of audio.
3.The Unit will change to your desired type audio about 3 seconds later.
4.Press the DISP (DISPLAY) button to resume the normal screen.
Subtitle setting
1.Press the DISP (DISPLAY) button twice. The FUNCTION menu display on the screen and
you can see how many audio formats are recorded on the disc.
2.Press the SUBTITLE button repeatedly to select your desired language.
3.The Unit will change to your desired language about 3 seconds later.
4.Press the DISP (DISPLAY) button to resume the normal screen.
DVD PLAYBACK FOR SPECIAL FUNCTION
(continued)
DVD CD
This manual suits for next models
1
Table of contents
Other Audiovox Home Theater System manuals

Audiovox
Audiovox Jensen JHT140 User manual

Audiovox
Audiovox RB-3600 User manual

Audiovox
Audiovox DV5007 - 500with 5 DVD Home Theater System User manual

Audiovox
Audiovox DV1201 - DV Home Theater System User manual

Audiovox
Audiovox AVR2000 User manual

Audiovox
Audiovox RB-3600 User manual

Audiovox
Audiovox DV1532 User manual

Audiovox
Audiovox CE3000HT User manual

Audiovox
Audiovox Jensen JHT350 User manual

Audiovox
Audiovox DVD Home Theatre System CD-R/RW CD Playback User manual