Audioxtra AXIS AT1900BT User manual

AT1900BT
12/24V WATER/DUST PROOF
AM/FM MULTIMEDIA PLAYER
SPECIFICATIONS
TUNER
- PLL Synthesized AM/FM Stereo
- Elite RDS Tuner
- FM 87.5~108 MHz; AM 531~1602 KHz
- 30 Station Presets - 18FM/12AM Memory
- Station Seek/Preset Scan/Auto Store
- Automatic or Manual Tuning
- Local/Distant Control
- Mono/Stereo
GENERAL
- Fixed Face Panel
- Mechless (without CD deck)
- IP54 Dust/Water Resistant Face & Body
- Conformal Coated PCB
- “Ultra Memory” To retain preset settings after battery
is disconnected
- Steering Wheel Control (3 Wire, 12 Function Programmable)
- Illuminated Controls (White)
- Digital Clock
- ISO DIN Mounting
- Mini DIN Chassis (96mm)
- Face Panel: 188W x 58Hmm
- Chassis: 178W x 50H x 96Dmm
- 12/24 Volt DC (10.8-32V) Negative Ground
- Max Power 40 Watts x 4 CH (24V)
BLUETOOTH
- Bluetooth in Phone Mode
- Pick-Up/End Call
- Internal/External Microphone - Selectable
- A2DP Audio Streaming
- Scrolling Song Title Display
AUDIO CONTROL
- Rotary Encoder
- Electronic Volume/Balance/Fader/
Bass/Treble
- Loud/Mute
- 4-Band DSP Settings
- Speaker Impedance 4-8 Ohm
- Tele Mute
MULTIMEDIA
- USB Input: Rear (with Charging)
- RCA AUX-IN: Rear
- 2 Ch RCA Line Out
- Intro/Repeat/Random Play/Pause
- Track Down/Up (MP3/WMA Files)
- Directory Down/Up
INCLUDED
- ISO Wiring Harness
- Installation Hardware
- 1 DIN Cradle
OPTIONAL
- Mounting U-Bracket
- External Handsfree Microphone
- DAB+ Module & Antenna
INSTRUCTION MANUAL

2
WIRING CONNECTION
CONSIDERATIONS
1. Please read these instructions carefully before installation.
2. Ensure all speaker cables are connected before powering the unit.
3. Insulate all exposed wires to avoid short circuit.
4. Please secure all wires after installation.
5. This player suits 12/24V DC vehicles.
6. Please confirm that all wires are correctly connected.
Wrong connections may cause faults or void the warranty.
INSTALLING THE UNIT
1 - Remove the mounting sleeve 2 - Insert the sleeve into the dashboard
and bend the tabs if necessary
3 - Slide the unit into sleeve
NOTE: Store the release
keys in a safe place for
future use
3
WIRING CONNECTION
WIRING CONNECTION
IMPORTANT NOTES:
1. This player can only be used in a 12/24V DC system
2. Do not connect the battery until all cables are attached.
3. Connect yellow wire to the positive of the battery (+).
4. When changing fuses, please replace with the same specification amperage.
5. Good quality speakers with 4-8 ohm impedance will provide the best audio result.
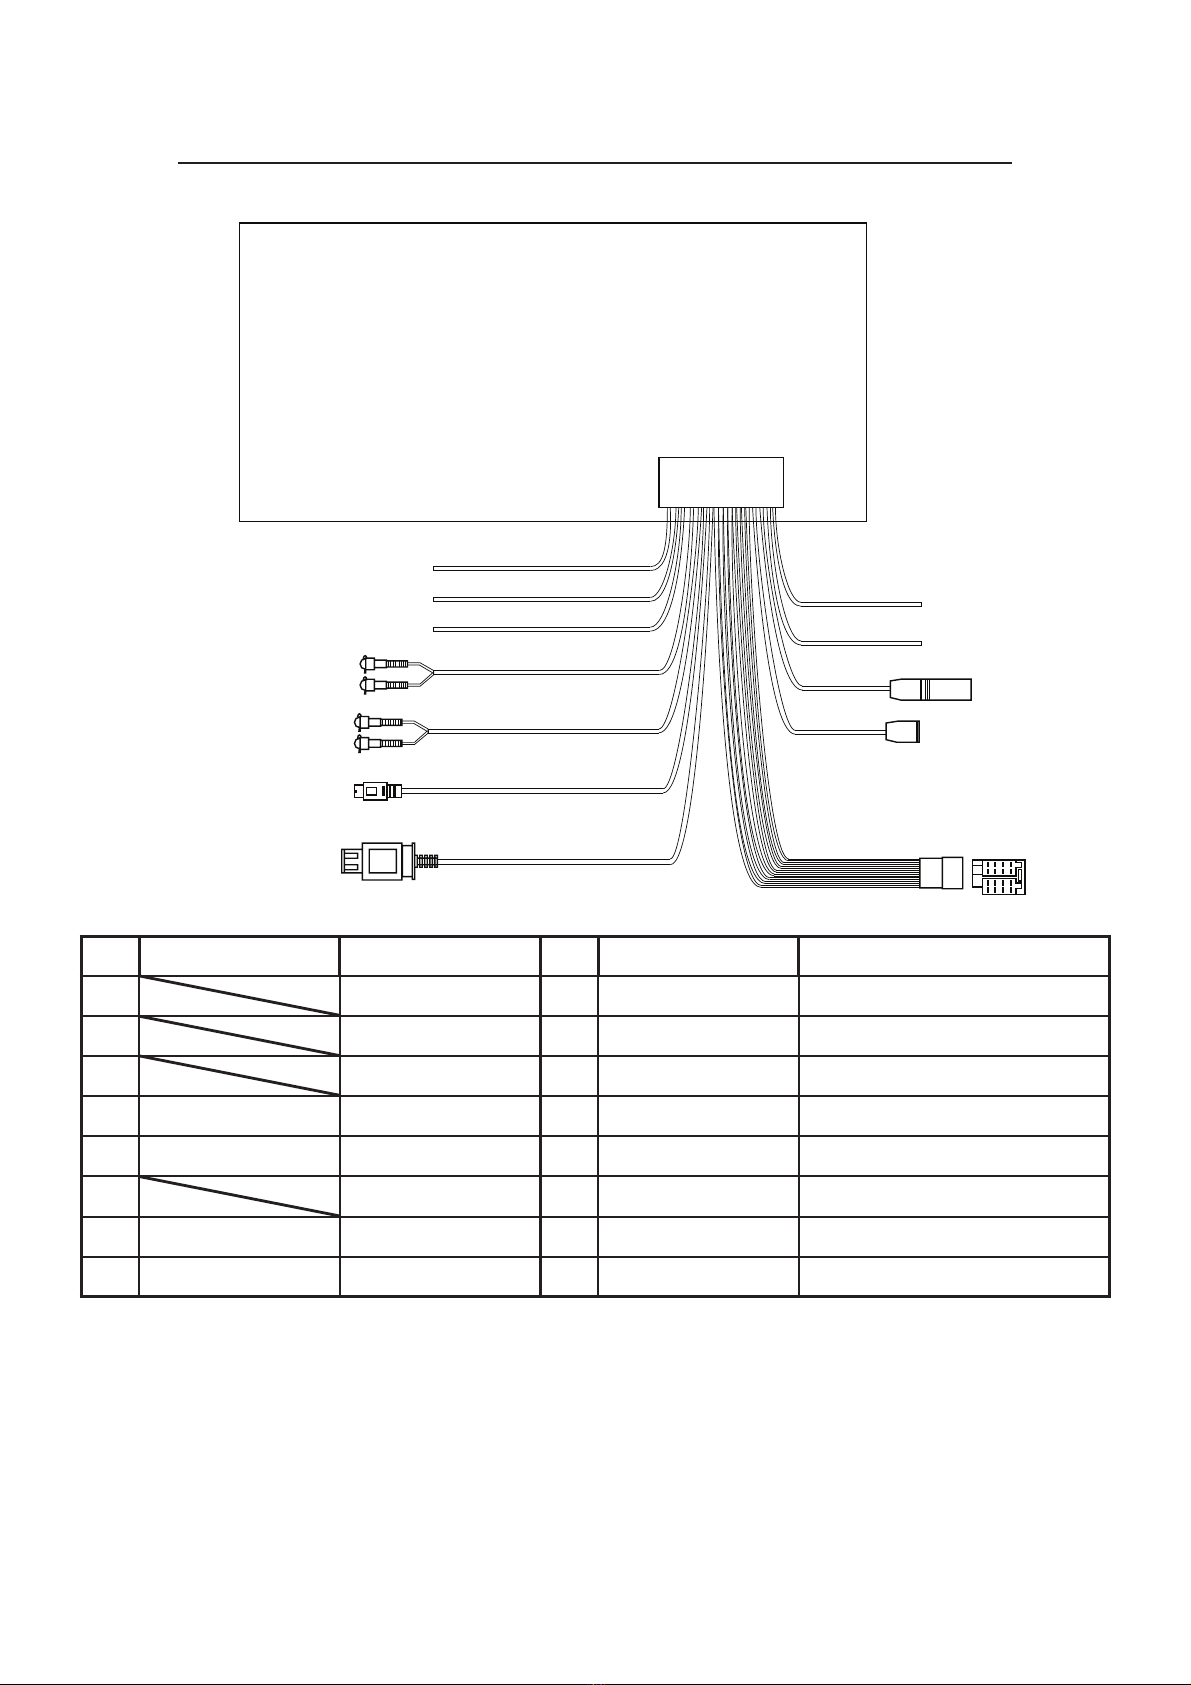
NO WIRE COLOUR DESCRIPTION NO WIRE COLOUR DESCRIPTION
A1 B1 PURPLE RIGHT REAR SPEAKER +
A2 B2 PURPLE/BLACK RIGHT REAR SPEAKER -
A3 B3 GREY RIGHT FRONT SPEAKER +
A4 YELLOW B+ B4 GREY/BLACK RIGHT FRONT SPEAKER -
A5 BLUE ANTENNA B5 WHITE LEFT FRONT SPEAKER +
A6 B6 WHITE/BLACK LEFT FRONT SPEAKER -
A7 RED ACC B7 GREEN LEFT REAR SPEAKER +
A8 BLACK GROUND B8 GREEN/GREEN LEFT REAR SPEAKER -
USB CONNECT
ISO
MIC IN
AUX IN - RCA (BLACK)
8 PIN MALE CONNECTOR
REAR RCA LINE OUT (GREY)
STEERING WHEEL CONTROL 1
STEERING WHEEL CONTROL 2
GROUND
RADIO ANTENNA
TELEPHONE MUTE
GROUND
BLACK
BLACK
ORANGE
BLACK
BROWN
BLACK
BROWN/BLACK
(For Optional DAB+)
4
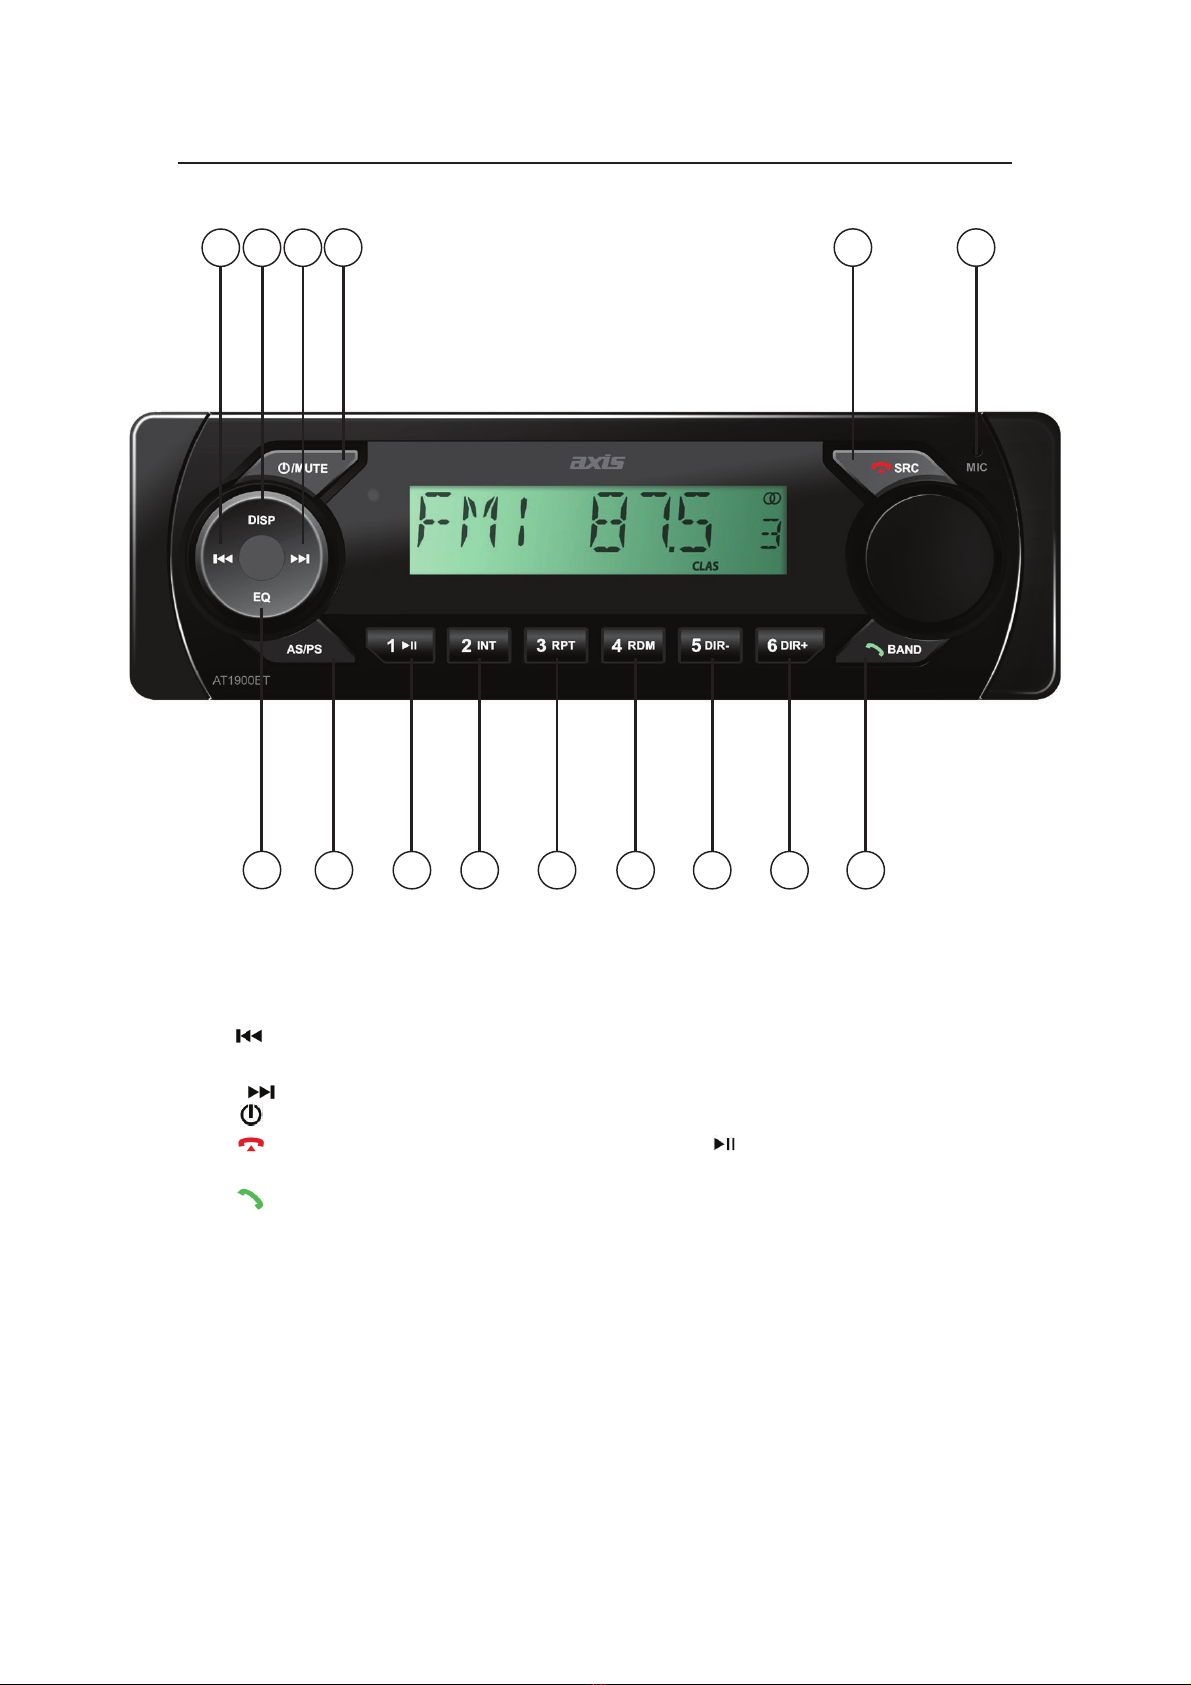
LOCATION OF CONTROLS
1. (Seek Down)
2. DISP (Display)
3. (Seek Up)
4. /MUTE (Power / Mute)
5. SRC (End Call/Source Select)
6. MIC (Microphone)
7. BAND (Answer Call/Band Select)
8. 6/DIR+ (Preset 6/Directory Up)
9. 5/DIR- (Preset 5/Directory Down)
10. 4/RDM (Preset 4/Random)
11. 3/RPT (Preset 3/Repeat)
12. 2/INT (Preset 2/Introduction)
13. 1/ (Preset 1/Play/Pause)
14. AS/PS (Auto Store/Preset Scan)
15 EQ (Equaliser Settings)
1234
15 14 13 12 11 10 9 8 7
56

5
KEY FUNCTIONS
KEYS ACTIONRADIO USB AUX BT
POWER
/MUTE
Short Power On/Mute Power On/Mute Power On/Mute Power On/Mute
Long Power Off Power Off Power Off Power Off
SRC/
Short Change Source/
Hang Up
Change Source/
Hang Up
Change Source/
Hang Up
Change Source/
Hang Up /Delete
Long BT Off/Link BT Off/Link BT Off/Link BT Off/Link
BAND/
Short Answer/
Band Change Answer Answer Answer/Dial
Long Auto store / / /
AS/PS Short Preset Scan Song Search / Phone Call Transfer
Long Auto Store / / /
DISP
Short Clock/Info Info/title
/Sch: 0 Clock/Info Clock/Info
Long Clock Setting
Show Clock Clock Setting Clock Setting Clock Setting
EQ Short FLAT-CLAS-POP-
ROCK-EQ OFF
FLAT-CLAS-POP-ROCK
-EQ OFF
FLAT-CLAS-POP-ROCK
-EQ OFF
FLAT-CLAS-POP-ROCK
-EQ OFF
Long LOUD On/Off LOUD On/Off LOUD On/Off LOUD On/Off
>> Short Seek Up Next File / Next File/Dial:9
Long Turn Up FF / /
<< Short Seek Down Previous File/Sch:8 / Previous File/Dial:8
Long Turn Down FR / /
VOL Rotary Volume Up/Down Volume Up/Down Volume Up/Down Volume Up/Down
SEL
(PUSH
VOL)
Short BAL-FAD-
FLAT-LOUD BAL-FAD-FLAT-LOUD BAL-FAD-FLAT-LOUD BAL-FAD-FLAT-LOUD
Long
AF-TA-PTY-REG-
BEEP-CLOCK-P_VOL
- SWC-DX-ST
AF-TA- BEEP-CLOCK-
P_VOL- SWC
AF-TA- BEEP-CLOCK-
P_VOL- SWC
AF-TA- BEEP-CLOCK-
P_VOL- SWC
1/PAU Short Recall M1 Station Play/Pause/Sch:1 / Play/Pause/Dial:1
Long Save Station to M1 / Software Version /
2/INT Short Recall M2 Station INT ON/OFF/Sch:2 / Dial:2
Long Save Station to M2 / Reset (5 sec) /
3/RPT Short Recall M3 Station RPT ONE/ALL/Sch:3 / Dial:3
Long Save Station to M3 / / /
4/RDM Short Recall M4 Station RDM ON/OFF/Sch:4 / Dial:4
Long Save Station to M4 / / /
5/DIR- Short Recall M5 Station DIR-/Sch:5 / Dial:5
Long Save Station to M5 -10 / *
6/DIR+ Short Recall M6 Station DIR+/Sch:6 / Dial:6
Long Save Station to M6 +10 / #

6
OPERATION
BASIC OPERATION
Turn On/Off and Mute Function
Press /MUTE button to turn on the unit. When system is on, press this button to
turn mute on/off. Press and hold /MUTE to power the unit off.
Audio and Setting Menu Adjustment
• Repeatedly press SEL button for the audio menu:
BAS(Bass)-TRE(Treble)-BAL(Balance)- FAD(Fader)-EQ-LOUD(Loudness)
• Press and hold SEL button for the setting menu:
AF-TA-PTY-REG-BEEP-CLOCK-P_VOL-SWC-DX-STEREO
In each menu item, rotate the VOL knob to adjust and set.
Display the Clock or Information
Press DISP button to show the clock or information.
Clock Setting
Press and hold DISP button for 2 seconds. “HH” will flash. Rotate VOL knob to change
the hour. After that press SEL button. “MM” will flash. Rotate VOL knob to change the
minutes. Then press SEL button once again to confirm changes.
EQ and Loud Function
Press EQ button to select preset mode˖FLAT-CLASS-POP-ROCK-EQ OFF.
Press and hold EQ button for LOUD on/off function.
SWC (Steering Wheel Control) Function
In SWC mode of the setting menu, rotate VOL knob to select first desired function (eg.
BAND). Then press and hold the corresponding button (BAND) on the steering wheel
for 1 second. When LCD shows OK, the pairing is successful. Repeat steps above to
program other buttons.
Resetting the Unit
In AUX mode, press and hold "2" button for 5 seconds for reset function.
A reset would be required due to the following:
a) Some buttons do not operate.
b) Error symbol shown on the display.
Note: If the RESET function is activated, all memory (settings & station presets) will
be cleared.
Auxiliary Input
Press SRC button to switch to AUX mode when connecting an external audio source.

7
OPERATION
RADIO OPERATION: Receive a Radio Station
Press SRC button to select radio mode, then press BAND button to select a band.
Press / button to receive the desired radio station.
Press and hold / button for manual tuning the frequency.
Auto Store
Press AS/PS button for 2 seconds to auto store stations to numeric buttons 1-6 of
band 1~3.
Preset Scan
Press AS/PS button to scan the preset stations stored in numeric buttons 1-6 of band
1~3.
Manually Store Station & Recall Preset Station
Tune to a station with or button. Press and hold one of the 1- 6 preset
buttons for 2 seconds. The current station is stored into the number button.
Press the preset button (1~6) to directly listen the stations saved to the
corresponding preset buttons.
USB PLAY OPERATION
When a USB is inserted, the unit will search the Track/MP3/WMA files and start to
play. If a USB/SD card is already inserted in the unit, continue pressing the SRC
button until the USB symbol appears.
Select File
Press / button to skip to next/previous file.
Press and hold / button to fast forward or fast reverse.
Play/Pause
Press button to pause/play the file.
INT Function
Press INT button to play the first 10 seconds of each file.
Press INT button again to cancel this function.
RPT Function
Press RPT button to select repeat mode.
RPT ONE: Repeat the same file.
RPT ALL: Repeat all files (default).
Random Function
Press RDM button and all files will be played randomly.
Press RDM again to cancel this function.
Select a Directory
Press DIR+/DIR- button to select directory forward or back.
+10/-10 File Function
Press and hold DIR+/ DIR- button for 2 seconds to skip +10/-10 files at a time.

8
OPERATION
Song Search
Press AS/PS button to select song search mode as below:
1) DIR Search
Press AS/PS button once. “DIR SCH” is displayed. Rotate VOL knob to select the
folder, then press SEL knob to enter that folder. Rotate the VOL knob again to select
the song. Then press SEL to confirm. The unit then searches the selected song to play.
2) NUM Search:
Press AS/PS button twice. “NUM SCH” is displayed. Select the song by directly
entering numeric buttons 1~6 (see the key function table).
Note: You can also rotate the VOL knob to select the song number. If the song number
was selected, the unit will wait for SEL knob for a few seconds and then search the
song, even if the SEL knob-button is not pressed.
Note: When connecting an MP3 player to unit that has a non rechargeable battery,
remove the battery from the MP3 player and then connect it to the USB interface.
Otherwise, battery damage may occur to the MP3 player.
CAUTION: When there are important files on the disc or USB, do not connect it to
the main unit for playback. This is because some operations may cause loss or
damage to important files and AXIS assumes no responsibility for this.
RDS (RADIO DATA SYSTEM) OPERATION
Alternative Frequency (AF)
Setting the AF to on/off: In AF mode of the setting menu (press and hold VOL knob).
AF On: Symbol “AF” appears on the display. The Program name is displayed when
receiving a RDS station. “AF” symbol starts blinking if the broadcasting signal is
getting weak. The unit will automatically search for a stronger station from AF list and
switch to that better signal station. If no strong station is found in the AF list, PI SEEK
mode will be activated.
AF Off: Switch off the AF mode.
ALARM:
“ALARM” will be displayed when an emergency broadcast is received. Meanwhile,
the sound output level will be automatically adjusted to the preset output level.
REG On/Off:
Setting the REG to on/off: In REG mode of the setting menu (press & hold VOL knob).
REG On:
The current listening program remains unchanged
.
REG Off:
A
llows the reception to move to a regional station.

9
OPERATION
Traffic Announcement (TA)
In TA mode of the menu, press and hold VOL knob to set the TA to on/off.
TA On: When a TA station is received, the unit will temporarily switch to radio mode
to listen to the TA station in RADIO/USB/AUX/BT mode. If the volume level was under
the TA volume it will automatically be raised to the TA volume.
TA Stop (TA interruption function):
To temporarily return to previous mode until next TA station is received.
TA Off: Turn off the TA function.
PTY Operation
In PTY mode of the menu, press and hold VOL knob. PTY SEL will be displayed. Rotate
the VOL knob to select PTY category. Once the desired PTY category is located, press
VOL knob to search.
BLUETOOTH OPERATION
PAIRING
Turn on Bluetooth search on your mobile phone for Bluetooth devices. “AX1 BT”
should appear in the list. Select “AX1 BT” and then input password “0000” if required.
When successfully paired, BT will be displayed on the LCD.
Answering / Rejecting an Incoming Call
When there is an incoming call, press key to answer. Press hang up key to
reject the call. To finish a conversation, press key to hang up call.
Making a Call
In BT mode, press key. The LCD will become blank. Here you can enter the
desired phone number and press key to dial.
(Note: Press the key to delete a wrong number.)
Transfer the Call between Mobile Phone and Unit
During a call, press AS/PS button to transfer the phone call between the mobile
phone and the unit.
Bluetooth Audio Streaming (A2DP Function)
Press SRC button to switch to BT mode. This will automatically stream audio via your
mobile device. Press key to pause/play the song. Press / button to
select next/previous song. NOTE: On your mobile phone, it may be necessary to switch playback via
the Bluetooth stereo headset. Consult the operating manual of your mobile phone for more information.
Disconnect the Bluetooth
After the mobile phone is paired with the unit, press and hold button for 2
seconds to disconnect Bluetooth pairing.
MEMORY BACKUP
The unit is equipped with built-in memory Integrated Circuits to save user settings
such as tuner preset stations & audio control settings. Whenever power is
disconnected, these settings won’t be lost.

10
SPECIFICATION
SPECIFICATIONS
GENERAL
Power Supply Requirements:
Chassis Dimensions:
Tone Controls
-Bass (at 100 Hz):
-Treble (at 10 kHz)
Maximum Output Power:
Current Drain:
RADIO
Frequency Coverage
IF
DC 12/24 Volts, Negative Ground
178 (W) x 96 (D) x 50 (H)
±10 dB
±10 dB
ϰϬtĂƚƚƐdžϰ,;ϮϰsͿ
10 Amp (max.)
FM
87.5 to 108 MHz.
10.7 MHz
Sensitivity (S/N=30dB) ϰʅs
Stereo Separation >25Db
Frequency Coverage
IF
Sensitivity (S/N=20dB)
AM
5ϯϭ to 1ϲϬϮ KHz
450 kHz
36 dBuV

11
TROUBLE SHOOTING
Before going through the checklist below, please check all wiring
connections. If any of the problems persist after checking, consult your
nearest AXIS Car Audio service centre.
Symptom Cause Solution
No power The car ignition switch is not on. If the power supply is connected to the
accessory circuit, but the engine is not on,
switch the ignition key to “ACC”.
The fuse is blown. Replace the fuse with one of same amperage.
No sound Volume is set to minimum Adjust volume to a desired level.
Wiring is not properly connected. Check wiring connection.
Unit has frozen/operation
keys no longer work
The built-in microcomputer may
not operate properly due to
electrical noise.
RESET the unit (see page 6).
Poor radio reception The antenna cable is not
connected.
Insert the antenna cable firmly.
The radio station automatic
selection does not work
Replace with sensitive antenna.
Defective antenna
The signals are too weak. Select a station manually.
Factory antenna is amplified. Find antenna power wire in factory harness and
connect to accessory power.
Condensation appears on
inside of front glass panel
Playing the unit continuously at
high volume generates heat in this
sealed unit. This may react with
outside temperature.
Allow unit to cool down by reducing volume or
powering off.
Condensation should then dissipate.
NOTE: Due to the great variety of devices with USB interfaces that sometimes
have manufacturer-specific functions, we cannot guarantee that all media will be
recognized and operate on this multimedia unit.
AT1900BT
Table of contents
Other Audioxtra Car Video System manuals


Popular Car Video System manuals by other brands


Kenwood
Kenwood LZH-100W - DVD Player With LCD Monitor instruction manual

PowerAcoustik
PowerAcoustik PTID-7350N operating manual

Sound Storm
Sound Storm SSV-8F user manual

Caraudio-Systems
Caraudio-Systems TF-RTI11 manual

CarShow
CarShow Honda CS-CRV12 CRV installation guide

DPVIDEO
DPVIDEO dp745nav Operation manual


