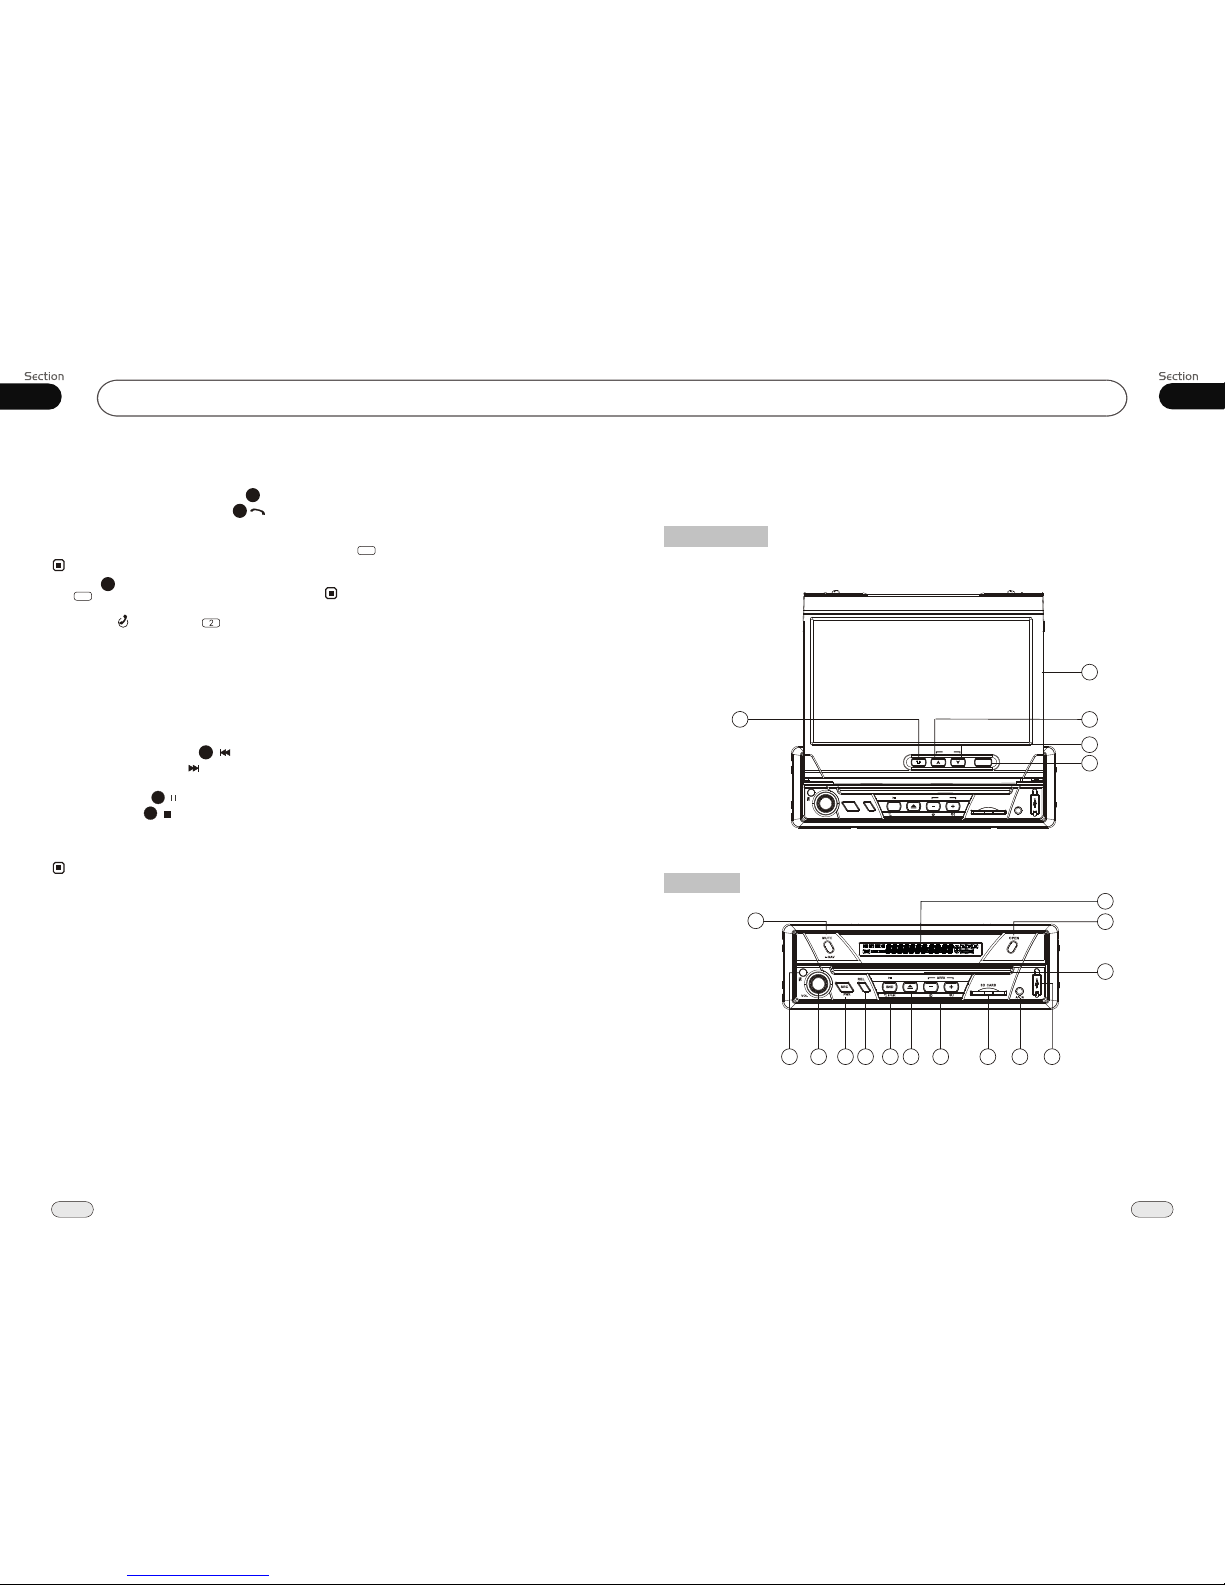
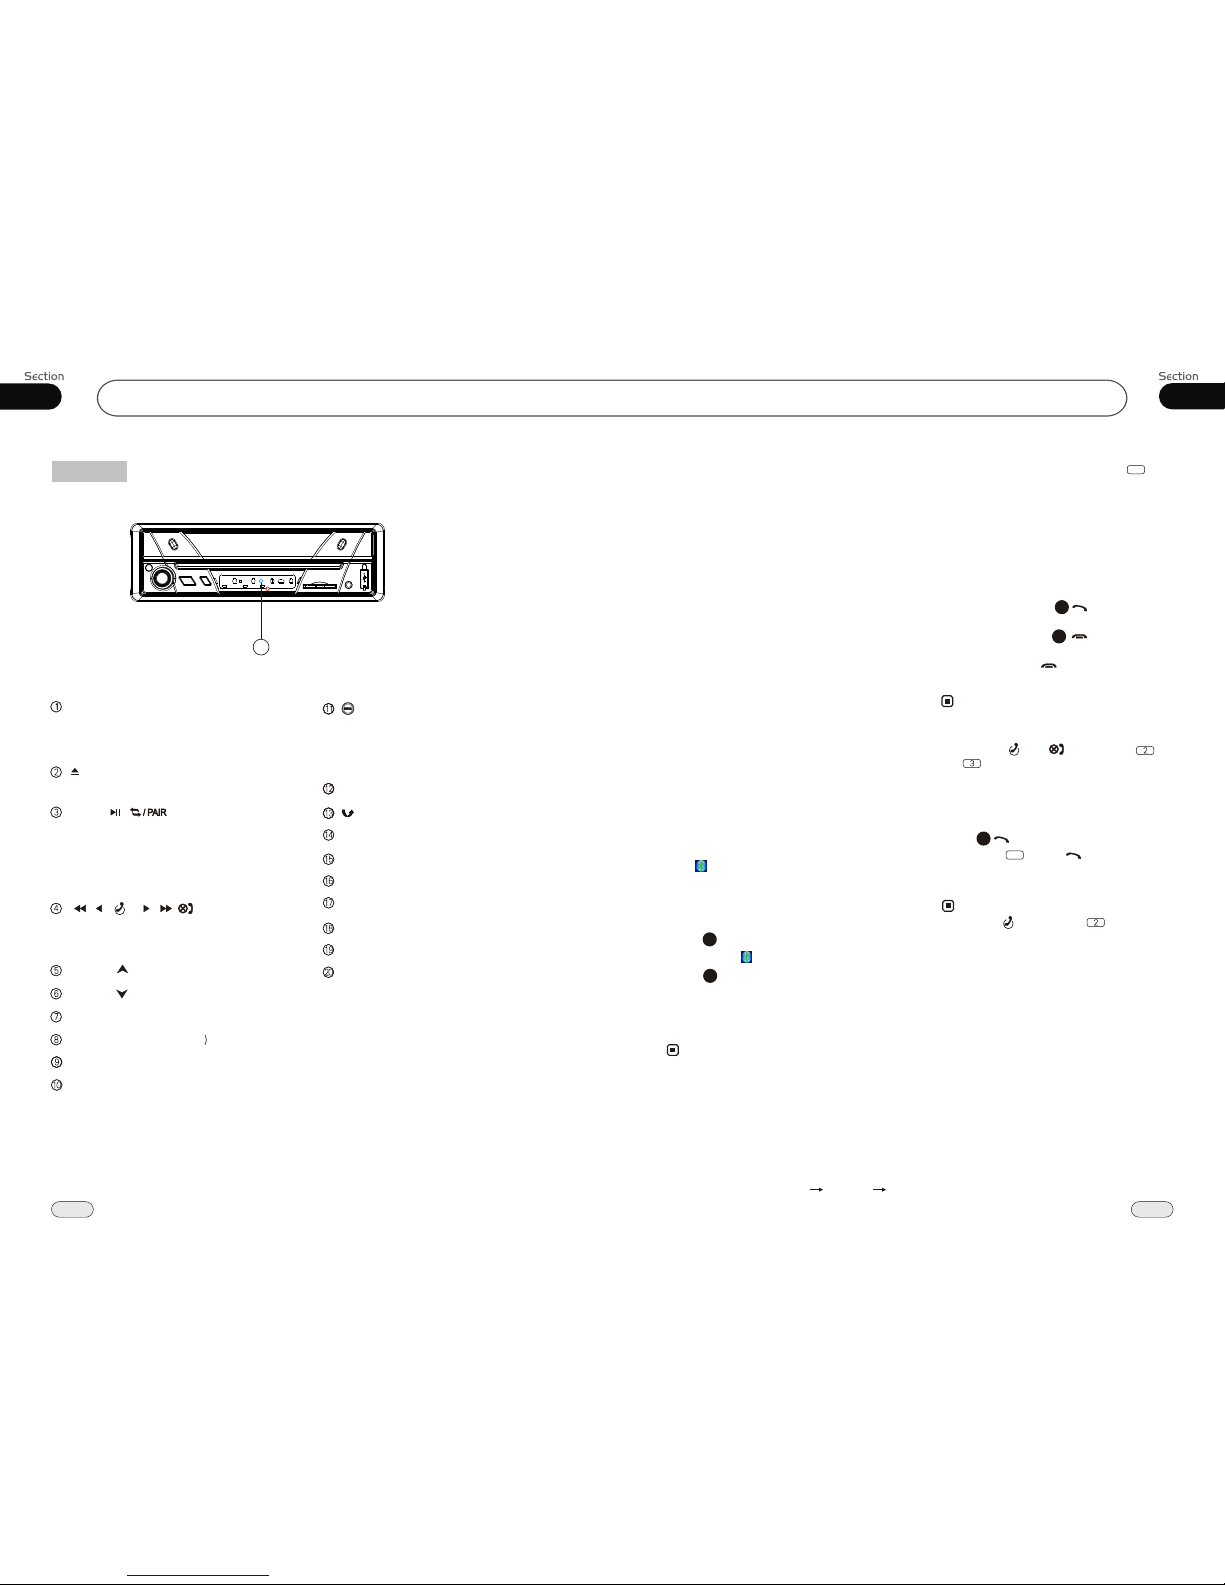
DPVIDEO dp745nav User manual

CAR DVD/VCD/CD/MP3/DIVX/WMA/SD PLAYER WITH
USB PORT
English Version
Warning:
Watching TV whiledriving is illegal inmost states.
There is asafety feature on this device whichenables viewing videosonly when parked.
All other featuresmay still be used while driving,such as audioand radio, etc,but must bedone with care.
Please contact anauthorized installer forprofessional installation
DP745NAV

00
2
Contents
Common Operations
3
To Select Source by Menu 16
Reset the Unit 16
Turning the Unit On/Off 16
Volume Control 16
Setting the Sound Characteristics 16
EQ Setting 17
Turning Loudness On/Off 17
Eject a Disc 17
Insert a SD Card 17
Mute Function 17
Mode Selector 17
Infrared Sensor 17
Double Function 17
Adjust Angel 17
Installation
Wiring Connections 12
Install the Unit 13
Detach the Unit 14
Install the Front Panel 15
Detach the Front Panel 15
2
1Before You Start
Important Safeguards 4
About this manual 4
Precautions 5
Maintenance 6
Location & function of the controls 7
Remote control 9
Specifications 11
15Main Menu
Main Menu Setup 18
Video Adjust 18
Audio Adjust 19
Source Setup 19
System Adjust 19
4
DVD/VCD/MP4
5
5
DVD/VCD/MP4 Setup 23
DVD/VCD/MP4 Play 23
Selecting Tracks Fast 23
Pause Playback 23
Stop Playback 23
Number Buttons 24
Play tracks at Random 24
Repeat Playing 24
Skip backward/forward/
24
System Switch 24
Slow Motion Playback 24
Increase Picture Size 25
On Screen Display 25
Setting the Playback Time 25
Changing Audio Language 26
Changing the Subtitle Language 26
Changing the Viewing Angle 26
Selecting Channel 26
Program Playing 27
Playing PBC(Menu) 27
Selecting Menu 27
DVD Setup Menu 27
F.F/F.REW the
Playback

6CD/MP3/SD/USB
CD/MP3/SD/USB Setup 34
CD/MP3/SD/USB Play 34
Selecting Tracks Fast 34
Repeat Playing 35
Number Buttons 35
Selecting Track 35
Stop Play 35
Playing Tracks at Random 35
Pause Playback 35
Skip backward/forward/F.F/F.REW
the Playback 35
On Screen Display 36
Program Playing 36
Eject SD Card 36
Eject USB 36
00
3
Contents
AUX (Optional)
AUX Touch Screen Menu 39
8
7Tuner
Listening to the Radio 37
Band Selector 37
Selecting the Stored Station 37
Manual/Automatic Tuning 37
DX/LOC Selector 37
MO/ST Selector 38
Goto FREQ 38
Scanning/Memorizing Stations
Automatically 38
Number Buttons 38 Additional Information
Simple Troubleshooting Guide 45
11
Bluetooth Mode
9
Bluetooth Operational Interface 40
Using a Bluetooth Wireless connection 40
Pairing Your Unit and Bluetooth Phone 40
Pairing in Handsfree Mode 40
Cellphone Pairing Mode 41
Bluetooth Connection and Disconnection 41
Using the Unit as a Handsfree Device 41
Last Number Dialing 41
To Dial by Cellphone 41
To Dial by the Unit 42
Using the Unit as Bluetooth Music Player 42
Audio Transfer between the Unit and
Phone 42
IPOD
IPOD Play 43
Selecting Tracks Fast 43
Playing Track F.F/F.REW 43
Switch 43
Repeat Playing 43
Playing Tracks at Random 43
Pause Playback 43
File Selector 44
Back to Previous Menu 44
Eject IPOD 44
10

Before You Start
IMPORTANT SAFEGUARDS About this manual
45
11
Simple Troubleshooting Guide
No power. Check and make sure whether the fuse is blown,
replace with the proper value if necessary.
Some errors occur in
LCD or no function
pressing the button.
the
when
Unable to receive stations.
CDs cannot be loaded.
Sound skips.
Images skip.
Press RESET button.
Check and make sure whether the antenna is
inserted or the antenna is properly connected, if
not, insert the antenna or connect it properly.
A CD is loaded in the mechanism.
The CD is dirty or damaged.
Improper setting of the color system. Set the color
system according to the
connected television.
to PAL or NTSC
.
.
.
Note:
If any of the problems persist after check list had been reviewed, consult your nearest service dealer. Never
attempt to disassemble your unit by yourself.
The following checklist might help to solve the problems you may encounter when using
the unit. Please double check and make sure if the connection and the procedure of
the operation is done properly before using the checklist .below
Problem Cause/Solution
.
.
.
Due to continuous product improvement, the operations
are subject to change.
Additional Information
Be sure to connect the color coded leads
according to the diagram. Incorrect con-
nections may cause the unit to malfunct-
,
ion or damage the vehicle s electrical sy-
stem.
Be sure to connect the speaker (-) leads
to the speaker (-) terminal. Never conn-
ect the left and right channel speaker c-
ables to each other or to the vehicle body.
Make sure all the connections are comp-
letely correct before turning on your unit.
When replacing the fuse(s), the replace-
ment must be of the same amperage as
shown on the fuse holder.
Do not block vents or radiator panels. B-
locking them will cause heat to build up
inside and may result in fire.
This unit features a number of sophisti-
cated functions ensuring superior
operation. All the functions have been
designed for the easiest possible use,
but many are not self-explanatory. This
manual will help you understand the
functions and operations of the unit.
This manual mainly explains remote
control operation. However, in
addition to those functions related with
DVD/VCD/CD/MP3/MP4/SD operation
that can only be operated by the remote
control, there are also functions that can be
operated by the buttons provided on the
main unit.
To lessen driver distraction from the road,
please install the unit in an apt place.
Use the unit after starting the engine,
otherwise the car battery will be drained
and the unit cannot be started.
Do not use the unit in extreme high tem-
perature or such low temperature condi-
tions, and also avoid humidity and direct
sunlight.
Take care of the magnetism of the unit.
Do not put a credit card, cassette or w-
atch around the unit, or they may break
or lose some information .
To lest disturb the video frequency, keep
far away from the unit when using your
phone.
Do not put the remote under high
temperature or where the sun strikes it,
or else the control may not work
properly.
control
remote
1
2
3
4
5
6
7
8
9
10
11

01
5
Before You Start
Type of disc
VCD
MP3
CD
NOTE: The unit is compatible with VCD1.0/1.1/2.0/3.0 version and DVCD disc.
DVD
Handle the disc by its edge to keep
the disc clean, and do not touch the surface.
Do not attempt to modify the unit,
modifying the unit may cause an
accident.
Stop the vehicle before carrying
out any operation that could
interfere with your driving.
Do not work in extremely high or
low temperature. Be sure the
temperature inside the vehicle
is between +60 C and -10 C
before turning on your unit .
To enjoy optimum sound and
images while playing, handle the
discs as follows:
Do not use your CDs with paste residue
or ink attached.
Do not use CDs with labels or stickers
attached, which may leave a sticky residue
while beginning to peel off.
(Shown in the picture)
Clean the discs with an optional clean-
ing cloth. Wipe each disc from the center out.
(Shown as the picture)
PRECAUTIONS
This unit can play the following discs only:
Recorded material
Sound and moving
pictures
Sound and moving
pictures
Sound only
Sound only
Size of disc
MPEG-4
Sound and moving
pictures
44
10 IPOD
During IPOD mode, press BACK button
on the remote control to go back to the
previous catalog.
During IPOD mode, press ROOT on the
remote control to go back to the root
catalog.
Press to select the previous 5 tracks,
press to select the next 5 tracks (show
as in the right of the picture).
And then touch the track on the screen to
play or touch the folder to open directly.
* Pressing in the monitor to go back to the
previous catalog, pressing and holding it to go
back to the root catalog.
During IPOD mode, to take IPOD out, the
main unit will switch to radio mode.
During other mode, to take IPOD out, the
main unit will keep the original mode.
BACK
Note:
File Selector
31
21
Eject IPOD
* Pressing / in the monitor performs the
same function.
Table of contents
Other DPVIDEO Car Video System manuals