Audioxtra axis AX1824S Series 2 User manual

PANEL
- Display Size: 60cm (23.6”) - AX1824S
81cm (32”) - AX1832S
- Full High Definition LED TV - AX1824S
- High Definition LED TV - AX1832S
- Aspect Ratio: 16:9
- Resolution: 1920 x 1080 - AX1824S
1366 x 768 - AX1832S
- Brightness: 220cd/m2 - AX1824S
250cd/m2 - AX1832S
- Contrast: 3000:1 - AX1824S
1200:1 - AX1832S
- Viewing Angle: 176(H) x 176(V) - AX1824S
178(H) x 178(V) - AX1832S
POWER
- Input: 9-36V DC / 4A @12V
- Optional AC Adapter: 240V 50Hz/60Hz
- Stand-by Power Consumption: 0.5W
CABINET
- Conformal Coated Circuit Board
- Size: 550 x 50 x 336mm - AX1824S
735 x 82 x 442mm - AX1832S
- Enhanced Strength VESA Mounting
- Net weight: 3.9 kg - AX1824S
5.1 kg - AX1832S
MULTIMEDIA & FEATURES
- TIMESHIFT: Pause, Rewind & Fast-Forward
Live TV (using PVR)
- USB Reader
- PVR (Personal Video Recorder)
- EPG (Electronic Program Guide)
DVD/CD PLAYER
- Built-In DVD Player
- Supports DVD/VCD/CD/MP3/DIVX/JPEG
- Supports DVD±R/DVD±RW/CD-R/RW
TUNER
- DVB-T Digital HD Tuner
- Analogue Tuner
- DTV Video System: MPEG-1MP@ML, H.264,
MPEG-4 (Video Codes)
- DTV Sound System: MPEG-1 Layer 1/2,
- ATV Video System: PAL
- ATV Sound System: BG, DK, I
SYSTEM
- MPEG-4 Video System
- OSD: Multi-languages
- Number of Channels: 99
- Comb Filter: 3D - AX1824S Only
- Teletext: ATV/1000 Pages
- Speakers: 2 x 3W Stereo - AX1824S
2 x 8W Stereo - AX1832S
SMART TV
- Android 7.1.1 OS
- Built-In WiFi
- Downloadable Apps
- Included Apps: Browser, Stan, YouTube,
Freeview FV, ABC iview, Tenplay, SBS On Demand
INPUTS
- RF / Antenna: 1
- Mini AV: 1
- Mini YPbPr: 1
- HDMI: 2
- VGA: 1
- USB: 3 (2 Smart)
- PC Audio: 1
- Ethernet: 1
INCLUDED
- Remote Control
- Cig Lead Car Power Adaptor
- Wall Mounted Screws
- Mini YPbPr Lead
- Mini AV Adaptor
OUTPUTS
- Headphone: 1 (3.5mm)
- Digital Coaxial: 1
- Line Out: 1
OPTIONAL
- Desktop Stand Legs
- 240V AC Adaptor
INSTRUCTION MANUAL
2YEAR WARRANTY
AX1824S Series 2 / AX1832S
12/24V LED DVD/SMART TV
SPECIFICATIONS

2
2
CONTENTS
TV Operation
Select Input Source ............................................................................................3
Initial Installation .................................................................................................3
Main Menu Operation .........................................................................................4
Picture Menu ......................................................................................................6
Channel Menu......................................................................................................4
Sound Menu .......................................................................................................7
Time Menu ..........................................................................................................8
Option Menu........................................................................................................9
Lock Menu ..........................................................................................................11
PVR ....................................................................................................................12
Media Operation
Media Operation..................................................................................................13
Photo Menu.........................................................................................................14
Music Menu.........................................................................................................15
Movie Menu.........................................................................................................16
Text Menu............................................................................................................17
DVD.........................................................................................................................18
Notes.......................................................................................................................28
Warranty Card........................................................................................................31
Android OS
Install Wizard.........................................................................................................20
Main Launcher.........................................................................................................23
Note Regarding Included Apps:
Apps are provided by third parties and functionality is subject to ongoing support by their
respective developers. Axis does not warrant or guarantee the future support or compatibility
of these apps.

3
2
CONTENTS
TV Operation
Select Input Source ............................................................................................3
Initial Installation .................................................................................................3
Main Menu Operation .........................................................................................4
Picture Menu ......................................................................................................6
Channel Menu......................................................................................................4
Sound Menu .......................................................................................................7
Time Menu ..........................................................................................................8
Option Menu........................................................................................................9
Lock Menu ..........................................................................................................11
PVR ....................................................................................................................12
Media Operation
Media Operation..................................................................................................13
Photo Menu.........................................................................................................14
Music Menu.........................................................................................................15
Movie Menu.........................................................................................................16
Text Menu............................................................................................................17
DVD.........................................................................................................................18
Notes.......................................................................................................................28
Warranty Card........................................................................................................31
Android OS
Install Wizard.........................................................................................................20
Main Launcher.........................................................................................................23
Press Source on the remote, then use the arrow keys to select your desired source. Press ENTER
on the remote to select the source.
Firstly connect an RF Antenna cable from the TV’s RF output to the TV Antenna socket.
presented with a number of dialogue
When you Reset the TV from the Setup menu, you will be
boxes that will guide you through the TV tuning process.
First Time Installation Menu
Selection 1: Language - English - select ENTER on the remote. Note this is the menu language
setting.
Selection 2: Country: Australia. Please select a different country if applicable.
Selection 3: Environment: On. There is no need to adjust this setting.
3
TV Operation
Select Input Source
Initial Installation

4
Auto Tuning
Press the ▼/▲buttons to selectAuto Tuning.After pressing the ENTER
ENTER
ENTER
DVB-T
DVB-T
button, the auto tuning
interface will be displayed.
Press the Menu button on the remote to select the Main Menu. From there, you can use the /
buttons to select between the following sub-menus:
- Channel
- Picture
- Sound
- Time
- Option
- Lock
Once you select a sub-menu, use the / buttons to select an option in the sub-menu.
4
Main Menu Operation
Channel Menu
.

5
Use the coloured buttons on the remote to edit the channels.
First press the / buttons on the remote to highlight the
channel you want to select, then:
Press the button to delete the channel from the program list.Red
Press the button to move the channel in the list.Yellow
Press the button to skip the selected channel (this channelBlue
will be skipped when using channel up/down on the remote.
Press the Fav button on the remote to add or remove the channel
from your favourite list.
Signal Information
This displays the current signal information of the TV Signal. This option can be useful to help
you position your RV’s antenna.
LCN (Logical Channel Number)
This setting makes sure that the Channels tuned into the TV represent the actual channel number.
Software Update (USB)
Software updates may become available for this TV from time to time. To update the Software, copy
the updated Software file onto an empty USB drive and insert in to the TV.
ENTER
5

6
Picture Mode
Press ▼/▲ buttons to select Picture mode, and go into next interface by pressing the ENTER
button.
buttons
Contrast, Brightness, Colour, Tint, Sharpness
Note:You can only adjust the Contrast, Brightness, Colour,
Tint & Sharpness settings can be adjusted when the User Picture Mode is selected.
Press the ▼/▲buttons to select the picture adjustment you would like to make then press
the / to adjust the desired setting.
Colour Temp
Press ▼/▲ to select the Colour Temp menu item, and then the ENTER button to take you to next
menu where you can change Colour Temperature. Modes available are standard, warm,
cool and personal.
Aspect Ratio
Press the ▼/▲buttons to select theAspect Ratio you would like to make then press the /
buttons to select theAspect Ratio from:Auto (Default), 4:3, 16:9, Zoom1, Zoom2.
Noise Reduction
Press ▼/▲ to select the Noise Reduction menu option, and then the ENTER button to take you to
next menu. Then press the ▼/▲ buttons to select off/low/middle/high.
6
Picture Menu

7
Sound Mode
Press the ▼/▲ buttons to select Sound Mode. Then press the ENTER button to select from a list
of sound modes. The sound mode can be switched between standard/music/movie/sports/
user using the ◄ / ► buttons.
Custom Equaliser
The frequencies adjust the following ranges: 120Hz - Bass, 500Hz - Midbass, 1.5KHz -Midrange,
5KHz - Upper Midrange, 10KHz - Treble
These settings can only be adjusted when the Sound Mode selection (above) is set to User.
Once this is set, press the ▼/▲ buttons to select the setting you would like to adjust.
Then use ◄ / ► buttons to increase or decrease the setting.
Balance
Press ▲/▼to select Balance and then press ENTER button to go into the Sub menu.
Withthe◄ / ► buttons, the balance (between left & right speakers) can be adjusted.
Auto Volume (AVL)
This function,when turned on will help balance out the volume level between different A/V sources so
one is not significantly louder than the other. It can also help reduce the volume of loud TV ads
compared to TV shows. The result depends greatly on the A/V source so this function is set default to
off. To turn AVL on, press ▼/▲ buttons to select Auto Volume and then press ENTER . Press ◄ / ►
buttons to turn AVL on/off.
Surround Sound
This mode is ideal for movies and simulates multi-speaker surround sound output.
SPDIF Mode
This setting selects the output mode for the coaxial digital lead. The default setting is PCM and this
should be suitable for most amplifier connections.
7
Sound Menu

8
TIME MENU
Clock
The clock and date is automatically programmed from information received from DTV
Channels. You should not need to use this sub-menu once you have received a DTV
signal, however this can be manually changed if required.
Off Time
This setting allows you to set a specific time to turn the TV off. Once you enter the menu,
this function can be set to operate once only, Daily, Mon-Fri, Mon-Sat, Sat-Sun or Sunday
only.
On Time
As with the Off Time function, this setting allows you to select a time to turn the TV on.
In addition to the day settings, you can also select the source you would like selected when
the TV turns on and your desired volume level.
Time Zone
The Time Zone is also set when first installing the TV and should not need to be adjusted.
Sleep Timer
Select Sleep Timer with the ▼/▲ buttons and press the ENTER button. Then with▼
▼
/buttons,
the sleep timer can be set to automatically turn the TV off in 10/20/30/60/90/120/180 or 240
minutes.
Auto Standby
Select Auto Standby with the ▼/▲ buttons. Then with the buttons, select 3,4 or 5 hours.◄ / ►
The TV will turn off if there is no activity using the remote or buttons onthe TV for this period
of time.
Time Zone
You should not need to use this sub-menu once you have received a DTV signal, however
this can be manually changed if required.
OSD Timer
The OSD Timer sets the amount of time the on-screen menus are displayed on the TV. The
default time is 15 seconds but should you wish to change this, select OSD Timer with the ▼/
buttons. Then with the ◄ / ► buttons, select Always (on) or 5, 10, 15, 20, 25, 30 seconds. ▲
8
Time Menu

9
OSD Language
Select OSD Language with the ▼/▲buttons then press ENTER to adjust the on-screen language.
TT Language
This setting is not used in Australia & New Zealand
Audio Languages
Press ▼
/▲ to selectAudio Language and select language with ▼/▲ or ◄ / ► buttons.
Press the ENTER button to confirm , then the menu button to return to the previous menu.
Subtitle Languages
Press ▼/▲ to select Subtitle Language and select language with▼/▲ or ◄ / ► buttons.
Press the ENTER button to confirm, then the menu button to return to the previous menu.
Hearing Impaired
Select Hearing Impaired (where supported) with▼/▲ buttons and then press the ENTER button.
PVR File System
To check the status of the USB drive, format a drive or change the maximum record/timeshift setting,
select PVR File System with▼/▲buttons and then press the ENTER button.
Reset
Press the ▼/▲ buttons and ENTER to select the Reset menu. Select Yes with the left arrow to
reset the TV to its factory settings which will erase all of the previous settings.
9
Option Menu

10
HDMI CEC
HDMI CEC allows devices connected to the TV via HDMI to communicate back and forth
with the TV.
Please see below for specific CEC settings
CEC Control:
Audio Receiver:
DeviceAuto Power Off:
TVAuto Power On:
Device List
Device Menu
Press the ◄ / ► buttons to turn CEC Control on of off. The default
setting is On.
Press the ◄ / ► buttons to turn Audio Receiver communication
on or off.
Press the ◄ / ► buttons to allow HDMI CEC connected components to
turn each other off.
Press the ◄ / ► buttons to turn HDMI CEC Auto TV power up on/off.
Press the ◄ / ► buttons to show HDMI CEC connected components
Press the ◄ / ► buttons to access the device menu.
Blue Screen
To have a Blue Screen background rather than Black when no input signal is available, select Blue
Screen with ▼/▲ buttons and then press the ENTER button to select on/off,then the menu
button to return to the previous menu.
10

11
Source Lock
Source Lock allows you to limit the input sources available on the TV - for example, just DVD
Default Source
Default Source allows you to select which input source is selected when the TV is first
turned on.
DTV Channel Type
This allows you to set the default DTV channel when the TV is turned on.
Max Volume
Max Volume limits the maximum volume that the TV can be turned up to.
Default Volume
The Default Volume setting allows you to set the desired volume level for when the TV is
turned on.
Clear Lock
Resets all settings.
Lock System
Select Lock System with the ▼/▲buttons and press ENTER. Then enter the password (default is “0000")
to access the Block Program, Parental Rating Key Lock & Hotel Mode menus.
SET Password
Select Set Password with the▼/▲buttons. Then press the ENTER button to enter the old password
(default is “0000”) and then set a new password by entering it twice.
Block Program (TV only, TV must be selected as the source)
Select Block Program with ▼/▲buttons, and press ENTER button. You can then add the
channels you wish to block.
Parental Rating (TV only, TV must be selected as the source)
Select Parental Rating with▼/▲button, and then press the ENTER button. With the ◄ / ►
buttons, the parental guidance function can be turned on or off.
Key Lock
This function disables the buttons on the back of the TV. To activate, select Key Lock with the
▼/▲buttons. Then with the ◄ / ► buttons, the Key Lock function can be turned on or off.
Hotel Mode
Hotel mode allows you to select a number of features that make this TV also useful for shop
displays, promotions or where you require simple operation from one source.
Select Hotel Lock with the ▼/▲buttons after you have turned the system lock off.
11
Lock Menu
12
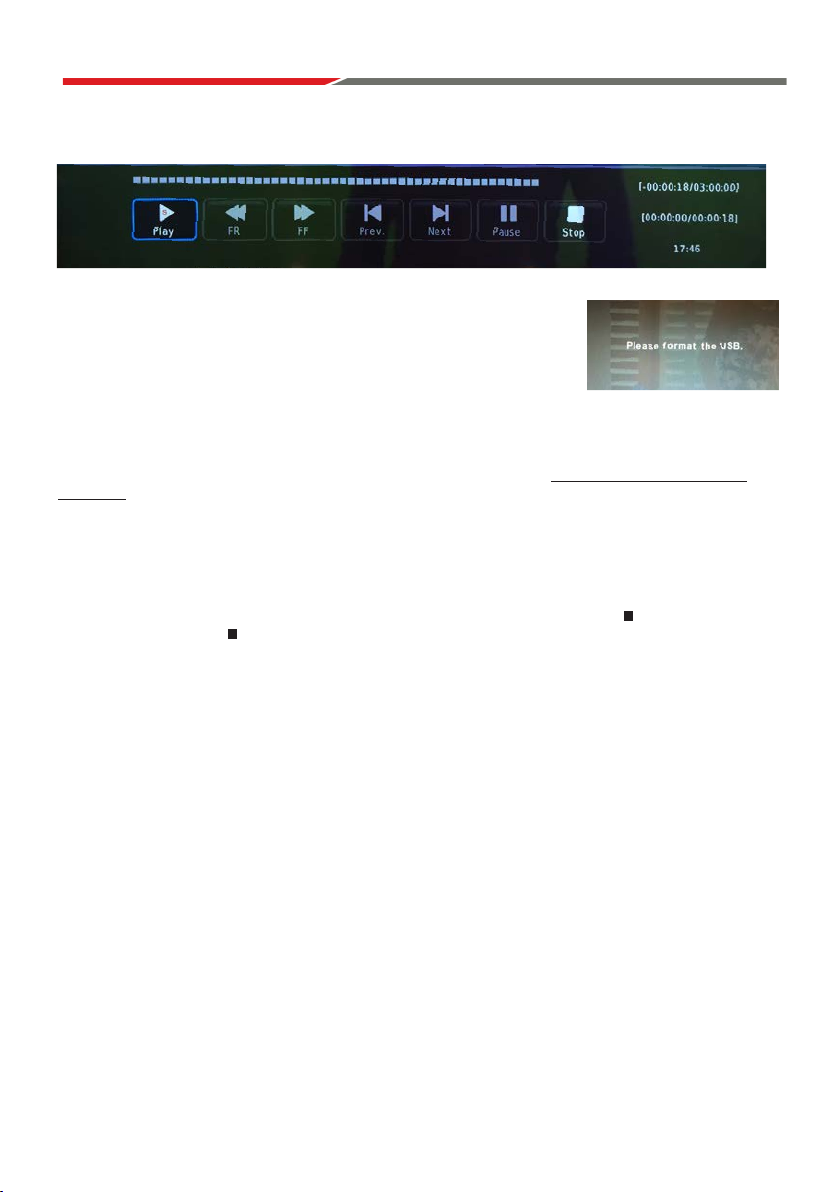
RECORD Live TV
Ensure you have a correctly formatted USB drive inserted in the TV
before recording. If the USB drive is not formatted properly, the TV
will display a message advising that the USB drive needs to be
formatted. To do this, go to the Option Menu,select PVR File System
and follow the steps in the PVR File System sub-menu to format the
USB Drive. Please ensure that you do not have any valuable data on
the drive before you do this.
When watching TV, you can press the •Record button on the remote to start recording a
programme. The Power light will also start flashing red/blue to confirm that recording is in
progress. The TV will also display the recording control menu (shown above) when you
commence recording.
NOTE: If you want to display this menu at any time when recording, simply press the ENTER
button on the remote.
Stop Recording
Press ENTER on the remote to display the Record Menu then press the button to stop recording.
You can also press the button twice to stop recording (the first press will bring up the Record Menu).
The TV will then display a confirmation message to stop recording. Press ◄ on the remote to confirm.
When the storage space of the USB drive is full, the TV will display a warning message then stop
recording and return to normal broadcast Television.
Time Shift/Pause Live TV
While watching DTV, press the “TIME SHIFT” button on the remote control to Pause Live
TV and bring up the time shift control menu. The time shift control menu is similar to the
Record menu and you can perform various functions such as exit time shift, or fast forward
to catch up to the live program etc.
Pressing the “TIME SHIFT” button again will continue the live program from where you
paused it (time shift).
NOTE: To display the Time Shift menu when the TV is either paused or on Time Shift
playback, press the “ENTER” button on the remote control.
The PVR function is only available for the TV channel that is being viewed. If you
change the channel, the PVR function will stop. You cannot switch to another Source while
recording. If you change the source, the recording will also be stopped.
12
PVR

13
Media OPERATION
Note: Before operating Media menu, Plug in USB device, then press SOURCE button.
Press button to select Media in the Source menu, then press Enter button to enter.
Press ◄ / ► button to select the type of media you wish to view in the Media menu,
then press Enter button to enter.
Press ◄ / ► button to select C, then press Enter button to view the contents of the USB device.
▼/▲
13

14
Press ◄ / ► button to select PHOTO in the main menu, then press button to enter.Enter
Press button to return to the previous menu.Exit
Photo Menu
Press ◄ / ► button to select the desired file to watch in the file selecting menu,
then press Enter to display the picture.
When highlighting a photo, the file information will appear on the right and the picture
will be previewed in the center.
14

15
Press ◄ / ► button to select PHOTO in the main menu, then press button to enter.Enter
Press button to return to the previous menu.Exit
Photo Menu
Press ◄ / ► button to select the desired file to watch in the file selecting menu,
then press Enter to display the picture.
When highlighting a photo, the file information will appear on the right and the picture
will be previewed in the center.
14
Press ◄ / ► button to select MUSIC in the main menu, then press button to enter.Enter
Press button to return to the previous menu.Exit
Music Menu
Press ◄ / ► button to select drive disk you want to watch, then press button to enter.Enter
Press ◄ / ► button to select return option to the previous menu.
28
15

16
Press ◄ / ► button to select MUSIC in the main menu, then press button to enter.Enter
Press button to return to the previous menu.Exit
Music Menu
Press ◄ / ► button to select drive disk you want to watch, then press button to enter.Enter
Press ◄ / ► button to select return option to the previous menu.
28
Press Display button to open the menu. Press ◄ / ► button to select a function, then press Enter button to enter.
Press button to return to the previous menu.Exit
Press ◄ / ► button to select desired drive disk, then press button to enter.Enter
Press ◄ / ► button to select MOVIE in the main menu, then press button to enter.Enter
Press button to return to the previous menu.Exit
Movie Menu
Press Enter button to play the selected movie.
29
16

17
Press ◄ / ► button to select MUSIC in the main menu, then press button to enter.Enter
Press button to return to the previous menu.Exit
Music Menu
Press ◄ / ► button to select drive disk you want to watch, then press button to enter.Enter
Press ◄ / ► button to select return option to the previous menu.
28
Press Display button to open the menu. Press ◄ / ► button to select a function, then press Enter button to enter.
Press button to return to the previous menu.Exit
Press ◄ / ► button to select desired drive disk, then press button to enter.Enter
Press ◄ / ► button to select MOVIE in the main menu, then press button to enter.Enter
Press button to return to the previous menu.Exit
Movie Menu
Press Enter button to play the selected movie.
29
16
Press ◄ / ► button to select TEXT in the main menu, then press button to enter.Enter
Press button to return to the previous menu.Exit
Text Menu
Press ◄ / ► button to select drive disk, then press button to enter.Enter
Press ◄ / ► button to select return option to change pages.
Press Display button to open the menu. Press ◄ / ► button to select a function,
then press Enter button to enter.
17

18
is accessed by pressing the D.Setup button.
Press to navigate the OSD Menu.
Press Enter to confirm the change.
Press D.Setup to leave the OSD Menu.
Pan & Scan (4:3)
The sides of the screen will be black.
Normal viewing mode.
Press D.Setup button on the remote control during DVD playback.
Press until the audio setup page is shown.
Downmix:
LT/RT: Mono audio during DVD playback.
Stereo: Stereo audio during DVD playback.
When you stop the disc, the player will automatically remember the point it finished playing.
When the disc is re-inserted, the player will continue from the same point.
46
DVD
Auto Tuning
ATV: Press MENU and then left arrow button to skipATV tuning.
DTV: Press MENU and then left arrow button to skip DTV tuning.
18

19
is accessed by pressing the D.Setup button.
Press to navigate the OSD Menu.
Press Enter to confirm the change.
Press D.Setup to leave the OSD Menu.
Pan & Scan (4:3)
The sides of the screen will be black.
Normal viewing mode.
Press D.Setup button on the remote control during DVD playback.
Press until the audio setup page is shown.
Downmix:
LT/RT: Mono audio during DVD playback.
Stereo: Stereo audio during DVD playback.
When you stop the disc, the player will automatically remember the point it finished playing.
When the disc is re-inserted, the player will continue from the same point.
46
DVD
Auto Tuning
ATV: Press MENU and then left arrow button to skipATV tuning.
DTV: Press MENU and then left arrow button to skip DTV tuning.
18
S
You can also select alternative subtitle languages by pressing the S.Title button on remote.
,
, based on the rating of the disc.
This function is pasword protected.
settings
Initial Installation
Connect a RF cable to the TV’s input called “RF-In”.
Select Language
Press ◄ / ► button to select the language to be used for menus and message.
Select Country
P
Select Tune Type
Press
Press ENTER to continue.
ress / button to highlight country menu.
Press ◄ / ► b
◄ / ► button to select Digital TV Tuning, Analogue TV Tuning or Both.
utton to select. Press ENTER to continue.
19

20
If you want to skip this wizard,
press “HOME” key.
If you have finished this wizard
once, it will not auto-open again.
If you do not want to choose your
network, you can skip this step
by pressing “Skip”. You will also find
the network settings in function
“Settings”
20
This manual suits for next models
1
Table of contents
Other Audioxtra Car Video System manuals


Popular Car Video System manuals by other brands


Farenheit
Farenheit 8" wide Touch Screen 1-Din Oversized Fully Motorized TFT... operating manual

Directed Video
Directed Video OHV1021 Owner's installation guide

Opel
Opel 2010 Astra manual

NavAtlas
NavAtlas DXU1100DVR Installation & owner's manual

Uconnect
Uconnect 430 Owner's manual supplement

Soundstream
Soundstream VDVD-160 owner's manual


