Aunger APT4300 User manual

Aunger APT4300 Box Trailer
Assembly Instructions
TRAILER KIT
APT4300

Assemby Instructions for APT4300 – Aunger 4’x 3’ Trailer
2
Warning – Avoid accidents
Keep children and pets away from the work area.
Maintain an orderly work area. Avoid laying cables, wires etc. on the floor.
Use personal safety equipment when using tools.
It is highly recommended that when assembling this trailer that two persons undertake
the task as some heavy lifting is required
No Tools are required for assembly
The following tools are included with this kit
1) 8-10 mm spanner
2) 10-12 mm spanner
3) 13-16 mm spanner
4) 14-17 mm spanner
5) 21mm socket wrench
Should you wish to use your own tools, feel free to substitute any tool, these are provided
for your convenience.
Note: A locking solution can be used on bolts for permanent assembly of the trailer,
however it is not essential.
Lay out all components, as per the diagram on the following page, prior to beginning
assembly to ensure all required parts are present and to assist with easy part
identification.
If there are components missing, DO NOT ASSEMBLE THE TRAILER, contact Aunger on
(07) 3260 2400 for replacement parts. DO NOT substitute any component as this will void
warranty and may affect ADR compliance.
If you have any problems with assembling the trailer, please contact Aunger on
(07) 3260 2400 for technical assistance
If you would like to enquire about having your trailer assembled for you,
please contact Future Logistics on 1300 307 712.
Please Note: Future Logistics is an assembly agent only and any technical
assistance or sales enquiries should be directed to Aunger.

Assemby Instructions for APT4300 – Aunger 4’x 3’ Trailer
3
This assembly instruction is for building TRAILER KIT APT4300.
Please use the enclosed assembly kit:
NO. DESCRIPTION QTY NO. DESCRIPTION QTY
1 M8*20 HEX-BOLT 4 18 10 L LATCH 1
2 M10*30 HEX-BOLT 4 19 FRONT GATE 1
3 M8*30 FLANGE HEX-BOLT
2 20 REAR GATE 1
4 M6*15 FLANGE HEX BOLT
4 21 LEFT SIDE PANEL 1
5 M8*15 FLANGE HEX-BOLT
11 22 RIGHT SIDE PANEL 1
6 M10*80 HEX-BOLT 2 23 PLATFORM 1
7 M10*75 HEX-BOLT 1 24 DRAWBAR 1
8 M8 LOCKNUT 2 25 FENDER (Mud Guard) 2
9 M10 LOCKNUT 3 26 LIGHT BOARD 1
10 M6 LOCKNUT 4 27 LIGHT BOARD SUPPORT 2
11 M8 SPRING WASHER 4 28 HITCH COUPLER (Coupling) 1
12 M10 SPRING WASHER 4 29 TRIANGLE BRACKET 1
13 RIGHT-ANGLE ELBOW 2 30 AXLE w/ shock absorbers 1
14 M6 FLAT WASHER 4 31 WHEEL 2
15 M10 FLAT WASHER 4 32 ELBOW (Drawbar Bracket) 1
16 M8 FLAT WASHER 6 33 CHAIN 1
17 M8 LOCK WASHER 11
Explanation of bolt sizes
E.g. M10*30 Flange Hex Bolt Type of Bolt i.e hex head with flange
Size of the bolt head – 10mm Length of Bolt Shaft – 30mm
32
Assemby Instructions for APT4300 – Aunger 4’x 3’ Trailer
4
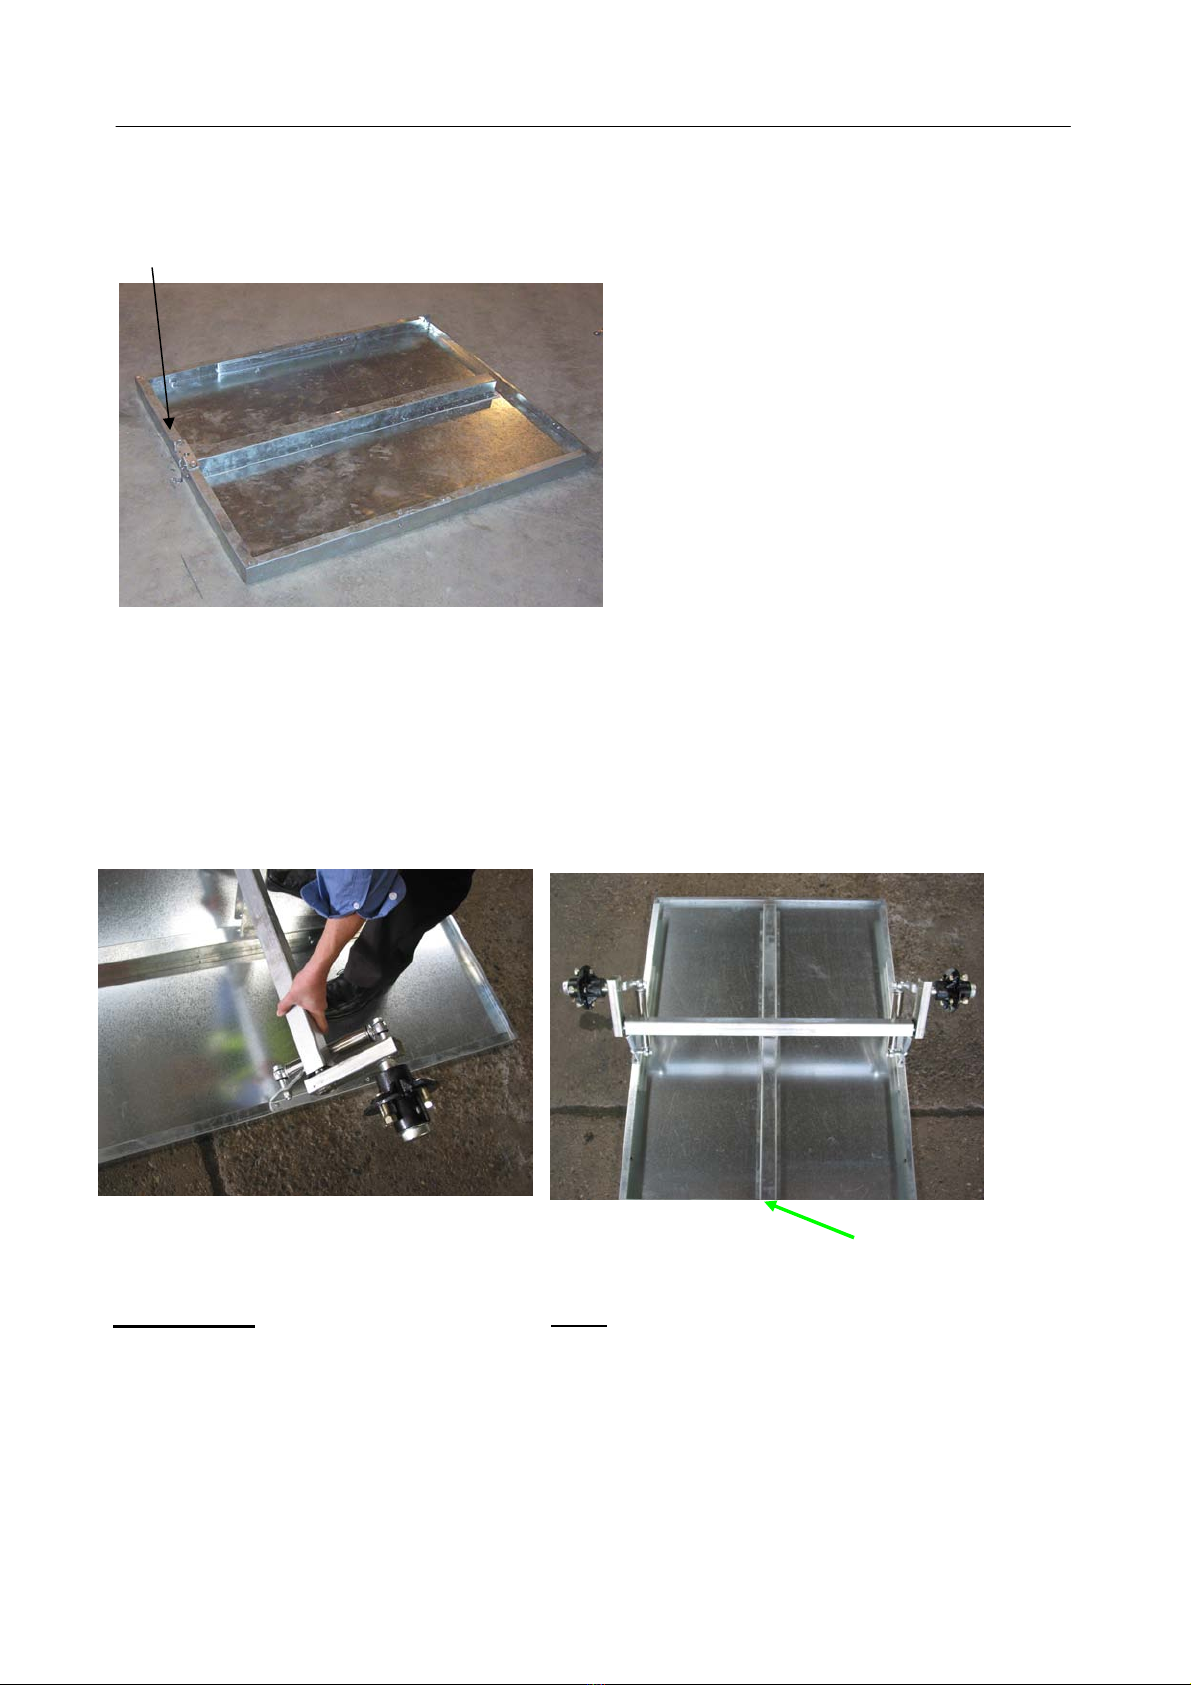
1. Begin by placing the platform upside down as shown. The bolt holes are at the front of
the trailer.
2. Place the axle on the platform as shown and use 2 x M10*30 hex-bolt, 2 x M10 Flat
Washer & 2 x M10 spring washer in each side. Place the flat washer first and put the
spring washer on top and then insert bolt and tighten.
Then fasten all four bolts.
Front of Trailer
Please note: the axle arms are pointing away from the bracket in the front of the trailer.
Assemby Instructions for APT4300 – Aunger 4’x 3’ Trailer
5
3. Place the elbow (drawbar bracket) (3) onto the front of trailer platform with the two right
angle elbows on top as shown (1&2). Secure with 2 x M8*30 flange hex bolt and 2 x M8
lock washer.
4. As the light board is attached to the drawbar, slide the light board under the axle prior to
attaching drawbar.
1&2
3

Assemby Instructions for APT4300 – Aunger 4’x 3’ Trailer
6
Fit the drawbar front and rear as shown. Attach drawbar to axle with 1 x hex-bolt M10x75
and locknut M10 and tighten (1). Secure drawbar latch as shown (2), insert R pin through
latch
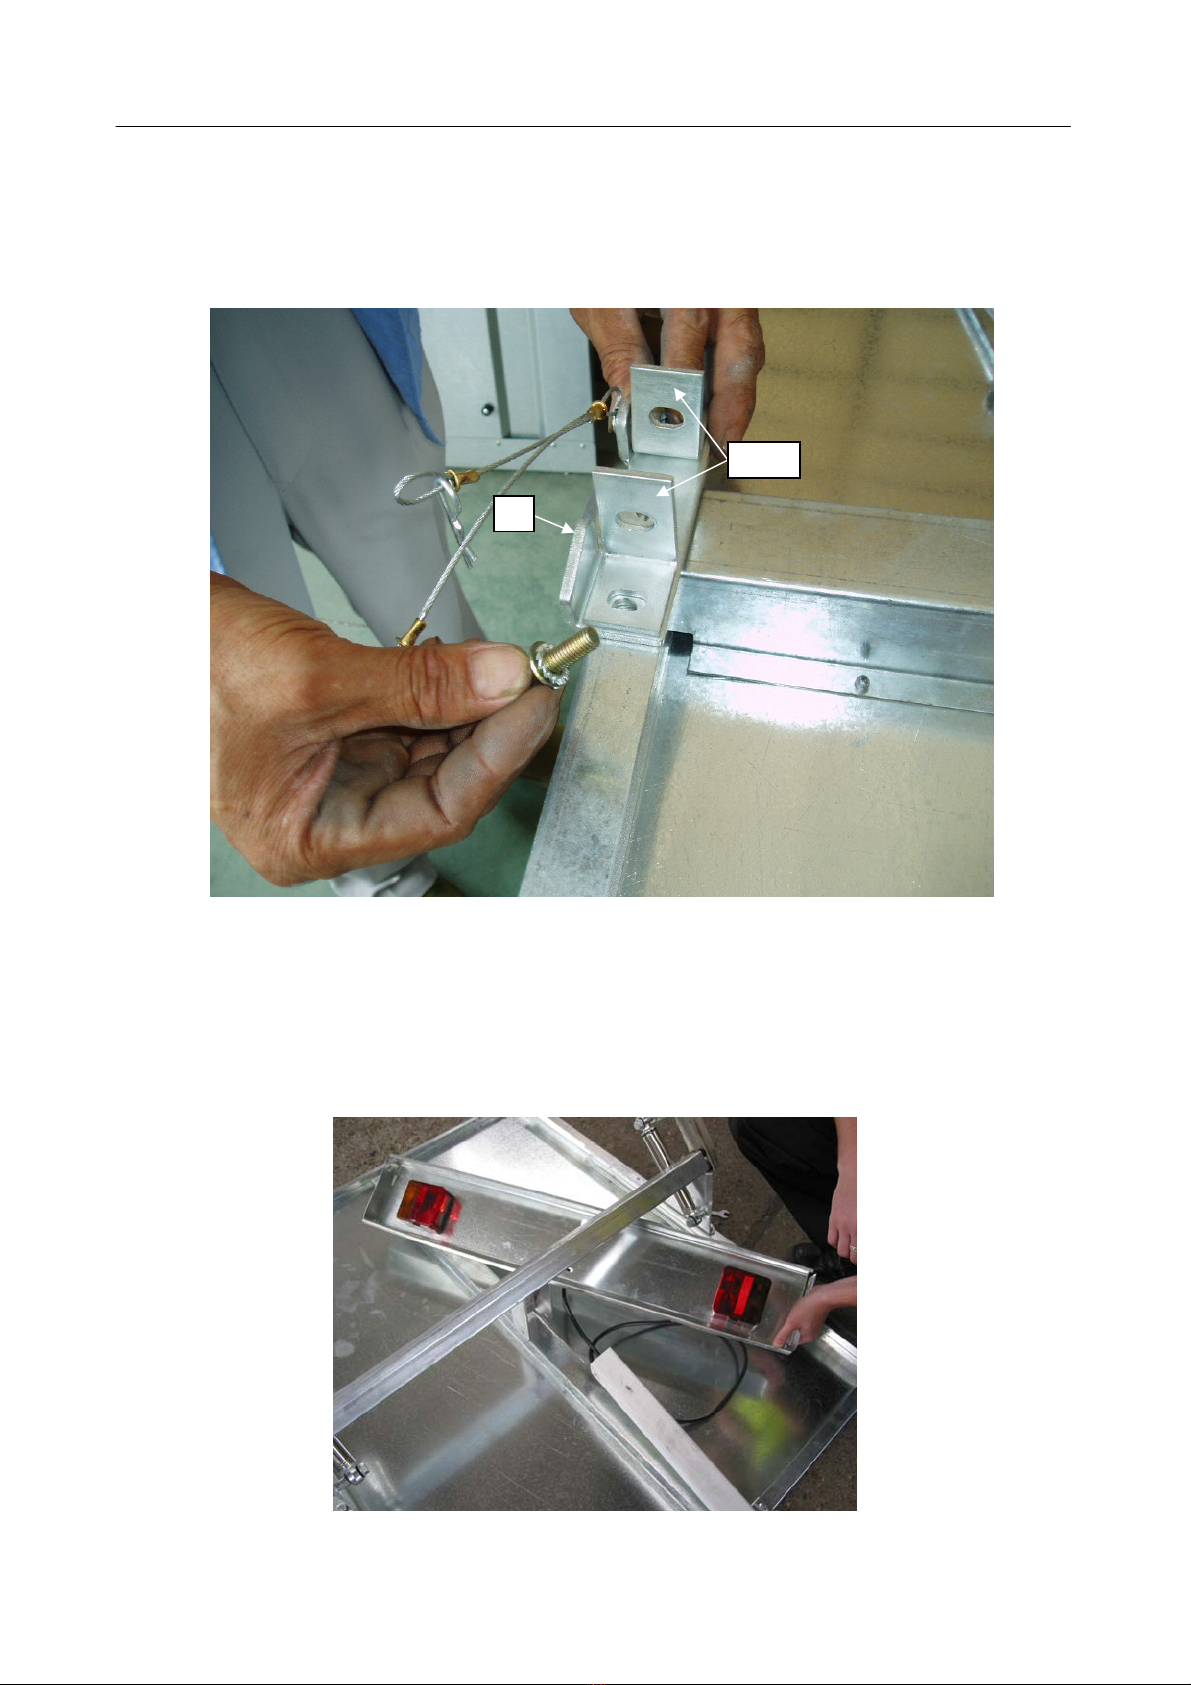
5. Fit the lightboard as shown. In the centre of the board, use 1 x M8*15 Flange Hex Bolt
and 1 x M8 Lock Washer and tighten.
6. Once the lightboard is fitted, attach the light board supports using 2 x M6*15 Flange
Hex-Bolt, 2 x M6 Flat Washer and 2 x M6 Locknut as shown. Repeat for other side
1
2
M6
Locknut
Assemby Instructions for APT4300 – Aunger 4’x 3’ Trailer
7
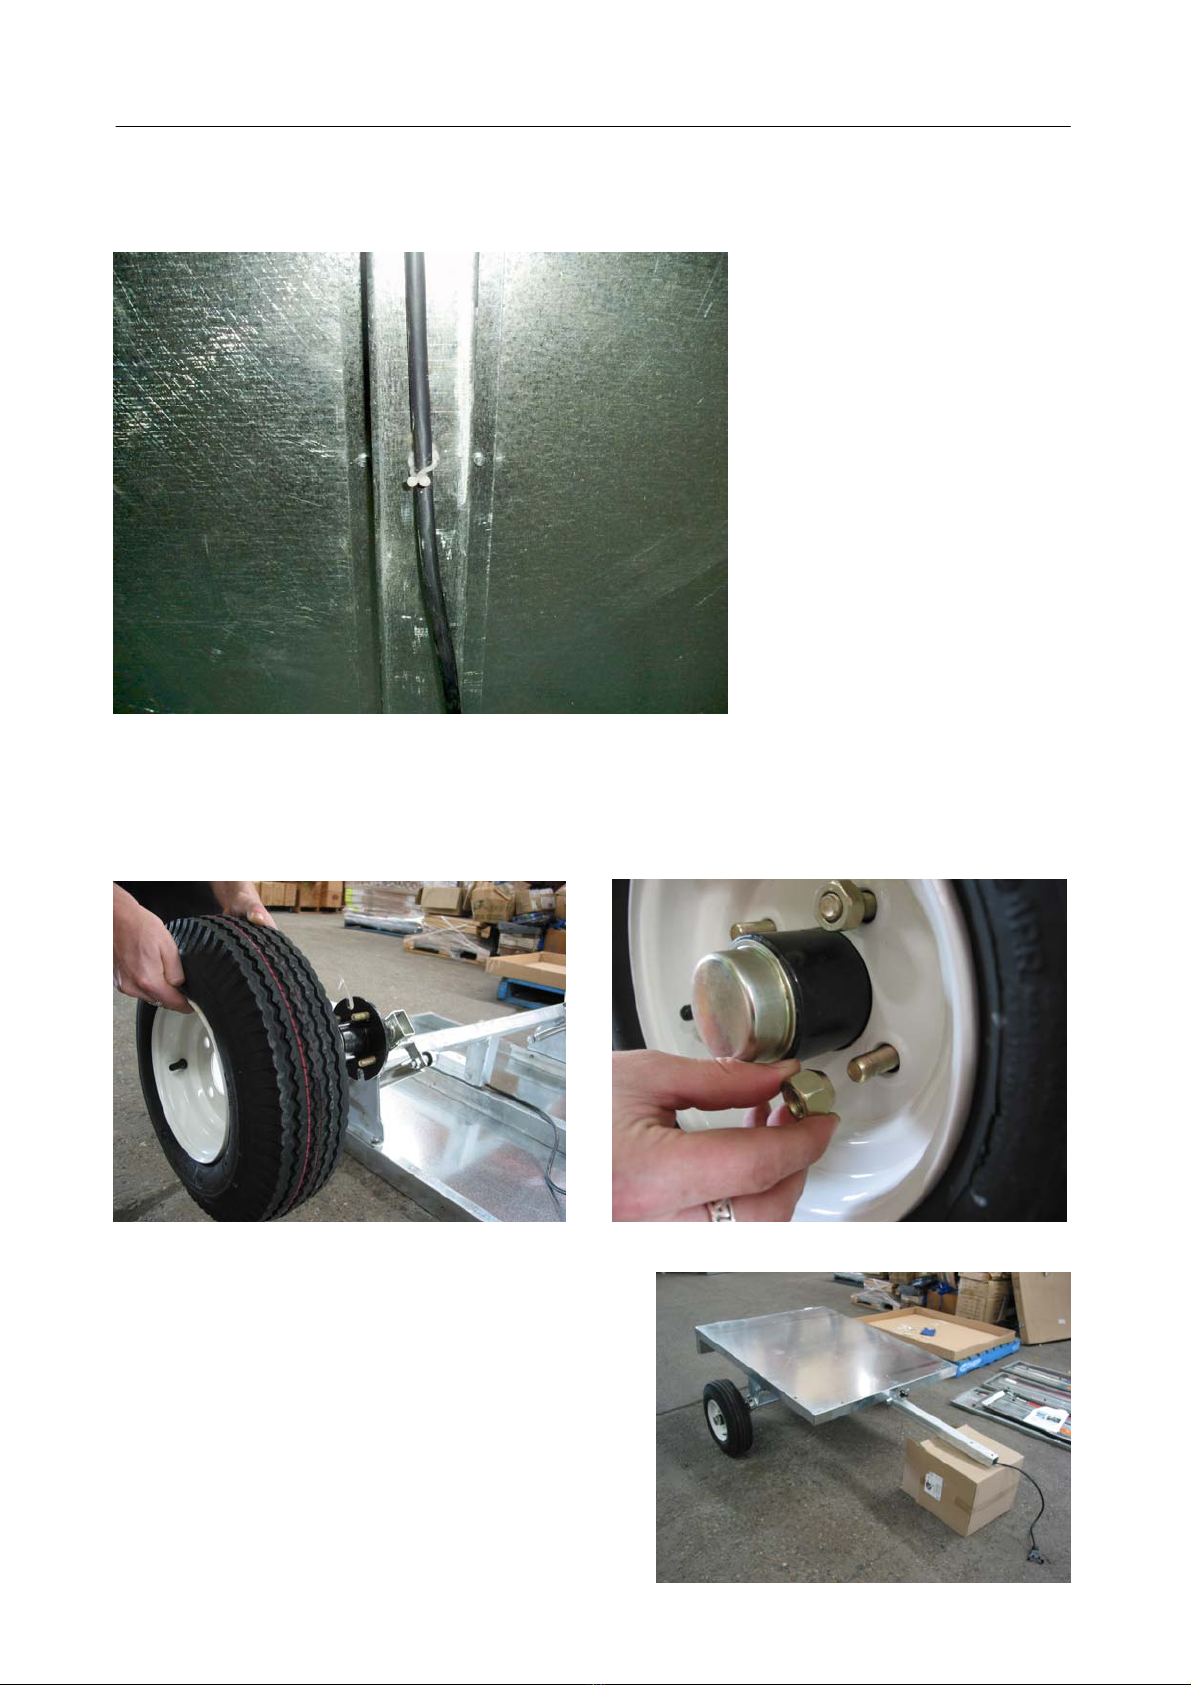
7. At this time, secure the black plastic tube that contains the wiring to the body of the
trailer as shown below. Simply twist these ties to secure the wire.
8. Remove the Hubnuts from the axle. Then mount a wheel on each side using 4 x M12
hubnuts (ensure tapered edge is facing in and located within hole). Make sure the black
tire valve is on the outside. Finger tighten each hubnut and then gradually tighten each
hubnut moving around the wheel until tightened hard.
9. Once the light board is attached in the centre
and you have fitted the light board supports,
turn the trailer over onto its wheels.
Assemby Instructions for APT4300 – Aunger 4’x 3’ Trailer
8
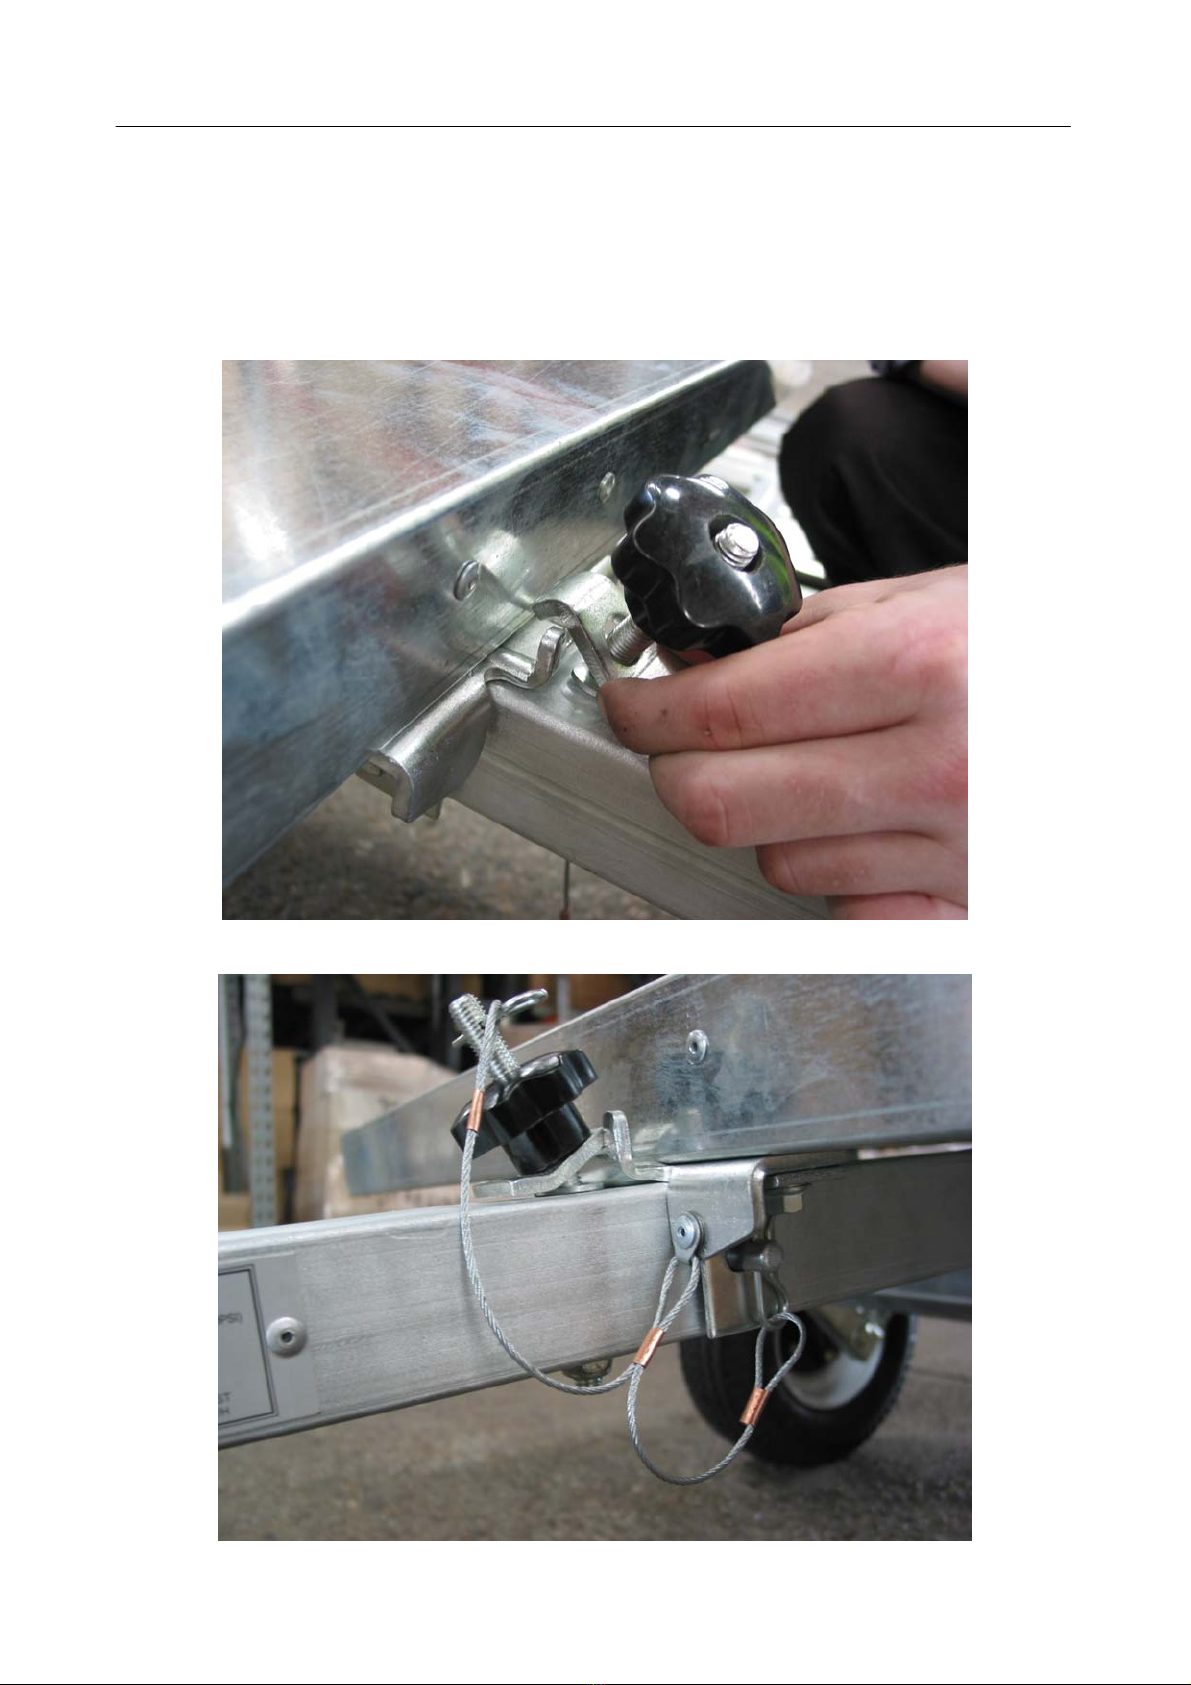
10. Loosen the knob first and then rotate locking plate over elbow (drawbar bracket) and
tighten. Ensure the nut underneath the knob on the underside of the drawbar is tightened.
Put the two R pins into the two holes. One hole is on the L latch and another is on the
thread of the knob.

Assemby Instructions for APT4300 – Aunger 4’x 3’ Trailer
9
11. Attach the side panels by aligning the panel and the holes in the trailer body (1). The
bolts on the bottom at the rear of the side panel will secure the light board to the trailer (2).
Note: the gatelock mechanism should be at the rear of the trailer
Attach 1x M8* 15 flange hex bolt, 1 x M8 Flat Washer and 1 x M8 Locknut at rear as
shown with the light board panel on the inside (3). Put the washer under the Locknut.
Repeat for other side.
Attach 1 x M8* 15 flange hex bolt and 1 x M8 Lock Washer in bottom of side panel (at the
front) as illustrated (1). Repeat for other side.
The bolts must not be tightened before all the bolts are in place including the ones in the
frontgate. This helps with ensuring all panels line up evenly.
3
2
1

Assemby Instructions for APT4300 – Aunger 4’x 3’ Trailer
10
Your trailer should now look like this:
12. Mount the frontgate. The front gate is the panel with the white reflectors on it.
Put 1 x M8* 15 flange hex bolt and 1 x M8 Lock Washer in each side of the gate at the top
(1). Put 1 x M8*15 flange hex bolt and 1 x M8 Lock Washer in each side at the bottom (2).
Repeat for other side.
Put 2 x M8* 15 flange hex bolt and 2 x M8 Lock Washer in the bottom sill of the gate (3).
1
2
3

Assemby Instructions for APT4300 – Aunger 4’x 3’ Trailer
11
13. Now all the bolts can be tightened. If you have any problems with lining the panels,
simply undo the the bolts, adjust the panel as necessary and retighten.
Fit the tailgate into the hinges and secure the latches on the sides
14. Mount the mudguard using 2 x M8*20 Hex Bolt, 2 x M8 Spring Washer and 2 x M8 Flat
Washer in each side. Place the flat washer on first with the spring washer on top then
insert bolt. Ensure the long side is to the back.
Assemby Instructions for APT4300 – Aunger 4’x 3’ Trailer
12
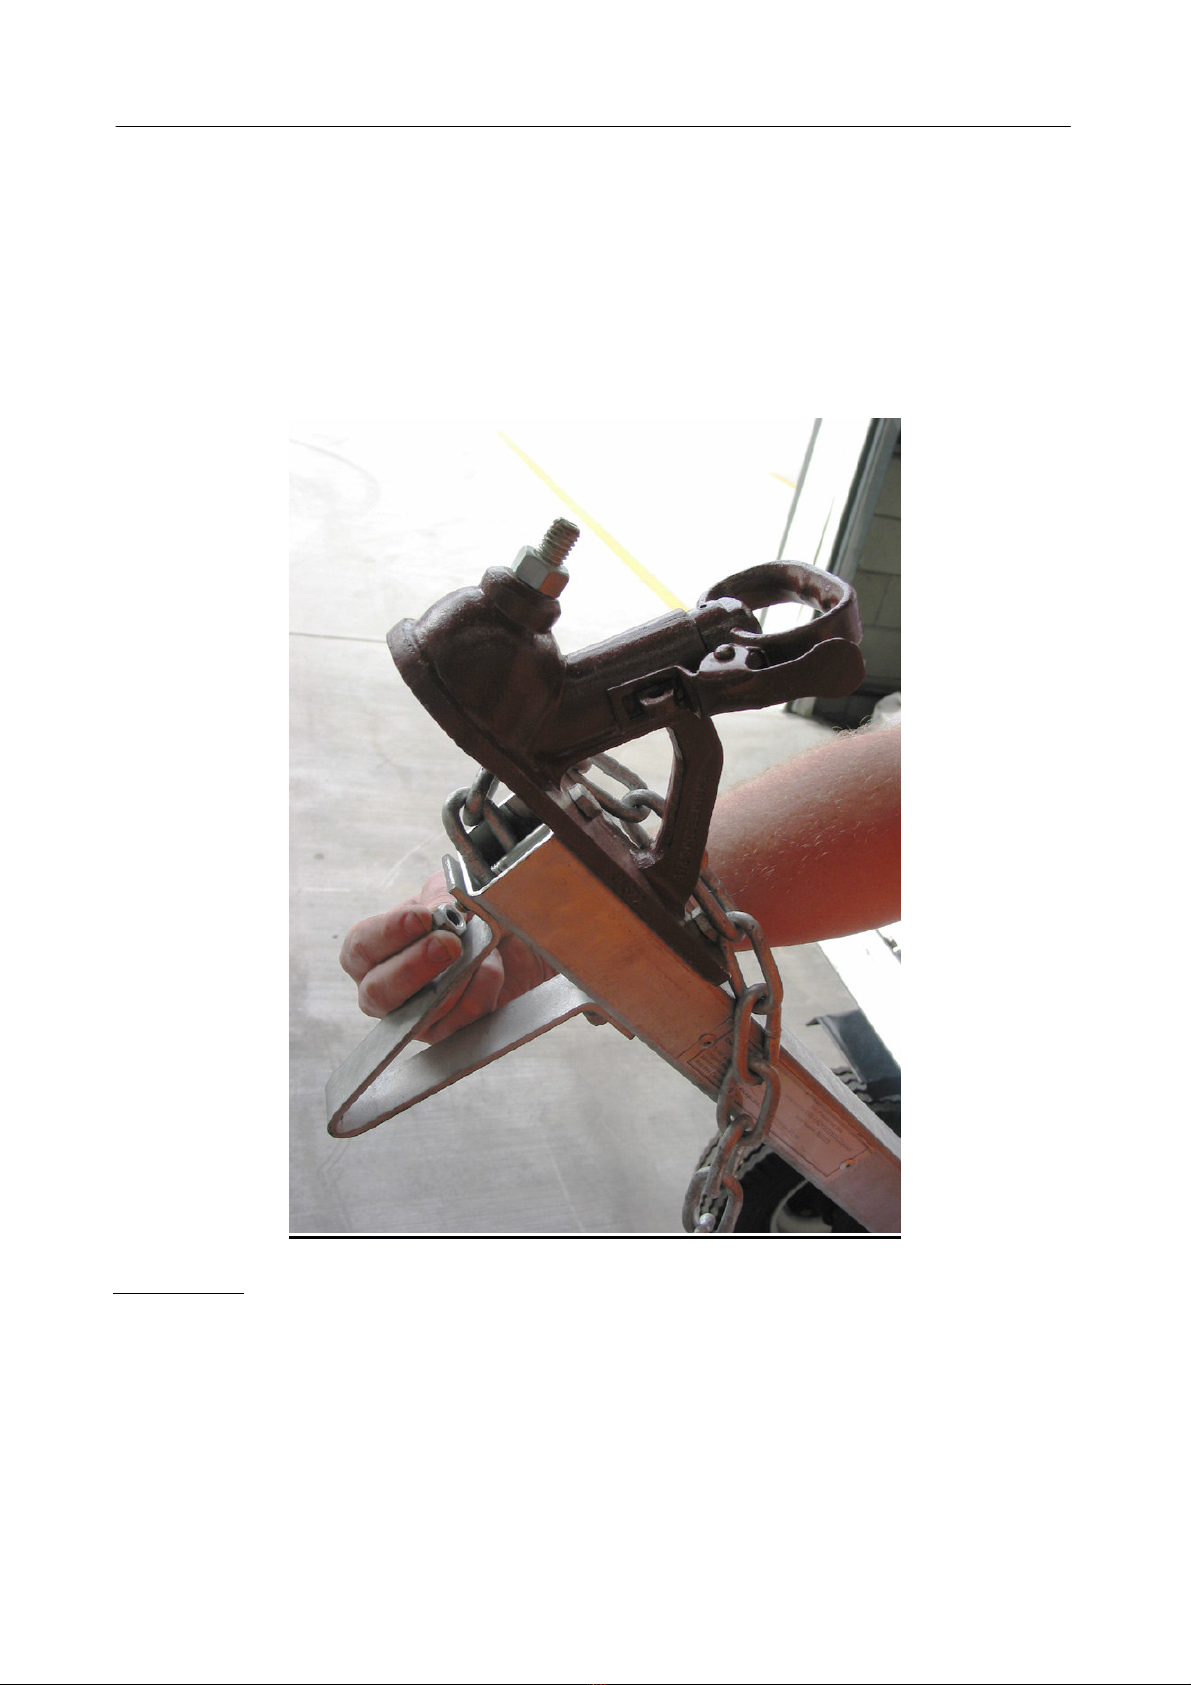
15. Attach the coupling, chain and triangle bracket to the drawbar as shown using
2 x M10*80 Hex Bolt and 2 x M10 Locknut.
Place the coupling on top of the drawbar and align the holes. Place bolt through coupling,
through chain (as shown) and through the triangle bracket underneath drawbar. Secure
with M10 Locknut underneath. Place second bolt at back of coupling through drawbar,
through triangle bracket and tighten M10 Locknut. Adjust length of chain as required, for a
shorter length, attach the bolt through another link.
Please Note: If you have any slack in the wiring, pull lighting cables loosely through
drawbar, wrap excess lighting cable through triangle bracket to prevent the cable from
dragging or sitting on the ground. Be sure to leave a small amount of slack in cables to
allow for tilt of tray.
Flip the trailer back onto its wheels. Take care to ensure all fastening points are tightened
and that all components have been used.
16. Now tests your lights, attach the trailer plug to the socket on the car and check the
following functions; brakes, indicators, parking lights and hazard lights.

Assemby Instructions for APT4300 – Aunger 4’x 3’ Trailer
13
Please complete the ’Before Road Use Checklist’ at the
back of these instructions prior to registration and road use
Your APT4300 is now fully assembled.
WARNING NOTE :-
This Trailer MUST BE Registered at the local Main Roads Authority BEFORE
Road Use. Refer to the documentation on ‘How to register your Aunger Trailer’, log
onto www.aunger.com.au or contact your local main roads authority
Always ensure the wheel nuts are tightly fastened and the connector plug is connected correctly to
allow trailer brake light, park light & indicator functions. Test to ensure all lights are in proper
working order prior to road use. Also ensure the coupling is properly connected to the 50mm tow
ball and the safety chain is attached prior to road use.
Loads
It is critical to your safety that this trailer is never overloaded beyond its design capability in such a
way to make it unsafe. All loads should be evenly distributed and secured. This trailer was not
designed to carry loads greater than 220kgs and due care and caution should be exercised when
loading weights approaching this maximum load.

Assemby Instructions for APT4300 – Aunger 4’x 3’ Trailer
14
IMPORTANT
The purpose of the following notices are to give you tips on safe use and operation of your
utility trailer:
1. This trailer is not designed for off-road use
2. Please read the instructions carefully and follow them step-by-step for easy
assembly. And please keep the instruction filed safely for easy reference at a later
date
3. Please double check the assembling, be sure each step is followed.
4. It is an offence to load the trailer more than its marked maximum load of 220 kgs.
5. Before using, please inspect your trailer and coupling and ensure they are firmly in
place and complete the before road use checklist
6. Ensure load is secured and strapped down firmly.
Maintenance:
Re-fill grease on bearing as deemed necessary. Signs that your hubs may
require grease include noisy bearings, poor free-spin of wheels and
overheated hubs. If grease does not fix this problem, call Aunger on
07 3260 2400
Always check fastening points such as coupling, chain and tilting mechanism
to ensure fittings are tight and secure
It is the responsibility of the owner to double check all bolts are tight and
secure before each road use
Check tires regularly to ensure even balance and wear.
See the ‘safe towing guide’ for tips and guidelines on how to
ensure safe and proper use of your Aunger Pro-Trailer and
other trailers, or to view this document and browse
the great range of Aunger Products log on to
www.aunger.com.au
Assemby Instructions for APT4300 – Aunger 4’x 3’ Trailer
15
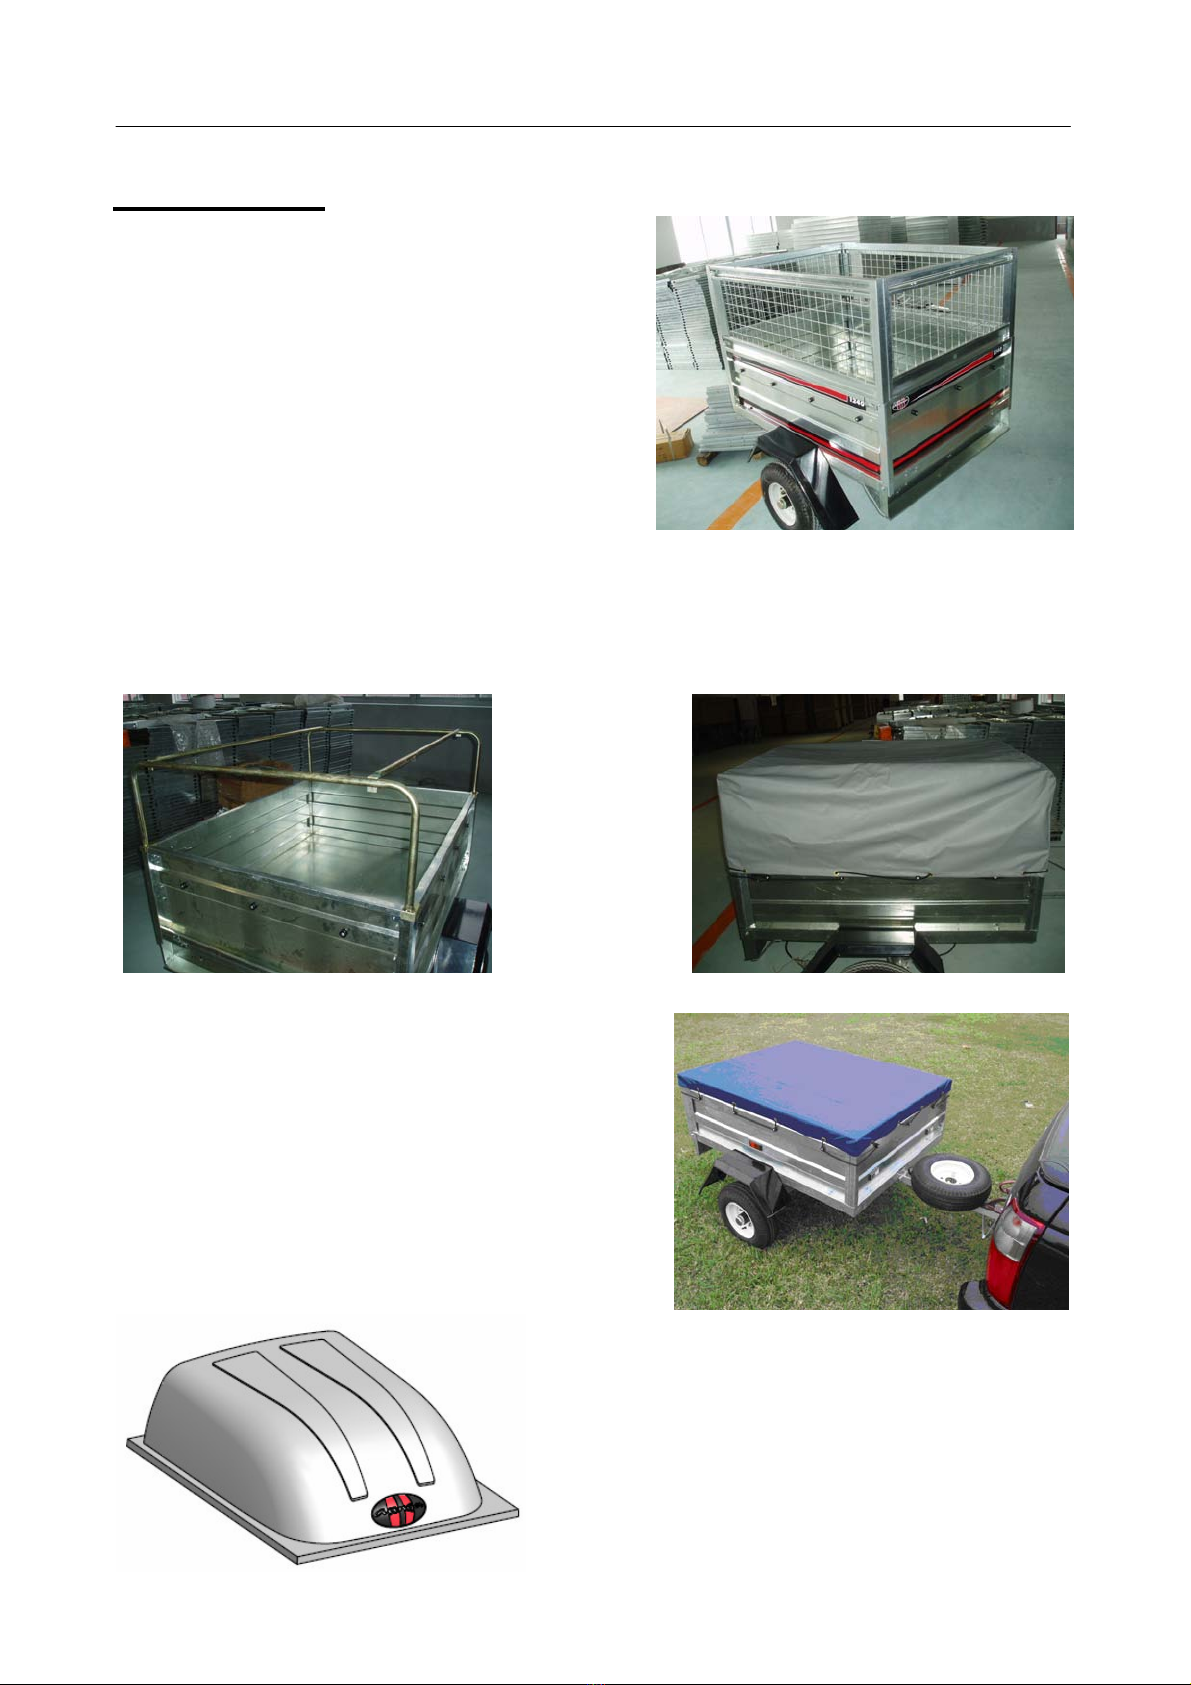
Accessories
Cage - APT4310
Designed for this trailer, this cage kit
doubles the useable volume of the trailer.
Clips into place (no drilling required).
Cage Cover - APT4311
Cover made of UV Treated PVC to fit
Cage – APT4310.
Tarp Riser Kit - APT4312
This 30cm riser kit is designed to give extra room for your possessions and keep them dry
and protected. Not designed to carry any weight.
Tarp - APT1245
Fully waterproof UV Treated PVC Material, fitted
for APT4300. Depending on availability may be
grey or blue
Spare Wheel - APT1243
Includes U-Bolt mounting bracket
Moulded Plastic Lid – APT4313
Made from durable UV Treated ABS plastic,
this stylish lockable lid keeps your
possessions secure and waterproof.

Assemby Instructions for APT4300 – Aunger 4’x 3’ Trailer
16
Trouble Shooting Guide
If your problem is not listed below or you are having difficulty in any step, please contact
Aunger on 07 3260 2400.
Lights not working
If you find a light/s not working, there are a few steps you can undertake to help diagnose
the problem. Always ensure the trailer plug is NOT connected to the vehicle when
undertaking these steps.
1) If a light works on one side but not on the other, try opening the light fixture and
swapping over the globes to ensure it is not a faulty or broken globe.
2) Check all connections to the light, ensure the clips are secure on the terminal and
check all wires are connected.
3) Open the trailer plug to check that all wires are connected into a slot
4) If no obvious fault can be seen, contact Aunger for technical assitance
Noisy Wheel Bearings
1) Check to see if the hub has any side to side to movement. If it does, the stub axle
nut needs to be tightened. See ’wobbly wheel’ below
2) Bearings may need grease
3) Once assembled the grease needs to be moved around on the bearings/ within the
hub, try spinning the wheel repeatedly to assist in lubricating the hub and bearings.
Wobbly Wheel
If your wheel ’wobbles’ from side to side it is likely that the hub requires further tightening.
See diagrams below for information on how to do this:
1. Remove the Dust Cover on the hub with a flathead
screwdriver
2. Remove the split pin

Assemby Instructions for APT4300 – Aunger 4’x 3’ Trailer
17
3. With a pair of vice grips or other suitable tool,
tighten the stub axle nut until the side to side
movement in the wheel stops. Insert the split pin
(you may need to re-expose the hole by loosening or
tightening the nut).
Spin the wheel to ensure a good free spin, double
check there is no side to side movement. Splay pin
ends to lock in place and put dust cover back on.
Nuts or Bolts left over/ missing
Follow through the steps of the instructions to ensure no step has been missed. Visually
inspect trailer to ensure all holes have bolts. A bag of ’spare components’ has been
included, this will be marked as such. If you have bolts missing for assembly please
contact Aunger on 07 3260 2400.
Can’t tighten nut/bolt
Try turning the bolt anti-clockwise to align the thread and then tighten.
Check the thread of the bolt to ensure it is not burred. If it is, contact Aunger for a
replacement or check the spare components bag for a duplicate
Cant align panels
Loosen off each bolt on that panel and its adjoining panels, line up the holes and loosely
tighten bolts. Once all bolts are in begin tightening down
Trailer jumps around with no load
All trailers tend to bounce around with light weights in them. If you are only carrying a light
load/ empty load and you find the trailer is jumping around on the road, you can choose to
drop the pressure in the tire to dampen the bounce. The recommended cold tire pressure
is a manufacturers recommendation based on carrying the maximum load, if you choose
to let your tires down below this, be sure to check the following:
- There is no bulge in the tire
- You are not carrying a large load
- You have an even tire pressure in both tires
- Recheck the tires when you load weight into the trailer
For clarification on these steps or for another enquiry please feel free to contact Aunger on
07 3260 2400.

Assemby Instructions for APT4300 – Aunger 4’x 3’ Trailer
18
Spare Parts for APT4300
Whole Axle Assembly w/ Hubs
included APT1241
Mudguard (Pair) APT1242
Spare Wheel APT1243
Trailer Hub Assembly - Single APT1244
Coil Spring Shock Absorber APT1246
Dust Cap on Wheel APT1247
Left Side Panel APT1248
Right Side Panel APT1249
Front Panel APT1250
Back Tailgate Panel APT1251
Triangle Bracket APT1252
Drawbar w/out VIN & Tire Placard APT1253
Light board (including wiring & plug) APT1254
Trailer Platform APT1255
Black Tightening Device APT1256
Bolts Kit APT1257
Elbow (Drawbar Bracket) APT1258
Light Board Support Bracket APT1259
For costs on these spare parts or any other enquiry contact Aunger on 07 3260 2400 or
visit www.aunger.com.au
Information for registration:
Tare Weight 80 kgs
Tyre Size 118mm
Ply Rating 4 ply
Rim profile 8” x 3.75”
Cold Tyre Pressure 60 psi
Axle Rating 330 kgs
Coupling rating 2000 kgs
ATM 310 kgs
Trailer Measurements:
Length 1.9 m
Centre of Coupling to Centre of Axle 1.35 m
Centre of axle to Rear .55 m
Front of Box to Centre of Axle .65 m
Width edge to edge 1.29 m
Height .85 m
Table of contents
Other Aunger Utility Vehicle manuals

Popular Utility Vehicle manuals by other brands


Edscha Trailer Systems
Edscha Trailer Systems TipperRoof Repairing instructions

Cushman
Cushman Titan 36V Owner's manual and service guide

Kendon
Kendon Stand-Up TRIKE/SPYDER/SIDECAR Ride-Up SRL owner's manual

Toro
Toro 07390H Workman HDX-Auto Operator's manual

Primo Water
Primo Water UT5x8-26HSS Assembly instructions

wsm
wsm RTV-X1120D Workshop manual