Aunger 5350 User manual

Aunger 5350 Box Trailer
Assembly Instructions
TRAILER KIT
APT5350

Warning – Avoid accidents
Keep children and pets away from the work area.
Maintain an orderly work area. Avoid laying cables, wires etc. on the floor.
Use personal safety equipment when using tools.
It is highly recommended that when assembling this trailer that two persons undertake
the task as some heavy lifting is required
No additional tools are required for assembly
The following tools are
included with this kit
1) 8-10 mm spanner
2) 10-12 mm spanner
3) 13-16 mm spanner
4) 14-17 mm spanner x 2
5) 19-22 mm spanner
6) 21mm socket wrench
Should you wish to use your own tools, feel free to substitute any tool, these are
provided for your convenience.
Note: A locking solution can be used on bolts for permanent assembly of the
trailer, however it is not essential.
Lay out all components, as per the diagram on the following page, prior to
beginning assembly to ensure all required parts are present and to assist with
easy part identification.
If there are components missing, DO NOT ASSEMBLE THE TRAILER, contact
Aunger on (07) 3260 2400 for replacement parts. DO NOT substitute any
component as this will void warranty and may affect ADR compliance.
If you have any problems with assembling the trailer, please contact Aunger on
(07) 3260 2400 for technical assistance
If you would like to enquire about having your trailer assembled for you,
please contact Future Logistics on 1300 307 712.
Please Note: Future Logistics is an assembly agent only and any technical
assistance or sales enquiries should be directed to Aunger.

This assembly instruction is for building TRAILER KIT APT5350
Please use the enclosed assembly kit:
NO.
DESCRIPTION QTY
NO.
DESCRIPTION QTY
1 M8*20 FLANGE HEX-BOLT 2 17 LIGHT BOARD SUPPORTS
2
2 M8*25 FLANGE HEX-BOLT 8 18 COTTER PIN 4
3 M6*16 FLANGE HEX-BOLT 4 19 SPRING PLATE 2
4 M8*16 FLANGE HEX-BOLT 12 20 FRONT GATE 1
5 M10*70 HEX-BOLT 4 21 REAR GATE 1
6 M10*80 HEX-BOLT 2 22 LEFT SIDE PANEL 1
7 M10 SPRING WASHER 2 23 RIGHT SIDE PANEL 1
8 M8 SPRING WASHER 8 24 PLATFORM 1
9 M10 LOCKNUT 4 25 DRAWBAR WITH CHAIN 1
10 M6 LOCKNUT 4 26 FENDER 2
11 M10 FLAT WASHER 2 27 LIGHT BOARD 1
12 M6 FLAT WASHER 4 28 HITCH COUPLER 1
13 M8 LOCK WASHER 14 29 TRIANGLE BRACKET 1
14 U BOLT 4 30 AXLE 1
15 M14*80 HEX-BOLT
WITH PIN HOLE
4 31 12” x 5.30” WHEEL 2
16 M14 LOCK NUT 4 32 LEAF SPRING 2
Explanation of bolt sizes
E.g. M8 * 25 Flange Hex Bolt Type of Bolt i.e hex head with flange
Size of the bolt head – 8mm Length of Bolt Shaft – 25mm

APT5350 Assembly Instructions www.aunger.com.au
4
Start by laying the trailer platform
on its back as shown. Note that the
hinges are located at the back of
the trailer.
Now fit the leaf spring onto the
trailer platform. Fit the end with
the nylon insert, as pictured, to the
front of the trailer. It is very
important that these are fitted in
the correct direction. Double check
by noting the location of the small
plastic twist tie, it will be towards
the back of the trailer.
Secure the front of the leaf spring
using an M14*80 Hex Bolt with
Pin hole, M14 Locknut and cotter
pin. Insert the bolt through the
nylon insert and the bracket,
tighten nut and insert cotter pin.
Split the cotter pin as shown below
Front of Trailer

APT5350 Assembly Instructions www.aunger.com.au
5
Secure the slipper (back part of leaf spring)
using an M14*80 Hex Bolt with pin hole, M14
Locknut and cotter pin same as previous step.
Split the cotter pin. Repeat these steps to secure
the leaf spring for the other side.
Place axle onto the leaf spring, using the lugs on the leaf spring and the divot in the axle
to locate it correctly.

APT5350 Assembly Instructions www.aunger.com.au
6
Attach the spring plate using 2 x U-Bolt and 4 x M10 Locknut (on the U-Bolt already) on
each side as shown. Be sure to gradually tighten each one to ensure the plate is even and
that locknuts are equally distanced along the thread.
Now attach the wheels to the hubs using the wheel nuts already supplied on the hub.
Ensure the tyre valve is facing outwards, and that the wheel nuts are fitted with tapered
edge inwards. Gradually tighten each wheel nut to ensure an even fit of the wheel.
Now pass the light board under the axle as
shown. Sit the light board near the back of
the trailer frame. Do not secure it yet as
the trailer will be flipped over before this
is secured.

APT5350 Assembly Instructions www.aunger.com.au
7
Now secure the drawbar to the trailer
frame using an M10 Flat Washer, M10
Spring Washer & M10*70 hex-bolt in
that order and tighten. Repeat for
second hole located at the front of
trailer body. Ensure the drawbar safety
chain link is facing up when fitting the
drawbar. This way when the trailer
is flipped the chain link will point
down and will not interfere with the
fitting of the coupling.
Secure trailer wiring cable by feeding through
the plastic ties and twisting as shown.
Attach support brackets for
drawbar using M8*25 Flange
Hex Bolt and M8 Spring
Washer. There are two supports
to the trailer body on each side.
Repeat step for other side.

APT5350 Assembly Instructions www.aunger.com.au
8
Secure bracing to side of
drawbar using M10*70 Hex
Bolt and M10 Locknut. Repeat
for both holes.
At this point in time, check that
all bolts are secure and tight.
Now flip the trailer over so it is
sitting on its wheels.
Please note: It is highly
recommended at least two
people undertake this process.
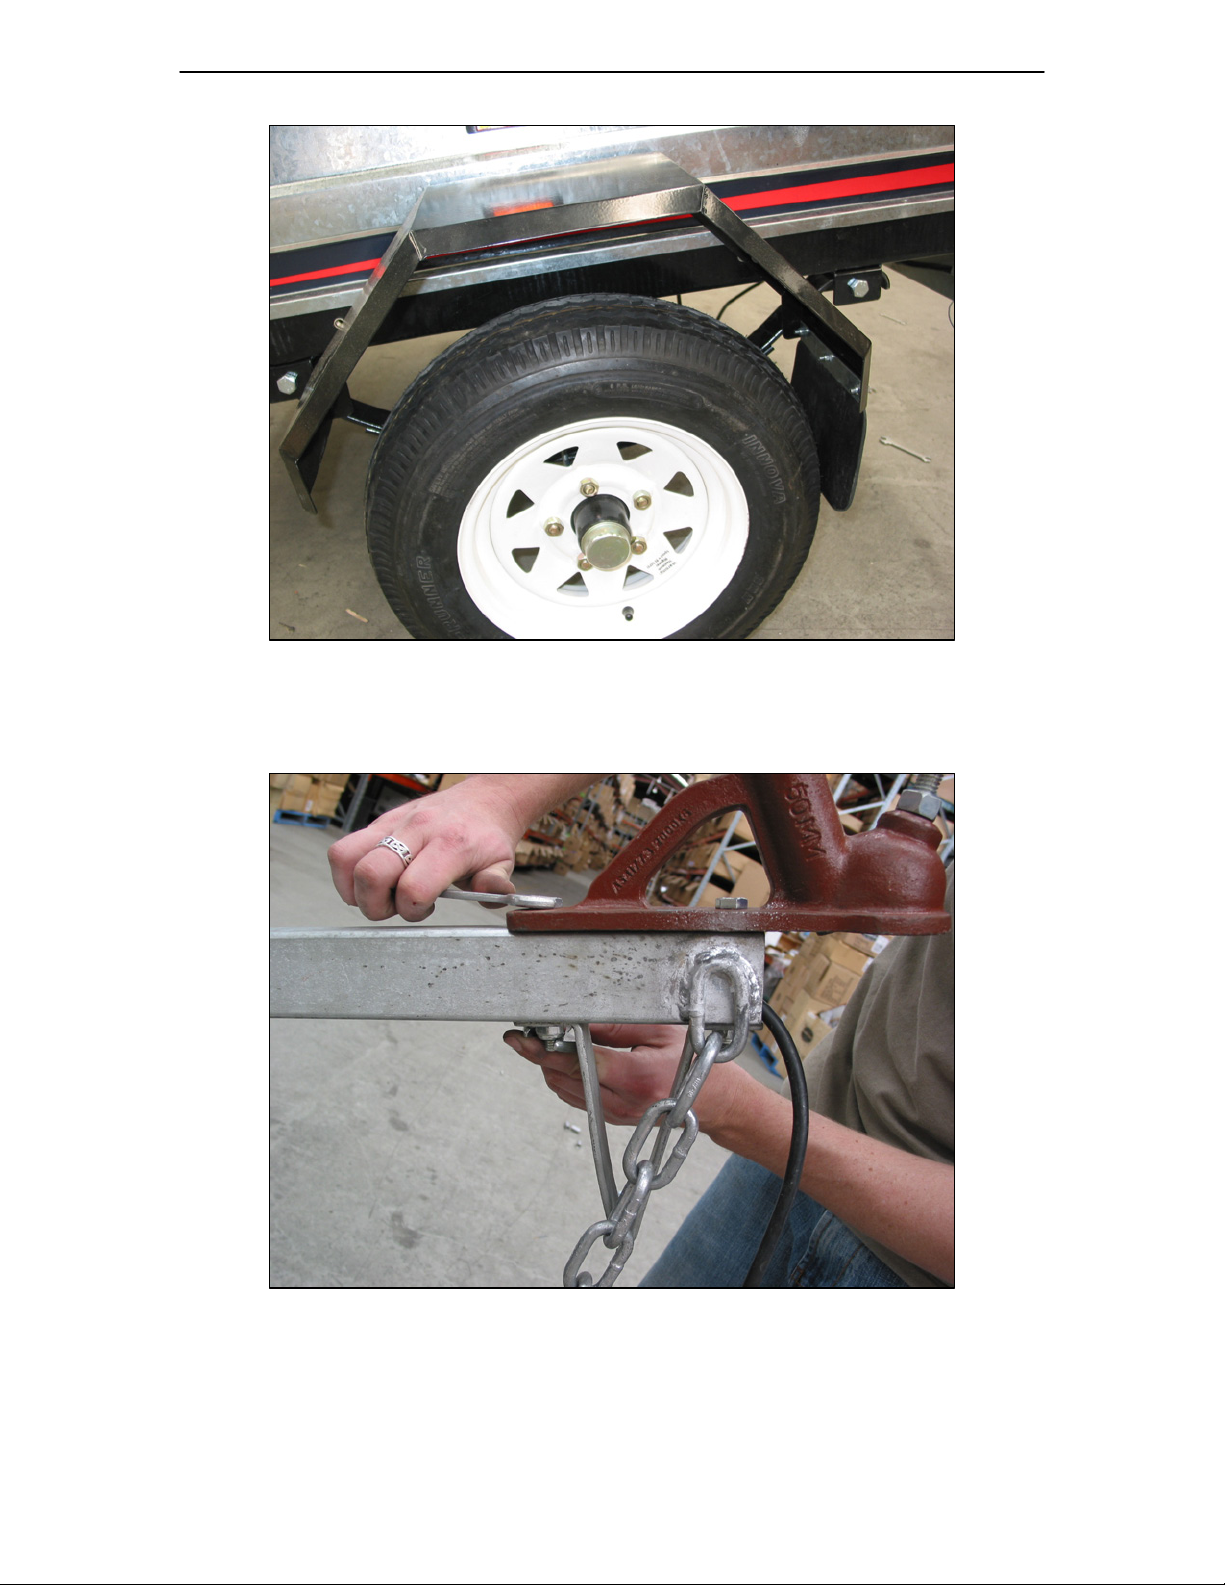
Secure the light board using 2
x M8*16 Flange Hex Bolt and
M8 Lock Washer as shown.
Your trailer will now look like
this

APT5350 Assembly Instructions www.aunger.com.au
9
Sit the side panel onto the
trailer frame as shown,
ensuring the latch is towards
the back of the trailer. Secure
the side panels using 1 x
M8*16 Flange Hex Bolt and
M8 Lock washer at the front
hole. Secure the panel at the
front (as pictured) and repeat
for the same hole on the other
side
There will be holes left in the
side panel, these do not require
bolts (these are for the handle
kit only)
Handy Tip:
Fit the panels loosely and save
tightening the bolts until all
panels are lined up perfectly.
Secure the front panel using M8*16 flange hex bolt and M8 Lock Washer. Six (6) bolts
are required for the front panel.

APT5350 Assembly Instructions www.aunger.com.au
10
Attach tailgate by aligning the
hinge on the gate to the body and
sliding it across. The gate is then
secured by securing the latch as
shown below
Secure the light board support brackets to the bottom of light board using M6*16 Flange
Hex Bolt and M6 Locknut, M6 Flat Washer. Place washer over hole and insert bolt,
tighten the nut from the underside. Repeat for other side

APT5350 Assembly Instructions www.aunger.com.au
11
Secure side of supports to trailer frame and panel using M8*16 flange hex bolt and M8
lock washer for top hole. Then use M8*20 Flange hex bolt and M8 Lock Washer for
bottom hole. Repeat for other side
APT5350 Assembly Instructions www.aunger.com.au
12
Secure Mudguards using M8*25 flange hex bolt and M8 Spring Washer. Two bolts per
side. Ensure the mudflaps are pointing to the back of the trailer. Repeat this step for the
other mudguard.
Secure coupling and triangle bracket as shown using M10*80 Hex Bolt and M10
Locknut.

APT5350 Assembly Instructions www.aunger.com.au
13
Your trailer is now complete. Be sure to check over the instructions and ensure each step
has been completed. Check all bolts are tightened and run through the safety checklist
provided before using the trailer for the first time.
Your APT5350 is now fully assembled.
WARNING NOTE:
This Trailer MUST BE Registered at the local Main Roads Authority BEFORE
Road Use. Refer to the documentation on ‘How to register your Aunger Trailer’,
log onto www.aunger.com.au or contact your local main roads authority
Always ensure the wheel nuts are tightly fastened and the trailer plug is
connected correctly to allow trailer brake light, park light & indicator functions.
Test to ensure all lights are in proper working order prior to road use. Also ensure
the coupling is properly connected to the 50mm tow ball and the safety chain is
attached prior to road use.
Loads
It is critical to your safety that this trailer is never overloaded beyond its design
capability in such a way to make it unsafe. All loads should be evenly distributed
and secured. This trailer was not designed to carry loads greater than 350kgs
and due care and caution should be exercised when loading weights
approaching this maximum load.

APT5350 Assembly Instructions www.aunger.com.au
14
IMPORTANT
The purpose of the following notices are to give you tips on safe use and
operation of your utility trailer:
1. This trailer is not designed for off-road use
2. Please read the instructions carefully and follow them step-by-step for
easy assembly. And please keep the instruction filed safely for easy
reference at a later date
3. Please double check the assembling, be sure each step is followed.
4. It is an offence to load the trailer more than its marked maximum load of
350 kgs.
5. Before using, please inspect your trailer and coupling and ensure they are
firmly in place and complete the before road use checklist
6. Ensure load is secured and strapped down firmly.
Maintenance:
Re-fill grease on bearing as deemed necessary. Signs that your
hubs may require grease include noisy bearings, poor free-spin of
wheels and overheated hubs. If grease does not fix this problem,
call Aunger on 07 3260 2400
Always check fastening points such as coupling and chain to
ensure fittings are tight and secure
After first road use, double check all bolts are tight and secure
Check tires regularly to ensure even balance and wear.
See the ‘safe towing guide’ for tips and guidelines on how to
ensure safe and proper use of your Aunger 5350 Trailer and
other trailers, or to view this document and browse
the great range of Aunger Products logon to
www.aunger.com.au

APT5350 Assembly Instructions www.aunger.com.au
15
Accessories
Spare Wheel –
APT5351
12” Wheel and U-Bolt bracket to
secure wheel to drawbar
Standard Tarp –
APT5352
Flat UV Treated PVC tarp
specifically designed to fit the
APT5350 trailer.
Mesh Cage Kit –
APT5353
Designed for this trailer, this cage kit
doubles the useable volume of the
trailer. Clips into place (no drilling
required)

APT5350 Assembly Instructions www.aunger.com.au
16
Mesh Cage Kit Tarp -
APT5354
Cover made of UV Treated PVC to
fit APT5353 Cage Kit
Handle Kit -
APT5355
4 piece handle kit for protection
of mudguards and tie down
anchor points
Moulded Plastic Lid –
APT5356
Made from durable UV Treated
ABS plastic,
this stylish lockable lid keeps your
possessions
secure and waterproof

APT5350 Assembly Instructions www.aunger.com.au
17
Trouble Shooting Guide
If your problem is not listed below or you are having difficulty in any step, please contact
Aunger on 07 3260 2400.
Lights not working
If you find a light/s not working, there are a few steps you can undertake to help diagnose
the problem. Always ensure the trailer plug is NOT connected to the vehicle when
undertaking these steps.
1) If a light works on one side but not on the other, try opening the light fixture and
swapping over the globes to ensure it is not a faulty or broken globe.
2) Check all connections to the light, ensure the clips are secure on the terminal and
check all wires are connected.
3) Open the trailer plug to check that all wires are connected into a slot
4) If no obvious fault can be seen, contact Aunger for technical assistance
Noisy Wheel Bearings
1) Check to see if the hub has any side to side to movement. If it does, the stub axle
nut needs to be tightened. See ’wobbly wheel’ below
2) Bearings may need grease
3) Once assembled the grease needs to be moved around on the bearings/ within the
hub, try spinning the wheel repeatedly to assist in lubricating the hub and
bearings.
Wobbly Wheel
If your wheel ’wobbles’ from side to side it is likely that the hub requires further
tightening. See diagrams below for information on how to do this:
1. Remove the Dust Cover on the hub with a
flathead screwdriver

APT5350 Assembly Instructions www.aunger.com.au
18
2. Remove the split pin
3. With a pair of vice grips or other suitable
tool, tighten the stub axle nut until the side to
side movement in the wheel stops. Insert the
split pin (you may need to re-expose the hole by
loosening or tightening the nut).
Spin the wheel to ensure a good free spin,
double check there is no side to side movement.
Splay pin ends to lock in place and put dust
cover back on.
Nuts or Bolts left over/ missing
Follow through the steps of the instructions to ensure no step has been missed. Visually
inspect trailer to ensure all holes have bolts. A bag of ’spare components’ has been
included, this will be marked as such. If you have bolts missing for assembly please
contact Aunger on 07 3260 2400.
Can’t tighten nut/bolt
Try turning the bolt anti-clockwise to align the thread and then tighten. Check the thread
of the bolt to ensure it is not burred. If it is, contact Aunger for a replacement or check
the spare components bag for a duplicate
Cant align panels
Loosen off each bolt on that panel and its adjoining panels, line up the holes and loosely
tighten bolts. Once all bolts are in begin tightening down
For clarification on these steps or for another enquiry please feel free to contact Aunger
on 07 3260 2400.

APT5350 Assembly Instructions www.aunger.com.au
19
Information for Registration:
Tare Weight 114 kgs
Tyre Size 558 mm (5.30 – 12)
Ply Rating 6 ply
Rim profile 12” x 4”
Cold Tyre Pressure 80 psi (552 kpa)
Axle Rating 600 kgs
Coupling rating 2000 kgs
ATM 480 kgs
Trailer Measurements:
Length 2.3 m
Centre of Coupling to Centre of Axle 1.6 m
Centre of axle to Rear .73 m
Front of Box to Centre of Axle .85 m
Width edge to edge 1.47 m
Height .92 m

APT5350 - AUNGER TRAILER WARRANTY
1. Aunger Carcraft Pty Ltd ABN 49 009 986 556 (“Aunger”) warrants that this trailer will
be free from defects in materials and workmanship for a period of twelve (12) months
from the first purchase.
2. Aunger will (at Aunger’s option) repair or replace at no cost any part or parts which, in
Aunger’s reasonable opinion, are shown to be defective.
3. This warranty only applies:
a. To the purchaser from Aunger’s distributor or reseller (“the first purchaser”);
b. For the period of twelve (12) months from the date of the first purchase (“the
warranty period”);
c. If the first purchaser wholly completes the warranty registration certificate
included with the assembly instructions supplied with the trailer kit and returns
the completed certificate to Aunger within fourteen (14) days of the first purchase
or the date of delivery (whichever is later); and
d. Within Australia.
4. This warranty does not cover:
a. Damage to the trailer caused by:
i. Assembly of the kit contrary to the assembly instructions;
ii. Use or operation of the trailer contrary to the assembly instructions
and/or the road rules of your state
iii. Any modifications to the trailer;
iv. Inadequate or improper maintenance;
v. Misuse of the trailer;
vi. The use or installation of accessories or components not expressly
authorised by Aunger;
vii. The tow vehicle electrical system;
viii. Overloading or improper loading;
ix. Unauthorised repair or replacement work.
b. Towing charges;
c. Any costs incurred in returning the trailer to Aunger
d. Any loss or damage of any kind including any economic loss caused directly or
indirectly by any defect in, unsuitability or failure of the trailer.
5. To claim under this warranty a Notice of Claim in Aunger’s approved form must be
given to Aunger within the warranty period. Aunger will then assess the trailer and will
advise whether the claim is accepted and, if so, whether the trailer is to be replaced or
repaired and the arrangements for this to occur.
6. Aunger is not liable for any unauthorised repair work.
7. The benefit of this warranty is not transferable.
8. This warranty is in addition to, and in not limitation of any non-excludable obligations
imposed upon Aunger as manufacturer under the provisions of Part IV of the Trade
Practices Act or by any other terms and conditions which the law does not allow Aunger
to exclude or limit. To the fullest extent permitted by law all warranties or conditions
implied by law (whether statutory or otherwise) are excluded.
The warranty registration over the page should be wholly completed and returned
to Aunger or faxed on 07 3260 2466. Alternatively you can log onto our website
(www.aunger.com.au) and complete the Warranty Registration online
This manual suits for next models
1
Other Aunger Utility Vehicle manuals

Popular Utility Vehicle manuals by other brands

TransTank
TransTank Versatile Boom Operator's handbook

BERG
BERG X-Treme Theme user manual

Redman and Associates
Redman and Associates BKTRLR-SAMS-1 Owner's assembly and safety manual

Panasonic
Panasonic KX-TGA571 Installation guides

SAC
SAC Turbo-Max 6100 Series Operator's & parts manual

Ground Control
Ground Control TOUGHSAT T-100 user manual


