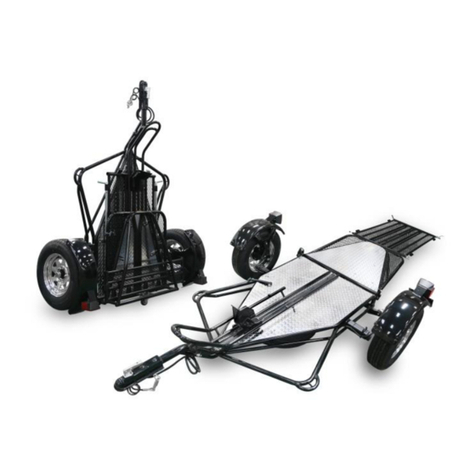
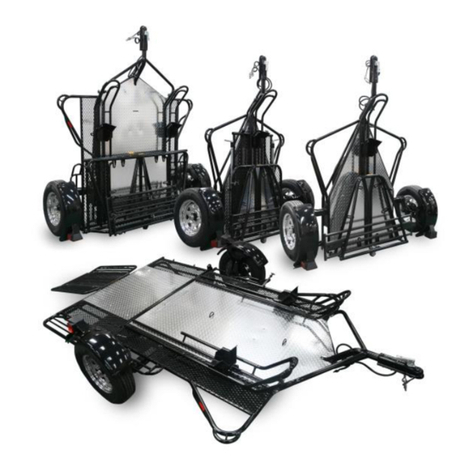
Kendon Stand-Up TRIKE/SPYDER/SIDECAR Ride-Up SRL User manual

KENDON TRIKE/SPYDER/SIDECAR
RIDE-UP SRL* STAND-UP™ TRAILER
*Suspension Reactive Loading
OWNER’S MANUAL
KENDON INDUSTRIES, LLC.
2990 E Miraloma Ave.
Anaheim, CA 92806 USA
Tel 714-630-7144 • Fax 714-630-7132
www.KendonUSA.com
Rev. 171115

-2-
TABLE OF CONTENTS
1.0 SAFETY WARNINGS..................................................................... 2
2.0 GENERAL INFORMATION............................................................. 3
3.0 TRAILER LAYOUT......................................................................... 4
4.0 ASSEMBLY.................................................................................... 8
5.0 COUPLER, SAFETY CABLES, AND LIGHTS.............................. 11
6.0 LOADING RAMPS........................................................................ 12
7.0 LOADING AND UNLOADING....................................................... 14
8.0 TIE-DOWN PROCEDURE ............................................................ 16
9.0 TRAILER STORAGE.................................................................... 17
10.0 HAZARDS AND MAINTENANCE............................................... 19
11.0 PARTS AND ACCESSORIES..................................................... 20
1.0 SAFETY WARNINGS
WARNING: Thoroughly read and understand all instructions and
owner’s manual(s) before using the trailer.
WARNING: Serious injury, death, and/or property damage may result
through improper use of this product, including crushing or severing type
injuries.
WARNING: Adult use only. Keep children away from trailer at all times.
WARNING: You must check to ensure that no part of the trailer will
contact the bottom, rear, front, fenders, fairings, luggage, frame,
suspension, cowlings, or other parts of your motorcycle BEFORE
loading. Kendon Industries, LLC is not responsible for damage to
motorcycles or other vehicles caused by interference with trailer frame
or components.
WARNING: Trailer should only be loaded and unloaded on a stable, flat
surface with the trailer properly connected to the tow vehicle.

-3-
WARNING: Properly attach the loading ramps per this manual’s
instructions.
WARNING: Obey trailer cargo capacity limits. Obey tow vehicle towing
and hitch capacity limits. Always consult your vehicle and trailer hitch
owner’s manuals before towing.
WARNING: There is an inherent risk in the loading and unloading
process. Failure to load your vehicle properly could result in serious
injury and or property damage. Load and unload at your own risk.
WARNING: Ramps must be properly secured to trailer prior to towing.
Ramps store below rear section on slide-out rails. Secure loading ramps
with locking padlocks or locking pins with wire retainers or similar
hardware. Check pins periodically and after stopping for security.
WARNING: If towing two bikes with fairings, make sure both bikes are
firmly tied down giving separation between fairings. Failure to properly
tie down the motorcycles could cause fairings to collide while towing.
Trailer owner is responsible for complying with all the recommended
procedures in this instruction manual. Use at your own risk. Kendon is
not responsible for injury, liability, property damage and/or any
consequential damage(s) caused by the misuse of this product.
WARNING: All motorcycles or other vehicles towed on trailer must be
firmly secured by a minimum of four (4) ratcheting tie-down straps.
Please consult Section 8.0 of this Owner’s Manual for proper tie-down
procedure. Kendon Industries, LLC is not responsible for damage or
injury caused by improper tie-down techniques. Never tow a vehicle
without at least four (4) tie-downs.
Trailer owner is responsible for complying with all recommended
procedures in this instruction manual. Use at your own risk.
Kendon Industries, LLC is not responsible for injury, liability,
property damage and/or any consequential damage(s) caused by
the misuse of this product.
2.0 GENERAL INFORMATION
Congratulations on your purchase of a Kendon Stand-Up™ Ride-Up
Motorcycle Trailer with SRL technology.

-4-
Safety is our number one concern. Before using this product, please
completely read these specific trailer instructions and familiarize yourself
thoroughly with the parts on your new Kendon Stand-Up™ Trailer.
SRL technology
SRL is short for “Suspension Reactive Loading.” SRL technology is a
combination of frame geometry, suspension components, and loading
ramp angle that minimize the apex created by a traditional ramp angle
and the bed of the trailer when loading and unloading.
The independent torsion suspension on your Kendon trailer works with
the loading ramp and the geometry of the rear section to minimize the
apex and create a smooth parallel surface for loading and unloading.
This means that there is a much lower angle when loading/unloading a
bike and virtually no point to hit the frame of the bike.
Safety Information
-Read and understand all warnings and warning labels before use
-Do not remove any warning labels or warning tags except for the
warning label on the coupler that must be removed before use
-Towing any trailer, proper loading, unloading and securing of the
load is serious business with inherent risks
-Serious injury, death and/or property damage can result to operator
and/or others through improper use of this product
-If you have any questions or need additional help or instructions,
please see your local Kendon dealer or contact us directly at 714-
630-7144 or info@KendonUSA.com
-If you lost or need additional copies of any of the instructions manual
referenced here, please visit our web site at www.KendonUSA.com
or contact us at 714- 630-7144 or info@KendonUSA.com
-Visit www.KendonUSA.com for new products, and support
3.0 TRAILER LAYOUT
Please familiarize yourself with the layout and components of your
Kendon Ride-Up SRL Trike/Spyder/Sidecar Stand-Up™ Trailer.

-5-
3.1 Loading Ramps
-Your trailer is equipped with two slide-out, folding loading ramps
-The two ramps work together to form a full-width loading ramp
-Always use the two ramps together to provide a safe loading surface
-Loading ramps fold shut and slide onto the angled slide brackets
below the rear section
3.2 Rear Section
-Your Kendon Stand-Up™ Trailer is designed to fold up and stand up
to save storage space
-The Rear Section of your trailer folds onto the Front Section for
storage or when no vehicle is being towed on the trailer
-The Rubber Latch holds the rear section closed when not in use
-Always tow the empty trailer with the Rear Section folded closed
-If the Rear Section is too heavy to fold closed, remove the Loading
Ramps and store separately
3.3 Front Raised Rail
-Your trailer features a Front Raised Rail that acts as a wheel stop for
most vehicles
-Can-Am Spyders, sidecars, two-wheeled motorcycles, ATVs, UTVs,
SxSs, and other vehicles with exposed front wheels should be rolled
all the way to the front of the trailer until the front tires contact the
Front Raised Rail
-Use the Front Raised Rail to anchor tie-downs

-6-
3.4 Front Triangle
-Your trailer features a Front Triangle that acts as a wheel guide and
stop for most trike-type vehicles
-Trikes and vehicles with a single front wheel should be rolled to the
front of the Front Triangle until the tire contacts the upper rail
-Be sure to load the vehicle in the center of the trailer and Front
Triangle so the wheel is not turned or cocked when it contacts the
point of the upper rail of the Front Triangle
-Use the Front Raised Rail to anchor tie-downs
3.5 Removable Tongue
-Your trailer is equipped with a Removable Tongue to shorten the
overall height while in storage
-To remove the Removable Tongue
oRemove the Retaining Pin from the Removable Tongue
Locking Pin
oRemove the Removable Tongue Locking Pin
oSlide the Removable Tongue out of the trailer frame
oInsert the Removable Tongue Locking Pin into the trailer
frame for safe keeping
oSecure the Removable Tongue Locking Pin with the
Retaining Pin
-To install the Removable Tongue, perform the steps above in
reverse order
-Always verify the Removable Tongue Locking Pin is in place and
secured with the Retaining Pin before towing
3.6 Tie-Down Loops and Anchor Points
-Please refer to Section 8.0 for more information about proper tie-
down procedures
-Tie-downs can be attached in several places on your Kendon trailer:
oFront Raised Rail
oOn-Axle Tie-Down Loops –look for a bent steel loop
welded to the axle of your trailer just inside the wheels,
under the frame rail of the trailer
oFront Triangle frame rails

-7-
-WARNING: The expanded metal mesh decking is not designed as a
tie-down anchor point; DO NOT tie down to this trailer component
-DO NOT tie down to the Rear Section
3.7 Swing Out License Plate Holder (Optional)
-Kendon Trike/Spyder/Sidecar trailer equipped with a Swing Out
License Plate Holder can eliminate interference between the license
plate and the trailer’s Rear Section or vehicle components
3.8 Coupler and Hitch Ball
-Your Kendon trailer is equipped with a 2-inch* coupler designed to
work with a standard 2-inch trailer hitch ball
-Make sure your tow vehicle’s hitch is equipped with a 2-inch* hitch
ball compatible with the coupler on your Kendon trailer
-The coupler should fit the ball with very little free play between the
ball and coupler
-Always close the coupler completely until that the latch fully engages
the trailer tongue; check before towing
-Always use a retaining pin or lock to secure the Coupler closed;
check before towing
*May vary outside the USA
3.9 Lights and Electrical
-Your Kendon trailer is equipped with a standard, 4-pin flat connector
for the lighting connection
-Plug the connector into your tow vehicle’s stock or aftermarket
lighting connector prior to towing
-Verify all lights are operating properly prior to towing
3.10 Safety Cables
-Your Kendon trailer is equipped with two braided steel safety cables
attached to the Removable Tongue section
-Your trailer also came equipped with two threaded Connecting Links
to attach the Safety Cables to your tow vehicle
-Using the Connecting Links, attach both Safety Cables to your tow
vehicle or trailer hitch and securely screw the nut closed
-Verify both Connecting Links are closed and both Safety Cables are
attached prior to towing

-8-
4.0 ASSEMBLY
If your Kendon trailer was delivered to you still packaged on a shipping
crate, you will need to perform some easy assembly procedures.
IF YOU DO NOT FEEL QUALIFIED TO PERFORM THESE ASSEMBLY
PROCEDURES OR DO NOT FEEL COMFORTABLE PERFORMING
THEM, PLEASE TAKE YOUR KENDON TRAILER TO ONE OF OUR
AUTHORIZED DEALERS OR A QUALIFIED MECHANIC FOR
ASSEMBLY AND INSPECTION PRIOR TO TOWING.
4.1 Uncrating and Assembly Video
You may view a complete video on the uncrating and assembly process
by viewing a video posted on the Kendon YouTube channel. To access
the video, please enter this URL into your web browser’s address bar:
https://www.youtube.com/watch?v=mK2dl1HDqRM&t=9s
4.2 Tools Required
You will need the following tools to uncrate and assemble your trailer
-Safety goggles or glasses
-Work gloves are recommended
-Utility knife or similar
-Crow bar and/or claw-style hammer
-Metal snips (also called tin snips, aviation snips, etc.)
-11/16” or 13/16” or 21mm lug wrench
-3/4" wrench (open or box end wrench)
-3/4" socket/ratchet or additional wrench
-10mm wrench (open or box end wrench; socket will not fit)
4.2 Uncrating
-Always wear safety goggles or glasses when using tools
-Remove all stretch film, bubble wrap, and cardboard
-Remove the wooden crate support pieces
-Cut the metal bands holding the trailer to the crate
-Remove the spare parts box attached to the trailer
-Remove all protective film as required

-9-
4.3 Install the Wheels
-Place the wheels onto the wheel hubs
-It may be necessary to remove extra crating or tip the trailer
backward for full access to the wheel hubs (see the video for tips)
-Secure the wheels to the hubs using the lug nuts enclosed in the
spare parts box
-It is not necessary to completely tighten the lug nuts yet
4.4 Remove the Trailer from the Crate
-You should now be able to remove the trailer from the crate base by
lowering it off the base onto the wheels
-TRAILER MAY BE HEAVY; USE ASSISTANCE AS NEEDED
-Grab the trailer by the neck or Raised Front Rail and slowly and
carefully pull it toward you
-Let the trailer roll off the crate base and onto the ground; be careful
not to damage the fenders
-Attach the trailer to your tow vehicle as indicated in Section 5.1 or
rest on the ground, using packaging material as paint protection
4.5 Install the Lights
NOTE: If your trailer came with LED taillights, please refer to the
installation instructions included with the LED taillight kit
Install the left and right taillights on the mounting brackets on each
fender
-The left side taillight has a clear bottom to illuminate the license
plate; install on the left fender
-Prior to bolting the taillights to the mounting brackets, connect the
lighting wires to the back of the taillights
oWires are color-coded for each taillight side
oGreen and brown wires are for the right side taillight
oYellow and brown wires are for the left side taillight
oOn the back of each taillight assembly, locate the color-
coded push-in holes for the wires
oPush the corresponding colored wire into each hole
oGently tug on wire to ensure it is securely held in place

-10-
-Secure the taillight assembly to the mounting bracket using one
6mm stud on the back of the taillight and one supplied M6 nut
-Place the round terminal ring over the remaining 6mm stud and
secure with the other M6 nut
-Tighten both M6 nuts completely
-Repeat this process on the other side
-Your taillights should now be fully connected
-Verify working operation prior to towing
4.6 Flip the Outer Casters
-To protect the outer casters from damage during shipment, they
were installed upside down in the mounts; they must be flipped over
-Hold the inside nut, close to the wheel, with a 3/4" wrench
-Remove the outside nut with a 3/4" wrench or socket/ratchet
-Remove the lock washer, flat washer, and caster
-Flip the caster over and insert into the mounting bracket
-Install the flat washer and lock washer
-Hold the inside nut with a 3/4" wrench and install the outside nut with
a 3/4" wrench or socket/ratchet
-Firmly tighten the outside nut
4.7 Flip the Loading Ramps
-Loading ramps were shipped upside down to protect Ramp Hooks
-Remove the loading ramps and install correctly prior to towing
4.8 Swing Out License Plate Holder
Your trailer came equipped with a Swing Out License Plate Holder to
eliminate clearance issues with the Rear Section and vehicles. Please
follow the included installation instructions.
4.9 Tighten Lug Nuts & Final Inspection
-Connect your Kendon trailer to your tow vehicle as indicated in
Section 5.0
-Using your lug wrench, torque the lug nuts to 60 ft-lbs. using a star-
shaped tightening pattern

-11-
-Make sure each lug nut is tightened to 60 ft-lbs.
-Prior to towing perform a complete inspection to confirm:
oTaillights are installed and working
oLug nuts have been completely tightened
oAll protective film has been removed
oLoading ramps are stored and secured for towing
oCoupler is completely locked and secured
oSafety cables are connected
oRear section is latched closed (unless trailer is loaded)
oThere are no loose parts or tools on the trailer
Your Kendon Stand-Up™ Trailer is ready for use. Register your trailer
and install a license plate as required by the laws of your state.
5.0 COUPLER, SAFETY CABLES, AND LIGHTS
Your Kendon Ride-Up SRL Trike/Spyder/Sidecar Stand-Up™ Trailer is
equipped with a standard trailer ball coupler, braided steel safety cables,
and US DOT-approved taillights/turn signals. Before towing, always be
sure the coupler is properly closed and secured, safety cables are
connected, and all lights are working.
5.1 Coupler
-Open the Coupler fully before lowering onto your vehicle’s hitch ball
-Carefully lower the Coupler onto the hitch ball, keeping all hands
and body parts away from any pinch points
-Close the Coupler by pushing down on the Coupler handle
-The latch on the coupler must fully engage the trailer tongue
-The Coupler should be secured closed as illustrated here:

-12-
-Always secure the coupler closed with a retaining pin or lock prior to
towing
-Failure to properly close and secure the coupler may result in
property loss or damage, injury, or death
5.2 Safety Cables
-Open the two Safety Cable Connecting Links by unscrewing the
threaded gate counterclockwise
-Attach the Connecting Links to your vehicles trailer hitch or a portion
of the vehicle’s frame
-Close both Connecting Links by screwing the threaded gates
clockwise until snug
5.3 Electrical and Lights
-Plug the trailer’s connector into your vehicle’s trailer light outlet
-Use an adapter as required
-Test both turn signals and brake lights prior to towing
6.0 LOADING RAMPS
Your Kendon Ride-Up SRL Trike/Spyder/Sidecar Stand-Up™ Trailer is
equipped with a two-piece, full-width, slide-out loading ramp designed to
let you easily and safely load your vehicles onto the trailer.
6.1 Loading Ramp Components
-Your trailer is equipped with a left and right loading ramp
-Each loading ramp consists of 2 folding sections; left and right
-Each loading ramp has 4 Loading Ramp Hooks; 2 per folding side
-The Rear Section has 4 matching Loading Ramp Hook Loops
-The Hooks are designed to insert into the Loops to attach your
Loading Ramps to the Rear Section for loading and unloading

-13-
-Each loading ramp also has a Loading Ramp Storage Loop welded
approximately 2/3rds of the way down the innermost ramp tube on
the small folding side
6.2 Loading Ramp Configuration
-The loading ramp sections will be marked left and right when you
receive your trailer from Kendon; please be sure to understand
which section is which before removing the marking tag
-The left loading ramp section will feature the small 12” fold-out side
on top, when connected to the Rear Section, and will fold out away
from the centerline of the trailer to the left
-The right loading ramp section will feature the small 12” fold-out side
on top, when connected to the Rear Section, and will fold out away
from the centerline of the trailer to the right
-Be sure to use and store the loading ramp sections on their correctly
corresponding sides of the trailer
6.3 Loading Ramps, Storage for towing
-Store your loading ramps under the rear section of the trailer
-For storage while towing, slide the ramps all the way under the rear
section and secure in place with locks or locking pins using the
Loading Ramp Hooks on the end of the trailer’s Rear Section and
the Loading Ramp Storage Loop at the end of the loading ramp
-Be sure both ramps are securely locked in place before towing
-Examples of the ramps properly locked in place for towing:

-14-
6.4 Loading Ramps, Storage for storage
-Store your loading ramps under the rear section of the trailer
-If the rear section becomes too heavy for easy operation, the loading
ramps can be completely removed and stored next to the trailer
-Slide the ramps approximately 2/3rds under the rear section
-Using a lock or locking pin, secure the ramps in place using the
Loading Ramp Hooks on the end of the trailer’s Rear Section and
the Loading Ramp Storage Loop that should line up with the Loading
Ramp Hook
-Examples of the ramps properly locked in place for storage:
7.0 LOADING AND UNLOADING
When properly performed, the loading/unloading procedures should be
very safe and easy on your Kendon Ride-Up SRL Trike/Spyder/ Sidecar
Trailer. Loading and unloading a vehicle requires certain skills and
techniques. Kendon recommends using two spotters while practicing the
loading and unloading technique with your bike. Most incidents occur
from first-time users with no experience in loading and unloading a
motorcycle. For your added protection, Kendon recommends wearing
your riding gear during the loading/unloading process.
WARNING: Your trailer MUST be securely attached to a tow vehicle
BEFORE attempting any loading or unloading procedure.
7.1 Preparing your loading ramps
-Remove the locks or pins attaching the ramps to the Rear Section

-15-
-Slide one section of loading ramp from beneath the Rear Section
and insert the Ramp Hooks into the Hook Loops
-Unfold the short side of the ramp and insert the Ramp Hooks into
the Hook Loops
-Slide the remaining loading ramp section from beneath the Rear
Section and insert the Ramp Hooks into the Hook Loops
-Unfold the short side of the ramp and insert the Ramp Hooks into
the Hook Loops
-Gently step on both sections of the loading ramp to be sure the
Hooks and Loops are fully engaged
7.2 Loading your vehicle
-Before loading your vehicle, open the Swing Out License Plate
Holder by unscrewing the retaining pin on the top right of the Holder
-Your license plate will swing open to eliminate clearance issues
-Align your vehicle so the vehicle’s centerline is near the centerline of
your Kendon trailer
-Gently and slowly ride or push your vehicle onto the trailer
-Guide the vehicle onto the trailer between the Raised Front Rail on
each side, being careful to avoid contact with it
-Vehicles with a single front wheel:
oCarefully guide the front wheel into the center and front of
the Front Triangle
oAdvance your vehicle slowly so you do not jump the
vehicle’s front wheel over the Front Triangle
oEnsure the front wheel is all the way forward in the Front
Triangle and straight
-Vehicles with two front wheels:
oCarefully guide the front wheels to the edge of the Raised
Front Rail
oAdvance your vehicle slowly so you do not jump the
vehicle’s front wheels over the Raised Front Rail
oEnsure both front wheels are straight and contacting the
Raised Front Rail equally
-Hold your vehicle in place for tie-down with the vehicle’s parking
brake, leave it in gear, or place blocks behind the wheels
-Secure your vehicle to the trailer using the tie-down procedure in
Section 8.0

-16-
-Replace and secure the loading ramps under the Rear Section of
the trailer as indicated in Section 6.3
-Close the Swing Out License Plate Holder, secure with retaining pin
7.3 Unloading your vehicle
-Before unloading your vehicle, open the Swing Out License Plate
Holder by unscrewing the retaining pin on the top right of the Holder
-Your license plate will swing open to eliminate clearance issues
-Prepare the loading ramps as indicated in Section 7.1
-Remove all tie-down straps
-Carefully and slowly back your vehicle straight backwards off the
trailer
-Replace and secure the loading ramps under the Rear Section of
the trailer as indicated in Section 6.3
-Close the Swing Out License Plate Holder, secure with retaining pin
8.0 TIE-DOWN PROCEDURE
KENDON USES A FOUR (4) POINT TIE-DOWN SYSTEM. IT IS NOT
SAFE TO TOW YOUR MOTORCYCLE WITHOUT TYING IT DOWN OR
BY ONLY USING THE FRONT OR REAR TIE-DOWNS. KENDON
RECOMMENDS USING TOP-QUALITY RATCHET-STYLE TIE-
DOWNS TO APPLY ADEQUATE PRESSURE WHEN TYING DOWN.
The following illustrations are suggested tie-down points only. Please
consult your vehicle’s owner’s manual for proper tie-down locations.
Always use caution when selecting tie-down points on your vehicle; be
sure to consider paint, accessories, interference points, etc. when
choosing tie-down locations. Kendon Industries, LLC is not liable for
damage to your vehicle by tie-downs or other devices used to secure
your vehicle to the trailer.

-17-
Suggested tie-down configuration for a trike-style vehicle:
Suggested tie-down configuration for Can-Am Spyder or similar vehicle:
9.0 TRAILER STORAGE
Your Kendon Stand-Up™ Trailer is designed to fold up and stand up to
minimize storage space. Kendon recommends using help for at least the

-18-
first few times you stand up and lower your trailer to be sure you do not
injure yourself or cause property damage.
The procedures listed below are recommendations only. Practice and
technique refinement will result in the easiest operation of your trailer.
9.1 Standing your trailer up for storage
-Before folding the Rear Section closed, open the Swing Out License
Plate Holder by unscrewing the retaining pin on the top right
-License plate will swing out to the side to eliminate clearance issues
-Fold the Rear Section closed
-Secure the Rear Section closed using the Rubber Latch
-Close the Swing Out License Plate Holder, secure with retaining pin
-Some users find it easier to block the trailer wheels prior to standing
the trailer up
-Grasp your trailer from the front, placing one hand on or near the
neck and the other on or near the front rail
-Lift the front of the trailer to about waist height
-Continue lifting the trailer into the standing position with a smooth,
steady lifting motion
-Be careful not to cause personal injury or property damage
-Roll your trailer into place using the casters mounted to the bottom
of the trailer
-NEVER ROLL YOUR TRAILER CASTERS ACROSS UNEVEN OR
ROUGH SURFACES AS CASTER DAMAGE WILL OCCUR
9.2 Lowering your trailer for use
-Place a foot on the lowest rail of the trailer
-Grasp your trailer from the front, placing one hand on or near the
neck and the other on or near the front rail
-Carefully pull the trailer toward you, slowly lowering it to waist height
-Position the coupler on the hitch ball as indicated in Section 5.1

-19-
10.0 HAZARDS AND MAINTENANCE
10.1 Hazards: Some common hazards associated with trailer use are
listed below. Please be familiar with these hazards and avoid them
when possible.
- Failure to read instructions or rider error
- Loss of balance while loading
- Slippery surfaces (wet, snow and/or icy surfaces are dangerous)
- Trailer not properly connected to tow vehicle. This is a common and
expensive error causing the trailer to tip up and run into the back of
your tow vehicle and also causing possible fall in the loading
process. This can also cause expensive damage to tow vehicle.
- Loading a vehicle when under the influence of drugs or alcohol.
Always load and unload with the same mental capacity needed for
riding or driving.
- Improper tongue weight: Your Kendon trailer requires 10%-15% of
total GVWR on the tongue for proper handling in tow. Please ensure
you have adequate tongue weight prior to towing. Contact Kendon at
714.630.7144 if you need assistance measuring tongue weight. If
your Kendon trailer begins to sway side to side while towing,
immediately. Visit https://www.kendonusa.com/how-to-measure-
tongue-weight-trailer/ for an article on proper tongue weight.
This is not a complete list of all risks. Physical strength, weight of vehicle
and riding skills all vary widely. Only you can determine your comfort
level through safe practice. Kendon wants you safe!
10.2 Maintenance
We recommend the following articles from the Kendon Technical Insight
Series for information and techniques to keep your Kendon Stand-Up™
Trailer looking and performing like new:
General care: https://www.kendonusa.com/care-maintenance-kendon-
stand-trailer/
Tire wear: https://www.kendonusa.com/kendon-technical-insight-series-
trailer-tire-wear-care/

-20-
Bearings and seals: https://www.kendonusa.com/kendon-technical-
insight-series-wheel-bearings-seals-lubrication/
11.0 PARTS AND ACCESSORIES
Kendon offers a variety of replacement parts and accessories for your new
trailer. Please visit www.kendonusa.com or call 714.630.7144 to order any one
of these great accessories. And check back often for the latest ways to make
your Kendon trailer your own.
NO PART OF THESE INSTRUCTIONS MAY BE COPIED AND/OR REPRODUCED WITHOUT
THE WRITTEN PERMISSION OF KENDON INDUSTRIES, LLC. ALL PART NUMBERS,
DIMENSIONS AND SPECIFICATIONS IN THESE INSTRUCTIONS ARE SUBJECT TO CHANGE
WITHOUT PRIOR NOTICE. COPYRIGHT © KENDON INDUSTRIES, LLC. ALL RIGHTS
RESERVED.
Table of contents
Other Kendon Utility Vehicle manuals
Popular Utility Vehicle manuals by other brands

AC Air Technology
AC Air Technology AC TRACKTECH T1X2 instruction manual

Kärcher
Kärcher TRS-3500-S Operator's manual

TILLOTSON
TILLOTSON T4 Assembly guidelines

NC ENGINEERING
NC ENGINEERING MKII 600 Series Operating, maintenance and safety instructions

Hammerhead
Hammerhead 2013 R 150 owner's manual

Toro
Toro 7280 Operator's manual