manuals.online logo
Brands
  1. Home
  2. •
  3. Brands
  4. •
  5. Aura
  6. •
  7. Bathroom Fixture
  8. •
  9. Aura Purebble II User manual

Aura Purebble II User manual

Purebbleis the ultimate
showerhead that uses
a unique advanced
patented technology
to create microbubbles.
Ideal for skin and haircare,
Purebble is bliss in the shower.
AURA TEC
Thank you for choosing Purebble;
Microbubble Shower Head.
Please read this manual carefully for
safe use of this product.
AURA TEC Inc.
1233-1,Mizuta,Chikugoshi,Fukuoka,
833-0027JAPAN
Tel:+81-942-53-2504,Fax:+81-942-53-2811
Manufacturer
Microbubbles Shower Head
Purebble II
User Manual
https://purebble.com/en/
MADE IN JAPAN
Purebble II
Introduction
Precautions
Warning
Product name: Microbubbles Shower Head, Purebble II
Materials
●Body: ABS resin
● O-ring: Silicone
● Filter: Stainless MeshFilter
Part Names
1
2
This user manual shows how to mount and care for the product.
Please readthis carefully before using to get the most out of this product.
Please keep this on hand for reference as necessary.
①
②
③
④
⑤
⑥
⑦
⑧
⑨
⑩
Shower head
Microbubble
nozzle
O-ring
Transparent
intake screw
(attached)
Air inlet
Screw joint
(G1/2)
Check water temperaturebefore using the shower to avoid being
scaldedbyhot water.
If you are using an instantaneous gas water heater, the water temperature
may change during your shower.
Keep the water temperature below 60. Higher temperatures will
causedamage,distortion, or discoloration of the product.
Thisproductis made ofplastic. Take care not to over tighten screws
whenmounting.
Do not use for other liquids such as solvents or chemicals.
Do not use productfor anythingother than showering.
Use a soft cloth toclean the product. Brushes may damage the
product.
Water remaining in the shower headwill drain from the air inlet when you
stopthe shower.
If the water pressure is too high, reduce the water volume.
When you remove the jet panel, usea soft cloth such as a towel to prevent
slipping.
If the water pressure of your shower is high, the shower head may pop out
of the shower holder when you start the shower. In such case, be sure to
hold the shower head by hand or make sure it is firmly set in the holder
before turning on the shower faucet.
Prior to installing, confirm that you have all the parts listed below. If there are
any missing or different parts, please contactthe store where you purchased
the product.
Body
Highest temperature for use: 60℃
Minimum water pressure: 0.035Mpa
Minimum water amount: 7L/min
Maximum service temperature: 60℃
Jet panel
O-ring
O-ring inside
Filter
Care
3 4
If you do not see air bubbles when placing the shower head under water.
If water leaks from the air inlet.
Hard Water Buildup
The above issues may be caused by lime clogging the filter inside the screw
joint between the showerhead and hose. Please clean the filter using the
methods below.
*Please take care not to lose any parts when you are cleaning.
Maintenance may be required:
If the jet panel is clogged:
Due to regular
operation
Due to irregular
operation
1.Clean with baking soda
①Prepare items
※Remove attached O-ring in
advance
③Add a small amount of
water on and work it into
the tiny holes in the jet panel.
②Sprinkle a plenty of
baking soda on the panel.
④Leave to sit for about 30
mins. Use the edge of a
toothbrush to scrub the tiny
holes on both sides.
⑤Rince well with water and reattach to shower head.
If clogging persists, you may need to repeat the process a few times.
Jet panel
O-ring
Water
Shallow plate
Toothbrush
Baking
soda
Blockage in the filter:
When Filling the Bathtub
If it appears that the Jet Panel is clogged, we recommend the cleaning
methods below.
If there is no improvement after trying the above,use a toothpick to clean the
holes carefully from the back side,as not to damage them.
See the illustration image.
If sand or any other foreign substance sticks to the filter, thewater flow may
be reduced. In this case, remove the O-ring that fixes the filter and then
remove any blockages from the filter.
When you fill the bathtub with Purebble for a micro bubble bath, please keep
the air inlet out of the water. If the air inlet is covered by water, the shower
head will not be able to produce microbubbles.
Continue to the next page ↗
※Water remaining in the shower head will drain from the airinlet when you stop the shower.
Regularly maintain Purebble for long term use.
5 6
Frequently asked questions
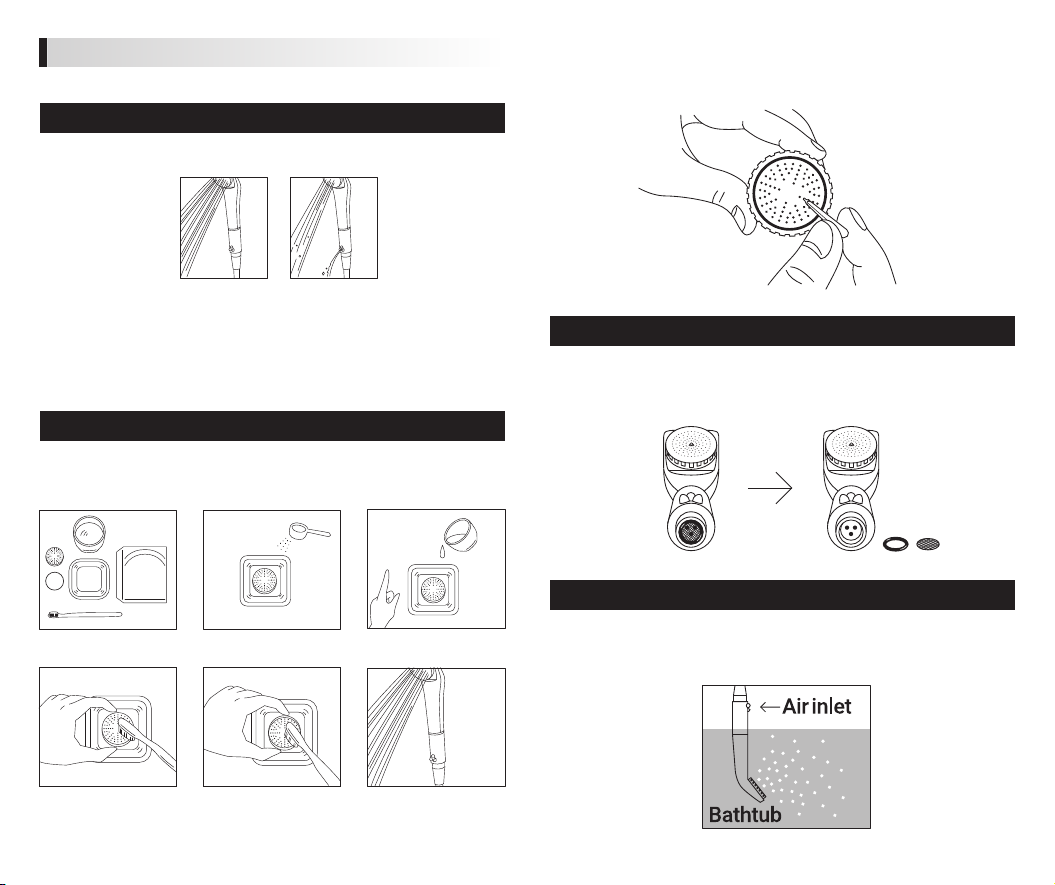
Why does water come out of the air inlet when I stop showering?
How do I know microbubblesare being generated?
Why does water come out of the air inlet when I’m showering?
A. There is no need for concern. When you stop showering, Purebble drains
anyremaining water from the air inlet. Draining also cleans the air inlet.
A. When you turn on the shower underwater, you will be able to see bubbles.
However, the bubbles should not cloud the water. As the microbubbles
are formed, you will also hear the air inlet takingin air.
A. This issuecouldbecausedby either of followingreasons: A foreign
substance may have gotten in the inlet, lowering the water flow rate and
pressure. Alternatively, limebuildup could have clogged the shower jet
panel. Please referto page 3.
Q1
Q2
Q3
Guarantee and After-Purchase
WARRANTY LIMITATIONS
CLAIM PROCEDURES:
STANDARD ONE YEAR MANUFACTURER WARRANTY:
The manufacturer warrants this product to be free from defects in workman-
ship and materials,under normal residential use and conditions, for a period
of one (1) year for the original invoice date.
Shipping and handling fees are to be paid for by the customer.
The manufacturer agrees, at its option during the warranty period, to repair
any defect in material or workmanship or to furnish a repaired or refurbished
product of equal value in exchange without charge (except for a fee for
shipping, handling, packing, return postage, and insurance which will be
incurred by the customer). Such repair or replacement is subject to
verification of the defect or malfunction and proof of purchase as confirmed
by showing the model number on original dated sales receipt.
This warranty does not include:
• Any condition resulting from other-than-ordinary residential use or any use
for which the product was not intended, such as use in rental or contract trade
or commercial use;
• Any condition resulting from incorrect or inadequate maintenance or care;
• Damage resulting from misuse, abuse, negligence, accidents or shipping
damage;
• Dissatisfaction due to buyer’s remorse;
• Normal wear and tear;
• Damages incurred during transportation;
• Damages incurred during assembly or maintenance;
• Any used, previously- displayed items.
All warranty claims must be filed by the consumer to the retailer of this product,
who in turn is to contact the manufacturer regarding any warranty return or
replacement. We will not handle claims from the consumer directly. Please retain
invoices for a minimum of one year for warranty purposes.
• Claims for defective merchandise must be made within ONE year from invoice
date. Claims for missing parts must be made within 60 calendar days after the
merchandise is received.
• Anyclaimfordefectivemerchandise returns must be packed in original
packaging.
• We reserve the right to specify that items be returned to the original warehouse
for inspection or be inspected by our representative in the field.
• Pictures are required to claim defective merchandise, along with a copy of
the original invoice.
• If the claim is justified, theitem(s) or part(s) will be repaired or replaced or a
credit will beissued.It is our policy to replace parts whenever possible.

Other Aura Bathroom Fixture manuals

Aura CARNABY ABFCAR3021 Series User manual

Aura

Aura CARNABY ABFCAR3021 Series User manual

Aura CARNABY ABFFIO3021 Series User manual

Aura

Aura CARNABY ABFFIO3021 Series User manual

Popular Bathroom Fixture manuals by other brands

Ancona Rivella manual

Ancona

Ancona Rivella manual

Clou Flush 6 CL/03.14060 installation instructions

Clou

Clou Flush 6 CL/03.14060 installation instructions

Zenna Home E40S2ALBN Assembly instructions

Zenna Home

Zenna Home E40S2ALBN Assembly instructions

Graff G-8231 installation instructions

Graff

Graff G-8231 installation instructions

Graff E-7081-T Instructions for assembly and use

Graff

Graff E-7081-T Instructions for assembly and use

Bradley ABP-1WCA Installation

Bradley

Bradley ABP-1WCA Installation

Sanela SLU 08LNB Instructions for use

Sanela

Sanela SLU 08LNB Instructions for use

Booth & Co AXBRIDGE BC-AXB-183-CP installation guide

Booth & Co

Booth & Co AXBRIDGE BC-AXB-183-CP installation guide

newform 695 instructions

newform

newform 695 instructions

Raritan STCFS Installation and maintenance instructions

Raritan

Raritan STCFS Installation and maintenance instructions

Abode Chao AB4044 manual

Abode

Abode Chao AB4044 manual

DURAVIT WD5008 011 090 installation instructions

DURAVIT

DURAVIT WD5008 011 090 installation instructions

Graff EX-1872-LM31W Instructions for assembly and use

Graff

Graff EX-1872-LM31W Instructions for assembly and use

Triton T100XR manual

Triton

Triton T100XR manual

Lammert Moerman JEE-O original Instructions for assembly

Lammert Moerman

Lammert Moerman JEE-O original Instructions for assembly

BOH Enviromental FPU SYSTEMS 99000457-UG Operation manual

BOH Enviromental

BOH Enviromental FPU SYSTEMS 99000457-UG Operation manual

Bossini Paloma Use and care instruction

Bossini

Bossini Paloma Use and care instruction

Sanela SLA 13 Mounting instructions

Sanela

Sanela SLA 13 Mounting instructions

manuals.online logo
manuals.online logoBrands
  • About & Mission
  • Contact us
  • Privacy Policy
  • Terms and Conditions

Copyright 2025 Manuals.Online. All Rights Reserved.