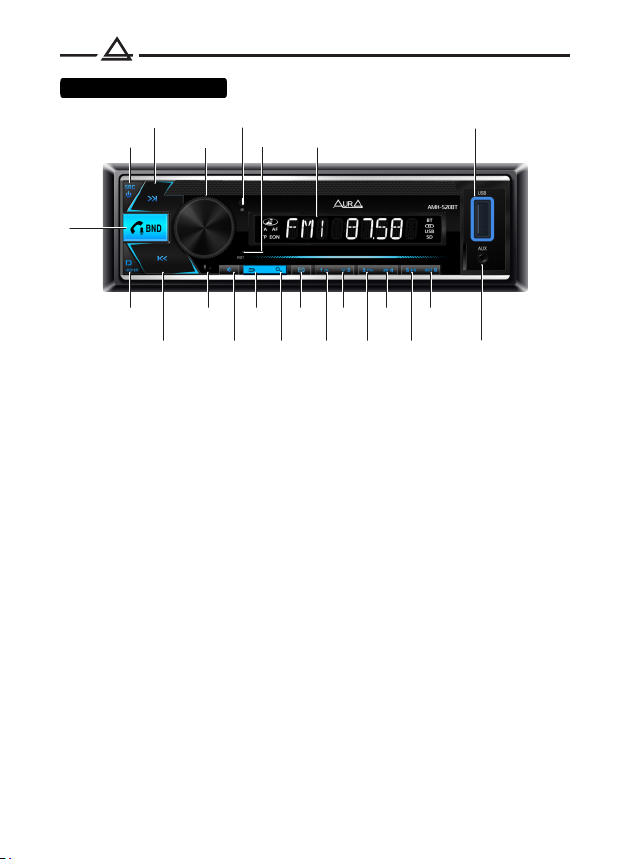
Aura AMH-520BT User manual

WARNING!
PLEASE READ CAREFULLY BEFORE USING
OWNER’S MANUAL
AMH-520BT
CAR BLUETOOTH / USB RECEIVER

is a registered trademark. All rights reserved. This
document in whole or in part may not be reproduced or copied without
the prior written permission of the manufacturer.
All brand and product names used in this document are trademarks or
registered trademarks of their respective companies.
Trademarks and product names are used for editorial purposes only
and for the benefit of such companies only.
The manufacturer does not accept any responsibility for the use of this
manual and decisions based on its use.
In order to improve product quality, product specifications and
features are subject to change without notice.
The Directive WEEE 2012/19/EU on waste electrical and electronic
equipment.
Waste electrical equipment should not be disposed of with your other
household waste. Please recycle it. Please contact your local authority
for the required information.
1
Copyrights
All illustrations in this manual are schematic images of objects and may differ
slightly from their real appearance.
Product service life - 3 years.

2
Content
Precautions...........................................................................................
Package bundle and installation...........................................................
Connection............................................................................................
Appearance, control elements..............................................................
Overall size............................................................................................
Remote control......................................................................................
Main functions.......................................................................................
Settings.................................................................................................
Radio.....................................................................................................
USB.......................................................................................................
Bluetooth...............................................................................................
Phone app.............................................................................................
Technical features..................................................................................
3
4
5
6
7
7
9
9
11
11
12
14
16

6. Do not use alcohol, solvents or gasoline for cleaning plastic parts and device.
Use only dry soft cloth for cleaning.
This user manual contains important safety advice and information on the correct
use of the device. Please follow all instructions in this manual carefully.
3. Do not drop the device and make sure do not hit it, as this may damage it.
5. Do not disassemble the device yourself. This may void the warranty.
2. Make sure that the device and especially its installation accessories are out of
the reach of children.
1. While installing the device, avoid places with high temperature, humidity, or
dusty places.
4. The manufacturer will not be held liable for any loss of data caused by device
damage, repairs or any other reason.
7. Avoid contact with liquids.
8. The product is designed for use with 12-volt negative-grounded electrical
systems only. Using the device on systems with a positive ground and / or
voltage other than 12 volts may damage the vehicle and the device.
3
Precautions

4
Open the package and make sure that inside include:
1. USB-receiver - 1piece
2. Remote control - 1 piece
3. Keys for receiver remove - 2 pieces
4. ISO - jack- 1 piece
5. Instruction
6. Guarantee
1DIN hole
If the car has a standard 1DIN hole for installing the head unit, use it as
described below.
Package bundle and installation
2. Use a screwdriver to pry out the metal tabs on the mounting cover to lock it
in place.
5. Insert the device into the mounting cover and slide it inward until it clicks into
place.
1. Install the mounting cover into the 1DIN hole provided by the manufacturer. If
the standard place has a 2DIN size, use adapter frames and adapters
brand
3. Check electrical connections, ISO connector or individual wires (depending
on the equipment of the specific car model).
If necessary, use ISO adapters brand
4. Connect the ISO connector to the device. And check the functionality of the
system before fixing it in the mounting box.

1. Make sure that the on-board voltage of your vehicle is +12 volts
2. Remove the fuse from the device before connecting the wires.
3. Connect the yellow (A4) wire to the +12 Volt DC power circuit.
6.Connect to the remote turn-on input of the amplifier or the antenna motor control input
5. Connect the black wire (A8) to the metal part of the car body.
7. Connect the rest of the wires according to the diagram.
Note: every time the yellow wire is disconnected from the 12 volt power circuit or the battery
terminal is removed, the device will revert to the factory settings.
4. Connect the red wire (A7) to the ACC terminal of the ignition switch.
fuse
15 A
Antenna connection input
radio receiver
RCA front – Left (white)
RCA back – Right (red)
RCA back – Left (white)
RCA front – Right (red)
MIC - external microphone input (not included)
Subwoofer L - left RCA subwoofer output (white)
Subwoofeк R - right RCA subwoofer output (red)
ISO Connector
power and acoustic systems
RED
ACC +12V
YELLOW
constant
power
+12V
BLACK
ground
MINUS
BLUE
control
wire
+12V
Front speakers
B3 Right channel + (grey)
B1 Right channel + (purple)
B5 Left channel + (white)
B8 Left channel – (green-black)
B4 Right channel – (grey-black)
B6 Left channel – (white-black)
Back speakers
B2 Right channel – (purple-black)
B7 Left channel + (green)
WARNING
DO NOT OPEN
5
Connection

6
1. Turn on / off the device / Select source
2. Next track / Fast forward / Radio tuning
3. Adjust volume / Switch settings / Confirm selection
4. IR receiver
5. LCD display
6. USB connector
7. Receiving / ending a call / Voice assistant / Switching radio bands (FM1, FM2, FM3)
8. Type of information on the display / Turn off the display
9. Previous track / Rewind / Radio tuning
10. Microphone
11. Muting the sound (Mute)
12. Return
13. Searching for tracks
14. Equalizer setting
15. Preset button 1 / Next folder
16. Preset button 2 / Previous folder
17. Preset Button 3 / Repeat Mode
18. Preset button 4 / Shuffle mode
19. Preset button 5 / Pause
20. Preset button 6 / Track scan mode
21. AUX input
22. Reset - reset to factory settings.
Control elements
1
2
3
4
5
6
7
8
9
10
11
12
13
14
15
16
17
18
19
20
21
22

7
106
32,5 49,5
188
178
182
53
50
58
Removing the battery protection (CR-2025).
Remote control supplied with battery protection.
The remote control will not work
until the protection is removed.
Battery replacement:
1. When the lithium battery has lost its capacity,
replace it as shown in the illustration.
2. Press and hold the latch in
direction indicated by arrow 1.
Pull the holder at the same time
from the remote control to
direction of arrow 2.
3. Replace the old battery with a new one.
Observe polarity! Make sure the (+) is on top!
4. Insert the battery holder into the remote
remote control.
12
4
3
Overall size
Remote control

8
1. Turn on/ off the device
2. Volume control
3. Switching radio bands
/ answer call
4. Previous track / Rewind
/ Radio setup
5. Source selection
6. Next track / Fast forward
/ Radio setup
7. Mute mode
8. / End call Clock
9. / Preset 1 button Pause
10. Preset 2 button
Track scanning mode /
11. Preset 3 button / Repeat mode
12. Preset 4 button / Shuffle mode
13. Preset 5 button
/ Skip back 10 tracks
14. Preset 6 button
/ Skip forward 10 tracks
15. Radio reception mode (mono / stereo)
16. Loudness (LOUD)
17. Scanning stations in memory / Automatic search and storage of stations (AMS)
18. Source selection
19. Selecting a preset equalizer
20. Attenuation of the tuner sensitivity (LOC)
2
Using the remote control (RC):
• Place the emitting window of the remote control in the direction of the sensor
window on the device.
• The working angle for receiving remote control signals is about 30 degrees.
• Distance between the emitting window of the remote control and the touch
window of the device should be less than 5 meters.
• A depleted battery can damage the remote control.
• Keep batteries out of the reach of children!
Remote control

Volume control
Rotate the volume knob (3) to set the desired level.
ON / OFF Power
Press any button to turn on the device.
Press and hold the button (1) /SRC, to turn on the device.
Source selection
Press the button (1) / SRC, to switch between playback sources:
Radio --> USB --> micro SD --> AUX in --> Bluetooth.
Press the button (11)
Mute mode
Settings menu
Press the volume knob button (3) and rotate to select
desired setting section: AUDIO (sound settings), DISPLAY
(display settings), TUNER (radio settings), CLOCK (clock), BEEP (button sound),
ANIMATION (display animation), DEMO MODE (demo mode).
Press the volume knob (3) to select the desired section.
9
Manual EQ - equalizer setting
Manual adjustment of 10 band equalizer (from -9 dB to +9 dB).
Tuning is possible at frequencies: 32/64/125/250/500 Hz / 1/2/4/8/15 kHz
AUDIO - sound settings
Main function
Preset EQ - equalizer preset.
Values: User / Flat / Classic / Rock / Pop / Jazz / Country
X-Bass
Turns on and adjusts the bass boost (OFF / LOW / HI).
Loudness
Turns on / off loudness.
Subwoofer
Turns on / off the subwoofer.
Fader
Adjusts the relative volume between front and back speakers.
Balance
Adjusts the relative volume between left and right channels.

10
DISPLAY settings
Color set - customize the color of the RGB backlight.
Variable - automatic change of backlight colors.
RED (red), PINK (pink), PURPLE (purple), BLUE (blue)
Customize - setting a custom highlight color.
Version - software version.
Local set - local search, on / off
Mono set - mono mode, on / off
Regional - selection of the broadcasting region (Europe, USA, Asia, Russia).
TUNER settings
CLOCK settings
Format - selection of the time display format (12/24 hours).
Setting - setting hour / minute values.
Beep - buttons sound.
Mute when buttons are pressed.
Animation - animation on the main screen.
Enabling and adjusting the delay interval before the animation plays
on the device display: No / 15/30 sec. / 1/2/4 min.
Demo mode - demo mode.
Enable / disable demo mode.

11
Radio
Range selection
Press the button (7) BND to select the broadcasting range
of radio stations: FM1, FM2, Fm3.
Saving and recalling radio stations
Press and hold one of the number buttons (1-6) to store the current radio station.
Press one of the number buttons (1-6) to recall the current radio station.
It is possible to store 6 radio stations in each broadcasting range.
Automatic station search
Press the button (9) or (2) to quickly search for stations.
Search and save stations automatically
Press and hold the BND button (3) for more than 2 seconds.
The unit will quickly search for and automatically save18 FM
radio stations with strong signals.
Manual station search
Press and hold the button (9) or (2) for more than 2 seconds to
switch to manual setting mode.
Press button (9) or (2) to change the frequency step by step.
Hold down the button (9) or (2) to change the frequency step by step.
USB
Connect a USB storage device to the connector on the front of the device.
MP3, FLAC files will start playing automatically.
The USB connector supports charging mobile devices. Charging current - 1A.
Switching tracks
Press the button (9) or (2) to skip to the previous or next track.
Rewind
Press and hold the button (9) or (2) to rewind or fast forward.
Play / Pause
Press the button (19) to stop playback.
Press again to resume playback.

12
Track scanning
Press the INT button (20) to play 10 seconds of each track in sequence.
Click again to stop scanning.
Repeat play
Press the button (17) to select the repeat play mode:
RPT FLD - repeat playback of all files in the current folder.
RPT ALL - repeat playback of all files on the media.
RPT ONE - repeat playback of the current file.
Shuffle play
Press the button (18) to turn on the random play mode.
Press again to disconnect.
Switching folders and tracks
Press the (15) or (16) button to switch to the previous or next source folder.
Press and hold the button (15) or (16) to move 10 tracks backward or forward.
BLUETOOTH
Pairing with your phone
Pair your phone with the AMH-520BT receiver:
1. Turn on Bluetooth on your mobile device.
2. Find “AMH-520BT” in the list of available BT devices and connect to it.
PIN-code for authorization: 1234.
3. In case of successful connection, the “BT” indicator on the display of the receiver
will stop blinking and will light up constantly.
4. The audio signal from the mobile device (music and calls) will be transmitted to
the car speakers.
Outcoming call
Dial the subscriber's number on your phone. The call will be made through
the speakerphone.
Incoming call
When an incoming call arrives, the caller's number will be displayed on the
receiver's screen. Press the button (7) to receive the speakerphone call.

13
End call
To reject an incoming call or end a conversation, press and
hold the button (7) .
Switch between phone and speakerphone
During a call, press the button (7) to transfer the audio signal from the
speakerphone to your phone or from the phone to the speakerphone.
Calling the last dialed number
Press and hold the button (7) on the receiver to call the last number in the list
of outgoing calls on your phone.
Press the button (7) on the receiver to activate the Siri function.
Volume control
Rotate the volume knob during a call to adjust the volume level.
Press the button (15) to mute the sound.
Bluetooth music (A2DP)
The AMH-520BT receiver supports the Bluetooth A2DP audio transmission protocol.
After successfully pairing your mobile device with the receiver, you will be able
to play music from your phone on the car audio system.
To switch tracks, press buttons (9) or (2) .
To stop playback, press the button (19) .
AUX
You can connect an external source to the 3.5mm jack on the front of the receiver
using the AurA AUX cable (optional).
Reset settings (reset)
Press the button (22) reset to reset the device to factory settings.

14
Phone App
Most of the device settings are available in the AurA mobile application
for Android or IOS.
You can control the AMH-520BT receiver from your smartphone:
1. Install the AurA app from Google Play or App Store.
2. Connect your smartphone to the receiver via Bluetooth.
3. Launch the AurA app to control the receiver.
Main
display
Music player

15
10-band
equalizer
Position
adjustment
RGB
lights

16
TECHNICAL FEATURES
75 Ω
500 mV (max 2 V)
mini Jack 3,5 mm
10 band, 34-15000 Hz
18 FM
87,5 - 108,0 mHz
gain from -9 dB to +9 dB, step 1 dB
2,4 HHz
A2DP, AVRCP, HFP
12 V (limits 9,6 – 15 V)
15 А
4 х 51 W
4 - 8 Ω
20 Гц – 20 kHz
vertical ±30°, horizontal ±15°
one (on front pannel, 3,5 mm)
6-channels (3 pairs)
4,5 V
15 А
178 х 108 х 50 mm
From 0°C to +60°С
From 45% to 80%
USB
FLAC, MP3
FAT16, FAT32
USB 2.0, USB 3.0, до 64Gb
English
Maximum output power:
Temperature (working):
Fuse:
Output level RCA:
Supported formats:
File system:
USB
Supported media:
USB/SD cards:
Main
Working supply voltage:
Display viewing angle:
Linear output (RCA):
Sizes (W х H х D):
Speaker Impedance:
Audio signal input (AUX, stereo):
Frequency Response Range:
Humidity (working):
Maximum current consumption:
AUX IN
Audio input level:
Id3 Tag support:
Radio FM
Preset memory for radio stations:
Jack:
Equalizer
Received frequency range FM:
Antenna impedance:
Profiles:
Frequency:
Bluetooth

www.aurael.ru
©2020 AURA Electronics Inc. All rights reserved.
Due to continuous product development and improvement, all specifications
Table of contents
Other Aura Receiver manuals