Aura AMH-79DSP User manual

PLEASE READ CAREFULLY BEFORE USING
AMH-79DSP
DSP BLUETOOTH / USB / FM RECEIVER
USER MANUAL
DSP
4x51W
MAX POWER

Copyright
1
Copyright
“ “, “ “ are registered trademarks. All rights reserved. This document,
entirely or in any part of it, is prohibited to reproduce, as well as copy without the
preliminary written permission of the manufacturer. All trademarks, logos and
names of products used on the packaging and in this document are logos or
registered trademarks of the respective companies. Trade brands, logos and
products are used only for editorial purposes and only in the interests of such
companies.
Disposal instructions
Directive Weee 2012/19/EU on waste from electrical and electronic equipment.
The electrical equipment that has served its term should not be thrown out with
the rest of the household waste. Please hand over it in secondary processing. To
obtain the necessary information, contact the local authorities.
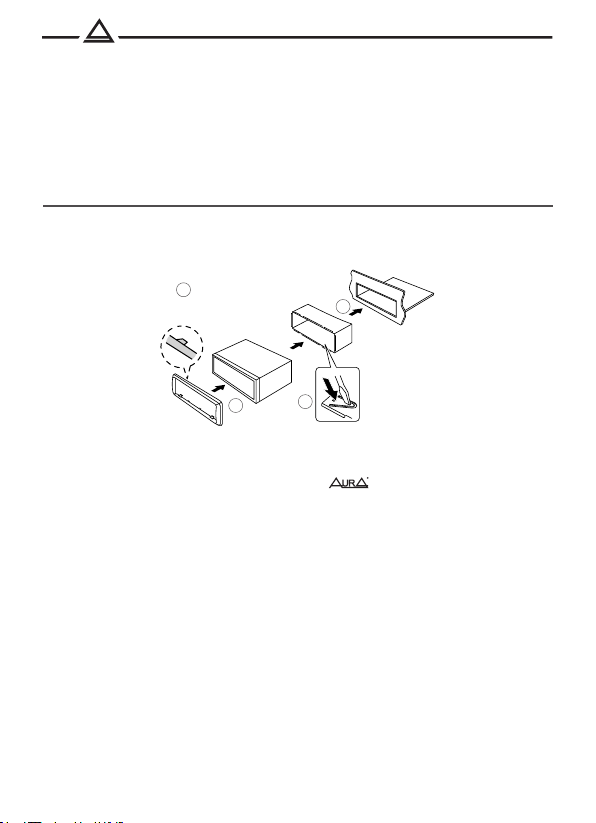
Important!
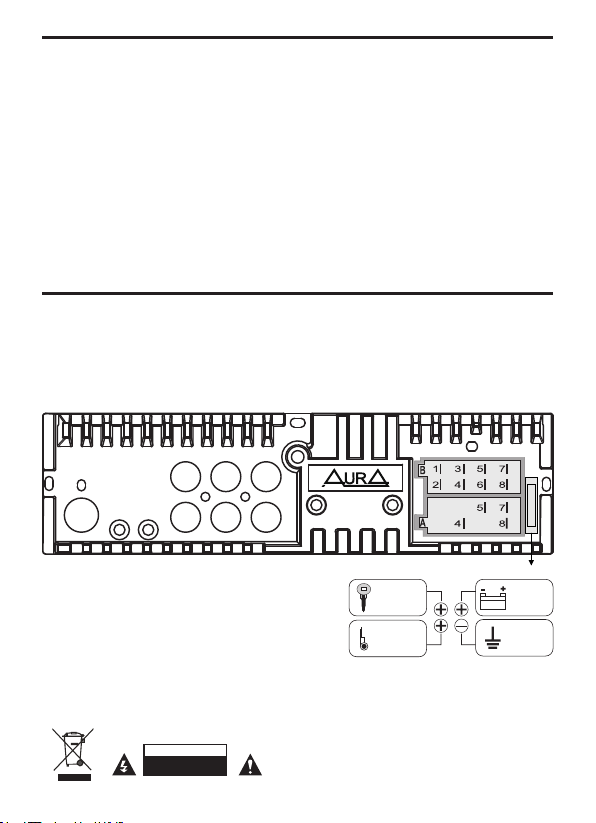
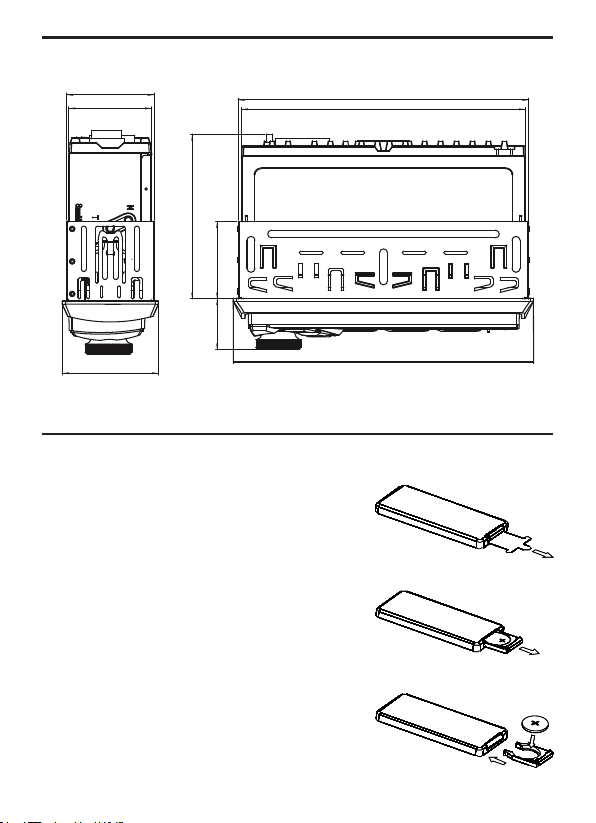
All illustrations given in this instructions are schematic images of objects and may
slightly differ from their real appearance.
Due to the continuous finalization and improvement of the product, all technical
characteristics, as well as the appearance, can be changed without prior notice.
Service life
In accordance with the law, the service life of 3 years from the date of sale of the
device with a store is set for this device. The value of the service life is in no way
related to the real life of the device and is exclusively an obligation in relation to
the legal requirements of the Law on the Protection of Consumer Rights. Given
the high quality control, reliability and degree of safety of the device, the actual
duration of operation can significantly exceed the officially established service
life, subject to the consumer of the rules established by the manufacturer.

2
Precautions............................................................................................
Equipment and installation ...................................................................
Connection ...........................................................................................
Appearance, controls ...........................................................................
Sizes......................................................................................................
Remote control......................................................................................
Basic operations ...................................................................................
Menu:
Sound settings ......................................................................................
Preservation of DSP settings (presets) ..................................................
Tuner settings ........................................................................................
Bluetooth settings .................................................................................
System settings .....................................................................................
Sources:
Radio......................................................................................................
USB .......................................................................................................
Bluetooth ...............................................................................................
AUX .......................................................................................................
Update by (software), reset of settings .................................................
Appendix for Android and iOS ..............................................................
Programming buttons on the steering wheel ........................................
Specifications........................................................................................
Warranty coupon ..................................................................................
3
4
5
6
7
7
9
9
13
14
14
15
15
16
17
18
18
18
18
20
21
Content

User manual contains important security recommendations and information
about the proper operation of the device. Please carefully follow all the
instructions given in this guide.
1. When installing the device, avoid places with high temperature, humidity, or
places where there is a lot of dust.
2. Make sure that the device and, in particular, its accessories for installation, are
inaccessible to children.
3. Do not drop the device and make sure that it is not subjected to blows, as this
can lead to its damage.
4. The manufacturer does not bear any responsibility for any data loss that arose
due to damage to this device, its repair or for any other reason.
5. Do not disassemble the device yourself. This can lead to cancellation of the
guarantee.
6. Do not use alcohol, solvents or gasoline to clean plastic parts and device
display. For cleaning, use only dry soft fabric.
7. Avoid contact of the device with liquids.
8. The product is designed for use only with 12-volt electrical systems with
negative grounding. The use of a device in systems with a positive grounding
and/or voltage different from 12 volts can lead to damage to the car and device.
3
Precautions

Package and installation
4
Open the package and make sure that inside are:
1. USB receiver - 1 pc.
2. Remote control - 1 pc.
3. Keys for removing the receiver - 2 pcs.
4. ISO connector - 1 pc.
5. Instruction
1
2
3
4
Installation of the device
Connect the required wires
and connectors
1. Install the mounting casing in the hole of the 1din standard,
provided by the manufacturer. If the regular place has a 2DIN size,
use transitional frames and adapters of the brand.
2. Light out the metal tongues on the mounting casing to fix it in place.
3. Check electrical connections, connector or individual wires
(depends on the configuration of a particular car model).
Connect the main connector to the device. Check
The system performance before fixing in the mounting casing.
4. Insert the device into the mounting casing and push it inward to
fixation by click.
In some brands of cars (for example, Toyota, Honda, ...), the device is mounted
by screws to standard brackets.
In this case, the mounting casing is not used.

Front speakers
B3 Rigth channel + (grey)
B4 Right channel – (grey-black)
B5 Left channel + (white)
B6 Left channel – (white-black)
Rear speakers
B1 Right channel + (purple)
B2 Right channel – (purple-black)
B7 Left channel + (green)
B8 Left channel – (green-black)
WARNING
DO NOT OPEN
5
RED
ACC +12V
YELLOW
constant
power
+12V
BLACK
ground
MINUS
BLUE
control
wire
+12V
SWC - steering wheel control input
ANT - radio antenna input (not included)
MIC - external microphone input (not included)
1. Make sure your vehicle's onboard voltage is +12 volts.
2. Remove the fuse from the device before connecting the wires.
3. Connect the yellow (A4) wire to the +12 volt DC power supply.
4. Connect the red wire (A7) to the ACC terminal of the ignition switch.
5. Connect the black wire (A8) to the metal part of the car body.
6. Blue wire (A5) - connect to the amplifier's remote turn-on input or antenna motor control
input.
7. Connect the remaining wires according to the diagram.
Note:
To avoid increased current consumption and unstable operation of the receiver, when
connecting the red wire (A7) to +12 volts (together with the yellow A4), set the “CAR ACC”
function in the “SYSTEM” menu to “NO”!
Power connection
2 WAY mode (regular)
SUB - RCA subwoofer
FL - RCA front (left)
FR - RCA front (right)
RL - RCA rear (left)
RR - RCA rear (right)
3 WAY mode (network)
SUB - RCA subwoofer
FL - RCA MF speaker (left)
FR - RCA MF speaker (right)
RL - RCA tweeter (left)
RR - RCA tweeter (right)
Connecting speaker and RCA cables
ANT
MIC SWC
SUB FL RL
SUB FR RR
15 A
fuse

6
8
1
2
4
5
10 1112
13
14
15
16
17
21
6
3
7
18
19
20
9
1. Turning on / off the device / Source choice
2. IR receiver
3. LCD display
4. USB port
5. Next track / rewinding / setting up radio
6. Volume adjustment / switching / confirmation of choice
7. Previous track / rewinding back / Radio setting
8. Return
9. Search
10. Microphone
11. Muffle of sound (mute)
12. Pre -tuning button 1 / next folder
13. Pre -setting button 2 / previous folder
14. Pre -configuration button 3 / repeat mode
15. Pre -configuration button 4 / random play mode
16. Pre -setting button 5 / pause
17. Pre -tuning button 6 / scanning mode of tracks
18. Type of information on the display
19. Reception / Call completion / Voice Assistant / Switching
Radio ranges (FM1/2, FM3 (VHF), AM1/2)
20. Resetting to the factory settings (Reset)
21. AUX input
Controls

7
Battery replacement:
When the lithium battery has lost capacity,
replace it as shown in the figure.
1. Pull the holder out of the remote control in
the direction of arrow 1.
2. Replace the old battery with a new one.
Observe polarity! Make sure the (+) is on top!
3. Insert the battery holder into the remote control.
1
2
3
7
Removing the battery protection (CR-2025).
The remote control comes with battery protection.
The remote control will not work until the
protection is removed.
1
2
3
108
25 49
188
178
182
53
50
58
Sizes
Remote control

8
2
Remote control
1. Turning on / off the device
2. Volume adjustment
3. Switching radio ranges
/ Reception of a call
4. Previous track / rewinding back
/ Radio setting up
5. Choosing a source
6. Next track / rewinding forward
/ Radio setting up
7. Muffling sound (mute)
8. Call completion / clock
9. Pre -configuration button 1
/ Pause
10. Preliminary settings button 2
/ Skaging mode of tracks
11. Preliminary settings button 3
/ Repeat mode
12. Preliminary settings button 4
/ Random play mode
13. Pre -configuration button 5
/ Switch to 10 tracks backward
14. Pre -configuration button 6 / Switch to 10 tracks forward
15. Radio station reception (mono / stereo)
16. Loud subtle
17. Memory scanning / Automatic search and
memorization of stations (AMS)
18. Choosing a source
19. Choosing the preset of equalizer
20. Lowering of the sensitivity of the tuner (LOC)
Using remote control (PDU):
• Place the radiating window of the remote control in the direction of the sensor
window on the device.
• A working angle for receiving the signals of the PDU is about 30 degrees.
• The distance between the radiation window of the DPD and the touch window of
the device. It should be less than 5 meters.
• The sowing nutrition element can lead to damage to the remote control.
• Store the nutrition elements in an inaccessible place for children!

Volume adjustment
Rotate the volume control handle to set the desired level.
Choosing a source
Press the button (1) / SRC to switch between sources
Reproduction: Radio -> USB -> Aux in -> Bluetooth.
Settings menu
Press the volume adjusting button (6) and rotate to select the necessary settings
section: AUDIO (sound settings), DISPLAY (display settings), TUNER (radio settings),
BLUETOOTH (Bluetooth settings).
To select the desired section, press the volume control handle.
9
IMPORTANT! Before entering the AUDIO menu (sound), when the name AUDIO
is displayed on the screen, press and hold the volume control button (6) to select
the 2-or 3-strip configuration of the crossover: 2 WAY (ordinary) or 3 WAY (network).
Turning on / off
Press any button to enable the device.
Press and hold the button (1) / SRC to turn off.
Main operations
Audio
Custom - Manual setting 24 canalizer 24 (from -9 dB to +9 dB).
Settings are possible at frequencies: 45/63 / 100/125 / 160 /250 / 315/400 / 500
/630 /800 /1 / 1.25 / 1.6 / 2.5 / 3.15 / 4 /5 /6 /6 /6 /6 , 3 /8 /10 / 12.5 / 16 /20.
EQ reset - reset settings of the equalizer.
Q-factor - installing the value of the quality factor (quality).
Values: 1 / 1.5 / 2.5 / 3.5.
Bass boost
Inclusion and configuration of low frequency reinforcements (5 levels).
Loudness
Inclusion and configuration of subtlepent (2 levels).
Presets:
Natural, Rock, Pop, Easy,
Top 40, JAZZ, Powerfull.
EQ SETTING

Balance
Setting relative volume between the left and right channels.
Fader
Setting relative volume between the front and rear speakers.
Volume limit
The choice of the value of the maximum possible volume level (3 - 40 units).
Power on vol.
The choice of the volume level when the receiver is turned on (1 - 40 units).
Subwoofer
Sub-W output - turning on / disabling the subwoofer.
Sub-W level - settings of the volume volume level.
Sub-W stereo - sabwuofer RCA output mode (Mono/Stereo).
Setting filters of low and high frequencies (FNCh and FVH). The settings of this
menu item will be different for configurations 2-WAY / 3-WAY!
X-OVER
EQ SETTING
10
Front HPF - FVF configuration (HPF) of the anterior speakers
F-HPF FRQ - cut frequency: trous (off.) / 30 / 40/50 / 60 /
70 /80 /90 /100 /120 /150 /180 /220 /250 /315 /400 /500 /630 /700 /800 Hz.
F-HPF SLOPE - the steepness of the decline: 6 / 12/18 / 24 dB per octave.
F-HPF GAIN - volume level, from -8 dB to 0 db.
Rear HPF - FVF configuration (HPF) of the rear speakers
R-HPF FRQ - cut frequency: trous (off.) / 30 / 40/50 / 60 /
70 /80 /90 /100 /120 /150 /180 /220 /250 /315 /400 /500 /630 /700 /800 Hz.
R-HPF SLOPE - the steepness of the decline: 6 / 12/18 / 24 dB per octave.
R-HPF GAIN - volume level, from -8 dB to 0 db.
Subwoofer LPF - Settings of the FNCH (LPF) and the phase of the subwoofer.
SW LPF FRQ - cut frequency: 30 /40 /50 /60 /70 / 80/90 / 100 /
120 /150 /180 /220 /250 /315 /400 /500 /630 /700 /800 Hz / Trough (excavation).
SW LPF PHASE - Switching the electric phase: 0 ° /180 °
SW LPF GAIN - volume level, from -8 dB to 0 db.
SW LPF SLOPE - the steepness of the decline: 6 / 12/18 / 24 dB per octave.
2-WAY (Regular)
Tweeter - high frequency setting
FRQ - frequency selection: 1 / 1.6 / 2.5 / 3.15 / 4 /5 / 6.3 / 8 /10 / 12.5 kHz.
GAIN LEFT - volume level (left channel), from -8 to 0 dB.
GAIN RIGHT - volume level (right channel), from -8 to 0 db.

11
2-WAY (Regular)
Position - choice of listening position.
All / Front Left / Front Right / Front All.
X’over reset
Reset crossover settings.
IMPORTANT! The delay setting starts from the farthest speaker from
listening position (usually a subwoofer).
The farthest speaker does not need additional delay.
The rest of the speakers must be corrected according to the difference between the
distance from the farthest speaker and the distance from the calculated speaker to
the listening position.
Make the necessary calculations for all speakers, then make the settings in the app
or in the receiver's menu.
Per-channel setting of signal time delays. The settings of this menu item will be
different for configurations 2-WAY / 3-WAY!
DTA SETTING - delay setting
3-WAY (Network)
Tweeter - HPF setting for tweeters.
HP FRQ - Cutoff frequency: 500 / 630 / 700 / 800 / 1 / 1.6 / 2.5 / 3.15 / 4 / 5 / 6.3 / 8 /
10 / 12.5 kHz.
SLOPE (High-High Frequency Slope) - the steepness of the decline: 6 / 12 / 18 / 24 dB
per octave.
PHASE (HF PHASE) - electrical phase switching: 0° / 180°
GAIN (HF LEVEL) - the volume level of the tweeters, from -8 dB to 0 dB.
Mid range - adjusting the high-pass filter (HPF) and low-pass filter (LPF) of the
midrange speakers
HPF FRQ (MF-HPF) - HPF cutoff frequency (HPF): THROUGH (off) / 30 / 40 / 50 / 60 / 70 / 80 / 90 /
100 / 120 / 150 / 180 / 220 / 250 / 315 / 400 / 500 / 630 / 700 / 800 Hz.
HPF SLOPE (MF-HFT DECAY) - the steepness of the decline: 6 / 12 / 18 / 24 dB per octave.
LPF FRQ (MF-LPF) - cutoff frequency: 500 / 630 / 700 / 800 / 1 / 1.6 / 2.5 / 3.15 / 4 / 5 / 6.3 / 8 / 10 /
12.5 kHz / THROUGH (off).
PHASE (MF PHASE) - electrical phase switching: 0° / 180°
LPF SLOPE (MF-LPF SLOW) - the slope of the LPF slope (LPF): 6 / 12 / 18 / 24 dB / oct.
GAIN (MIDDLE LEVEL) - the volume level of the midrange speakers, from -8 dB to 0 dB.
Woofer - low-pass filter (LPF) and subwoofer phase adjustment
LPF FRQ (SUB LPF) - cutoff frequency: 30 / 40 / 50 / 60 / 70 / 80 / 90 / 100 /
120 / 150 / 180 / 220 / 250 / 315 / 400 / 500 / 630 / 700 / 800 Hz THROUGH (off).
SLOPE (SAB-LPF SLOW) - the steepness of the decline: 6 / 12 / 18 / 24 dB per octave.
PHASE (SUB PHASE) - electrical phase switching: 0° / 180°
GAIN (SUB LEVEL) - subwoofer volume level, from -8 dB to 0 dB.
X-OVER

12
3-WAY (Network)
Position
Listening Position Selection: All / Front Left / Front Right / Front All.
Delay units
Select the unit of measurement: centimeters or milliseconds.
DTA reset
Reset delay settings.
Car type
Vehicle type selection: Sedan / Station Wagon / Minibus.
Gain - volume value of each channel
Front left - front left
Front right - front right
Rear left - rear left
Rear right - rear right
Sub-W left - subwoofer left
Sub-W right - subwoofer right
Delay - value for each channel:
Front left - MF/LF left
Front right - MF/LF right
Rear left - HF left
Rear right - HF right
Sub-W left - subwoofer left
Sub-W right - right subwoofer.
Gain - volume value of each channel
Front left - MF/LF left
Front right - MF/LF right
Rear left - HF left
Rear right - HF right
Sub-W left - subwoofer left
Sub-W right - right subwoofer.
Delay - value for each channel.
Front left - front left
Front right - front right
Rear left - rear left
Rear right - rear right
Sub-W left - subwoofer left
Sub-W right - subwoofer right
DTA SETTING

13
Color select
Setting the color of the RGB backlight.
Spectrum
Frequency spectrum display, on/off.
Dimmer
Backlight dimming settings, on/off.
Dimmer timer - dimming the backlight by time.
DISPLAY - display settings
DSP Presets
You can save 6 independent settings (presets) and quickly switch between them
(software version 6.1 and higher).
IMPORTANT! Settings are retained when the battery power is turned off.
1. Adjust the EQ, delay and crossover settings.
2. Exit the "Audio" menu.
3. hold down the volume knob (encoder) for 3 seconds. “DSP KEYS” (“memory”)
will flash on the bottom line of the display.
4. To save the current settings to the memory cell "1", hold down the button "1"
for 2 seconds. “Preset 1” will appear on the bottom line.
5. Hold down the volume knob (encoder) for 3 seconds to exit the save settings mode.
6. Change the EQ, delay and crossover settings.
7. Exit the "Audio" menu.
8. hold down the volume knob (encoder) for 3 seconds. “DSP KEYS” (“memory”)
will flash on the bottom line of the display.
9. To save the current settings to the memory cell "2", hold down the button "2"
for 2 seconds. “Preset 2” will appear on the bottom line.
10. Briefly press the "1" button to recall the settings stored in "preset 1" ("preset 1").
11. Briefly press the "2" button to recall the settings stored in "preset 2" ("preset 2").
TUNER - radio function settings
Local seek
Local search, on/off
Stereo set
Stereo mode, on/off

14
BLUETOOTH
PIN-code edit
Changing the BT pairing PIN.
MIC gain
BT microphone level adjustment.
Clock - clock setting
Clock format - selection of clock display format (12 / 24 hours).
Clock adjust - setting hours / minutes.
Data format - select date display format.
Data set - setting date values.
Time sync - exact time synchronization via RDS.
Language
Selecting the menu display language.
SYSTEM
TUNER (RADIO)

15
Range selection
Press the (19) BAND button to select the broadcast bandradio stations:
FM1, FM2, FM3 (VHF), AM1, AM2.
Automatic search for radio stations
Press the button (7) or (5) to quickly search for stations.
Storing and recalling radio stations
Press and hold one of the number buttons (1-6) to memorize the current radio station.
Press one of the number buttons (1-6) to recall the current radio station.
It is possible to store 6 radio stations in each broadcast band.
Radio
SYSTEM
Factory reset
Reset / return to factory settings.
Animation - animation on display
Enabling and setting the delay interval before playing the animation on the device
display: no / 15 / 30 sec. / 1 / 2 / 4 min.
Demo mode
Enable / disable demo mode.
Car ACC - ignition lock type
Yes - set for the car with ACC position, the red power wire of the device is connected
to the ACC position of the ignition switch.
No - set for the machine without the ACC position, the red power wire is connected
to constant +12 volts.
The BT module and USB connector will be disabled when the device is turned off.
Version
Viewing the current software version (firmware).
Beep - button sound
Enable / disable sound when buttons are pressed.
AUX IN
Enable/disable AUX source.
SWC
Programming regular steering wheel buttons.
Detailed description of the programming procedure on page 18.
Overheat
Overheat protection: 90 / 100 / 110.
0 0 0

16
Switching tracks
Press the button (7) or (5) to move to the previous ornext track.
Rewind
Press and hold button (7) or (5) to rewindback or forward..
Play/Pause
Press the button (16) to stop playback.
Press again to resume playback.
Scanning tracks
Press the (17) INT button to play in sequence for 10 seconds.every track.
Click again to stop scanning.
Repeat
Press the button (14) to select the repeat playback mode:
Repeat folder - Repeat playback of all files in the current folder.
Repeat one (repeat track) - repeat playback of the current file.
Repeat all (repeat all) - repeat playback of all files on the media.
Random play
Press button (15) to select random play mode:
Random folder / Random All / Random Off.
Manual search for radio stations
Press the button (7) or (5) to change the frequency step by step.
Hold down the button (7) or (5) to enter the auto tuning mode.
Automatic search and storage of stations
Press and hold the SEARCH button (9) for more than 2 seconds.The unit will
quickly search and automatically store 18 FM and 12 AM radio stations with
strong signals.
Radio
USB
Connect the USB storage device to the connector on the front panel of the device.
Playback of supported file formats will start automatically.
The USB connector supports charging mobile devices.
IMPORTANT! There is a large selection of free and other software for encoding
FLAC (16bit/44.1kHz), Mp3 and WAV files on the market, and depending on the
encoding status and file format, poor playback quality or noise may occur during
playback. Playback is not possible in some cases.

17
Outgoing call
Dial the subscriber's number on your phone.
The call will be made on speakerphone.
Incoming call
When an incoming call comes in, the caller's number will be displayed on the
receiver's screen. Press the button (19) to receive a hands-free call.
Ending call
To reject an incoming call or end a conversation, press and hold the button (19) .
Switching between phone and speakerphone
During a call, press the button (19) to transfer audio from the speakerphone to
your phone or from your phone to the speakerphone.
Call to the last dialed number
Press and hold the button (19) on the receiver to call the last number in your
phone's outgoing call list.Press the button (19) on the receiver to activate the
Siri function.
Phone pairing
Pair your phone with receiver:the AMH-79DSP
1. Turn on Bluetooth on your mobile device.
2. Find "AMH-79DSP" in the list of available BT devices and connect to it.
Authorization PIN: 1234 .
3. In case of successful connection, the “BT” indicator on the receiver’s display will
stop blinking and will light up constantly.
4. The audio signal from the mobile device (music and calls) will be transmitted to
the car speakers.
Switching folders and tracks
Press the button (13) or (12) to switch to the previous or next source folder.
Press and hold the (13) or (12) button to move 10 tracks backward or forward.
USB
BLUETOOTH
Volume control
Rotate the volume knob during a call to adjust the volume level.
Press the (11) MUTE button to mute the sound.

18
Bluetooth music (A2DP)
The VENOM-D41DSP receiver supports Bluetooth audio transmission protocol.
After successfully pairing your mobile device with the receiver, you will be able to
play music from your phone on the car audio system.
To switch tracks, press the buttons (7) or (5) .
To stop playback, press the button (16) .
You can connect an external source to the 3.5mm jack on the front of the receiver
using an AurA AUX cable (sold separately).
AUX
Press and hold for 10 seconds. button (20) RST to reset the device to factory
settings.
Reset settings
Software update
We are pleased to offer the option to update the firmware to bring you the best
performance and the latest features for your device.
Please check the availability of the new software version on the website
www.aurael.ru
Most device settings are available in the AurA Audio mobile app for Android or iOS.
You can control the AMH-79DSP receiver from your smartphone:
1. Install the AurA Audio app from Google Play or the App Store.
2. Connect your smartphone to the receiver via Bluetooth.
3. Launch the AurA Audio app to control the receiver.
Phone app
Steering wheel button setup
This function can only be implemented in cars with resistive control buttons, the
common wire of the buttons is connected to the car's ground.
For the steering wheel buttons to work correctly, you must first connect the wires
of the standard control panel to the 3.5 mini-jack AurA SWC-001 adapter cable
(supplied separately).
The ground wire (WHEEL GND) of the standard control panel must be connected
to the black GND wire, and the WHEEL KEY A and WHEEL KEY B signal wires must
be connected to the K1 (red) and K2 (white) wires of the AurA SWC-001 cable,
respectively.

19
Steering wheel button setup
Table of contents
Other Aura Receiver manuals
Popular Receiver manuals by other brands

WUNDER TECHNIK
WUNDER TECHNIK DVB-T2 WT2-M6811 instructions

Sennheiser
Sennheiser L 2015 manual

Harman Kardon
Harman Kardon AVR 230 quick start guide

MFJ
MFJ 8100K instruction manual

Sensata
Sensata IWR-PORT Series operating manual

Dual Electronics Corporation
Dual Electronics Corporation XDVD176BT Installation & owner's manual