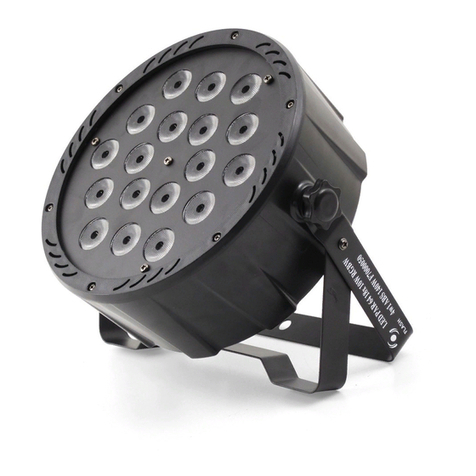
Aurora Lite Bank 1000F User manual

1. Introduction
2. Safety precautions
3. Specifications
4. Components and accessories
5. Control panel
6. Operating instructions
7.Warranty
www.auroralitebank.com
TABLE OF CONTENTS
1000F
LED light for broadcast, photo, and video studios
Marking

Safety Precautions
For your own safety, please read and follow all safety instructions and warnings.
Exemption from Liability
The manufacturer, disclaims liability for any damage to persons or property caused by inappropriate
operation, damage of this kind lies in the responsibility of the operator.
Warranty
This product is manufactured to local specifications and the warranty is valid within the country of
purchase. Should the product fail or malfunction, while you are abroad, the manufacturer assumes
no responsibility for servicing the product locally or bearing the expenditure incurred thereof.
1. Introduction
This guide provides information on how to use the product functions to get the full effect and
benefits of the Aurora 1000F light, as well as warnings on its use.The Aurora 1000F is designed for
professional use, for interior locations or studio and must only be operated by qualified technical
personnel.To obtain the maximum features, please read the following operating instructions very
carefully before using the product for the first time. Please keep these operating instructions for
you and subsequent users to reference in the future.
This equipment has been checked and meets the requirements of general safety for electronicdevices.
These requirements are specified, to provide a reasonable protection against electromagnetic
interference, when the equipment is used in commercial environments.
This equipment generates, uses, and can emit waves of radio frequency, and if not properly used
following the instructions in this manual, can produce interference in radio communications.
The use of this equipment in residential areas can produce interference; the user will be the only one
responsible in correcting them.
1. Please read the following operating instructions very carefully, before using this fixture for the
first time.
2. In order to protect against risk of electric shock, the installation should be properly grounded.
Non-compliance or using a non-grounded type plug will expose you to the risk of electric shock.
3.The lamp head acts as a heat sink through its rear section and the surface can reach a temperature
around 60 ºC.
4. Do not attempt to open any of the device or component housings.To reduce the risk of electric shock,
do not remove lamp head cover. No user-serviceable parts are inside.
Maintenance and repair work to be carried out only by authorized Service Centre.
5. Do not store or use under humid or moist conditions for an extended amount of time.
6. Do not cover the vent holes while using it. Proper ventilation must be provided.
Avoid exposing the lamp head to the heat radiation of other light fixtures.
7. Keep this equipment out of reach of children
2. SAFETY PRECAUTIONS

3. Specifications
Specifications
150W
Day Light version: 5600 ± 200°K
Tungsten version: 3200 ± 200°K
Broadcast version: 0% - 100%, on board control or 5-pin DMX
Photo version: 20% - 100%, on board control only
90V – 240V AC
54.7 (L) x 29.7 (H) X 15.1 (W) (cm)
9kg
-20°C - 40°C
Power consumption
Dimming
Color temperature
Power supply
Dimensions
Weight
Operating temperature
Features
HIGH LIGHT OUTPUT
Utilizing high efficient LED chips, Aurora 1000F features 2,890 lux at a 1m distance with a beam
angle of 109.8°.
Brightness achieved reaches 1kW of conventional light, whilst consuming 85% less electricity.
CUTTING AND SHAPING
4-way barn doors are supplied and also a slot for gel-frame insertion is equipped at the front.
Cut and shape the Light as you wish.Front screen diffuses harsh light and throws soft and yet
bright light.
An optional pole-operated yoke is available and enables easy panning and tilting of the light
BROAD DIMMING RANGE
1000F photo version dims from 20% to 100%. An on-board dimmer knob allows one to
control power with great accuracy, featuring smooth and gradual increase and decrease.
1000F broadcast version dims from 0% to 100%. Soft touch buttons on board enable full power
control, as well as DMX channel setting when connected to a DMX control unit.
Integrated 5-pin DMX in and out ports are for full DMX control.

Dimensions
4
Photometric Data
15.1cm
15.1cm
54.7cm
54.7cm
29.7cm
0.30 m
0.60 m
0.90 m
1.20 m
1.50 m
1.80 m
2.10 m
2.40 m
2.70 m
3.00 m
Beam Width : 0.73 m
35573.25 lux in center
11725.20 lux in side
Beam Width : 1.45 m
8893.31 lux in center
2931.30 lux in side
Beam Width : 2.18 m
3952.58 lux in center
1302.80 lux in side
Beam Width : 2.91 m
2223.33 lux in center
732.82 lux in side
Beam Width : 3.64 m
1422.93 lux in center
469.01 lux in side
Beam Width : 4.36 m
988.15 lux in center
325.70 lux in side
Beam Width : 5.09 m
725.98 lux in center
239.29 lux in side
Beam Width : 5.82 m
555.83 lux in center
183.21 lux in side
Beam Width : 6.55 m
439.18 lux in center
144.76 lux in side
Beam Width : 7.27 m
355.73 lux in center
117.25 lux in side
Average Beam Angle = 101.0°
Max. Beam Angle = 114.0° at Φ1 = 90°~ Φ2 = 270°
Min. Beam Angle = 90.8° at Φ1 = 0°~ Φ2 = 180°

4. Components and accessories
5
Broadcast version
PUSH
1
2
3
4
5
6
7
8
10
11
12
9
1. 4-leaf barndoor (included, not removable)
2. Gel insertion frame
3. Lock for gel filter
4. Front screen
5. Security cable
6. Tightening knob for manual yoke
7. Control panel with 5-pin DMX in port and out port
8. Handle
9. Manual yoke
10. 1.5m power cord attached (fixed)
11. 2m DMX dimmer cable
12. 3/8”stud

6
Photo version
1
2
3
4
5
6
13. Pole-operated yoke (optional accessory)
14. Adjustment bell-handle for panning
15. Adjustment bell-handle for tilting
16. Clamp (optional accessory)
1. 4-leaf barndoor (included, not removable)
2. Gel insertion frame
3. Lock for gel filter
4. Front screen
5. Security cable
6. Tightening knob for manual yoke
13
15
16
14

7
7. Control panel with no DMX ports
8. Handle
9. Manual yoke
10. 5m power cord attached (removable)
11. 3/8”Stud for hanging or stand mounting
12. Pole-operated yoke (optional accessory)
13. Adjustment bell-handle for panning
14. Adjustment bell-handle for tilting
15. Clamp (optional accessory)
15
ACINPUT POWERFUSE VOLUME
Made in Korea
Model : aurora 1000F
Input power : 90~240V,50/60Hz
Power consumption : 150W±10%
Color temp : Warm Cool
USEONLYWITH A 250V FUSE
11
8
12
14
13
7
10
9

1. Power inlet for input 90V – 240V AC
2. 3A Fuse
3. Power switch: on/off
4. Power increment knob: dimming range 20% - 100%
5. CONTROL PANEL
Broadcast version
Photo version
32145678
PUSH
123 4
AC INPUT POWERFUSE VOLUME
Made in Korea
Model : aurora 1000F
Input power : 90~240V,50/60Hz
Power consumption : 150W±10%
Color temp : Warm Cool
USE ONLY WITH A 250V FUSE
1. 3A Fuse
2. Power switch: on/off
3. Power cord (not removable): for power input 90V – 240V AC
4. 5-pin DMX in port
5. 5-pin DMX out port
6. Digital display: DMX channel will be displayed when DMX console connected / in use and
light output (%) will be displayed when DMX not connected.
7. UP button: Every push on the up button will increase light intensity or DMX channel
8. DOWN button: Every push on the down button will decrease light intensity or DMX channel.
Up and Down buttons are for power increments when a DMX console is disconnected,
and for channel control when a DMX console is connected.
8

6. Operating Instructions
9
1) Mounting to a light stand or hanging to a ceiling system
2) Connecting the power cable
3) Connecting DMX cable
Hang to a ceiling system
Insert 3/8” stud into a socket in the clamp and tighten retainer knob. Install the unit to a batten
and rotate clamp handle (not included), until securely fixed.
For photo version unit, connect the power cable to the IEC inlet. Broadcast version unit comes
with a non- removable power cable.
Connect the power cable plug to the mains power outlet.
To avoid electric shocks and/or damage to the equipment, the power switch located at the
control panel must be off, before connecting or disconnecting cables.
If DMX control is required, plug one end of the DMX dimming cable into the out port of the
DMX console (users own equipment) and the other end to the DMX in port on the Light.
To connect more than one light, connect another dimming cable to the DMX out port in the
light and the other end to the DMX in port for another light in serial.
For more than 32 lights, a splitter needs to be used.
Mounting on a light stand
Place the unit on to a light stand and fix it, using tightening screw as shown in the picture.
Secure the unit using security cable.

Manual yock
4) Security cables
When the lighting unit is mounted in a hanging position or on a light stand, it must be secured
with a safety cable.
3/8”stud is included but, this can be replaced to a larger or a smaller size stud as per user’s
preference. The Manual yoke allows user to tilt the unit,but not to pan.
5) Turning the Power On/Off
Turn on the lighting unit by switching on the power button.The light settings always remain
stored when it is powered off.
Warning The light unit is electrically protected against power failures but to avoid possible
electric shocks and/or equipment damages, make sure the power switch is off before connecting
or disconnecting cables. In cases of shorting, replace the 3A fuse inside the fuse holder, located at
the control panel.
6) DIMMER Light intensity variation
Light intensity can be easily increased or reduced, using the UP / DOWN buttons on the control panel.
The digital display indicates the selected dimmer value from a minimum of 0 to a maximum of 100.
Push the UP button to increase light intensity or push the DOWN button to decrease it.
7) DMX 512 CONTROL
8) Yoke for tilting and panning
1000F is designed for full DMX control from the 5-pin DMX port, located on the control panel.
Connect the DMX cable coming from your console, into the DMX IN connector located at the back.
Next to the DMX IN there is also a DMX OUT connector to daisy-chain fixtures.
Address channels
To address channels for the 1000F units, just push the UP or DOWN buttons to increase or decrease
the channel. The chosen channel number will be displayed at the window for 10 sec and then
disappear automatically. To recheck the channel number, press either up or down button and to
readdress it, press up or down button until the wanted figure appears.
10

Pole-operated yoke
Pole-operated yoke enables user to tilt and pan the unit without climbing up a ladder.
To tilt downward, rotate the grey bell anticlockwise with or without using a pole.
To pan the light clockwise, rotate the blue bell anticlockwise with or without using a pole.
11

Aurora 1000F is guaranteed to be free from defects in workmanship and parts and carries a two year
warranty period from the date of purchase. Defects that occur within this warranty period, under normal
use and care will be repaired or replaced at Aurora Lite Bank discretion,solely at our option with no
charge for parts or labour. In the event of the equipment malfunction, contact the dealer from whom
you purchased the product.
Please note, that you will be not be reimbursed for the cost of bringing the equipment to us or to our
authorized dealers or to our service center.
Aurora Lite Bank reserves the right to replace the product or relevant part with the same or equivalent
product or part, rather than repair it.Where a replacement is provided the products or part replaced
becomes the property of Aurora Lite Bank.
This warranty does not cover any damage resulting from:
- Failure to follow the instructions in the instruction manual;
- Repair, modification or overhaul not conducted by any Aurora authorized or approved personnel.
- Fire, natural disaster, act of God, lightning, abnormal voltage, etc;
- Submergence in water (flooding), exposure to alcohol or other beverages, infiltration of sand or mud,
physical shock, or dropping of the equipment and other unnatural causes.
This warranty only applies to the 1000F and not to the accessories, such as the barn doors, nor does it
apply to fuses and other consumables provided.
Any consequential damages arising from failure of the equipment, such as expenses incurred in taking
pictures or recording images or loss of expected profit, will not be reimbursed, whether they occur during
the warranty period or not. Parts essential to the servicing of the light equipment (that is, components
required to maintain the functions and quality of the fixture) will be available for a period of five years
after the product is discontinued.
7. WARRANTY
8-2 Yeonamro-42 gil, buk-gu, Daegu 702-835, Korea Tel : (82-53) 384-9874 Fax : (82-53) 384-9886
T
he total or partial reproduction of this manual is prohibited without the express written permission of
Aurora Lite Bank. Information and specifications in this document are subject to change withoutnotice.
2012 c Copyright Aurora Lite Bank. All rights reserved.
12
Table of contents
Other Aurora Lite Bank Lighting Equipment manuals

