Austin Kontore Leopold Bench Kit User manual
© 2009 Austin Kontore LLC Page 1 of 12
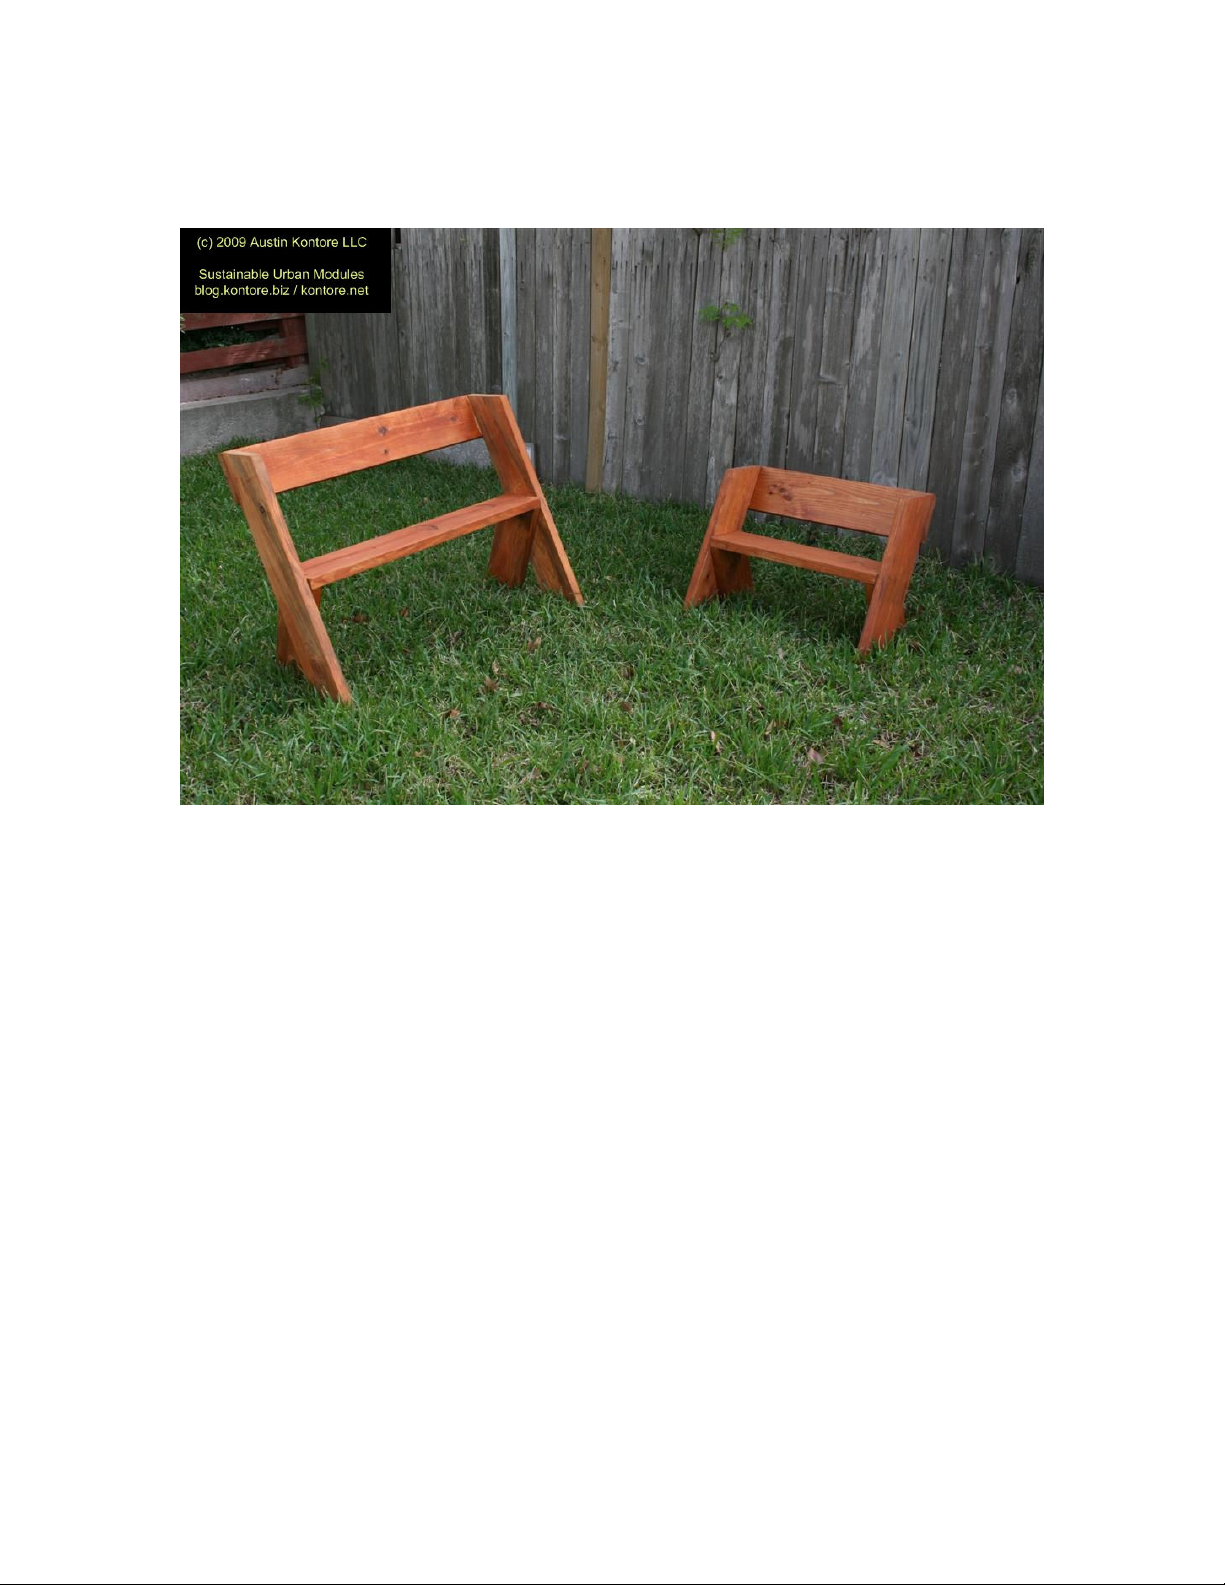
Leopold Bench Kit
Children’s Version
Assem ly Guide
Version 20091013C
Austin Kontore LLC
Austin, TX
kontore.net
512-436-0512

© 2009 Austin Kontore LLC Page 2 of 12
Introduction
Thank you for purchasing our Leopold Bench kit. We are sure it will give you years of enjoyment.
Why Pine?
You will have noticed that our Leopold Benches are made of Pine, instead of pressure treated lum er.
This was a conscious choice, ased on the eliefs of Aldo Leopold. Leopold elieved that we should live
within nature, not against it. Left on its own, the ench will gradually ecome one with the earth again.
Technical Support
If you have any questions during assem ly, please give us a call at 512-436-0512 or send an e-mail with
your question to [email protected].
Special Symbols
Repeat The preceding step, or series of steps, will need to e repeated.
Important
An important note, which should e read efore performing a step, or series
of steps. Used to avoid potential assem ly pro lems.
Goal More information on what you are trying to accomplish during a given step.
Note An informational note, used to further explain the reasoning ehind a step.
Assembly Overview
1. Fasten the Legs together, resulting in two Leg Assem lies.
2. Attach the Seat to the Leg Assem lies.
3. Attach the Backrest.
4. Sand and Stain the completed ench.
© 2009 Austin Kontore LLC Page 3 of 12
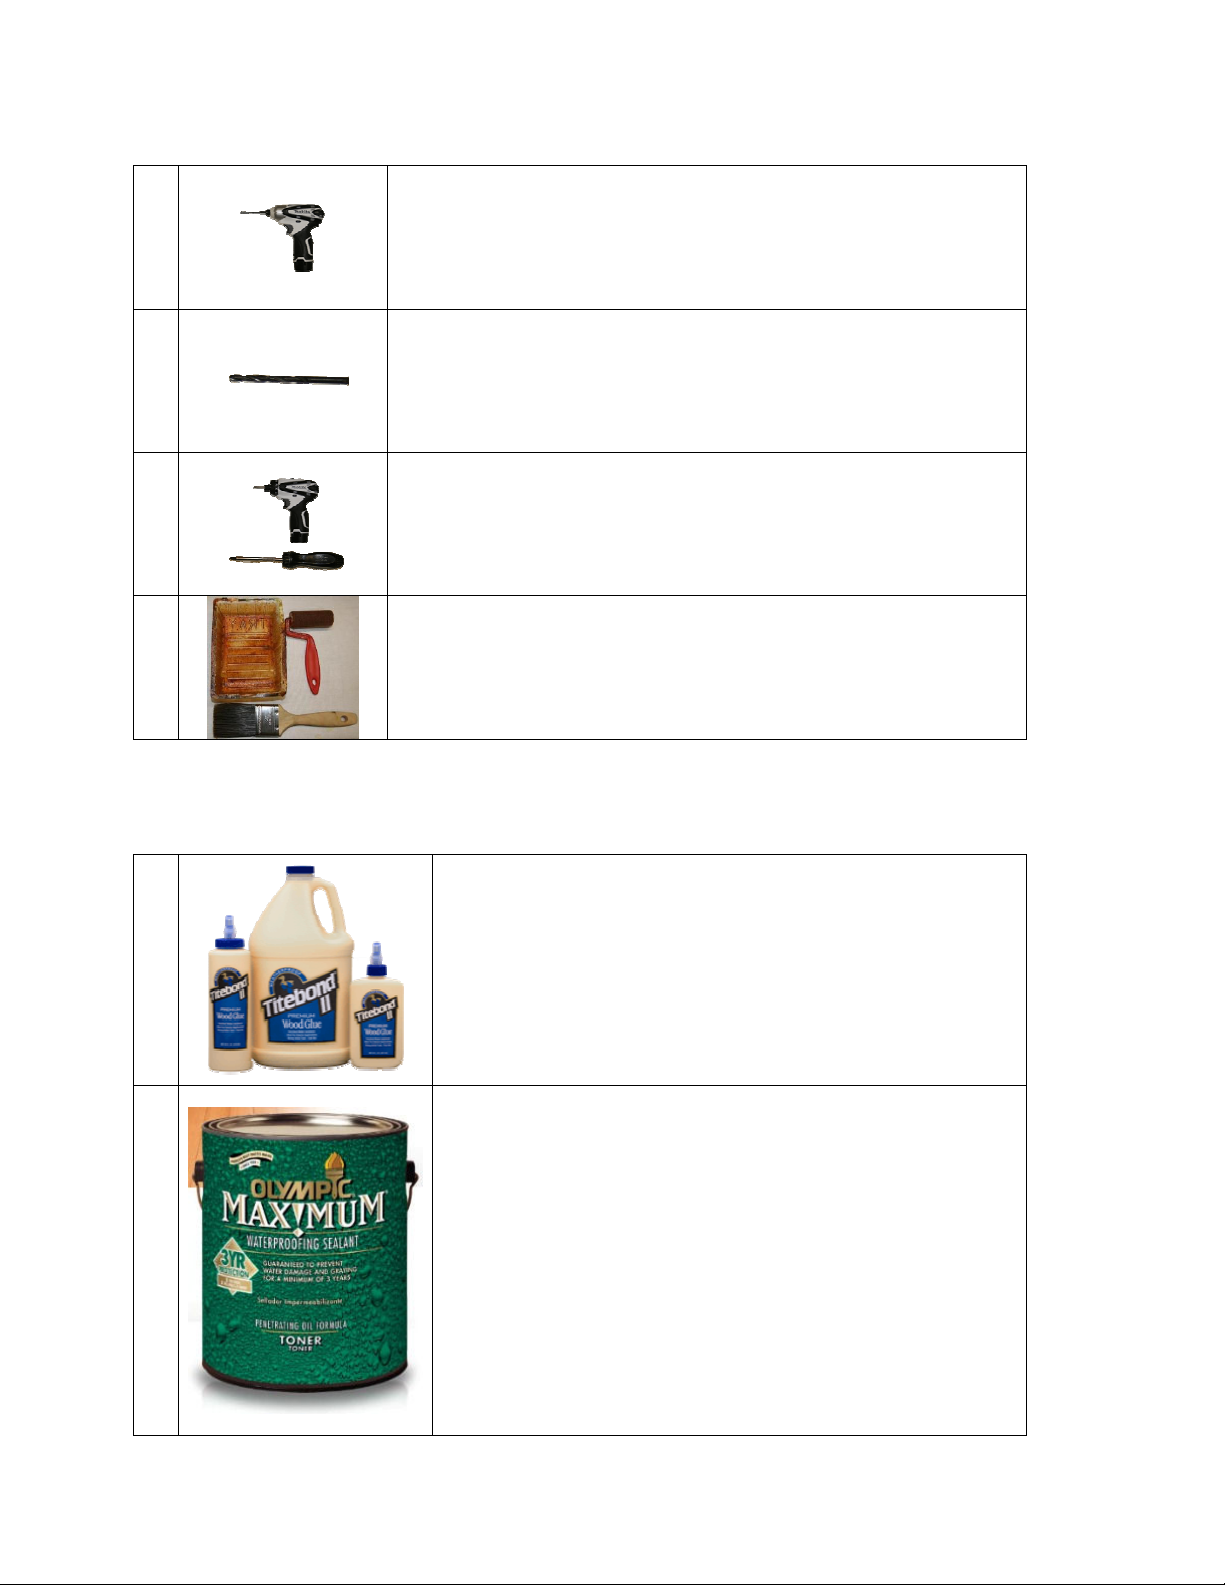
Required Tools
Electric or hand drill. A cordless power drill is preferred, ut any kind
will work.
1/8” drill it, for wood.
Power screw driver with Phillips it or Phillips screw driver. A power
driver will make assem ly much easier.
Painting equipment (paint rush, tray, rags, et cetera)
Required Materials
Exterior grade wood glue, such as TiteBond II. Construction
Adhesive (PowerGra , Liquid Nails) can also e used, ut apply
sparingly.
A quart of exterior “deck” sealant or exterior grade paint.
For our assem led version we use “Olympic Maximum
Waterproofing Sealant”, which is availa le in quart or 1 gallon
sizes. The “Penetrating Oil Toner” product provides color (the
grain still shows) and excellent water protection (3 years).
You can choose any color. Our finished products use the
“Canyon Brown”, which gives a nice dark color, or “Redwood”,
for a lighter look.

© 2009 Austin Kontore LLC Page 4 of 12
Included Materials
Description Quantity Photo
31” 2x8 Pine. Straight 90° cuts.
Backrest. 1
28” 2x8 Pine. Straight 90° cuts.
Seat. 1
24” 2x8 Pine. Angled 22° cut.
Front Legs. 2
11 ½” 2x8 Pine. Angled 22° cuts.
Rear Legs. 2
2 ½” Exterior Grade Screws (green) 18

© 2009 Austin Kontore LLC Page 5 of 12
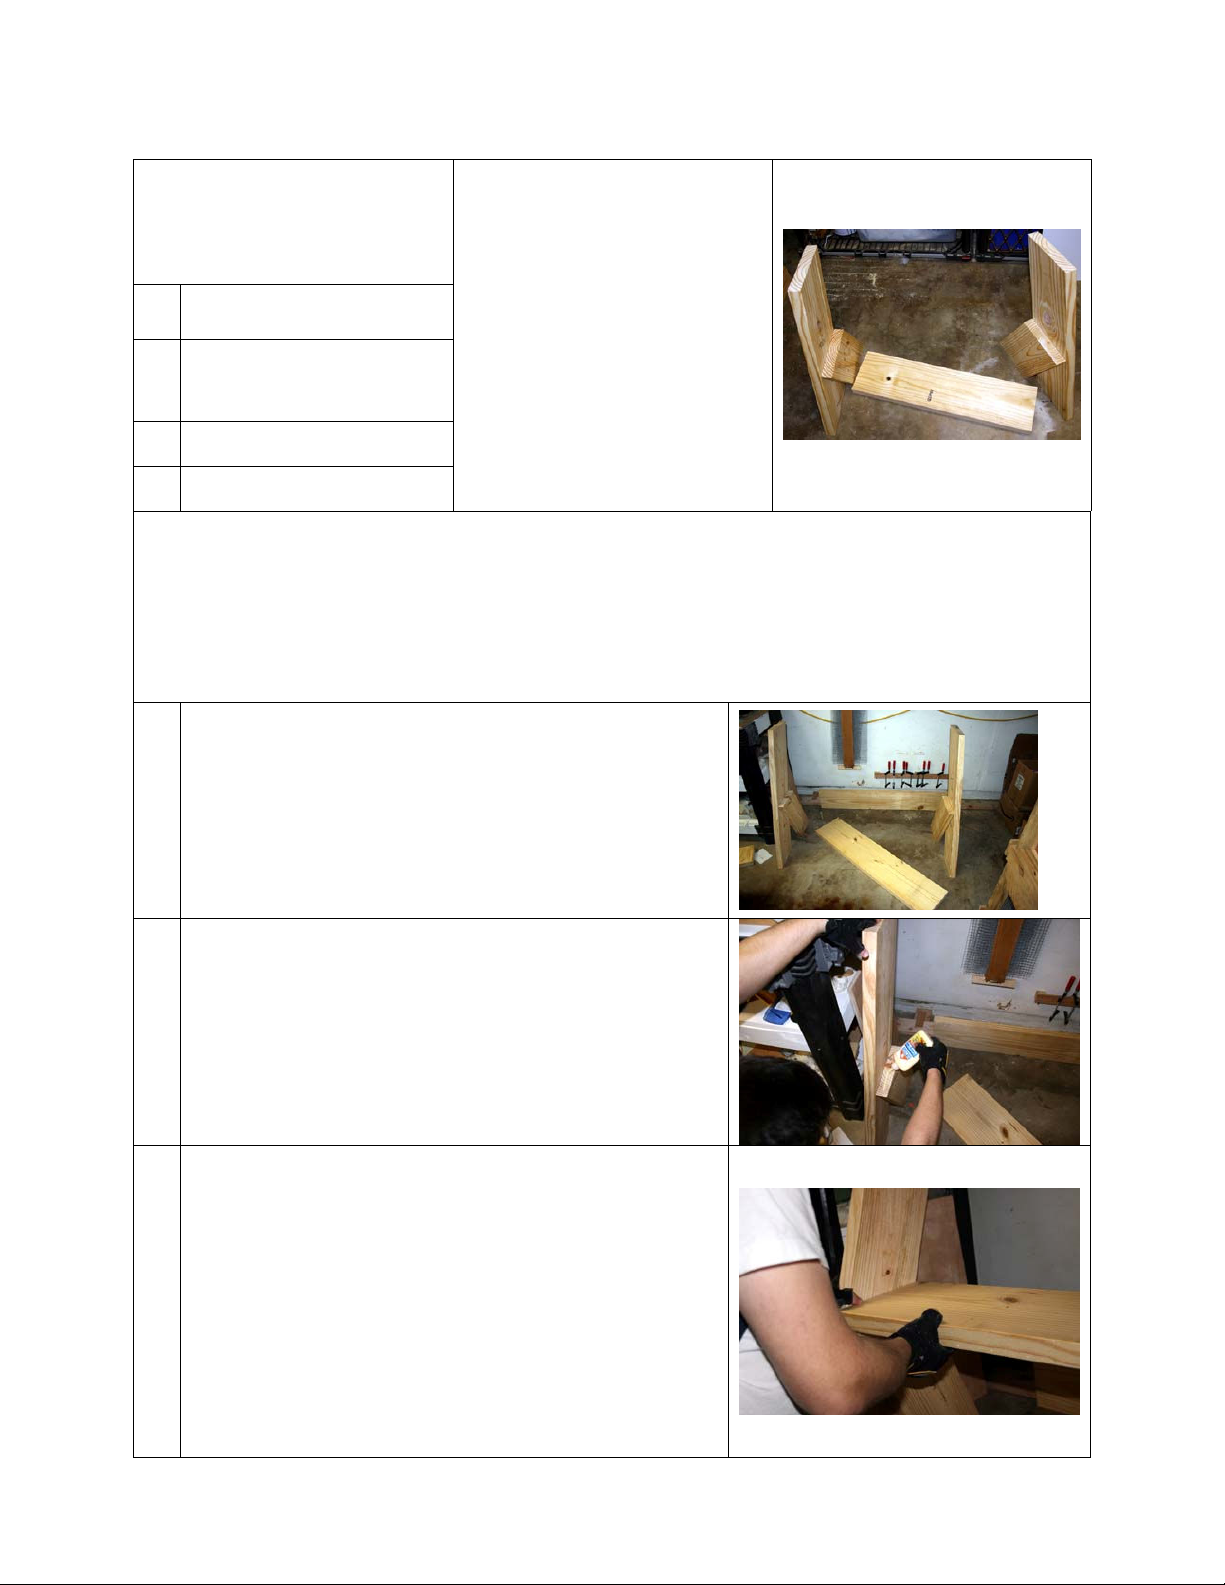
Le Assemblies
(2) 24” 2x8 Pine
Angled 22° cuts
Front Legs
(2) 11 ½” 2x8 Pine
Angled 22° cuts
Rear Legs
(6) 2 ½” Screws
Exterior Wood Glue
A complete leg is an assem ly consisting of a Front Leg (24″ angled) and Rear leg (11 ½″ angled).
You will need a straight edge to help align the legs. An
easy way to do this is to stack the lum er which makes the
Seat and Back on top of each other, then clamp them to a
work ench.
Another option, if you are working on the floor, would e
utt them against a wall. You can also tip the Back on its
edge and use it (shown in this photo).
Next, lay the two Front Legs on the large flat work surface;
with the ottoms against the straight edge. They should
e making a ig triangle-like shape, with the ottoms of
the legs flat against the guide/wall/straightedge.
Important: Make sure to do this on a ig smooth
surface, like a large work ench.
Note: You are uilding the legs on their sides, to make
them easier to assem le.
Put the (2) 11 ½″ Rear Leg pieces on top of the Front Legs.
Note: Alignment of the Rear Legs will e easier if you
slip a piece of scrap 2- y material under the ends of the
Rear Legs, as shown in the photo.

© 2009 Austin Kontore LLC Page 6 of 12
See where the Rear Legs and the Front Legs overlap? It’s a
triangle-like shape.
Goal: You want to put a little wood glue or
construction adhesive where they overlap.
To get the glue in the right place, first align the parts, and
then draw two lines on each leg assem ly.
REPEAT for
oth leg assem lies.
Remove the Rear Legs and spread glue in the triangle area.
Important: Don’t overdo the glue or the pieces won’t
come together nicely. Make a small “triangle” of glue.
Important: Construction adhesive does not stain, and
can e difficult to sand off. Try to avoid getting any on the
face (exposed surfaces) of the wood. Clean up excess right
away.
With the Rear and Front legs aligned and glued, it is now
time to drill (3) holes per leg.
Goal: The holes will e drilled in the triangle area
where the glue was applied.

© 2009 Austin Kontore LLC Page 7 of 12
Using a 1/8” drill it, drill (3) holes on each leg assem ly.
REPEAT for oth leg assem lies.
Important: Only drill a hole a out 2” deep – you don’t
want to drill all the way through the Front Leg.
Three (3) 2 ½″ deck screws hold the Rear Leg to the Front
Leg. You’ll need (6) screws in total to make the two leg
assem lies.
Using your screwdriver, fasten the Rear Leg to the Front
Leg with (3) screws.
REPEAT for oth leg assem lies.
Important: Make sure the angles look right, that the
“feet” of the legs are flat against your straight edge, and
that oth finished leg assem lies are mirrors of each
other.
Once the legs are screwed together, you can test them y
standing them up. They may tip a it, ut the ottom
(“feet”) of the leg assem lies should e flat against the
floor, and the Rear Legs should e mounted at the same
height as each other.
© 2009 Austin Kontore LLC Page 8 of 12
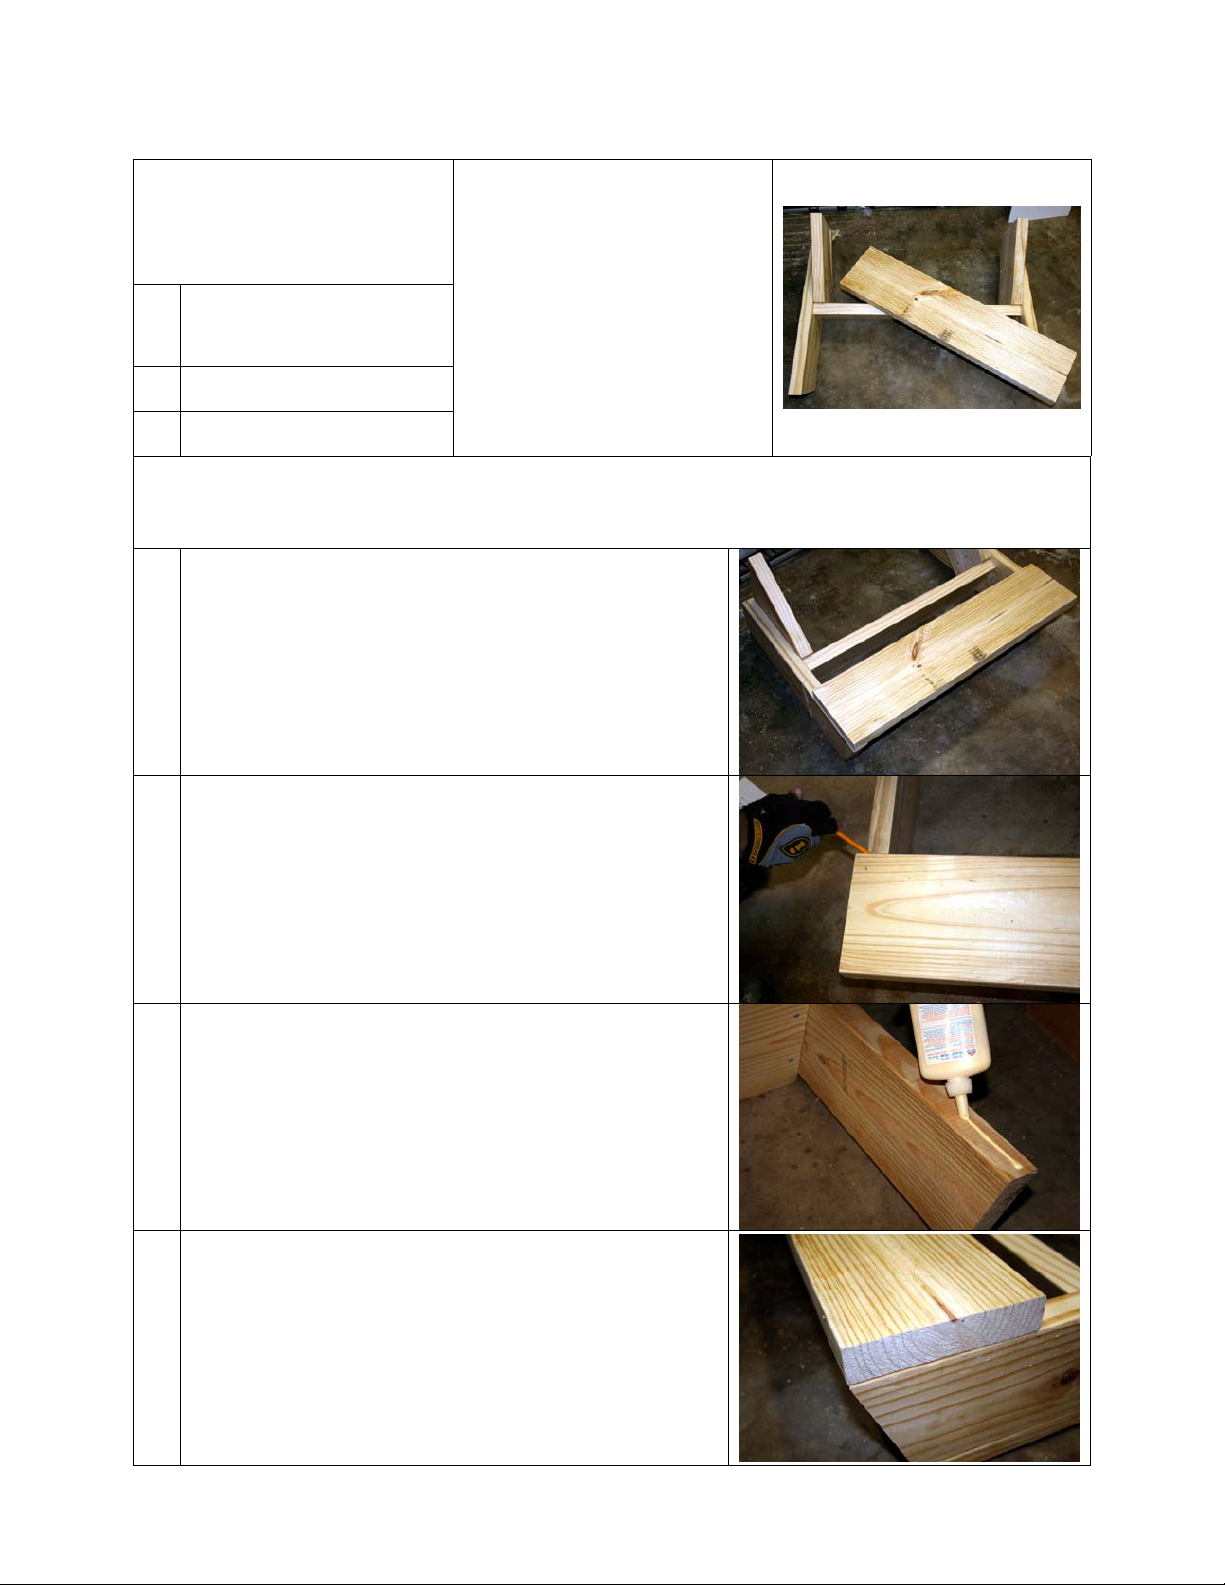
Attachin The Seat
(2) Leg Assem lies
(Assem led previously)
(1) 28” 2x8 Pine
Straight 90° cuts
Seat
(8) 2 ½” Screws
Exterior Wood Glue
Now that the Leg units are assem led, the seat will e installed. It is important that the seat e carefully
fastened so that the legs are perpindicular to the floor (standing plum – straight upright).
A helper can assist in holding the piece tightly while you are drilling and screwing it together, and a level
can help make sure everything is plum and level.
Stand the Leg Assem lies up. They should e spaced 28″
apart.
Note: A helper is useful here.
While the legs are standing up, spread a little glue on the
tops of the Rear Legs.
REPEAT for oth leg assem lies.
Important: Construction adhesive does not stain, and
can e difficult to sand off. Try to avoid getting any on the
face (exposed surfaces) of the wood. Clean up excess right
away.
Lay the seat in place, on top of the glue.
Important: Before putting the seat in place, check to
see which side is most attractive. Have the nicer side
facing up. This is a good way to “hide” knots in the wood.
Don’t worry a out lum er grade marks—those can e
sanded off.

© 2009 Austin Kontore LLC Page 9 of 12
The seat will e a out ½” to 1” forward. You want it
rought toward the front of the ench, so it overhangs a
it.
Note: The sharp corner should e sanded down when
you are done with assem ly.
Drill two holes at the edge of the seat of the seat, a out
½” from the ends, and 1 ½” from the front and rear edges,
making sure that the seat remains in its aligned position.
REPEAT at the other end of the seat.
Note: It will e a little difficult getting a large power drill
in close. A smaller drill will make the jo easier.
Fasten the Seat to the Leg Assem ly using (4) screws. You
are fastening into the top of the Rear Leg, two screws on
each end.
Important: Make sure that the seat is TIGHTLY
screwed and FLUSH with the upright leg assem ly. The
oard should e right up against the Front Leg, and sitting
completely on the Rear Leg.
For additional strength, drill two holes on the outside of
the legs. These holes should go though the face of the leg
and into the edge of the seat. You may need to measure
the distance from the floor to determine where to drill. (It
will e approximately 11 ½” from the floor.)
REPEAT at
the opposite side of the ench.
From the outside of the leg, use (4) more screws to further
pull the seat to the legs. In total, there will e (8) screws
holding the seat to the legs – four on the top of the seat,
and four from the ends.
© 2009 Austin Kontore LLC Page 10 of 12
Attachin The Backrest
(1) 31” 2x8 Pine
Straight 90° cuts
Backrest
(4) 2 ½” Screws
Exterior Wood Glue
You will notice that the ench is a little flexi le at this point. Installation of the Back will solve this.
Lay the ench on the ground or workta le.
Align the Back on the rear of the ench. The Back will e
flush to the top of the leg assem lies.
Make a pencil mark on oth sides of the legs.
Remove the Back and apply thin layer of glue, going no
further than the line you just made.
Important: Construction adhesive does not stain, and
can e difficult to sand off. Try to avoid getting any on the
face (exposed surfaces) of the wood. Clean up excess right
away.
Realign the Back on top of the glue.
Important: Before putting the ack in place, check to
see which side is most attractive. Have the nicer side
facing down. This is a good way to “hide” knots in the
wood. Don’t worry a out lum er grade marks—those can
e sanded off.

© 2009 Austin Kontore LLC Page 11 of 12
Using a 1/8” drill it, drill (2) holes through the ack and
into the Leg Assem ly. The holes should e a out 1 ½”
from the top and ottom edges of the Back.
REPEAT for oth sides of the ack. Four holes total.
Starting with one end, fasten the Back to the Leg Assem ly
using a screw. Make sure that the edges of the Back are
aligned with the Leg. The edges should e flush.
Move to the opposite side of the ack, and fasten the ack
with another screw. You will pro a ly have the hold the
wood so that everything is aligned.
Once the two screws are fastened, finish the attachment
of the ack using the two remaining screws.
Note: It’s okay if the Back overlaps a it, ut if it does,
you should sand it down for an improved look.
The Back is now attached to the ench with four screws.
The ench can now e placed upright and tested.
Note: A little it of “wo le” is normal. When placed on
your lawn the wo le will not e noticea le.
© 2009 Austin Kontore LLC Page 12 of 12
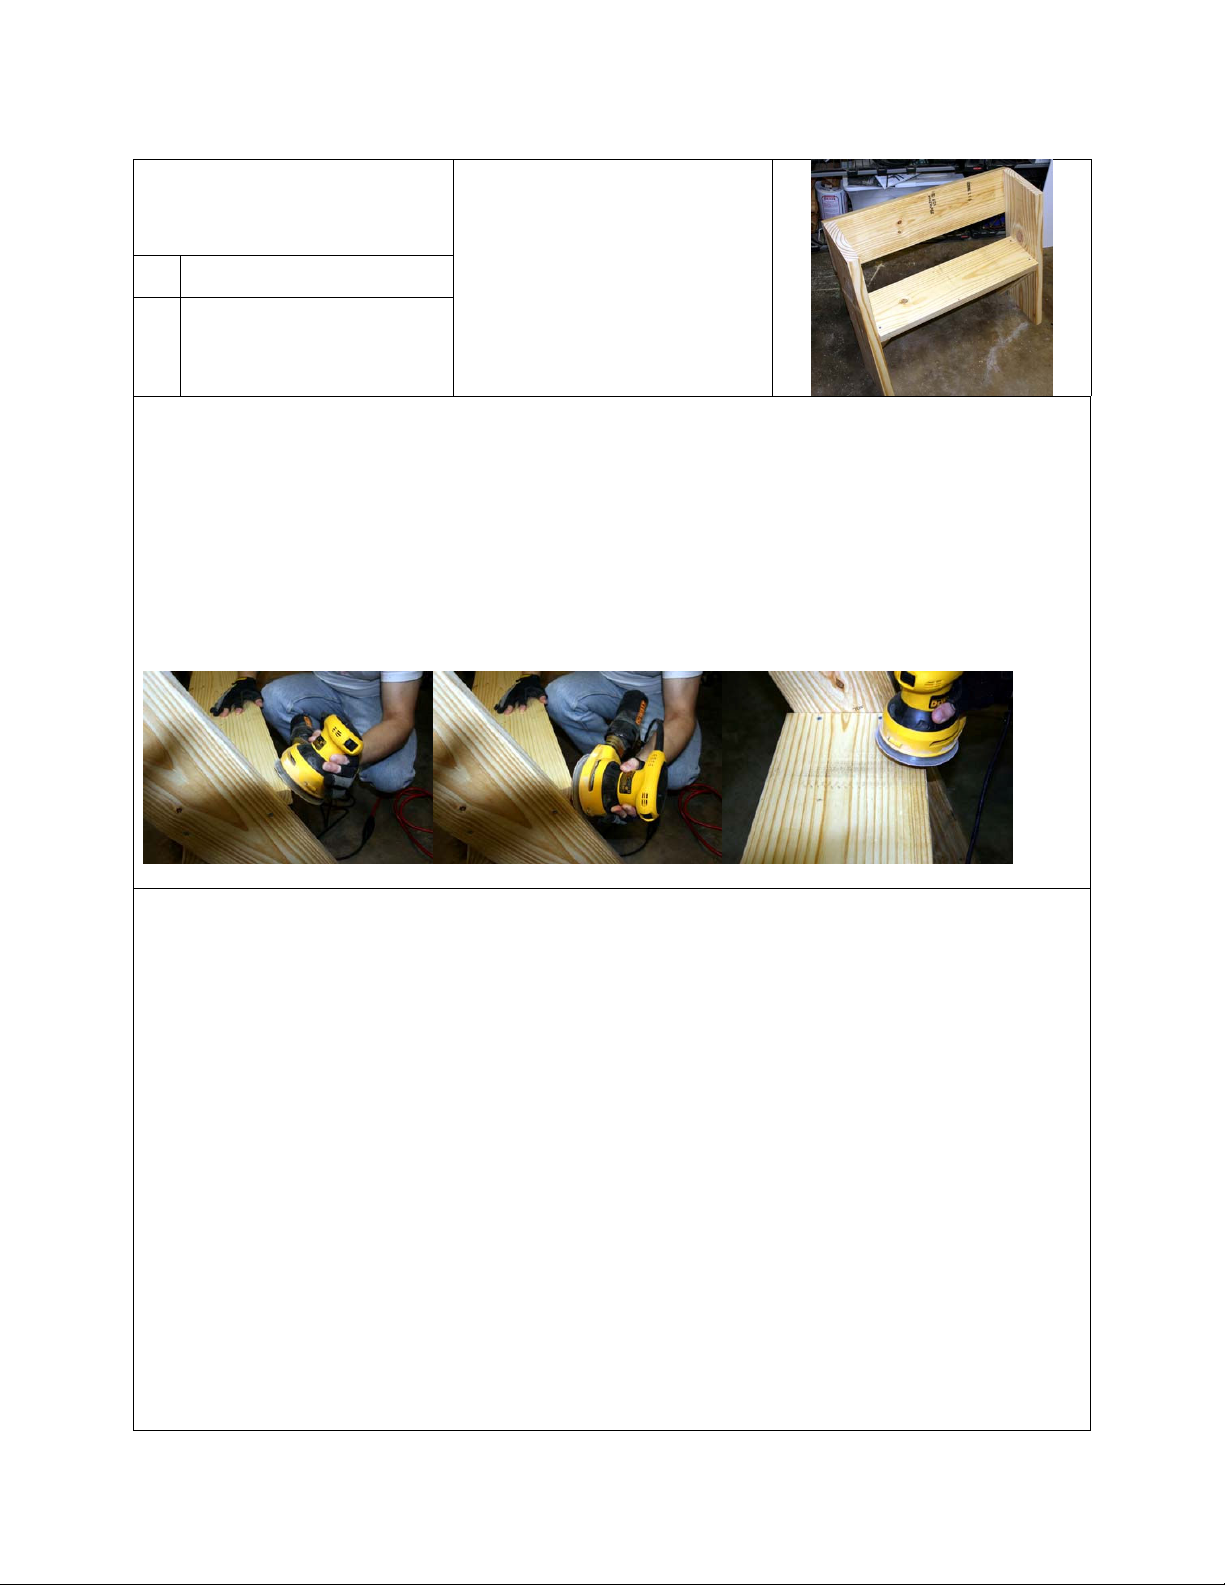
Sandin And Stainin
(1) Completed Bench
Staining and Painting
Supplies (Stain, Brushes,
Paint Trays, Sand Paper)
The Leopold Bench is now completely assem led! Congratulations! Why not take a moment to relax and
enjoy the fruits of your la or.
Once assem led, it is recommended that a power sander (or sandpaper and a lock) e used to soften
all exposed edges. Focus on the edges of the Seat, Back, and front edges of the Front Legs. Anywhere
you are likely to touch. The rounded edges also make for a more polished appearance.
The sander should also e used to “erase” any lum er grade marks or other lemishes.
This kit uses Pine, which requires staining and sealing efore it is placed outside. Use a good quality all-
in-one waterproofing sealer. The stain/sealer used for decks and fences is perfect, and availa le in a
num er of colors. Dark colors work well with the Pine.
When staining, pay careful attention to making sure the top surfaces (where water can pool) were well
stained. Also make sure that the “feet” were well coated. (The top and ottom of the legs are end grain,
so they really suck up the stain. This is good—let the stain really soak into those parts, to etter protect
from rot.
Another option would e to paint the Pine. Use any exterior grade paint, ensuring that the feet and
Seat, in particular, are well covered. Painting the ench in right colors will surely attract children to
your new ench.
If you opt to make more versions of this kit on your own, you may wish to try redwood, cedar, or treated
lum er. If using redwood or cedar, you can leave the material natural and watch it age. Though, it is
recommended that Linseed Oil ased product e used, to add UV and water protection. Do not try
painting cedar – latex will peel over time.
Table of contents


