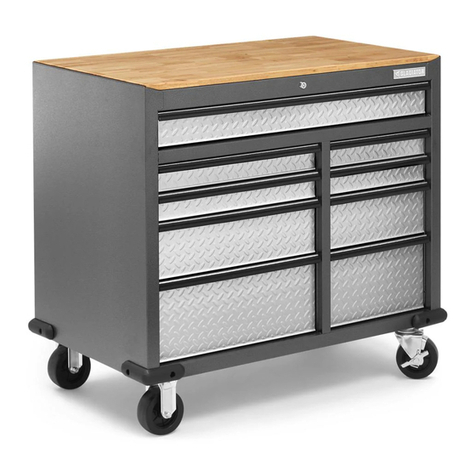
Gladiator GAMT41HWJG00 User manual

PREMIER 41"9-DRAWER
MOBILE WORKBENCH
WITH HARDWOOD TOP
Assembly Instructions
W11381274B www.gladiatorgarageworks.com
www.gladiatorgarageworks.ca
TABLE OF CONTENTS/TABLE DES MATIÈRES/ÍNDICE
MODEL/MODÈLE/ MODELO:
GAMT41HWJG
MOBILE WORKBENCH SAFETY ..............2
DIMENSIONS .............................................3
MOBILE WORKBENCH USE
REQUIREMENTS .......................................4
ASSEMBLY INSTRUCTIONS.....................4
FINAL ASSEMBLY......................................6
POWER OUTLET WITH USB.....................7
MOBILE WORKBENCH
MAINTENANCE..........................................7
REGISTERING YOUR
PRODUCT...................................................7
WARRANTY................................................8
In U.S.A. call: 1-866-342-4089
Aux É.U. téléphoner au: 1-866-342-4089
En EE.UU. llame al: 1-866-342-4089
In Canada call: 1-800-807-6777
Au Canada téléphoner: 1-800-807-6777
En Canadá llame al: 1-800-807-6777
ÉTABLI MOBILE À 9
TIROIRS DE 41" AVEC
DESSUS EN BOIS
MASSIF
Instructions d’assemblage
SÉCURITÉ DE L'ÉTABLI MOBILE............. 9
DIMENSIONS .............................................10
CONDITIONS D’UTILISATION
DE L'ÉTABLI MOBILE................................11
INSTRUCTIONS D’ASSEMBLAGE............11
ASSEMBLAGE FINAL ................................13
PRISE DE COURANT AVEC USB..............14
MAINTENANCE DE L’ÉTABLI MOBILE ....14
ENREGISTREMENT DE
VOTRE PRODUIT.......................................14
GARANTIE..................................................15
BANCO DE TRABAJO
MÓVIL DE CALIDAD
SUPERIOR DE 41"
CON 9 CAJONES Y
SUPERFICIE DE MADERA
MACIZA
Instrucciones de ensamblaje
SEGURIDAD DEL BANCO DE
TRABAJO MÓVIL.......................................17
DIMENSIONES...........................................18
REQUISITOS DE USO DEL BANCO DE
TRABAJO MÓVIL.......................................19
INSTRUCCIONES DE ENSAMBLAJE.......19
MONTAJE FINAL........................................21
TOMA DE CORRIENTE CON USB ...........22
MANTENIMIENTO DE BANCO DE
TRABAJO MÓVIL.......................................22
CÓMO REGISTRAR EL PRODUCTO........22
GARANTÍA..................................................23

2
MOBILE WORKBENCH SAFETY
You can be killed or seriously injured if you don't immediately
You can be killed or seriously injured if you don't follow
All safety messages will tell you what the potential hazard is, tell you how to reduce the chance of injury, and tell you what can
happen if the instructions are not followed.
Your safety and the safety of others are very important.
We have provided many important safety messages in this manual and on your appliance. Always read and obey all safety
messages.
This is the safety alert symbol.
This symbol alerts you to potential hazards that can kill or hurt you and others.
All safety messages will follow the safety alert symbol and either the word “DANGER” or “WARNING.”
These words mean:
follow instructions.
instructions.
DANGER
WARNING

3
Model GAMT41HWJG
A41" (104 cm)
B24.5" (62.3 cm)
C38" (97 cm)
DIMENSIONS
C
A
B

4
MOBILE WORKBENCH USE REQUIREMENTS
■Intended for garage use in a dry location.
■Use caster locks when not being moved.
■Maximum weight limit is 100 lbs (45 kg) for each drawer.
■Maximum weight limit for mobile workbench is
1500 lbs (682 kg).
ASSEMBLY INSTRUCTIONS
TOOLS AND PARTS
■Gather the required tools and parts before starting assembly.
Parts are located inside tool cabinet.
TOOLS NEEDED
■Double-sided 10 mm / 12 mm wrench (included)
■Philips screwdriver
■Hex key
PARTS SUPPLIED
■Mobile workbench
■Cord storage hook (2)
■Cabinet handle
■Fixed casters (2)
■Swivel casters (2)
■Drawer and tray liners (9)
■Keys (2)
■Bumpers (4)
■F1 - M6 – 1.00 x 15 hex bolt (4)
■F2 - M8 – 1.25 x 25 hex bolt (16)
■F3 – M6 – 1.00 x 12 pan-head Philips screw (4)
■F4 - 6 mm washer (8)
■F5 - M6 hex-head bolt (8)
UNPACK THE MOBILE
WORKBENCH
■Remove the packaging from the mobile workbench. Parts are
located inside the cabinet drawer. Verify contents.
See “Parts Supplied.”
■Set aside the outer cardboard package for use during
assembly.
■After assembly, dispose of all packaging materials properly.
WARNING
Excessive Weight Hazard
Use two or more people to move and assemble
workbench.
Failure to do so can result in back or other injury.
F1 M6 – 1.00 x 15 hex bolt (4)
F2 M8 – 1.25 x 25 hex bolt (16)
F3 M6 – 1.00 x 12 pan-head
Philips screw (4)
F4 6 mm washer (8)
F5 M6 hex-head bolt (8)

5
Position the handle over the threaded inserts on the side of
the cabinet. Attach handle with M6-1.00 x 15 Hex bolts (F1) (4)
and tighten with 10 mm wrench (provided).
1. Attach the Handle
F1
F1
Position the cord storage hooks over the threaded inserts on
handle side of the cabinet. Using M6-1.00 x 12 pan-head Philips
screws (F3) (4) attach the hooks facing opposite of each other.
Tighten the screws with a Philips screwdriver.
2. Attach Cord Storage Hooks
F3
F3
F1. M6 - 1.0 x 15 hex bolt F3. M6 – 1.00 x 12 pan-head Philips screw
Push in all the cabinet drawers fully and lock using the key. Using
two or more people, lay the cabinet down on its back with the
drawers facing upward. Protect the cabinet back nish by laying
it down on the saved cardboard packaging material. Attach the
swivel casters to the cabinet, on the same side as the handle,
using M8-1.25 x 25 hex bolts (F2) (8) and tighten with the provided
12 mm wrench. Attach the xed casters to the cabinet, on the
opposite side as the handle, using M8-1.25 x 25 hex bolts (F2) (8)
and tighten with the provided 12 mm wrench.
3. Attach the Casters
F2
F2
Fixed casters
Swivel casters
F2. M8 - 1.25 x 25 hex bolt
WARNING
Excessive Weight Hazard
Use two or more people to move and assemble
workbench.
Failure to do so can result in back or other injury.

6
FINAL ASSEMBLY
Using two or more people, lift the mobile workbench up and onto the casters.
WARNING
Excessive Weight Hazard
Use two or more people to move and assemble
workbench.
Failure to do so can result in back or other injury.
1. Bumper Assembly
F4. 6 mm washer
F5. M6 hex-head
bolt
F5
F4
Using 6 mm hex head bolts (F5) (8) and 6 mm washers
(F4) (8), fasten a bumper to each corner of the cabinet.
Completely tighten all the fasteners.
NOTE: To keep from stripping the bolts, do not overtighten.
F4
F5
2. Use, Remove and Replace
the Drawers
NOTE: The key locks all of the drawers. Use the drawer liners
to avoid scratching or damaging the drawers.
REMOVING THE DRAWER
Unload the contents from the drawer. Slide out the drawer as
far as it will go. Press the lever down on the right-hand track
and lift the lever up on the left track to release the drawer.
Pull the drawer out the rest of the way.
REPLACING THE DRAWER
Align the drawer guides with the receiving glides. Hold the
receiving glides rmly and insert the drawer guide.
NOTE: It is normal for the drawer to close tightly the rst time
after it has been removed. Push the drawer in completely.
A. Lever
A

7
■The powerstrip cord is shipped outside the right side and
must be routed through the rubber grommet located above
the powerstrip.
■Remove the power cord packaging material and pull the cord
power plug through the grommet completely.
■Do not insert a cord through a hole without a grommet.
■Always unplug power cord when moving or cleaning the
mobile workbench.
■The mobile workbench includes cord hooks that allow for
cord storage.
■The powerstrip includes an on/off switch that has an overload
protector rated at 15 A. Do not overload the powerstrip.
■The USB ports can be used to charge cell phones and power
USB devices.
Electrical Shock Hazard
Plug into a grounded 3 prong outlet.
Do not remove ground prong.
Do not use an adapter.
Do not use an extension cord.
Failure to follow these instructions can result in death,
fire, or electrical shock.
WARNING
POWER OUTLET WITH USB
MOBILE WORKBENCH MAINTENANCE
■Always unplug and remove all cords before cleaning the mobile workbench.
■The mobile workbench may be cleaned with a mild detergent and water.
■The drawer slides and casters can be lubricated with high-quality bearing grease.
■Remove any grease or oil with a non-flammable cleaner.
REGISTERING YOUR PRODUCT
There are many benets to registering your product. Find out more and register your product online at:
www.gladiatorgarageworks.com.
Consumers in Canada can call 1-800-807-6777.
In the U.S.A. call 1-866-342-4089.
NOTE: This device complies with Part 15 of the FCC Rules.
Operation is subject to the following two conditions:
1. This device may not cause harmful interference, and
2. This device must accept any interference received, including
interference that may cause undesired operation.
NOTE: This equipment has been tested and found to comply with
the limits for a Class B digital device, pursuant to Part 15 of the
FCC Rules.
These limits are designed to provide reasonable protection
against harmful interference in a residential installation. This
equipment generates, uses, and can radiate radio frequency
energy, and if not installed and used in accordance with
the instructions, may cause harmful interference to radio
communications. However, there is no guarantee that interference
will not occur in a particular installation. If this equipment does
cause harmful interference to radio or television reception, which
can be determined by turning the equipment off and on, the user
is encouraged to try to correct the interference by one or more of
the following measures:
■Reorient or relocate the receiving antenna.
■Increase the separation between the equipment and receiver.
■Connect the equipment into an outlet on a circuit different
from that to which the receiver is connected.
■Consult the dealer or an experienced radio/TV technician for
help.

8
GLADIATOR®MOBILE
WORKBENCH WARRANTY
ATTACH YOUR RECEIPT HERE. PROOF OF PURCHASE IS REQUIRED
TO OBTAIN WARRANTY SERVICE.
Please have the following information available when you call the
Customer eXperience Center:
ɃName, address and telephone number
ɃModel number and serial number
ɃA clear, detailed description of the problem
ɃProof of purchase including dealer or retailer name and address
IF YOU NEED SERVICE:
1. Before contacting us to arrange service, please determine whether your product requires repair. Some questions can be addressed without
service. Please take a few minutes to review the instructions or visit www.gladiatorgarageworks.com.
2. All warranty service is provided exclusively by our authorized Gladiator®Service Providers. In the U.S. and Canada, direct all
requests for warranty service to:
Gladiator Customer eXperience Center
In the U.S.A., call 1-866-342-4089. In Canada, call 1-800-807-6777.
If outside the 50 United States or Canada, contact your authorized Gladiator dealer to determine whether another warranty applies.
ONE YEAR LIMITED WARRANTY
WHAT IS COVERED WHAT IS NOT COVERED
ONE YEAR LIMITED WARRANTY ON WOOD TOP
For one year from the date of purchase, when this product is operated
and maintained according to the instructions attached to or furnished
with the product, Gladiator®will replace or repair the defective product
or parts to correct defects in materials or workmanship.
THREE YEAR LIMITED WARRANTY ON POWERSTRIP
For three years from the date of purchase, when this product is
operated and maintained according to the instructions attached
to or furnished with the product, Gladiator®will replace or repair
the defective product or parts to correct defects in materials or
workmanship.
LIFETIME LIMITED WARRANTY ON MOBILE WORKBENCH
For the life of the product, when the Workbench is used and maintained
according to the instructions attached to or furnished with the product,
Gladiator will pay for repair or replacement of the defective product or
parts to correct defects in materials or workmanship.
1. Service calls to correct the installation of any Gladiator®products or
to instruct you on how to use or install them.
2. Damage resulting from improper handling or shipping of products,
or products damaged by accident, misuse, abuse, re, ood
improper installation, acts of God, neglect, corrosion, modication
or mishandling.
3. Shipping or freight fees to deliver replacement products or to return
defective products.
4. Repairs or replacement when your product is used in other than
normal, single-family household use, such as a commercial
environment or handled in any way inconsistent with the installation
instructions included with the product.
5. Cosmetic damage including scratches, dings, dents or cracks that
do not affect the structural or functional capability of the product.
6. Replacement parts or product for Gladiator®products operated
outside the United States and Canada.
7. In Canada, travel or transportation expenses for customers who
reside in remote areas.
8. Any labor costs during the limited warranty period.
9. Damage resulting from improper loading beyond the specied
maximum weight capacity outlined in the assembly instructions
provided with the product.
10.Surfaces damaged due to chemical interaction resulting in
corrosion of paint or metal.
11.Any damage, splitting, cracking or warping of the wooden top past
the rst year.
The cost of repair or replacement under these excluded
circumstances shall be borne by thecustomer.
DISCLAIMER OF IMPLIED WARRANTIES; LIMITATION OF REMEDIES
IMPLIED WARRANTIES, INCLUDING TO THE EXTENT APPLICABLE WARRANTIES OF MERCHANTABILITY OR FITNESS
FOR A PARTICULAR PURPOSE, ARE EXCLUDED TO THE EXTENT LEGALLY PERMISSIBLE. ANY IMPLIED WARRANTIES
THAT MAY BE IMPOSED BY LAW ARE LIMITED TO ONE YEAR, OR THE SHORTEST PERIOD ALLOWED BY LAW. SOME
STATES AND PROVINCES DO NOT ALLOW LIMITATIONS OR EXCLUSIONS ON HOW LONG AN IMPLIED WARRANTY OF
MERCHANTABILITY OR FITNESS LASTS, SO THE ABOVE LIMITATIONS OR EXCLUSIONS MAY NOT APPLY TO YOU. THIS
WARRANTY GIVES YOU SPECIFIC LEGAL RIGHTS, AND YOU MAY ALSO HAVE OTHER RIGHTS WHICH VARY FROM STATE
TO STATE OR PROVINCE TO PROVINCE.
Outside the 50 United States and Canada, this warranty does not apply. Contact your authorized Gladiator dealer to determine if
another warranty applies.
If you need service, call the Gladiator Customer eXperience Center, 1-866-342-4089 (toll-free), from anywhere in the U.S.A. In
Canada, contact your Whirlpool Canada LP designated service company or call 1-800-807-6777.
In the United States, Gladiator means Whirlpool Corporation, Benton Harbor, Michigan 49022. In Canada, Gladiator means
Whirlpool Canada LP, Mississauga, ON L5N 3A7.
Keep this book and your sales slip together for future
reference. You must provide proof of purchase or installation
date for in-warranty service.
Write down the following information about your Workbench to
better help you obtain assistance or service if you ever need it.
You will need to know your complete model number and serial
number. You can nd this information on the model and serial
label located on the back of the product.
Dealer name______________________________________________
Address___________________________________________________
Phone number_____________________________________________
Model number_____________________________________________
Serial number _____________________________________________
Purchase date_____________________________________________
4/20
Table of contents
Other Gladiator Tools Storage manuals

Gladiator
Gladiator VERSATOP Series User manual

Gladiator
Gladiator GAAC27HWGX User manual

Gladiator
Gladiator STEEL MODULAR GEARBOX CABINET User manual

Gladiator
Gladiator GAWB04HWJW User manual

Gladiator
Gladiator GAWB04HWEG User manual

Gladiator
Gladiator PREMIER GAMT41HWJG User manual

Gladiator
Gladiator GACP15XXMG User manual

Gladiator
Gladiator GCB100 User manual