AUSTIN SCIENTIFIC M600 User manual

TABLE OF CONTENTS:
1. FEATURES
2. DESCRIPTION
3. TECHNICAL SPECIFICATION
3.1 SUMMARY SHEET
3.2 OPERATING AND COOLANT CONDITIONS
3.2.1 OPERATING CONDITIONS
3.2.2 COOLANT CONNECTIONS
3.2.3 COOLANT QUALITY
3.3 ELECTRICAL CONNECTION
3.3.1 POWER INPUT
3.3.2 MAIN CABLE AND LEADS
3.3.3 COLD HEAD CONTROLS
3.3.4 AUTO RESTART FUNCTION
4. INSTALATION
4.1 UNPACKING AND INSPECTION
4.2 MOUNTING
4.2.1 OPERATING ANGLE
4.2.2 FLEXLINES AND CONNECTIONS
4.2.3 COLD HEAD CONNECTION
5. OPERATION
5.1 SWITCHING ON
5.2 NORMAL OPERATION
5.3 SAFETY DEVICES
6. MAINTANANCE AND SERVICE
6.1 ABSORBER REMOVAL
6.2 HELIUM PRESSURE ADJUSTMENT
7. TROUBLE SHOOTING
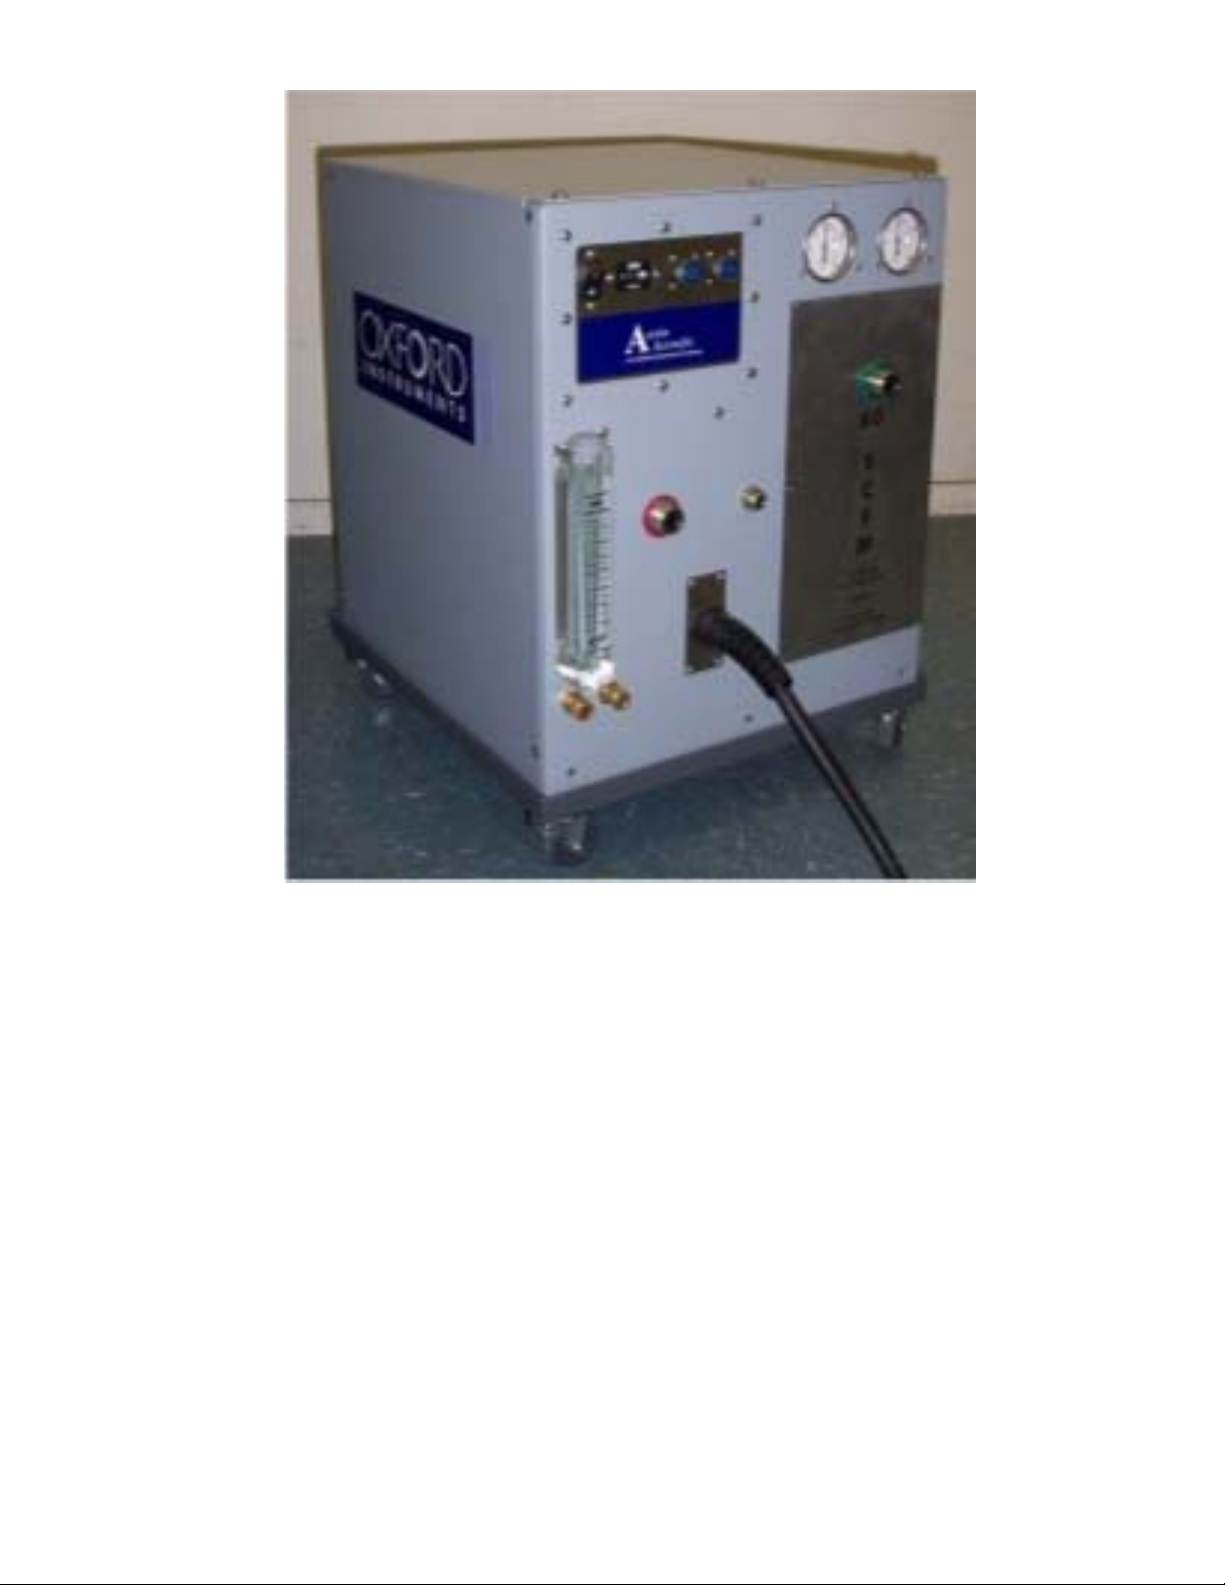
1. MAIN FEATURES
• Absorber can be replaced from the front of the unit,
permitting convenient rack or cabinet installation.
• Both high and low side pressure gages.
• Electrical box is a field replaceable unit.
• High and low voltage units available for use at both 50 Hz
and 60 Hz.
• Water flow meter provides user feedback to ensure adequate
water supply.
• Compressor can be controlled remotely.

2. DESCRIPTION
Compressed helium is used as a refrigerant when trying to achieve
cryogenic temperatures (as low as 4 Kelvin). The high-pressure helium is
delivered from the compressor to a cold head through the supply line (300-350
psi). The helium is expanded in the cold head to produce a temperature drop.
The cold head uses a motor and a piston like “displacer” to move the expanded
helium though regeneration materials to increase the thermodynamic efficiency of
the cycle. After expansion, the helium returns to the compressor through the
return line (50-100 psi). Theses magnets operate at cryogenic temperatures and
the chilled radiation shield helps maintain these temperatures.
The compressor itself consists of five main components: The compressor
capsule, the heat exchanger, the mist separator, absorber, and volume tank.
Compressing helium generates a large amount of heat. To remove this
heat from the compressor, oil is mixed into the helium as it is being compressed.
The compressor removes most of the oil from the helium stream before it leaves
the capsule. The oil is then pumped (by the differential pressure generated by the
compressor) out of the compressor, through the water-cooled heat exchanger, and
then back to the compressor.
The heat exchanger is a brazed, flat plate heat exchanger. It has two
circuits for hot fluids. One is for the oil (as mentioned above). The other circuit
is for the helium. Removing the heat of compression from the helium makes it
better able to chill the cold head. The two hot fluids are cooled by water. The
water enters and exits the compressor from the front panel.
The helium leaving the compressor still has a small amount of oil mixed
with it. If this oil makes it to the cold head, it will freeze and foul the cold head.
The function of the mist separator and absorber is to remove this oil from the
helium stream. The mist separator is filled with fiberglass. Oil agglomerates on
the glass fibers, drops to the bottom of the separator and is plumbed back to the
compressor, again by differential pressure. The absorber is filled with activated
charcoal. This charcoal adsorbs the remaining oil from the helium stream. The
absorber eventually fills with oil and must be changed. A typical time between
replacements is 20,000 hours.
The volume tank is an empty tank that provides extra volume on the low
side of the system to keep the low side pressure from going negative when the
system is running.
There are a number of subsystems that support these five main
components. There is an electrical box that contains the power and diagnostic
electronics and provides a user interface. The compressor electrical box also
supplies power to run the cold head motor though a connector on the front panel.
There are two thermostats attached to the plumbing lines that open should
temperatures get out of range. There is a solenoid valve that opens when the
compressor shuts down, providing a passage between the high and low side,
equalizing the two.

Flow diagram of the compressor system

3. TECHNICAL SPECIFICATION
3.1 SUMMARY SHEET
COMPRESSOR SPECIFICATION UNITS M600-HV M600-LV
VOLTAGE REQUIREMENTS (±10%)
50HZ-3 PHASE V 400 200
60HZ-3 PHASE V 460 230
POWER REQUIREMENTS
50HZ-3 PHASE KW 8.2 7.5
60HZ-3 PHASE KW 8.8 7.8
OPERATING CURRENT WITH WARM COLD HEAD
50HZ A 10 21
60HZ A 10 21
REMOTE CONTOL VOLTAGE VAC 24 24
HELIUM CONNECTORS IN ½”
Aeroquip
Same
STATIC HELIUM PRESSURE
50HZ PSI (bar) 240(16.5) 240(16.5)
60HZ PSI (bar) 240(16.5) 240(16.5)
458
18.0
532
21.0
441
17.4

RETURN HELIUM PRESSURE
50HZ PSI (bar) 50 50
60HZ PSI (bar) 50 50
SUPPLY HELIUM PRESSURE
50HZ PSI (bar) 280 280
60HZ PSI (bar) 300 300
COOLANT DATA
FLOW RATE (MIN) GPM 1.5 1.5
MIN. INLET TEMPERATURE °F(C) 40(5) 40(5)
MAX. INLET TEMPERATURE °F(C) 85(30) 85(30)
WEIGHT Lb(kg) 230(105) 230(105)
3.2 OPERATING AND COOLANT CONDITIONS
3.2.1 OPERATING CONDITIONS:
When the compressor is operating, the ambient temperature must
remain between 40°F and 104°F (5°C and 40°C).
3.2.2 COOLANT CONNECTIONS:
The standard connections on this compressor, for the coolant system,
are 3/8” Swagelok connectors. Connections can be modified to meet
customer requirements.
3.2.3 COOLANT QUALITY
Heat exchanger manufacturer recommends 1200-840 micron strainer
on water supply and the following water requirements:
Electrical conductivity: >50 µS/cm
Iron: <1.5 mg/l
Manganese: <0.5 mg/l
Ammonia: <2 mg/l
pH value: 6 – 9
Chloride: <100 mg/l
Free carbon acid: <20 mg/l
Nitrate: <100 mg/l
Sulphate: <50 mg/l
Sulphide: 0 mg/l

3.3 ELECTRICAL CONNECTIONS
3.3.1 POWER INPUT
The power input can be adjusted to accommodate the different volt
outputs from the customer.
3.3.2 MAIN CABLE AND LEADS
Production units can be fit with a variety of cord lengths and
connectors. Which polarized connector, if any, are to be fitted to
production units is yet to be determined.
3.3.3 COLD HEAD OUTPUT
The stock compressor will have the ability to control Austin
Scientifics’ cold heads. Compressors can be easily fitted with a wide
variety of cold head drives, connectors and cables to meet customer
requirements.
3.3.4 AUTO RESTART FUNCTION
Our unit will have an automatic restart with brownout or blackout in
power, when power is reapplied to the system. A manual reset will be
necessary for a unit that stops operating with a fault condition.
3.4 MULTI-CRYO SYSTEMS
3.4.1 COMPRESSOR CAPACITIES
The stock compressor has the ability to supply multiple cold heads.
Compressors can be operated with various Cryopump configurations.
Using Helium hose manifolds and drive cable Splitter Boxes to meet
customer requirements.
3.4.2 CRYOPUMP CONFIGURATIONS
The M600 is capable of operating cryopumps in the following
configurations.
1. Up to Three (3) CP-8’s.
2. Two (2) CP-10’s, or one CP-10 & one CP-8
3. One (1) CP-16

4. INSTALLATION
4.1 UNPACKING AND INSPECTING
Once the units have been received, examine the packaging for signs of
damage. This type of packing is reusable for these compressors.
Unpack the equipment and verify that no damage has occurred in
transit. Check the tip and tell devices and the pressure gauges for
signs of mishap during transit. The tip and tell device should insure
that the unit has not been transported at an angle greater than 45° and
the pressure gauges should read 240psi±10%.
The unit comes with a removable castor frame. We have the option to
install feet, castors or rails, depending on the customer requirement.
If damage is detected contact the carrier and Austin Scientific as soon
as possible.
4.2 MOUNTING
4.2.1 MAX OPERATING ANGLE
The compressor unit can be installed and operate with a
maximum tilt of 10° in any direction.
4.2.2 FLEXLINES and CONNECTORS
The lines and connectors have been equipped with self-sealing
coupling, this maintains the positive seal so no helium can
escape during any maintenance.
These couplings should never see oil or grease and before any
installation check all connections for foreign material and clean
if necessary. Verify that all flat seals on the male connectors
are in good condition and replace if necessary.
Work with the flex lines only if the compressor switch is in the
off position and the internal pressure is below 400psi.
Never twist the flex lines.
Tighten down coupling as far as possible and then back it off by
¼ of a turn.

4.2.3 CONNECTING THE COLD HEAD
Connect the flexline from the compressor supply; this is marked
with a green washer, to the inlet of the cold head. Then connect
the flexline from the compressor return; this is marked with a
red washer, to the outlet of the compressor. This can be
changed with customer requirement.
Crossing the connection on the cold head will cause damage to
the internals of the cold head.
With the appropriate cable supplied from Austin Scientific,
complete the connections form the compressor electronic box to
the electrical connection on the cold head. This will supply
power and logic to the cold head.

5. OPERATION
5.1 SWITCHING ON
Turning the compressor on will automatically start the compressor
and cold head. It is not recommended to run a compressor without all
the proper connections verified.
5.2 NORMAL OPERATION
The helium used for this compressor must be ultra high pure quality
(99.9999% pure) any impurities can cause problems inside the cold
head that the compressor is controlling.
5.3 SAFETY DEVICES
The unit is fitted multiple safety devices:
An external pressure relief valve
A thermal switch on the oil temperature
A thermal switch on the helium temperature
Fuses for the main power
Fuses for the cold head
An internal pressure relief valve
Electronic Phase monitoring device
Motor overload and thermal switch for the compressor

6 MAINTANENCE AND SERVICE
Before any service verify that the power has been removed from the
system
6.1 ABSORBER REMOVAL
The service interval of the absorber of the M600 is 20,000 hours (27.4
months).
The M600 absorber has been placed at the front of the unit, behind a
removable cover, to facilitate replacement. Absorber replacement
should take about 15 minutes. This is ideal for rack and rail mounted
compressor units.
6.2 HELIUM PRESSURE ADJUSTMENTS
The helium charge can be increased or decreased by using the ¼” self-
sealing connector on the front of the unit, this connection is marked
by a white washer.
Never charge the compressor above a static pressure of 250psi
(17.2bar)
7. TROUBLE SHOOTING
For any trouble or questions installing and operating the M600 unit
please contact the service department of Austin Scientific at:
Austin Scientific
Phone (512) 441-6893 x 112
Fax (512) 443-6665

RETURNING EQUIPMENT
Before returning any equipment, please contact Austin Scientific to receive special
instructions and to obtain a Return Good Authorization (RGA) number.
Austin Scientific
4114 Todd Lane
P.O. BOX 18863
Austin, TX 78760
(512) 441-6893
FAX (512) 443-6665
Austin Scientific
West Coast Service Center:
500 Laurelwood Road #9
Santa Clara, CA 95054
(408) 496-0782
FAX (408) 469-0785
PM1
REMOTE
SWITCH
AB
2
A
A
BC
C
B
3
1
DE
E
D
F
F
RED
13
TS1
R2
2
ETM
24V
TS2
M2
14
M2 R1
O. L.
TD1
3
1
F6
T3
S1
12 8
S2
K1
13 K1
F4
480V
415V
230V
380V
F5
208V
SW1
L1 L2
WHT
BLK
5
9
K1
14
BLK
RED
WHT
M2
PM1
4
L3
3
5
M1
F2
F1
NCBA NCBA
123 4 12
34
T2 T1
YEL
14
13
18
96
95
Notes:
1. Each E-Box must be fuctionally
tested prior to receipt
D
C
B
A
A
B
C
D
1
2
3
4
5
678
87654321
THE INFORMATION CONTAINED IN THIS
DRAWING IS THE SOLE PROPERTY OF
AUSTIN SCIENTIFIC. ANY REPRODUCTION
IN PART OR AS A WHOLE WITHOUT
THE WRITTEN PERMISSION OF
AUSTIN SCIENTIFIC IS PROHIBITED.
PROPRIETARY AND CONFIDENTIAL
NEXT ASSY USED ON
APPLICATION
DIMENSIONS ARE IN INCHES
TOLERANCES:
SURFACE FINISH 32RMS OR BETTER
ANGULAR: MACH 1° BEND 2°
TWO PLACE DECIMAL .01
THREE PLACE DECIMAL .005
INTERPRET GEOMETRIC
TOLERANCING PER:
MATERIAL
FINISH
--
--
DRAWN
CHECKED
ENG APPR.
MFG APPR.
Q.A.
COMMENTS:
DATE NAME AUSTIN SCIENTIFIC
TITLE:
SIZE
B
DWG. NO. REV
SHEET 1 OF 2
WEIGHT:
SCALE: 1:1.5
REVISIONS
REV. DESCRIPTION DATE APPROVED
UNLESS OTHERWISE SPECIFIED:
ECO
0000 CRK
11/22/02
RELEASE SCHEMATIC
A
93-00001-011 B
ELECTRIC BOX, LV, M600,
ASC DRIVE
B
360 ADDED PG2, W/ TRANS MOUNT NOTE 8/31/04 JAM
B.V.
8/31/04
7/24/02 CRK
This manual suits for next models
1
Table of contents
Popular Air Compressor manuals by other brands

RFC
RFC SL Series Technical manual

CVS
CVS RKL 160 Mounting instructions

GEA
GEA HG22P Series Assembly instructions

Campbell Hausfeld
Campbell Hausfeld FP2601 Operating instructions and parts manual

Craftsman
Craftsman evolv 921.167500 Operator's manual

Zgonc
Zgonc YELLOW PROFILINE YPL 183-2 KIT Translation from the original instruction manual


Chicago Pneumatic
Chicago Pneumatic CPVS 40 instruction manual

Huvema
Huvema BL 50 AIR manual

Sullivan-Palatek
Sullivan-Palatek 75UDG Operating and parts manual

Ozito
Ozito ACP-5020K instruction manual

Parkside
Parkside PKO 270 A4 Operating and safety instructions

Clarke
Clarke BOXER 55 Operation & maintenance instructions