TLC PLUS COMPRESSOR KIT
USER MANUAL
OPERATING INSTRUCTIONS
Your TLC PLUS is powered via the Battery Clips or Terminal Rings, and can be used as a portable or hard-
mounted to your vehicle using the respective attachments. To avoid draining your battery and assure the
compressor is getting the proper amperage, make sure your vehicle’s engine is running during operation,
especially if using for a prolonged period of time. Do not connect the Red Clip or Red Terminal Ring to any
power source other than the Positive (+) Terminal of your vehicle’s battery.
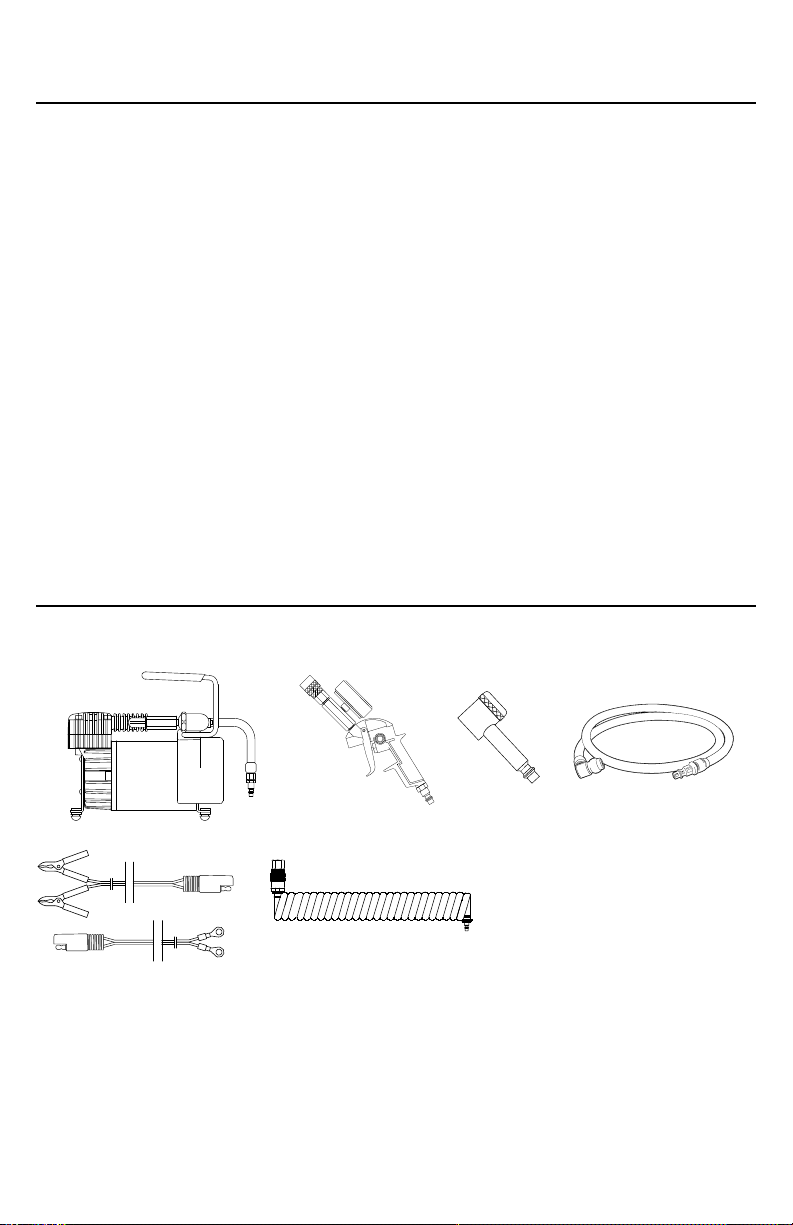
1 - CONNECTING TO THE BATTERY USING THE 2-PIN SAE BATTERY CLIPS
TheBatteryClipsoeraexiblewayofpoweringyourcompressorfromanyvehiclebysimplyclipping
them onto the battery terminals.
a. Make sure the compressor switch is in the OFF (O) position.
b.Makesurethevehicle’sengineandignitionareo.
c. Connect the Red Clip to the Positive (+) terminal of your battery.
d. Connect the Black Clip to the Negative (-) terminal of your battery, or other ground source.
e. Start the engine.
2 - CONNECTING TO THE BATTERY USING THE 2-PIN SAE TERMINAL RINGS
The Terminal Rings allow you to mount the compressor permanently to a vehicle and also provide a more
practical way of using it as a portable.
a.Makesurethevehicle’sengineandignitionareo.
b. Install the Red Terminal Ring on the Positive (+) terminal post of your battery, this can be done by
removing the nut that holds the clamp in place, installing the terminal ring, and re-tightening the
nut. Refer to your vehicle’s owner’s manual for help if needed.
c. Install the Black Terminal Ring on the Negative (-) terminal post of your battery or other
ground source.
d. Connect compressor power cord to the 2-Pin SAE terminal.
e. Start the engine.
3 - USING THE COMPRESSOR
Now that your vehicle is running, you’re ready to operate your TLC PLUS.
a. Connect the Coil Hose to the Quick Connect Stud on your TLC PLUS.
b.ConnecttheTLCInatortotheotherendoftheCoilHose.
c.TurnonyourTLCPLUSbyippingtheswitchtotheON(I)position.
d.ThecompressorwillrunbrieyandautomaticallyshutowhentheCoilHosehasbeenlledto
max pressure.
e. You’re now ready to perform your pneumatic tasks!
HARD-MOUNT INSTALLATION INSTRUCTIONS
a. Refer to section 2 of Operating Instructions and connect the battery Terminal Rings to your
vehicle’s battery.
b. Select a FLAT, UPRIGHT, AND SECURE location where the compressor can be mounted.
c. Route the compressor’s power cord to the terminal rings and connect using the SAE plug.
d. If it’s necessary to mount the compressor in a place beyond the power cord’s reach to the
Terminal Ring attachment, refer to the amp draw chart on the last page of this manual and use
appropriate gauge wire to extend your battery Terminal Ring attachments. When in doubt, always
use the next larger wire size.
IMPORTANT NOTE:
This compressor is moisture & dust resistant, but NOT DIRT OR WATERPROOF. Do not mount
compressor in locations where the unit is likely to come in contact with the elements.