AutoFull AF083 User manual

安装、使用家具前,请阅读使用说明书
微信扫一扫
获取安装视频
说明书出版日期:2021年3月20日
产品安装使用说明书
Assembling instruction
取扱説明書
Instructions d'Installation du Produit
Anweisungen zur Produktinstallation
Istruzioni per l'installazione del prodotto
Instrucciones de instalación del producto

安装注意事项 ( 请在安装前认真阅读 )
本产品体型大重量重,安装时请尽量2人协助安装。
安装前请认真确认各个部件的数量。
为了保护地板,请在柔软的地板上或软的布上进行安装。
安装时为了避免受伤,建议您带上手套。
请注意,气压杆一旦安装上,就比较难再拆除。如果搬家等需要拆除的情况,请用橡胶头
的锤子多次轻轻的敲打气压杆的底部,用震动的原理,把气压杆和五爪分离。因此需要使
用工具来完成所以请小心不要受伤。
( 此作业引起的商品破损、事故不属于产品保障范围之内,请小心操作 )
1
2
3
4
5
使用注意事项
清扫打理时,请用柔软的布进行擦拭。
产品的功能使用,请阅读使用说明书。
请避免在潮湿或有烟火的地方使用,请避免阳光直射。
请不要踩在椅子上或用来当作梯子使用,有引起翻倒的危险。
请注意,本产品仅限一个人使用。两人以上使用会破坏产品的稳定性,具有一定危险。
为了您的安全,严禁拆解气压杆。
1
2
3
4
5
6
1 2
说明书中的产品、配件等配图均为示意图,仅供参考。由于产品的更新和升级,
产品实物与示意图可能略有差异,请以实物为准。若有疑问,请详询客服。
P01-P08
P09-P16
P17-P24
P25-P32
P33-P40
Ltaliano
Español
P41-P48
P49-P56
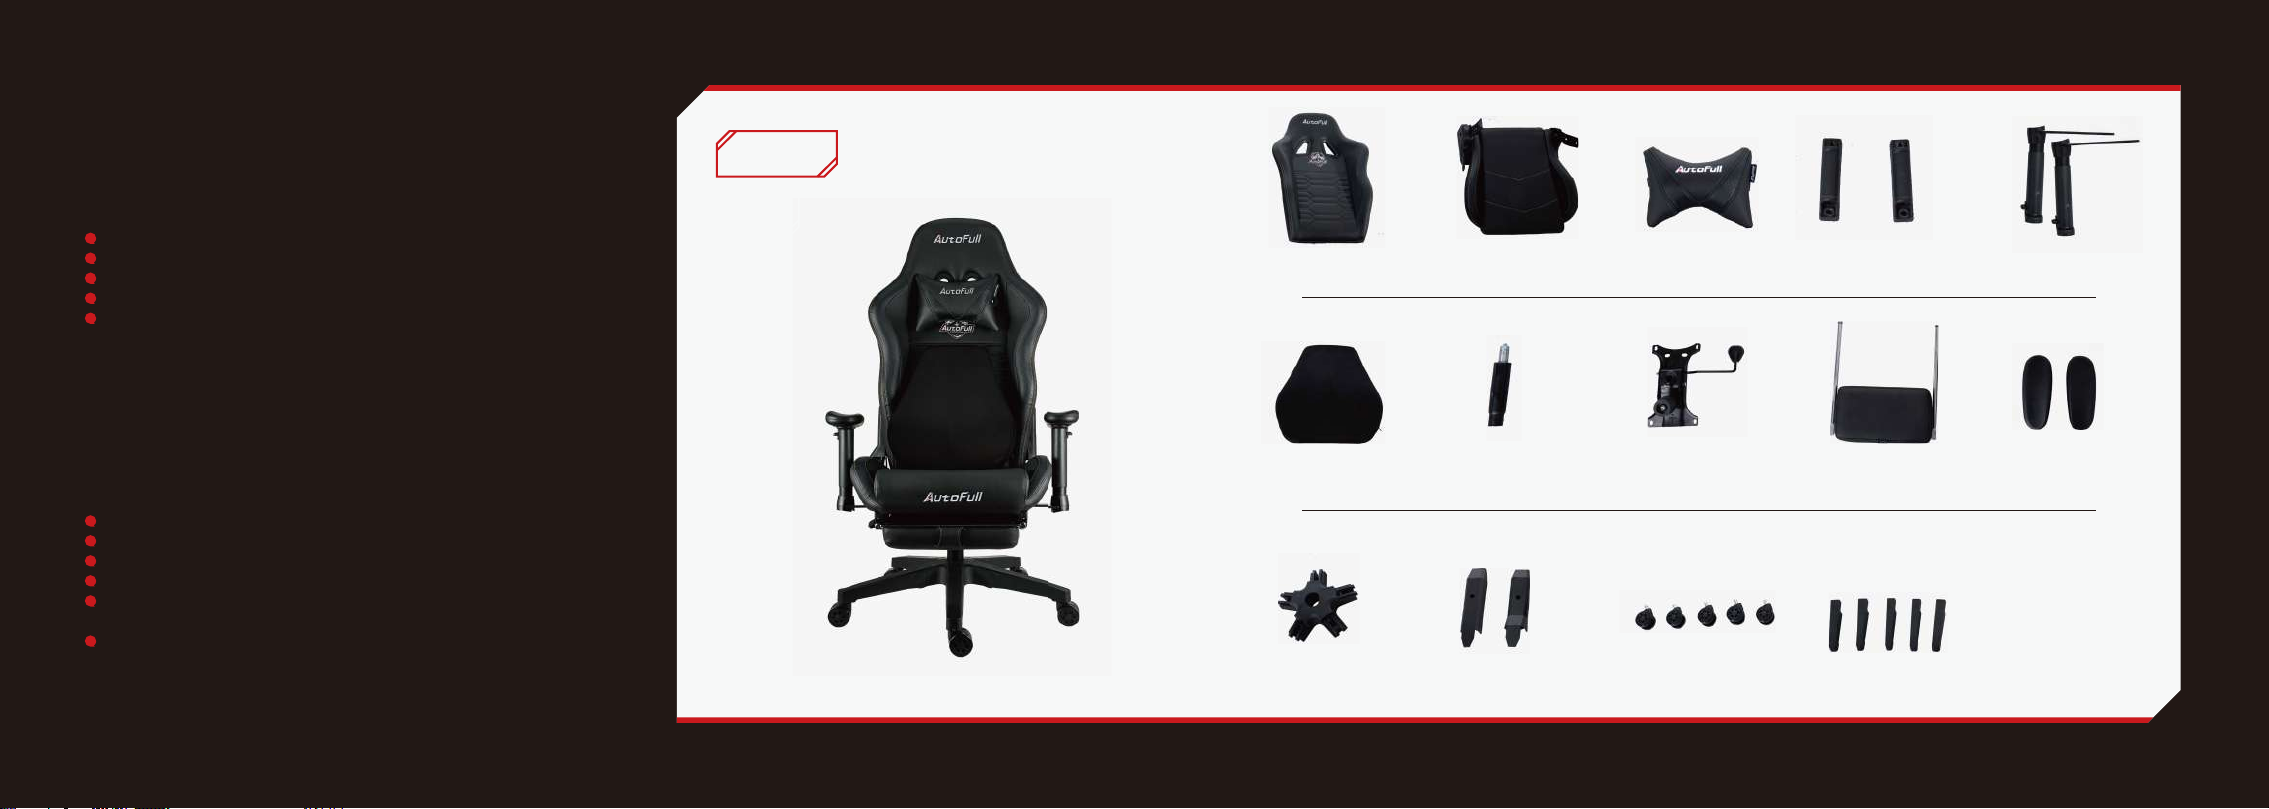
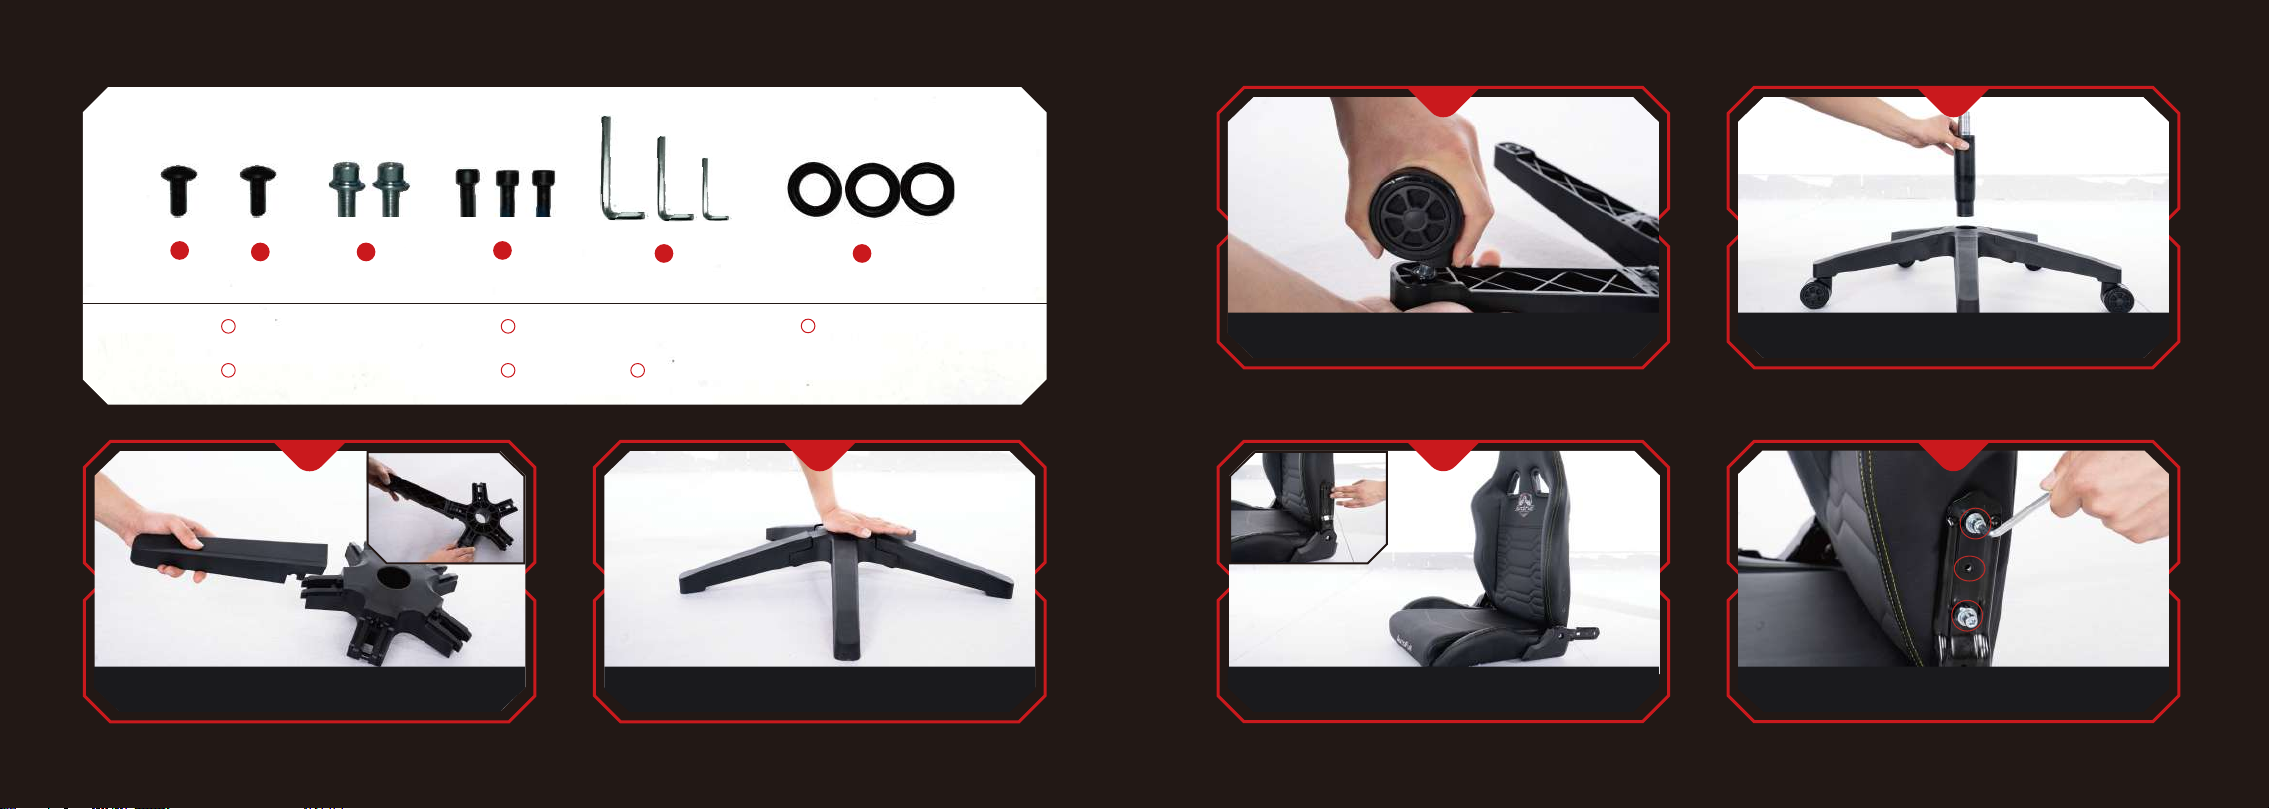
五爪×1 调角器壳×2
脚托滑块×2 扶手柄×2
椅轮×5
腰枕×1 气压杆×1
靠背×1 坐垫×1 头枕×1
底盘×1 脚托×1 扶手面×2
AF083
名称:傲风电竞椅
型号:AF083系列
执行标准:QB/T 2280-2016
产品生产日期:见底盘条形码
甲醛释放量≤0.120mg/㎡h
TVOC≤0.5mg/㎡h
靠背接触面材质及特征:耐水解PU
坐垫填充物材质及特征:高密度定性棉,高回弹 五爪臂×5

3 4
1
3
2
4
2 3 4
配件表 备用螺丝(M8×20mm)×1
备用螺丝(M8×30mm)×1 调角器螺丝(M5x16mm)x2
5
5扳手×2
1
4
2
5
配件表 备用搁脚滑块(M6x16mm)x1 备用扶手面螺丝(M6×16mm)×1
调角器螺丝(M5×16mm)×3 扳手x3 6橡皮圈x3
3备用螺丝(M8×25mm)×2
把五爪臂C型缺口对准五爪核心边缘的圆柱,向上搬动扣上,依次装上5个五爪臂
01
五爪正面朝上,使劲向下按压五爪核心
02
把椅轮装进椅脚
03
把气压杆插入五爪孔
04
拧下靠背螺丝,并把靠背如图放置。
05
用靠背螺丝固定靠背
靠背螺丝
调角器外壳螺丝
靠背螺丝
(注:先把主调角器(有手柄的一侧)的上方孔位对准,4个靠背螺丝依次对准孔位后再拧紧)
06
12 3 45 6

5 6
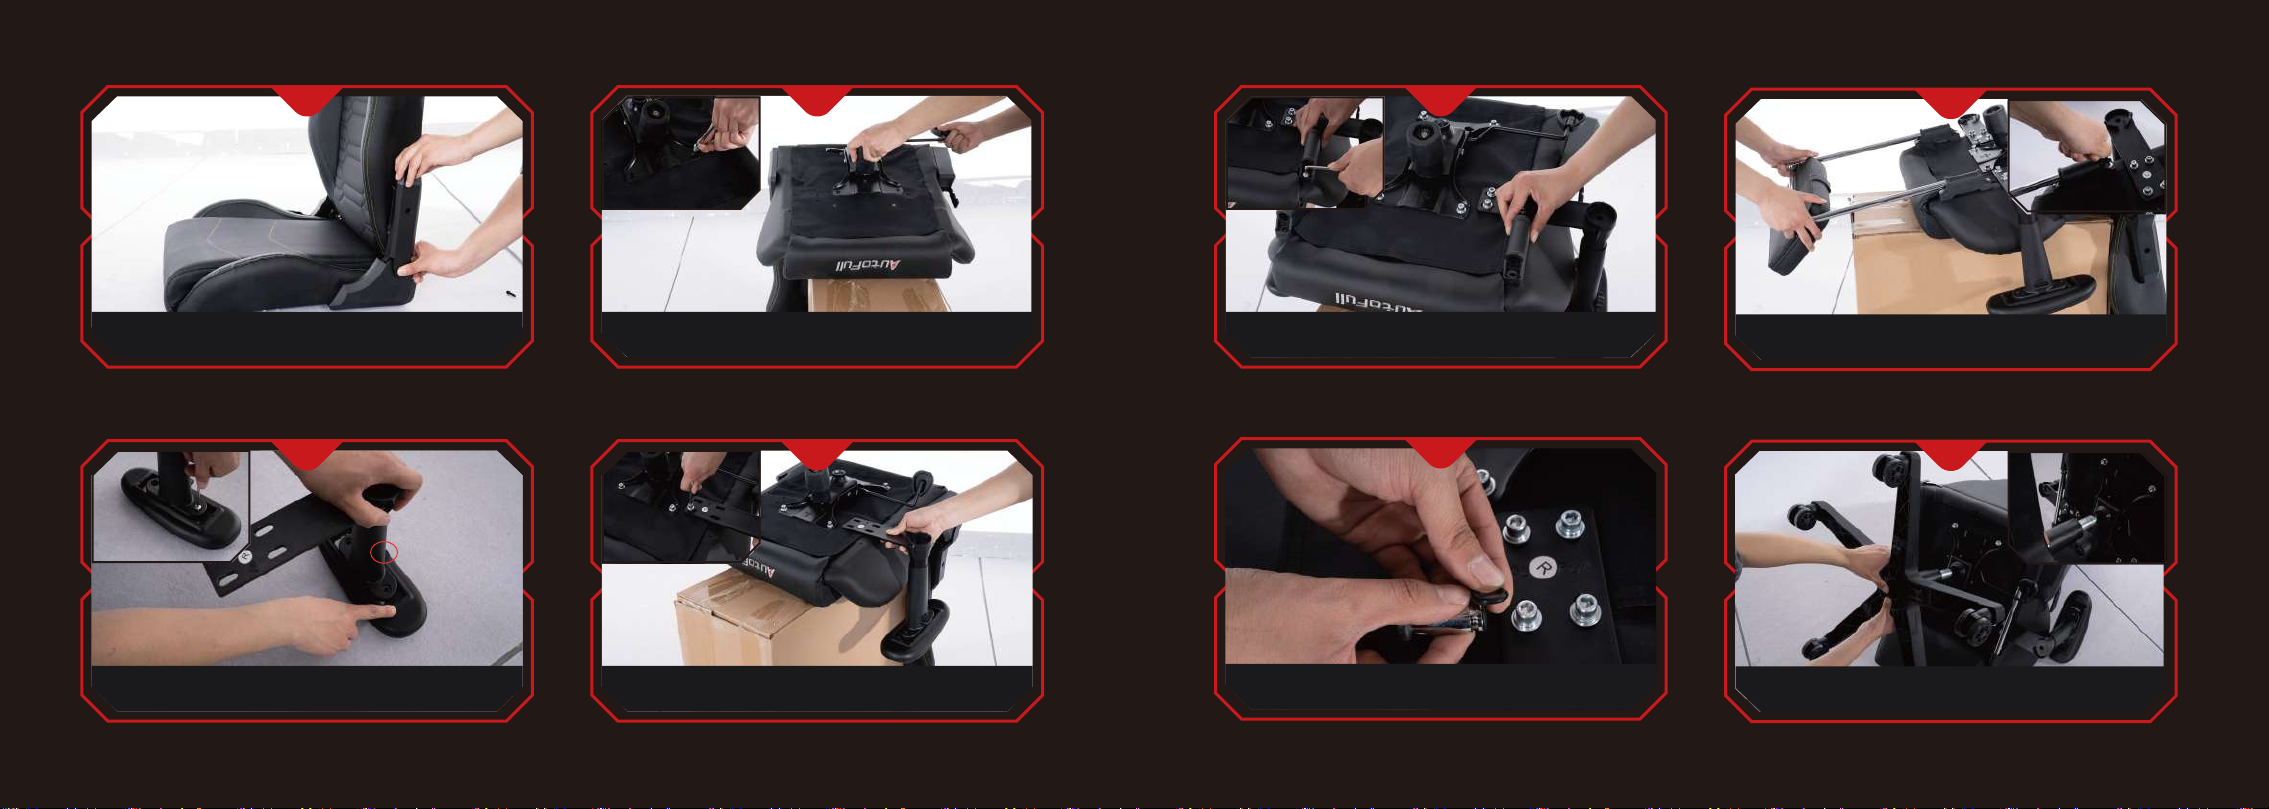
先把调角器外壳对准坐垫卡扣,用力拍下并用调角器螺丝固定
07
如图放上底盘,并用底盘螺丝固定
08
将扶手面预装螺丝拆下后,用螺丝将扶手面和扶手柄装在一起
09
把坐垫上的扶手预装螺丝拆下后,将扶手如图放置,并用扶手螺丝固定
10
11
拧下预装螺丝,脚托滑块如图放置,拧上脚拖滑块螺丝
12
对准脚托滑块孔位,插入脚托,来回滑动几次
13
脚托插回坐垫,在滑竿顶部扣上橡皮圈
14
将之前组装好的五爪和气压杆插入底盘孔内
(注:等所有螺丝拧入1/3后,再全部拧紧;安装完毕之后,操作把手在人坐在椅子上右手的一侧)
(注:扶手面厚的一边与扶手柄升降开关在同一侧)
(注:四颗螺丝先不要完全拧紧) (注:滑动不卡涩时,把所有脚托滑块螺丝拧紧)
升降开关

7 8
升降功能
常见问题排查
人不坐在椅子上,上抬坐垫右下方底盘上的控制杆
,椅子就可以升高了。人坐在椅子上,上抬坐垫右下
方底盘上的控制杆,椅子就可以降低了。
底盘装反。请拆下底盘后更换安装方向,详见步骤8。
后躺功能
人坐在椅子上,人往后靠并往上扳动坐垫右方的手
柄,椅子就可以后躺,当躺到合适角度,放开手柄即
可锁定靠背;继续往上扳动手柄,人恢复坐姿,靠背
即可回弹。
安装完后发现椅子前倾
1
请参考步骤5和步骤6。如还有问题,请联系售后客服处理。
靠背安装不上
2
产品使用方法
立起椅子,使颈枕皮筋带穿过靠背眼睛扣,扣上卡扣
15
放上人体工学腰枕
16
说明书出版日期:2021年3月20日
1
Precautions for installation
(please read carefully before installation)
For the large size of this product, please try to assist 2 people during installation.
Please confirm the quantity of each component carefully before installation.
In order to protect the floor, please install it on a soft floor or a soft cloth.
To avoid injury during installation, it is recommended that you wear gloves.
Please note that once the Cylinder is installed, it is difficult to remove it. If you
need to disassemble, please tap the head of the Cylinder with a rubber-headed
hammer several times, and then remove the base. Then use the principle of
vibration to continue to gently tap the base. Therefore, you need to use tools to
complete it, so please be careful not to get injured.
(The product damage and accidents caused by this operation are not covered by the
product guarantee, please be careful)
1
2
3
4
5
Precautions for use
When cleaning, please wipe with a soft cloth.
Please read the instruction manual for the functional use of the product.
Please avoid using in damp or fire place. Please avoid direct sunlight.
Please do not step on the chair or use it as a ladder, there is a risk of overturning.
Please note that this product is limited to one person. The use of more than two
people will destroy the stability of the product and have certain risks.
For your safety, it is strictly prohibited to disassemble the Cylinder.
1
2
3
4
5
6
9 10
The product, accessories and other drawings in the manual are schematic diagrams for
reference only. Due to product updates and upgrades, the actual product and the schematic
may differ slightly, please refer to the actual product. If you have any questions, please
contact customer service.
Base core×1 Cover of the
recliner adjuster×2
Footrest slider×2 Armrest handle×2
Chair wheel×5
Lumbar Pillow×1 Cylinder×1
Backrest×1 Seat cushion×1 Headrest×1
Tilt mechanism×1 Footrest×1 Armrest surface×2
AF083
Base arm×5
3
11 12
1
3
2
4
2 3 4
配件表 备用螺丝(M8×20mm)×1
备用螺丝(M8×30mm)×1 调角器螺丝(M5x16mm)x2
5
5扳手×2
1
4
2
5
Accessories table
Spare screw for footrest slider
(M6x16mm)x1 Spare screw for armrest surface
(M6×16mm)×1
recliner adjuster screws
(M5×16mm)×3 Wrenchx3 6Rubber bandx3
3Spare screws
(M8×25mm)×2
Align the C-shaped notch of the base arm with the column at the edge of the base core,
move upward to buckle, and install 5 base arms in sequence
01
Put the base face up and press down firmly on the base core
02
Insert the chair wheel into the base
03
Insert the Cylinder into the base
04
Unscrew the backrest screw and place the backrest as shown
05
Fix the backrest with backrest screws(Note: first align the upper holes of the main recliner
adjuster
Backrest screw hole
Backrest screw hole
screw hole of the cover
of recliner adjuster
(Note: first align the upper holes of the main recliner adjuster (the side with the handle), and then tighten
the 4 backrest screws in sequence)
06
12 3 45 6

5
13 14
Buckle up the cover of the recliner adjuster as shown and fix it
with the recliner adjuster screws
07
Unscrew the pre-installed screws of the tilt mechanism, put on the tilt mechanism as
shown, and fix it with the tilt mechanism screws
08
Unscrew the pre-installed screws of the armrest surface, then fix the armrest surface and
the armrest handle with them
09
Unscrew the pre-installed screws of the armrest on the seat cushion, place
the armrest as shown, and fix it with the armrest screws
10
11
Unscrew the pre-installed screws of the footrest slider, place the footrest
slider as shown, and screw on the footrest slider screws
12
Insert the footrest into the footrest slider hole.Swipe it back and forth
several times
13
Insert the footrest back into the cushion, and put rubber bands on the top
of the sliding rod
14
Insert the assembled base and cylinder into the hole of
the tilt mechanism
(Note: After all the screws are screwed in 1/3, then tighten them all; after installation, the operating lever is
on the right side of the cushion when a person sits on the chair)
(note: the thick side of the armrest surface is on the same side as the handle lift switch)
(Note: Do not tighten the four screws completely) (Note: When the sliding is not jammed, tighten all the footrest slider screws)
Lifting switch

15 16
Lifting function
Troubleshoot
common problems
If the person is not sitting on the chair, the
chair can be raised by raising the lever on the
bottom right Tilt mechanism of the cushion. A
person sits in a chair, raise the lever on the
right Tilt mechanism of the seat cushion, and
then descends
The Tilt mechanism is reversed. Please remove
the Tilt mechanism and change its direction,
refer to step 8.
Reclining function
The person sits on the chair, the person leans
back and pulls the handle on the right side of the
cushion, the chair can lie back, when lying at a
proper angle, release the handle to lock the
backrest; continue to move the handle up, the
person recovers Sitting back, the backrest can
rebound
After the installation, found the
chair leaning forward
1
Please refer to step 5 and step 6. If you still have
problems, please contact after-sales customer service.
The backrest cannot be installed
2
Stand upright the chair and install the headrest as shown
15
Put on the lumbar pillow
16
Manual publication date: March 20, 2021
product instructions

1
1
組み立て上のご注意
組み立て作業は、2人以上でお行いください。
組み立てる前に、部品それぞれの数量をご確認ください。
床を傷つけないよう、柔らかい床や布の上にお組み立ちください。
お怪我をしないために、手袋をお使いください。
シリンダーを取り付けたら、取り除きにくいですので、引越し等の必要によって、椅子を解体する場合、ゴム先端の
ハンマーでシリンダーの先を数回軽くたたいてから支えをお取り除きください。それから、引き続きベースを軽くた
たき、震動の原理でそれを外します。工具を使用する必要があるため、けがをしないようにご注意ください。
( この作業による商品の破損、事故は製品保証の範囲ではありませんので、ご注意ください。 )
1
2
3
4
5
使用上のご注意
掃除する際は、柔らかい布でお拭きください。
製品の機能に関しては、取扱説明書をお読みください。
湿気、水気の多い或いは火気のある場所は避け、長時間の直射日光が直接当たらない場所にお置き
くだ さい 。
転倒の可能性があるため、椅子の上に立ったり、踏み台代わりに使ったりしないでください。
1人のみに使用限定、2人以上使用すると、製品の安定性を壊して危険性があります。
ご使用の安全を守るために、シリンダーをお取り除かないでください。
1
2
3
4
5
6
17 18
お取扱説明書の中の製品図、部品図などは模式図で、ご参考までにご覧ください。製品の改
良があったら、実物と見本は少し違っているかもしれないので、ご承知ください。何かご不
明の点があれば、お気軽に弊社のカスタマーサービスに詳しくお聞きください。
ベース核×1 角度調整蓋×2
フット レ スト スラ イ ダ ー × 2 アーム レストハ ンドル × 2
キャスター × 5
ランバ ーサポート× 1 ガスシリンダー × 1
背もたれ×1 座面×1 ヘッドレスト × 1
台座×1 ヘッドレスト × 1 アームレスト面×2
AF083
ベース脚×5

3
19 20
1
3
2
4
2 3 4
配件表 备用螺丝(M8×20mm)×1
备用螺丝(M8×30mm)×1 调角器螺丝(M5x16mm)x2
5
5扳手×2
1
4
2
5
附属品の詳細
フットレ スト ス ラ イダ ー 用 の 予 備 ボ ルト
(M6x16mm)x1 アームレスト表面用の予備ボルト
(M6×16mm)×1
角度調整ボルト (M5×16mm)×3 六角レンチx3 6輪ゴムx3
3予備用ボルト
(M8×25mm)×2
ベース脚のC字型の切り欠きを、ベース核の端にある支柱に合わせ、上に上げてバックルを締め、ベ
ース脚を順番に取り付けます
01
ベース脚を上に向け、ベース核を強く押し下げます
02
キャスターを差し込 みます
03
ガスシリンダ ー をベ ース 穴 に 差し込 み ます
04
背もたれボルトを取り外してから、背もたれを画像のように置きます
05
背もたれボルトで背もたれを締め付けます
背 もた れ の ボルト 穴
背 もた れ の ボルト 穴
角度調整蓋のボルト穴
(ご注意:まず、角度調整の上部の穴(ハンドルのある側)を合わせてから、4つの背もたれボルトを順番に締め付けます)
06
12 3 45 6

5
21 22
角度調整蓋を画像のように取り付けてから、調整ボルトで締め付けます
07
台座の取り付け済みボルトを取り外し、台座を画像のように置き、台座ボルトで締め付けます
08
アームレスト面の取り付け済みボルトを取り外し、ボルトでアームレスト面とアームレストハンドルを締
め付けます
09
座面とつながているアームレストボルトを取り外し、アームレストを画像のように置き、
アームレストボルトで締め付けます
10
11
取り付け済みボルトを取り外し、フットレストスライダーを画像のように置き、フットレ
ストスラ イダ ー ボ ルト を締 め 付 け ます
12
フット レ スト を フットレ スト スラ イ ダ ー の 穴 に 差 し 込 み 、何 回 か 往 復 し て み ま す 。
13
フットレストロッドの先に輪ゴムをはめます
14
ガスシリンダ ー を台 座 に 差し込 みます
(ご注意:すべてのボルトを1/3に締め付けた後、すべて締め付けます。取り付けました後、調節レバーは椅子の右側になり
ます)
(ご注意:アームレスト面の厚い側は昇降スイッチと同じ側にあります)
(ご注意:4本のボルトを完全にお締め付けないでください) (ご注意:スムーズに伸縮できたら、すべてのフットレストスライダーボルトを締め付けます)
昇 降 スイッチ

23 24
昇降機能
よくあ る 問 題
座面を上げたい時、腰を浮かせて、台座右下側のレ
バ ー を 上 げ ま す 。座 面 を 下 げ た い 時 、座 っ た ま ま 、同
じレバー を上 げます。
台座が逆に組み立てられた可能性がございます。手順8
をご確認ください。
リクライニング機 能
背もたれに背中をつけた状態で座面右側のレバーを上
げると、リクライニング機能がします。適切な角度になっ
たら、レバーを放して背もたれをロックします。
背もたれを戻したい場合、レバーを上げます。背もたれ
に背中を離れ、背もたれが戻ります。
組み立てました後、椅子が前傾し
ています
1
手順5と手順6をご参考ください。何かご不明な点がございまし
たら、カスタマーサービスセンターまでお問い合わせください。
背もたれは取り付けられません
2
ヘッドレストの帯を背もたれの目に通し、帯を締めます
15
ランバ ーサポートを置きます
16
取扱説明書の発行日:2021年3月20日
ご使用方法

1
25
Précaution d'Installation
(Veuillez lire attentivement avant l'installation)
Pour la grande taille de ce produit, essayez d'aider 2 personnes lors de l'installation.
Confirmez le nombre de chaque composante avant l'installation.
Afin de protéger le plancher, veuillez l'installer sur un sol doux ou un chiffon doux.
Il est recommandé de porter des gants lors de l'installation pour éviter des blessures.
Veuillez noter qu'une fois le vérin de gaz est installé, il est difficile à le retirer. Si vous
devez démonter la chaise, veuillez utiliser un marteau en caoutchouc pour frapper
doucement plusieurs fois à la tête du vérin de gaz, et retirez la base. Ensuite frappez
doucement au pied de la chaise pour le faire tomber en appliquant le principe de la
vibration. Attention de ne pas faire mal quand vous utiliser des outils pour compléter le
retrait.
(Dommage causé par cette opération, les accidents ne sont pas couverts par la garantie du
produit, veuillez faire attention)
1
2
3
4
5
PRÉCAUTIONS D'EMPLOI
Veuillez essuyer avec un chiffon doux lors du nettoyage.
Veuillez lire attentivement le manuel d'instruction concernant l'utilisation des fonctions
du produit.
Veuillez éviter d'utiliser ce produit dans des endroits humides ou pyrotechniques et
d'exposer ce produit aux rayons directs du soleil pendant une longue période.
Veuillez à ne pas marcher sur la chaise et à ne pas utiliser la chaise comme une échelle, il y
a un risque de renversement.
Veuillez noter que ce produit est pour une personne seulement,l'utilisation de ce produit
pour deux personnes ou plus endommagera la stabilité du produit et posera certains
risques.
Pour votre sécurité, il est interdit de démonter le vérin de gaz.
1
2
3
4
5
6
Le produit, les accessoires et les autres dessins du manuel sont des diagrammes schéma-
tiques pour référence uniquement. En raison des mises à niveau du produit, le produit réel
et le schéma peuvent différer légèrement, veuillez vous référer au produit réel. Si vous avez
des questions, veuillez contacter le service client.
26
Centre du pied×1 Coque de réglage
d'angle×2
Coulisse du repose-pied×2 Accoudoir×2
Roulette×5
Oreiller lombaire×1 Vérin de gaz×1
Dossier×1 Coussin×1 Appui-tête×1
Base×1 Repose-pied×1 Couverture de
l'accoudoir×2
AF083
Pied×5

3
27 28
1
3
2
4
2 3 4
配件表 备用螺丝(M8×20mm)×1
备用螺丝(M8×30mm)×1 调角器螺丝(M5x16mm)x2
5
5扳手×2
1
4
2
5
Vis de rechange pour la coulisse du
repose-piedde (M6x16mm)x1 Vis de rechange pour la couverture
de l'accoudoir(M6×16mm)×1
Vis de rechange pour le réglage
d'angle (M5×16mm)×3 Clé de visx3 6Élastiquex3
3Vis de rechange
(M8×25mm)×2
Alignez l'encoche en forme de C de l'accessoire du pied avec la colonne sur le bord du
centre du pied et bouclez-la vers le haut, puis installez les 5 accessoires du pied en
séquence.
01
Les pieds sont tournées vers le haut et appuyez fortement sur le
centre du pied.
02
Insérez les roulettes dans les pieds.
03
Insérez le vérin de gaz au centre du pied.
04
Dévissez les vis du dossier et placez le dossier comme indiqué
sur la figure.
05
Fixez le dossier avec les vis du dossier.
Trou de vis du dossier
Trou de vis du dossier
Trou de vis de coque
de réglage d'angle
(Remarque: alignez d'abord les trous supérieurs du réglage d'angle principal (le côté avec la poignée), puis
serrez les 4 vis du dossier dans l'ordre des trous)
06
Accessoires
12 3 45 6
5
29 30
Alignez d'abord la coque de réglage d'angle avec la boucle du
coussin, l'appuyez et fixez-la avec la vis de réglage d'angle.
07
Placez la base comme indiqué sur la figure et fixez-le avec les vis de base
08
Après avoir dévissé les vis préinstallées de couverture de l'accoudoir, utilisez les vis pour
assembler la couverture et l'accoudoir
09
Après avoir dévissé les vis préinstallées de l'accoudoir sur le coussin, placez
l'accoudoir comme indiqué sur la figure et fixez-le avec la vis de
l'accoudoir.
10
11
Placez la coulisse du repose-pied comme indiqué sur la figure et vissez la
vis de coulisse du repose-pied
12
Alignez la position du trou de la coulisse du repose-pied, insérez le repose-pied et faites-le
glisser plusieurs fois d'avant en arrière.
13
Insérez le repose-pieds dans le coussin, et bouclez
l'élastique sur le dessus de la tige.
14
Insérez la part du pied dans le trou de la base.
(Remarque: vissez toutes les vis au 1/3, puis serrez-les toutes; après l'installation, la poignée se trouve sur le
côté droit quand vous vous asseyez sur la chaise)
(remarque: le côté épais de la couverture est du même côté que le contrôle de montée et descente de
l'accoudoir)
(remarque: ne serrez pas complètement les 4 vis) (Remarque: Après le glissement en douceur, serrez toutes les vis de la coulisse du repose-pied)
Contrôle de montée
et descente

31 32
Fonction de levage
Résoudre les
problèmes courants
Montée - Lorsque vous quittez la chaise,
relevez le levier sur le côté droit.
Descente - Lorsque vous vous asseyez sur la
chaise, relevez le même levier.
La base est inversée. Veuillez retirer la base et
changer le sens de l'installation. Reportez-vous à
l'étape 8 pour plus de détails.
Fonction d'inclinaison
Appuyez votre dos contre le dossier, puis relevez
le levier sur le côté droit, le dossier commence à
s'incliner. Arrêtez de relever, l'inclinaison du
dossier est fixée. Relevez le même levier lorsque
votre dos quittez le dossier, et le dossier revient à
l'angle d'origine.
La chaise se penche vers l'avant
après l'installation
1
Veuillez référer aux étapes 5 et 6. Si vous avez encore
des questions, veuillez contacter le service après-ven-
te.
Le dossier ne peut pas être installé
2
Relevez la chaise, bouclez le lacet de l'appui-tête.
15
Mettez l'oreiller lombaire.
16
Date de publication du manuel: 20 mars 2021
Mode d'emploi

1
33 34
Hinweis zur Montierung
(Bitte lesen Sie den folgenden Text vor der Montage)
Dieses Produkt hat ein großes Gewicht. Bitte versuchen Sie, 2 Personen bei der Installation zu
unterstützen.
Bitte überprüfen Sie die Anzahl der Teile.
Montieren Sie das Produkt auf einem weichen Boden oder einem weichen Tuch, um eine
Beschädigung des Bodens zu vermeiden.
Bitte benutzen Sie Handschuhe, um Verletzungen zu vermeiden.
Achtung: sobald die Gasdruckfeder in den Sockel eingesetzt ist, lässt sie sich nur schwer
entfernen.Wenn die Gasdruckfeder entfernt werden muss, klopfen Sie zuerst den Kopf der
Gasdruckfeder mit einem Gummihammer und entfernen Sie dann den Sockel. Bitte gehen Sie
vorsichtig vor, um keine Teile zu zerbrechen.vibration. Attention de ne pas faire mal quand vous
utiliser des outils pour compléter le retrait.
(Alle durch Unterbrechung verursachten zerbrochenen Sachen sind nicht im Lieferumfang
enthalten unsere Wartungsverantwortung. Bitte gehen Sie vorsichtig damit um.)
1
2
3
4
5
Hinweis zur Verwendung
Verwenden Sie einen weichen Lappen, um Schmutz zu entfernen.
Bitte lesen Sie die Bedienungsanleitung, um die Funktionen zu nutzen.
Bitte vermeiden Sie nasse und pyrotechnische Orte, direkte Sonneneinstrahlung
vermeiden.
Treten Sie nicht auf den Stuhl und benutzen Sie ihn nicht als Leiter, da Sie sonst umfallen
können.
Bitte sitzen Sie nicht bei mehreren Personen gleichzeitig.
Zu Ihrer Sicherheit ist es strengstens verboten, den Gasdruckfeder zu demontieren.
1
2
3
4
5
6
Das Produkt, das Zubehör und andere Zeichnungen im Handbuch sind schematische Darstellungen,
die nur als Referenz dienen. Aufgrund von Produktaktualisierungen und -upgrades können sich das
tatsächliche Produkt und der Schaltplan geringfügig unterscheiden. Weitere Informationen finden Sie
im tatsächlichen Produkt. Bei Fragen wenden Sie sich bitte an den Kundendienst.
Fußmitte×1 Abdeckung des
Lehnverstellers×2
Fußstützenschieber×2 Armlehnengriff×2
Stuhlrad×5
Lendenkissen×1 Gaszylinder×1
Rückenlehne×1 Kissen×1 Kopfstütze×1
Kippmechanismus×1 Fußstütze×1 Armlehnenoberfläche×2
AF083
Fuß×5

3
35 36
1
3
2
4
2 3 4
配件表 备用螺丝(M8×20mm)×1
备用螺丝(M8×30mm)×1 调角器螺丝(M5x16mm)x2
5
5扳手×2
1
4
2
5
Ersatzschraube für
Fußstützenschieber (M6x16mm)x1 Ersatzschraube für
Armlehnenoberfläche(M6×16mm)×1
Einstellschrauben für die Liege
(M5×16mm)×3 Schraubenschlüssel x3 6Gummiband x3
3Ersatzschrauben
(M8×25mm)×2
Richten Sie die C-förmige Kerbe am Fußzubehör an der Säule am Rand der Fußmitte aus,
wickeln Sie sie ein und installieren Sie das 5-Fuß-Zubehör nacheinander.
01
Die Füße sind nach oben gedreht und drücken fest auf die
Fußmitte.
Setzen Sie das Stuhlrad in die Basis ein
03
Setzen Sie die Gasfeder in die Mitte des Fußes ein
04
Lösen Sie die Schrauben der Rückenlehne und positionieren Sie
die Rückenlehne wie in der Abbildung gezeigt.
05
Befestigen Sie die Rückenlehne mit den Schrauben der Rückenlehne.
Ersatzschraube zur
Winkeleinstellung
Ersatzschraube zur
Winkeleinstellung
Schraubenloch der
Abdeckung des
Verstellverstellers
(Hinweis: Richten Sie zuerst die oberen Löcher des Hauptwinkelverstellers aus (die Seite mit dem Griff) und
ziehen Sie dann die 4 Schrauben der Rückenlehne in der Reihenfolge der Löcher fest.)
06
02
Zubehör
12 3 45 6
5
37 38
Richten Sie zuerst die Winkeleinstellschale an der Schlaufe des Kissens aus,
drücken Sie sie nach unten und befestigen Sie sie mit der
Winkeleinstellschraube.
07
Platzieren Sie die Basis wie in der Abbildung gezeigt und befestigen Sie sie mit den
Basisschrauben
08
Nachdem Sie die vorinstallierten Schrauben der Armlehnenabdeckung gelöst haben,
montieren Sie die Abdeckung und die Armlehne mit den Schrauben
09
Nachdem Sie die vorinstallierten Schrauben der Armlehne am Kissen gelöst
haben, setzen Sie die Armlehne wie in der Abbildung gezeigt ein und
befestigen Sie sie mit der Armlehnenschraube.
10
11
Positionieren Sie den Fußstützenschieber wie in der Abbildung gezeigt und
ziehen Sie die Fußstützenschiebeschraube fest
12
Richten Sie die Position des Lochs im Fußstützenschieber aus, setzen Sie die Fußstütze ein
und schieben Sie sie mehrmals hin und her.
13
Schlingen Sie das Gummiband oben auf die Gleitstange
und setzen Sie die Fußstütze in das Kissen ein.
14
Führen Sie den Teil des Fußes in das Loch in der Basis ein.
(Hinweis: Schrauben Sie alle Schrauben 1/3 fest und ziehen Sie sie dann fest. Nach der Installation befindet
sich der Griff auf der rechten Seite, wenn Sie auf dem Stuhl sitzen)
(Hinweis: Die dicke Seite der Abdeckung befindet sich auf derselben Seite wie die Auf- und Absteuerung
der Armlehne)
(Hinweis: Ziehen Sie die 4 Schrauben nicht fest an) (Hinweis: Ziehen Sie nach dem sanften Gleiten alle Schrauben am Fußstützenschieber fest.)
Aufstiegs- und
Abstiegskontrolle
Table of contents
Languages:
Other AutoFull Indoor Furnishing manuals

Popular Indoor Furnishing manuals by other brands

FMD Furniture
FMD Furniture PENNY 5 Assembly instructions

Cooper Lighting
Cooper Lighting AMETRIX 1268 Specification sheet

Filippi 1971
Filippi 1971 VittEr PANCAKE manual

U-Line
U-Line H-3107 manual

Atlantic
Atlantic Gaming Desk Pro quick start guide

Safavieh Furniture
Safavieh Furniture Melvin DNS9200A quick start guide


Onespace
Onespace FREELEY 50-1010QA Assembly instructions

Ideal-Standard
Ideal-Standard T4107Y4 installation manual

Threshold
Threshold STUDIO McGEE Crystal Cove TGT30BK manual

Home Decorators Collection
Home Decorators Collection 1067 Accent Chair Use and care guide

NORTH STATES
NORTH STATES 5343 instructions

Sauder
Sauder Dakota Pass 419440 manual