manuals.online logo
Brands
  1. Home
  2. •
  3. Brands
  4. •
  5. Autopot
  6. •
  7. Lawn And Garden Equipment
  8. •
  9. Autopot AQUAvalve5 Auto5 Pot Instruction Manual

Autopot AQUAvalve5 Auto5 Pot Instruction Manual

Your Auto5
Set-up Guidelines
Simple care
guidelines
plants
Allow your
to
establish
before turning your
system
on
.
5
[email protected] I www.autopot-usa.com I +(1) 702 338 0373 [email protected] I www.autopot-usa.com I +(1) 702 338 0373
Ensuring that the AQUAvalve5 floods
and drains correctly
Care and maintenance
Making sure your AQUAvalve5 floods and
drains correctly is simply achieved and
only takes a few seconds.
Hold the AQUAvalve5 at eye level so that
you can see the silicone fitted to the top
float resting on the hole below it.
The silicone must create a tight seal when
touching the hole.
If it looks like it is not sitting parallel on the
hole below, simply lift the top float and
apply pressure to one side of the silicone,
drop the float and hold at eye level again.
Repeat the procedure if necessary.
At the end of your growing season, clean
the AQUAvalve5 using warm soapy water.
Using an old tooth brush will help.
The AQUAvalve5 is easily disassembled.
The top float will slide all the way across
and the bottom float is unclipped from its
pivoting position. The circular discs fitted to
the top float can also be removed by using
pliers to grip the raised point.
At this point is it advisable to remove the
silicones to avoid them being lost.
It is also handy to have a paper clip or pipe
cleaner to hand so that you can push it
through the AQUAvalve5 nozzle, this will
remove any lime scale build up that may
have occurred during the growing season.
Blowing through the AQUAvalve5 nozzle
will also help to remove any build up. Do
not under any circumstances use a drill &
drill bit to clear the AQUAvalve5 nozzle.
This will potentially damage the
AQUAvalve5 beyond repair.
11
2
2
3
4
Ensure the silicone is sitting parallel
on the hole below it. Hold at eye level
to check the position is correct
If you require any guidance email - [email protected]
Advice
Allow your plants to establish for 10-14 days before turning system on
Required Reservoir Capacity
• 1x Auto5 lid
• 1x 4ft x 4ft garden tray
• 1x round blue access cover
• 5x 9 gal fabric SpringPot
• 1x AQUAvalve5
• 1x AQUAvalve Cover
• 1x AQUAvalve PotSock
• 1x metal plate for PotSock
• 1x metre 3/8" piping
• 1x 3/8" top hat grommet
• 1x drill template
Auto5 Kit - contents Auto5 Setup
Advice
• Please note that multiple FlexiPots may increase room humidity due to the exposed surfaces of the fabric pots.
• Pot up your plants, water through, then allow your plants to establish in the pots for a period of 10 to 14 days before
turning your system on. This will encourage a stronger and healthier root system.
• Always raise your reservoir to a minimum of 6" above the highest AQUAvalve and re-fill the reservoir when there is
approximately a 1/3 of the solution left - NEVER ALLOW THE RESERVOIR TO RUN EMPTY.
• With AQUAvalve5 systems mineral or organic fertilisers may be fed via the reservoir and pipework. Organic
fertilisers will require a water pump in the reservoir running for 15 mins every 2 hrs and cleaning of the reservoir,
pump, and filter each time the reservoir empties. Flush pipework with plain water every time the reservoir empties.
• Clean all substrate from the bottom and sides of the pots before placing in trays to ensure AQUAvalve functionality.
• Always use free draining substrates, for example: soil/perlite, coco/perlite, soil/clay pebbles, coco/clay pebbles,
rockwool/clay pebbles.
FlexiTank or
FlexiTank Pro Capacity
Auto5
System Size
FlexiTank / Pro 25 gal 1x Auto5
FlexiTank / Pro 60 gal 2x Auto5
FlexiTank / Pro 105 gal 4x Auto5
FlexiTank 200 gal 8x Auto5
FlexiTank 265 gal 10x Auto5
Pot and Tray Dimensions
Auto5 No Pots - contents
FlexiTank and FlexiTank Pro are the only collapsible reservoirs
that AutoPot recommend for use with Auto5 Systems.
A minimum 25 gallon reservoir is required per unit.
[email protected] I www.autopot-usa.com I +(1) 702 338 0373
48"
48"
4.1"
15"
SpringPot
9 gal
15"
• 1x Auto5 lid
• 1x 4ft x 4ft garden tray
• 1x round blue access cover
• 1x AQUAvalve5
• 1x AQUAvalve Cover
• 1x AQUAvalve PotSock
• 1x metal plate for PotSock
• 1x metre 3/8" piping
• 1x 3/8" top hat grommet
• 1x drill template
Auto5 Basic - contents
• 1x Auto5 lid
• 1x 4ft x 4ft garden tray
• 1x round blue access cover
• 1x drill template
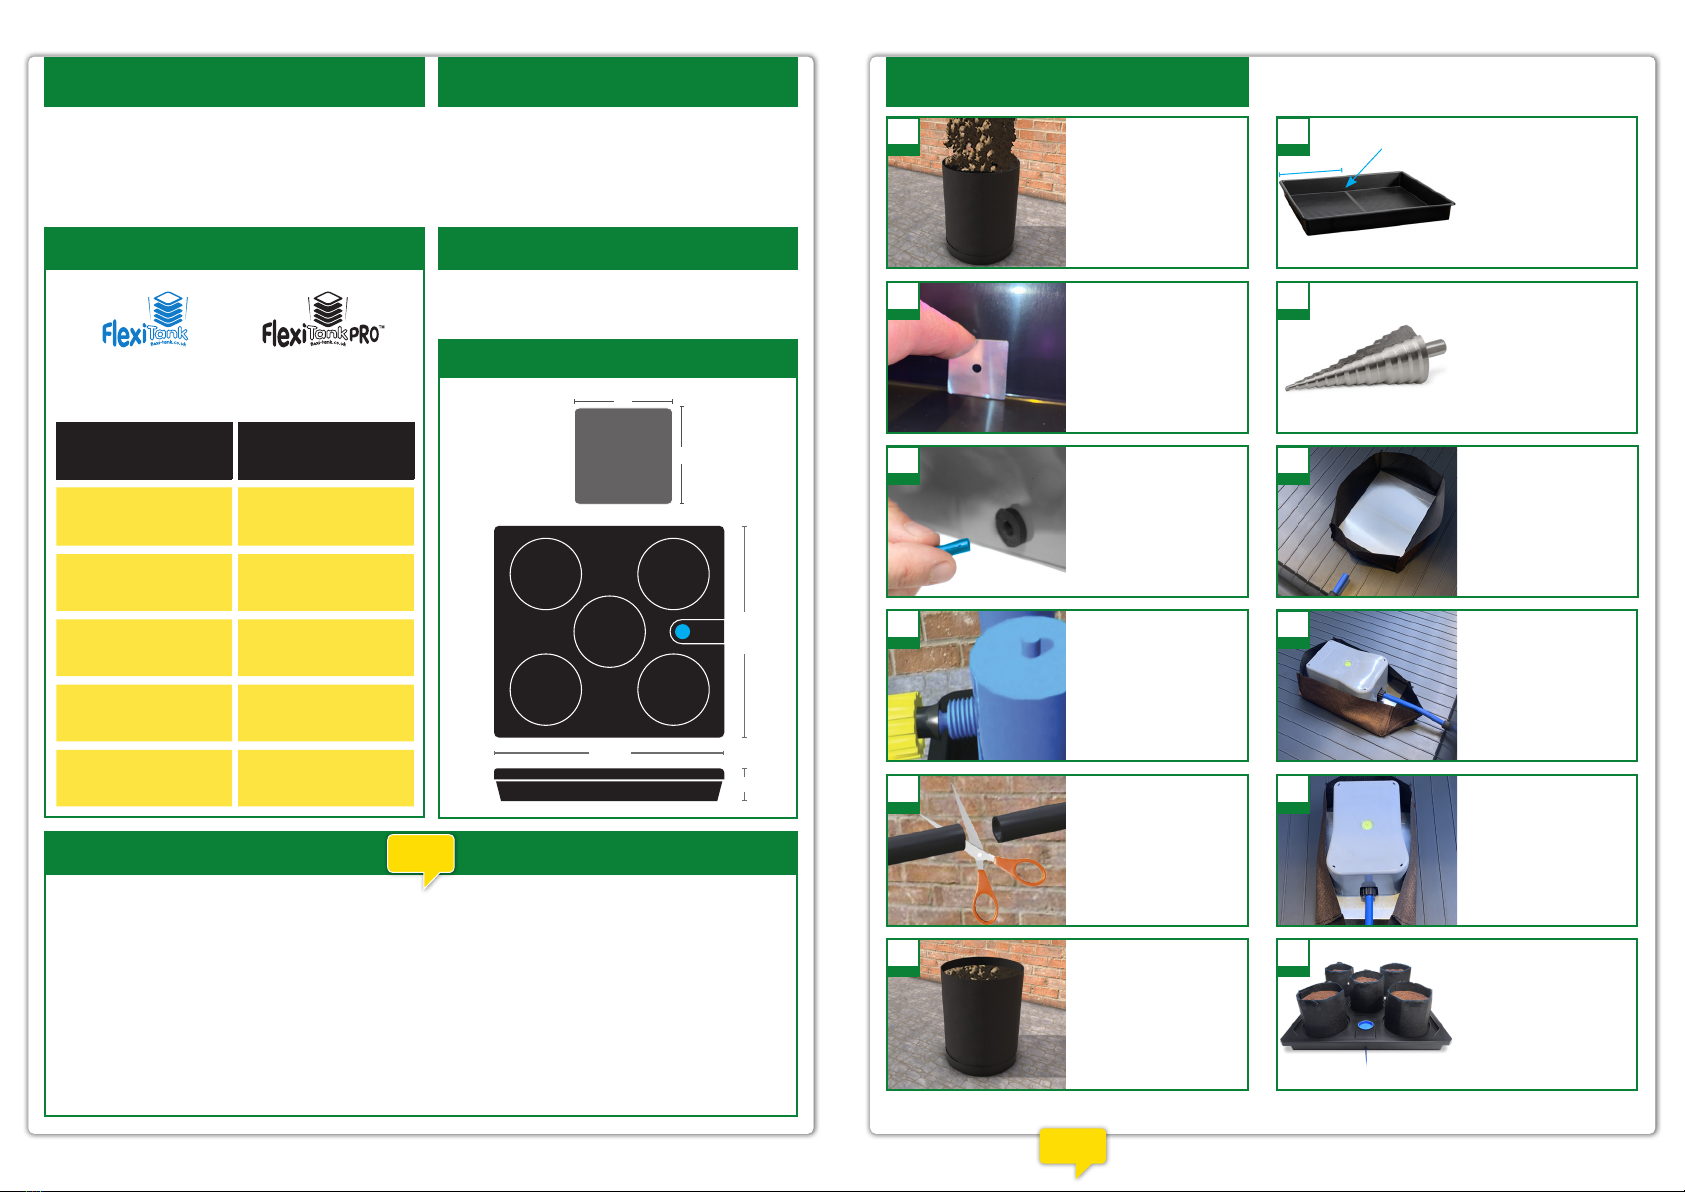
12 Make sure the system is
clean and free of debris.
Place the lid on top of the
tray. Insert the pots. Place
the round blue access
cover over the valve.
11
Brush down the pots to
ensure they are clean
and free of debris.
10 Remove any slack from 3/8"
pipe by drawing excess
pipe out of the tray.
Ensure that the circular spirit
level indicates the tray is
level, adjust if required.
9Taking the end of the 3/8"
pipe outside the tray, cut
to an appropriate length.
Connect via 3/8" / 1/2"
fittings to a filter (not incl.).
Connect filter to reservoir.
Leave tap off.
8
Place the connected
AQUAvalve on the metal
plate in the tray.
Place the AQUAvalve cover
over the AQUAvalve.
7Attach the AQUAvalve to the
3/8" pipe inside the tray.
Remove AQUAvalve collar.
Push pipe through collar and
attach to AQUAvalve nozzle.
Rescrew collar - DON’T
overturn... when you
feel it grip STOP.
6Place AQUAvalve PotSock
in the tray, copper side
facing out, shortest side
facing the tray wall, in
line with the 3/8" pipe.
Place metal plate
in the PotSock.
5From the outside of the
tray push 3/8" top hat
grommet into the 1/2" hole
in the Auto5 tray wall.
Thread 3/8" pipe into the
tray through the grommet.
4At the drilling position
use a STEP DRILL BIT
to drill from the inside
of the tray outwards.
Drill a 1/2" diameter
hole in the wall.
3At the marked halfway
point stand the drill
template upright against
the inside of the tray wall.
Mark drilling position in
centre circle of template.
24"
Mark here
2The garden tray requires
drilling for pipe access.
Measure to the halfway
point along any one of
the tray sides (24").
Mark halfway point on the
inside of the tray side.
1
Fill pots with medium
and pot up plants.
Water through pots
and allow to drain
outside the tray.

This manual suits for next models

1

Other Autopot Lawn And Garden Equipment manuals

Autopot AQUAvalve 48Pot User manual

Autopot

Autopot AQUAvalve 48Pot User manual

Autopot COCOMAT User manual

Autopot

Autopot COCOMAT User manual

Autopot SpringPot 6 Instruction Manual

Autopot

Autopot SpringPot 6 Instruction Manual

Autopot SpringPot 12 Instruction Manual

Autopot

Autopot SpringPot 12 Instruction Manual

Autopot easy2Propagate Instruction Manual

Autopot

Autopot easy2Propagate Instruction Manual

Autopot AQUAvalve5 1Pot Instruction Manual

Autopot

Autopot AQUAvalve5 1Pot Instruction Manual

Autopot SpringPot 9 Instruction Manual

Autopot

Autopot SpringPot 9 Instruction Manual

Autopot AQUAvalve easy2grow Kit User manual

Autopot

Autopot AQUAvalve easy2grow Kit User manual

Autopot AQUAvalve 4Pot system Instruction Manual

Autopot

Autopot AQUAvalve 4Pot system Instruction Manual

Autopot easy2GO Kit User manual

Autopot

Autopot easy2GO Kit User manual

Autopot SpringPot 36 Instruction Manual

Autopot

Autopot SpringPot 36 Instruction Manual

Autopot AQUAvalve 24Pot Instruction Manual

Autopot

Autopot AQUAvalve 24Pot Instruction Manual

Autopot Auto8 Instruction Manual

Autopot

Autopot Auto8 Instruction Manual

Autopot AQUAvalve5 SpringPot 60 Pot XL Instruction Manual

Autopot

Autopot AQUAvalve5 SpringPot 60 Pot XL Instruction Manual

Autopot AQUAvalve Instruction Manual

Autopot

Autopot AQUAvalve Instruction Manual

Autopot AQUAvalve5 Auto3 XL Instruction Manual

Autopot

Autopot AQUAvalve5 Auto3 XL Instruction Manual

Autopot Auto3 XL Instruction Manual

Autopot

Autopot Auto3 XL Instruction Manual

Autopot AQUAvalve5 SpringPot 24 Pot XL Instruction Manual

Autopot

Autopot AQUAvalve5 SpringPot 24 Pot XL Instruction Manual

Autopot SpringPot 16 Instruction Manual

Autopot

Autopot SpringPot 16 Instruction Manual

Autopot Auto 9 XL Instruction Manual

Autopot

Autopot Auto 9 XL Instruction Manual

Popular Lawn And Garden Equipment manuals by other brands

TRANSNECT BC108 user manual

TRANSNECT

TRANSNECT BC108 user manual

BC Northern Lights BloomBox manual

BC Northern Lights

BC Northern Lights BloomBox manual

Gardena 1407 operating instructions

Gardena

Gardena 1407 operating instructions

BC Northern Lights MotherShip Technical manual

BC Northern Lights

BC Northern Lights MotherShip Technical manual

Marolex TITAN 12 owner's manual

Marolex

Marolex TITAN 12 owner's manual

Agri-Fab Poly Lawn Roller 45-02671 owner's manual

Agri-Fab

Agri-Fab Poly Lawn Roller 45-02671 owner's manual

BAS technic 3297 quick start guide

BAS technic

BAS technic 3297 quick start guide

CAMPAGNOLA HOLLY Use and maintenance manual

CAMPAGNOLA

CAMPAGNOLA HOLLY Use and maintenance manual

Electris ELKC039PC Instructions for use

Electris

Electris ELKC039PC Instructions for use

Solo 518 instruction manual

Solo

Solo 518 instruction manual

Sears BugWacker 557-5199 owner's manual

Sears

Sears BugWacker 557-5199 owner's manual

Milwaukee TURBO-Pro Operator's manual

Milwaukee

Milwaukee TURBO-Pro Operator's manual

Prem-I-Air EH1357 user manual

Prem-I-Air

Prem-I-Air EH1357 user manual

juwel 20322 Assembly instructions

juwel

juwel 20322 Assembly instructions

FUTUR vert FM3 installation manual

FUTUR vert

FUTUR vert FM3 installation manual

Little Wonder 5612-12-01 Operator's & parts manual

Little Wonder

Little Wonder 5612-12-01 Operator's & parts manual

SNOWJOE AQUAJOE AJFJH100-58-MAX-RM instructions

SNOWJOE

SNOWJOE AQUAJOE AJFJH100-58-MAX-RM instructions

Protect GM20L USER MANUAL, INSTALLING AND OPERATING MANUAL

Protect

Protect GM20L USER MANUAL, INSTALLING AND OPERATING MANUAL

manuals.online logo
manuals.online logoBrands
  • About & Mission
  • Contact us
  • Privacy Policy
  • Terms and Conditions

Copyright 2025 Manuals.Online. All Rights Reserved.