manuals.online logo
Brands
  1. Home
  2. •
  3. Brands
  4. •
  5. Autopot
  6. •
  7. Lawn And Garden Equipment
  8. •
  9. Autopot easy2Propagate Instruction Manual

Autopot easy2Propagate Instruction Manual

www.autopot-usa.com easy2Propagate set-up guide
Your complete
plant production facility
easy2Propagate
Lid
easy2Propagate
Complete Kit
easy2Propagate
Extension Kit
easy2Propagate
Basic Kit
Simple care
guidelines
Ensuring that the AQUAvalve5 floods
and drains correctly
Care and maintenance
Making sure your AQUAvalve5 floods and
drains correctly is simply achieved and
only takes a few seconds.
Hold the AQUAvalve5 at eye level so that
you can see the silicone fitted to the top
float resting on the hole below it.
The silicone must create a tight seal when
touching the hole.
If it looks like it is not sitting parallel on the
hole below, simply lift the top float and
apply pressure to one side of the silicone,
drop the float and hold at eye level again.
Repeat the procedure if necessary.
At the end of your growing season, clean
the AQUAvalve5 using warm soapy water.
Using an old tooth brush will help.
The AQUAvalve5 is easily disassembled.
The top float will slide all the way across
and the bottom float is unclipped from its
pivoting position. The circular discs fitted to
the top float can also be removed by using
pliers to grip the raised point.
At this point is it advisable to remove the
silicones to avoid them being lost.
It is also handy to have a paper clip or pipe
cleaner to hand so that you can push it
through the AQUAvalve5 nozzle, this will
remove any lime scale build up that may
have occurred during the growing season.
Blowing through the AQUAvalve5 nozzle
will also help to remove any build up. Do
not under any circumstances use a drill &
drill bit to clear the AQUAvalve5 nozzle.
This will potentially damage the
AQUAvalve5 beyond repair.
11
2
2
3
4
Ensure the silicone is sitting parallel
on the hole below it. Hold at eye level
to check the position is correct
• 1x Clear easy2Propagate Lid with 4 x Fitted Vents
(Fits 47" x 21.5" Garden Tray – not included Lid Only option)
• 1x Clear easy2Propagate Lid with 4 x Fitted Vents
• 1x 47" x 21.5" Garden Tray
• 2x Coco Matting 23" x 20" x 1.2"
• 1x Root Control Sheet 46" x 20"
• 1x Clear easy2Propagate Lid with 4 x Fitted Vents
• 1x AQUAvalve5
• 1x AQUAvalve5 Cover
• 1x 3/8" Elbow Bar
• 1x 1/2" - 3/8" Tee Connector
• 1x 3/8" Tee Convertor
• 3.3' of 3/8" Piping
• 1x 47" x 21.5" Garden Tray
• 2x Coco Matting 23" x 20" x 1.2"
• 1x Root Control Sheet 46" x 20"
easy2Propagate Lid Only
easy2Propagate Basic Kit
easy2Propagate Extension Kit
• 1x Clear easy2Propagate Lid with 4 x Fitted Vents
• 1x 6.6 Gallon FlexiTank
• 1x 1/2" - 3/8" Click-Fit Adaptor and Filter
• 1x AQUAvalve5
• 1x AQUAvalve5 Cover
• 1x 3/8" Elbow Bar
• 5' of 3/8" Piping
• 1x 47" x 21.5” Garden Tray
• 2x Coco Matting 23" x 20" x 1.2"
• 1x Root Control Sheet 46" x 20"
easy2Propagate Complete Kit
Using easy2Propagate without AQUAvalve5 (Basic Kit)
Using easy2Propagate with AQUAvalve5 (Complete and Extension Kit)
• Place the CocoMat in the Garden Tray. Place the
root control sheet on top of the CocoMat – gold
face up.
• Now place small pots or seed trays on the surface
of the root control sheet. Ensure that the pots /
seed tray is flat based and allows the growing
media to make contact with the surface of the root
control sheet.
• Water through each seed cell or pot once from
the top to ensure that the capillary action starts
between the surface of the root control sheet and
the media at the bottom of the pot.
• Pour water into the tray until the CocoMat is 2/3
submerged.
• Place easy2Propagate Lid onto tray ensuring all
corners are fitted snugly.
• AQUAvalve5 is only supplied with easy2Propagate
‘Complete’ and ‘Extension’ Kits
• Cut a section out of one corner of the CocoMat using
heavy duty scissors, this is to allow a space for the
AQUAvalve5 and AQUAvalve5 cover to sit on the
Garden Tray.
• Cut a section out of the root control sheet to allow
access to the AQUAvalve5 and AQUAvalve5 cover.
• Place the CocoMat in the tray, place the root control
sheet on top of the CocoMat – gold face up.
• Place the AQUAvalve5 and AQUAvalve5 cover on the
surface of the tray in the space that you have cut out.
• Now place small pots or seed trays on the surface of
the root control sheet. Ensure that the pots / seed tray
is flat based and allows the growing media to make
contact with the surface of the root control sheet.
• Water through each seed cell or pot once from the top
to ensure that the capillary action starts between the
surface of the root control sheet and the media at the
bottom of the pot.
• Now connect your AQUAvalve5 to your reservoir, fill
the reservoir with water and add nutrients, if required.
• Place easy2Propagate Lid onto tray ensuring all
corners are fitted snugly.
Use heat pads under the tray or
propagation lights above it to warm
the water and create humidity.
Close vents to generate
temperature and humidity
Once the seedlings or cuttings
have rooted you can begin to
gradually open the vents.
1. We recommend a target temperature
of 70-80°F / 25-30°C with minimum
80% humidity.
Remember that young plants need less food than established ones.
Do not connect your easy2Propagate to an AutoPot Watering System that is also feeding established plants.
2. If you are using raised pots, such as terracotta
pots or bonsai pots, a small length of capillary
matting (not included) can be cut and pushed
inside the hole at the bottom of the raised pot.
The capillary matting will act as a wick.
When to begin opening
the vents
Once the vents are fully opened
leave for several days prior to
removing the lid.
Hardening off
Contents Setting Up the AQUAvalve5
Propagation Tips
Tips
!
Preparation
• When using CocoMats please note that they should be treated before use. Place the CocoMat in pH 4.5
water and keep fully submerged to soak for 24-48hrs. Then rinse and use with pH 5.5 water.
• Submerge the root control sheet in water for 30 minutes.
• To ensure that your plants receive full levels of light remove protective film from easy2Propagate Lid
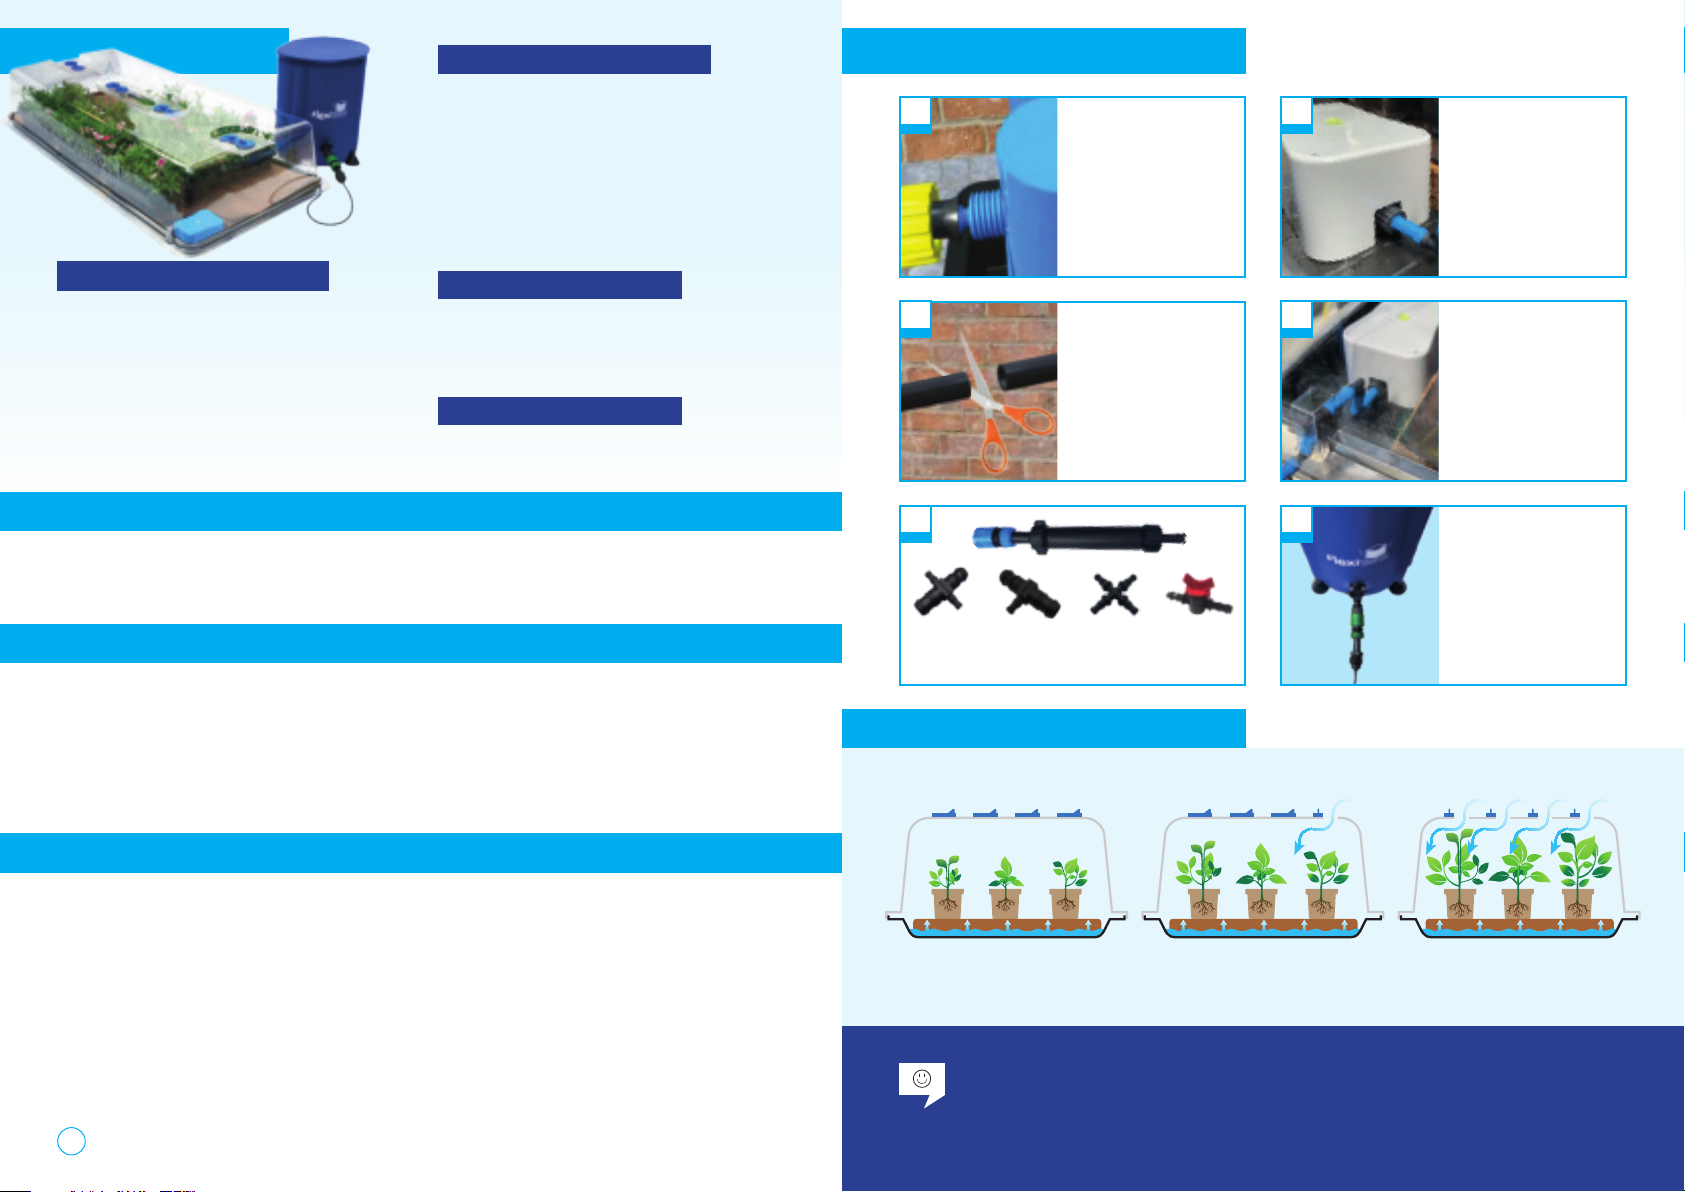
1Remove threaded collar
from AQUAvalve5.
Push one end of the ready-
assembled 3/8" Elbow
Bar through the collar and
attach to AQUAvalve5
nozzle.
Then replace the
AQUAvalve5 collar.
3
Cut 3/8" pipe to
appropriate length
if required.
Connect to
3/8" Elbow Bar.
2Place the AQUAvalve cover
over the AQUAvalve.
The AQUAvalve and
cover should be placed
directly onto the tray.
Ensure the circular spirit
level indicates the tray is
level, adjust if required.
4Position the 3/8" Elbow
Bar so that it routes out
of the piping port in the
easy2Propagate lid.
Ensure:
• The pipe does not trap
• The lid fits snugly
• AQUAvalve and Cover
still sit flat on the tray.
6To connect to the
FlexiTank push
1/2"-3/8" Click-Fit
Adapter and Filter onto
the 3/8" pipe.
Then push the Click-Fit
Adapter and Filter onto
the FlexiTank tap.
Connect to your system using 1/2" or 3/8" fittings.
5

This manual suits for next models

2

Other Autopot Lawn And Garden Equipment manuals

Autopot easy2GO Kit User manual

Autopot

Autopot easy2GO Kit User manual

Autopot AQUAvalve 24Pot Instruction Manual

Autopot

Autopot AQUAvalve 24Pot Instruction Manual

Autopot AQUAvalve5 Auto5 Pot Instruction Manual

Autopot

Autopot AQUAvalve5 Auto5 Pot Instruction Manual

Autopot AQUAvalve5 Auto3 XL Instruction Manual

Autopot

Autopot AQUAvalve5 Auto3 XL Instruction Manual

Autopot SpringPot 36 Instruction Manual

Autopot

Autopot SpringPot 36 Instruction Manual

Autopot AQUAvalve easy2grow Kit User manual

Autopot

Autopot AQUAvalve easy2grow Kit User manual

Autopot AQUAvalve 48Pot User manual

Autopot

Autopot AQUAvalve 48Pot User manual

Autopot Auto3 XL Instruction Manual

Autopot

Autopot Auto3 XL Instruction Manual

Autopot SpringPot 12 Instruction Manual

Autopot

Autopot SpringPot 12 Instruction Manual

Autopot SpringPot 16 Instruction Manual

Autopot

Autopot SpringPot 16 Instruction Manual

Autopot AQUAvalve 4Pot system Instruction Manual

Autopot

Autopot AQUAvalve 4Pot system Instruction Manual

Autopot Auto 9 XL Instruction Manual

Autopot

Autopot Auto 9 XL Instruction Manual

Autopot Auto8 Instruction Manual

Autopot

Autopot Auto8 Instruction Manual

Autopot COCOMAT User manual

Autopot

Autopot COCOMAT User manual

Autopot AQUAvalve5 SpringPot 24 Pot XL Instruction Manual

Autopot

Autopot AQUAvalve5 SpringPot 24 Pot XL Instruction Manual

Autopot AQUAvalve5 SpringPot 60 Pot XL Instruction Manual

Autopot

Autopot AQUAvalve5 SpringPot 60 Pot XL Instruction Manual

Autopot AQUAvalve5 1Pot Instruction Manual

Autopot

Autopot AQUAvalve5 1Pot Instruction Manual

Autopot AQUAvalve Instruction Manual

Autopot

Autopot AQUAvalve Instruction Manual

Autopot SpringPot 6 Instruction Manual

Autopot

Autopot SpringPot 6 Instruction Manual

Autopot SpringPot 9 Instruction Manual

Autopot

Autopot SpringPot 9 Instruction Manual

Popular Lawn And Garden Equipment manuals by other brands

FLORABEST 279218 Instructions for use

FLORABEST

FLORABEST 279218 Instructions for use

Dura Trel 11190 Elmwood Trellis Assembly instructions

Dura Trel

Dura Trel 11190 Elmwood Trellis Assembly instructions

All Pond Solutions WF-20000 quick start guide

All Pond Solutions

All Pond Solutions WF-20000 quick start guide

Garten Meister 920565 Original instructions

Garten Meister

Garten Meister 920565 Original instructions

TriStar IV-3720 user manual

TriStar

TriStar IV-3720 user manual

LuxenHome WHPL1191 instruction manual

LuxenHome

LuxenHome WHPL1191 instruction manual

Deltafox DG-CGS 3615 Translation of the original instructions for use

Deltafox

Deltafox DG-CGS 3615 Translation of the original instructions for use

AQUAJOE FIBERJACKET AJFJH50-58-PRO Quick start manual

AQUAJOE

AQUAJOE FIBERJACKET AJFJH50-58-PRO Quick start manual

Yard Craft Elevated Garden Planter Assembly manual

Yard Craft

Yard Craft Elevated Garden Planter Assembly manual

AQUA FORTE GardenSniper manual

AQUA FORTE

AQUA FORTE GardenSniper manual

FLORABEST FRP 350 B1 translation of original operation manual

FLORABEST

FLORABEST FRP 350 B1 translation of original operation manual

Zest 4 Leisure Deep Root Planter 1.8m Assembly instructions

Zest 4 Leisure

Zest 4 Leisure Deep Root Planter 1.8m Assembly instructions

Euro Systems M150RG ORIGINAL USER INSTRUCTIONS

Euro Systems

Euro Systems M150RG ORIGINAL USER INSTRUCTIONS

FLORABEST FLV 1200 A1 translation of original operation manual

FLORABEST

FLORABEST FLV 1200 A1 translation of original operation manual

Cramer A48T10PS-CR manual

Cramer

Cramer A48T10PS-CR manual

Garland KLS 2000 operating instructions

Garland

Garland KLS 2000 operating instructions

Independence Mosquito Magnet operating instructions

Independence

Independence Mosquito Magnet operating instructions

Cub Cadet ST 228 Operator's manual

Cub Cadet

Cub Cadet ST 228 Operator's manual

manuals.online logo
manuals.online logoBrands
  • About & Mission
  • Contact us
  • Privacy Policy
  • Terms and Conditions

Copyright 2025 Manuals.Online. All Rights Reserved.