Autoslide AUTOSLIDE Wireless IR Sensor Instruction Manual
Installing your AUTOSLIDE Wireless IR Sensor / AUTOSLIDE Hardwire IR Sensor
The AutoSlide Infrared sensor (wireless or hardwired) is designed for use
with the AutoSlide or MultiDrive door opener. This sensor will keep the
door open to either human or pet width for as long as it detects heat in
front of it. The detection range can be set to anywhere from 9” to 4’6”.
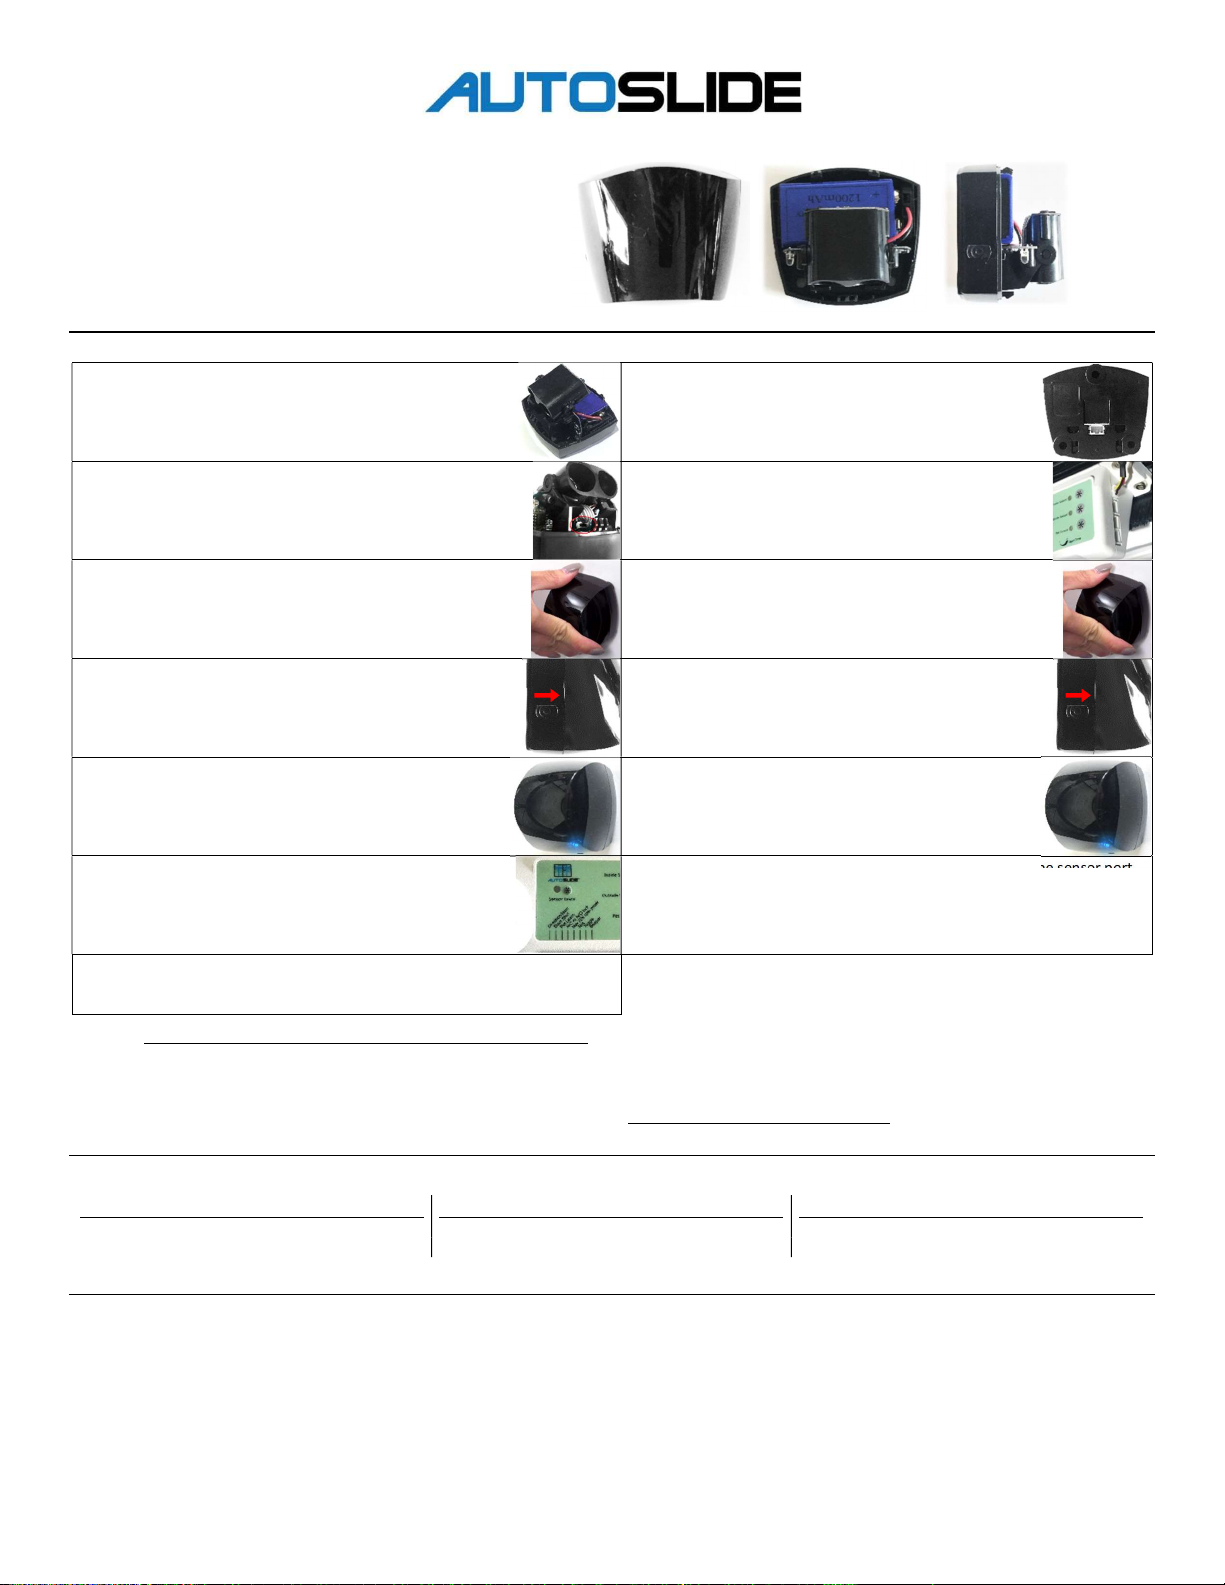
The wireless IR takes a standard 9V battery, while the hardwired IR has a
sensor port on the back side (no battery needed).
Installation Guide
Wireless Hardwired
1.
Remove the cover of the sensor to expose the board. If the
battery isn‘t installed, rotate the transceiver down, connect
the battery to the plug, and slide the battery into place.
1.
Connect your sensor cable to the back of the IR sensor.
Usually the sensor cable is led in from behind the unit
(through the space at the back of the endcap).
2.
Locate the small black switch in the center of the board
underneath four small white cables. Set the switch to the
right for Pet Sensor, or to the left for Outside Sensor. For
information on which to use, see Sensor Guide below.
2.
Connect the other end of
your
sensor cable to either
the
Inside Sensor, Outside Sensor, or Pet Sensor port on the
AutoSlide’s control panel. For information on which to use,
see Sensor Guide below. Do not plug into bottom port.
3.
Replace the cover.
Use a temporary fixing (such as duct tape)
to mount the sensor at the desired location. See Mounting
Guide at bottom.
3.
U
se a temporary fixing (such as duct tape) to mount the
sensor at the desired location. See Mounting Guide at
bottom.
4.
Power on the sensor using the small black switch on the side
of the sensor. A small blue light in the sensor should start
flashing. Immediately position yourself in front of the sensor
at the desired max trigger distance (do not attempt to
program for over 4’6”).
4.
Power on the sensor using the small black switch on the
side of the sensor. A small blue light in the sensor should
start flashing. Immediately position yourself in front of the
sensor at the desired max trigger distance (do not attempt
to program for over 4’6”).
5.
After about 5 seconds, the blue light will start flashing more
rapidly. Stay in front of the sensor at the desired distance
until the blue light stops flashing. Test the sensor by moving
in front of it (the blue light in the sensor should flash when
triggered).
5.
After about 5 seconds, the blue light will start flashing
more rapidly. Stay in front of the sensor at the desired
distance until the blue light stops flashing. Test the sensor
by moving in front of it (the blue light in the sensor should
flash when triggered).
6.
Press Sensor Learn on the
AutoSlide
’s control panel, then
immediately trigger the sensor by moving in front of it. Wait a
few seconds, then trigger the sensor again by moving in front
of it.
6.
Your sensor should now be able
to trigger the
AutoSlide
at the sensor port
used in Step 2. Note that the unit must be in Pet Mode for the sensor to
trigger the Pet Sensor port to open the door.
7.
Your sensor should now be able to trigger the unit at the sensor port chosen
in Step 2. Note that the unit must be in Pet Mode for the sensor to trigger the
Pet Sensor port to open the door.
Do not attempt to program the sensor for over 4’6” trigger distance.
If the sensor won’t trigger or flash blue, confirm there’s no damage to the connections at the sensor’s power switch, and change the battery if it’s a
wireless sensor. **Wireless IRs take standard 9V batteries.**
If the sensor won’t open the door but flashes blue, confirm the sensor is connected to the right port (review sensor guide below).
If the sensor triggers intermittently or constantly, reposition the sensor to look away from direct/reflected sunlight and adjust the sensitivity dial.
Sensor Guide
The hardwired IR sensor can connect to any of the three top sensor ports – Inside Sensor, Outside Sensor, and Pet Sensor. The wireless IR sensor can only connect to
Outside Sensor or Pet Sensor. Certain sensor ports are only enabled in select modes:
Inside Sensor
Opens the door to full human width. Enabled in:
Outside
Sensor
Opens the door to full human width. Enabled in:
Pet
Sensor
Opens the door to partial pet width. Enabled in:
●
Green Mode
●
R
ed
Mode
●
Pet
Mode
●
Green Mode
●
Pet
Mode
(ca
n be disabled)
●
Pet
Mode
Mounting Guide
The AutoSlide IR sensors should be fixed securely by screws, double
-
sided foam, or
command strips. The IR sensor should be mounted:
*Out of direct sunlight or weather/rain exposure* (sunlight shining into the
sensor can be read as heat and falsely trigger it)
One on each side of the door for access on both sides
As close to the door frame as possible
Placed so the beam goes horizontally across the door opening (for pet usage)
At a height to suit your pet (for pet usage)
Screw Fix Installation:
1. Remove the front cover to reveal the transceiver, sensitivity
adjuster, and fixing holes.
2. Use the screws provided to secure the sensor into position. For
masonry and other hard surface applications it may be necessary
to pre-drill and install wall plugs to have a secure fixing (command
strips are an alternative if this isn’t an option).
AUTOSLIDE LLC - autoslide.com - 833-337-5433
ON
ON

FCC Statement
This device complies with part 15 of the FCC Rules. Operation is subject to the following two conditions:
1. This device may not cause harmful interference, and
2. This device must accept any interference received, including interference that may cause undesired operation.
Any Changes or modifications not expressly approved by the party responsible for compliance could void the user's authority to operate the equipment.
Note: This equipment has been tested and found to comply with the limits for a Class B digital device, pursuant to part 15 of the FCC Rules. These limits are designed to
provide reasonable protection against harmful interference in a residential installation. This equipment generates uses and can radiate radio frequency energy and, if not
installed and used in accordance with the instructions, may cause harmful interference to radio communications. However, there is no guarantee that interference will not
occur in a particular installation. If this equipment does cause harmful interference to radio or television reception, which can be determined by turning the equipment off
and on, the user is encouraged to try to correct the interference by one or more of the following measures:
Reorient or relocate the receiving antenna.
Increase the separation between the equipment and receiver.
Connect the equipment into an outlet on a circuit different from that to which the receiver is connected.
Consult the dealer or an experienced radio/TV technician for help.
This device complies with part 15 of the FCC Rules. Operation is subject to the following two conditions:
1. This device may not cause harmful interference, and
2. This device must accept any interference received, including interference that may cause undesired operation.
Changes or modifications not expressly approved by the party responsible for compliance could void the user's authority to operate the equipment.
NOTE: This equipment has been tested and found to comply with the limits for a Class A digital device, pursuant to part 15 of the FCC Rules. These limits are designed to
provide reasonable protection against harmful interference when the equipment is operated in a commercial environment. This equipment generates, uses, and can radiate
radio frequency energy and, if not installed and used in accordance with the instruction manual, may cause harmful interference to radio communications. Operation of this
equipment in a residential area is likely to cause harmful interference in which case the user will be required to correct the interference at his own expense.
AUTOSLIDE LLC - autoslide.com - 833-337-5433
This manual suits for next models
1
Table of contents
Popular Accessories manuals by other brands


Cornelius
Cornelius Energize 2 HC Operator's manual

nature7
nature7 ORIENT Translation of original user's manual

ROCTEST
ROCTEST PISA-M instruction manual

Woodstock
Woodstock G2371 instruction manual

Bird b gone
Bird b gone Bird Spider 360 installation instructions

PCB Piezotronics
PCB Piezotronics YM101A02 Installation and operating manual


