AUVIO 4000041 User manual

XX-XXX
User’s Guide
THE PERFORMANCE YOU NEED
®
®
Clock Radio for iPod® or iPhone®
User’s Guide 4000041
Please read this user’s guide before using your new radio.

23
Contents
Important Safety Instructions .............................................................................................5
Features ................................................................................................................................7
Package Contents ................................................................................................................7
Setup ....................................................................................................................................8
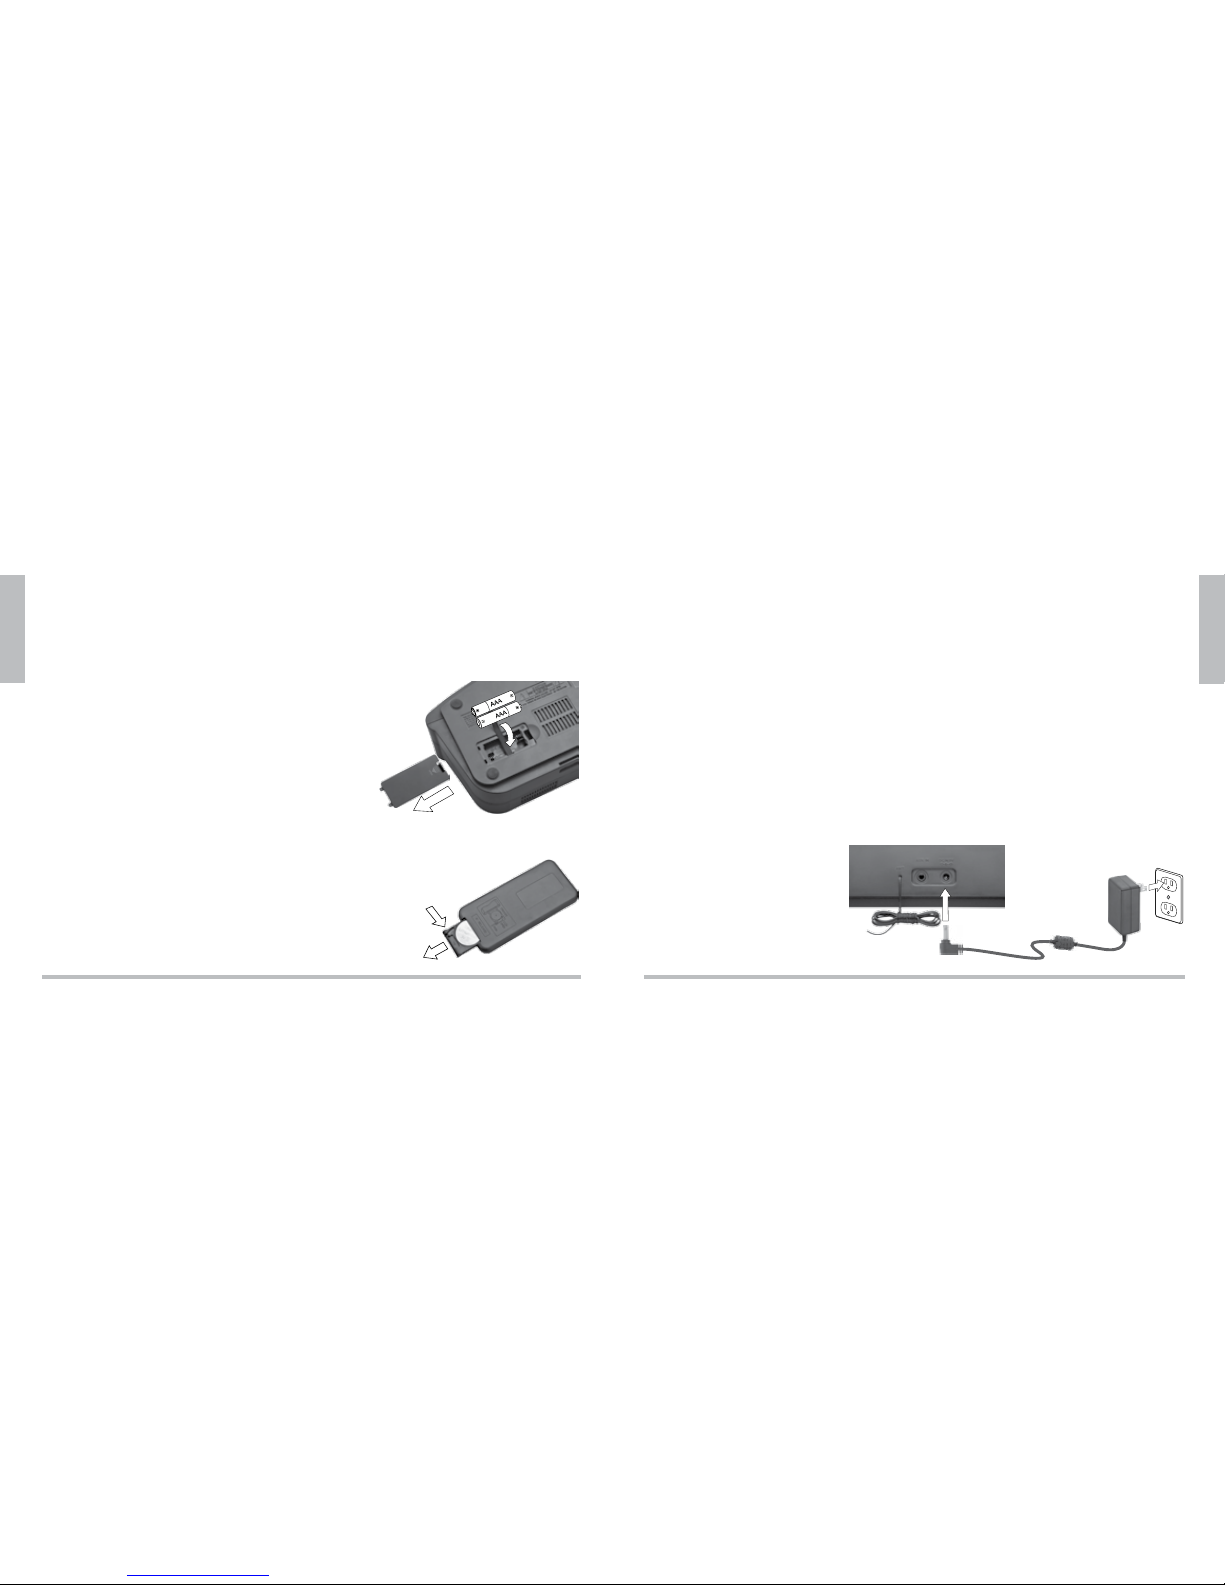
Power Your Clock Radio .................................................................................................8
Install Backup Batteries ............................................................................................8
Prepare Remote Control ..........................................................................................8
Connect to AC power ...............................................................................................9
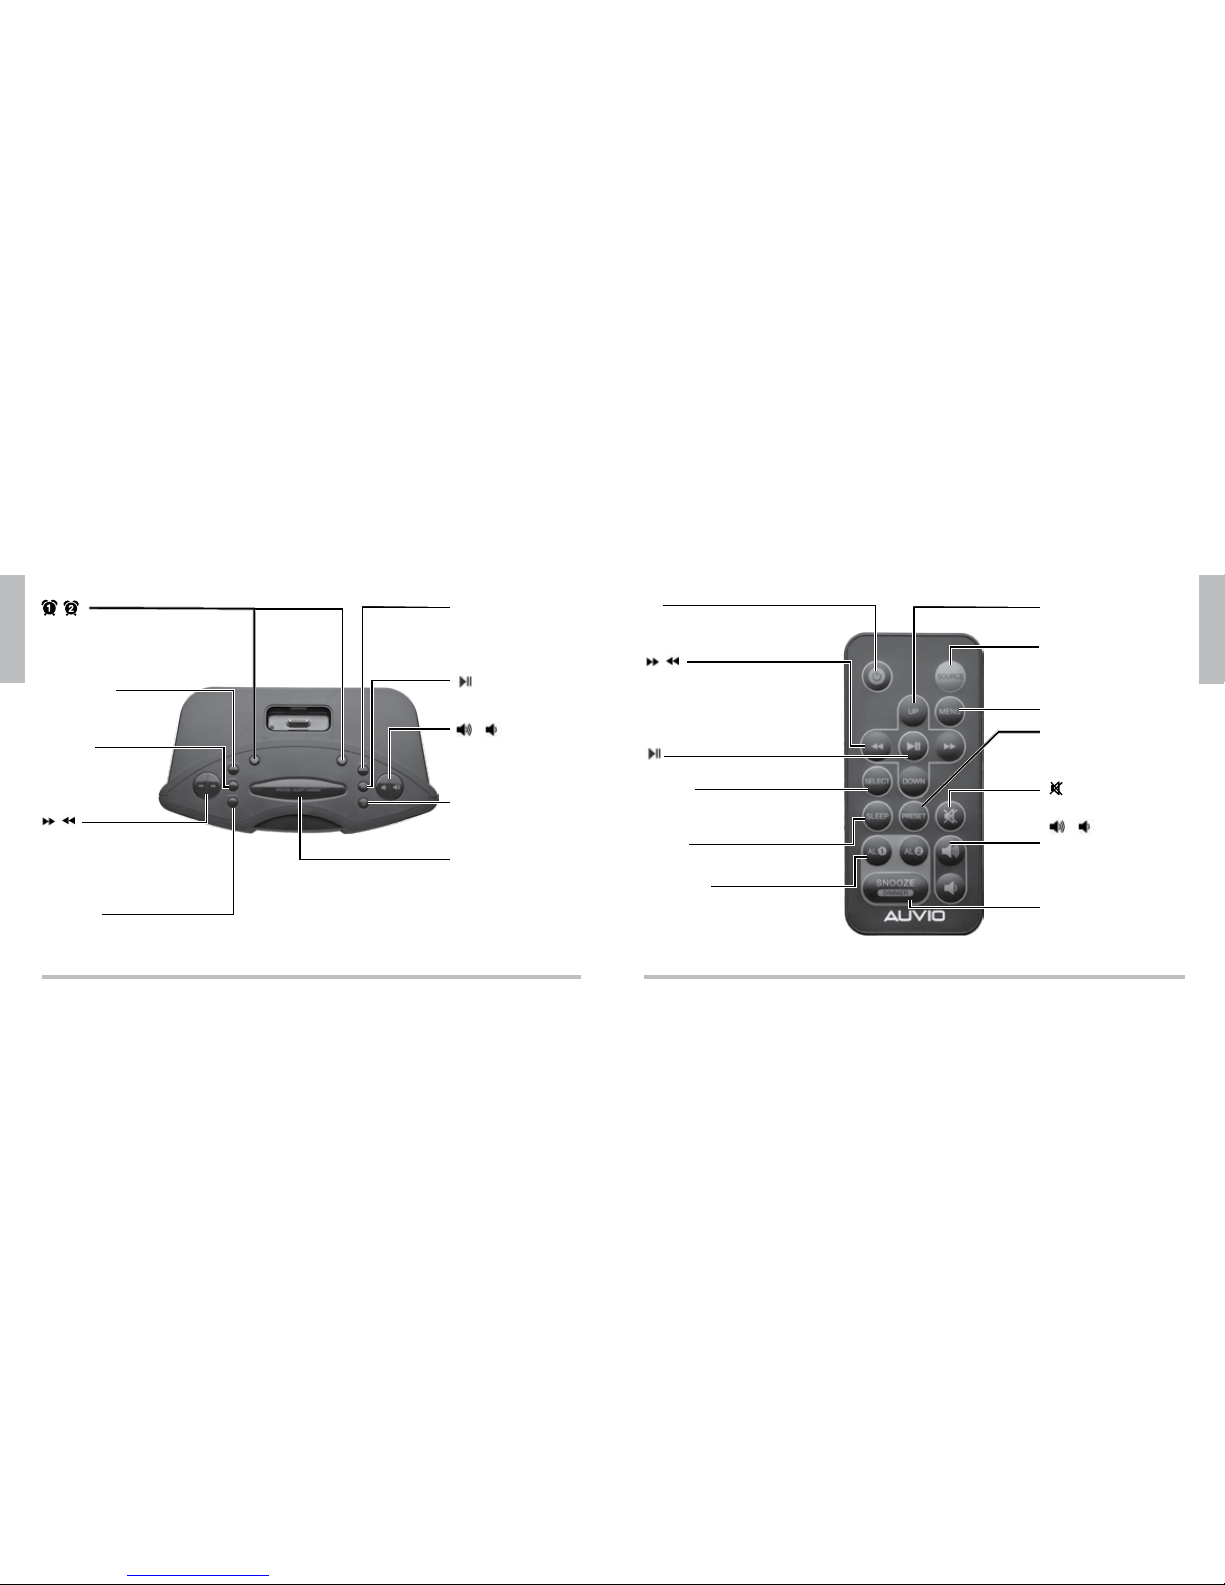
Basic Operation ..................................................................................................................12
Activate/Deactivate Standby Mode ...........................................................................12
Volume Up or Down ....................................................................................................12
MUTE ............................................................................................................................13
Listen to the Radio .......................................................................................................13
Manual Tuning ........................................................................................................13
Auto Tuning .............................................................................................................13
Store and Recall Preset Stations ...........................................................................14
Listen to Music on Your iPod/iPhone ..........................................................................15
Docking and Charging Your iPod/iPhone ..............................................................15
Play Your Music .......................................................................................................16
Listen to an External Audio Source ............................................................................16
Advanced Operation ..........................................................................................................17
Clock Radio Settings ....................................................................................................17
Setting Clock Time ..................................................................................................17
Using Time Sync Function .....................................................................................17
Setting Alarms ........................................................................................................18
Snooze .....................................................................................................................19
Setting Sleep Timer ................................................................................................20
LCD Dimmer Setting ..............................................................................................20
Additional Information ......................................................................................................21
Frequently Asked Questions .......................................................................................21
Specifications ...............................................................................................................22
FCC Information ...........................................................................................................22
Limited Warranty ..........................................................................................................23

45
Important Safety Instructions
1. Read instructions before operating the product.
2. Retain instructions for future reference.
3. Heed all warnings.
4. Follow all instructions.
5. Unplug this product from the wall outlet before cleaning. Do not use liquid cleaners or
aerosol cleaners. Clean only with a dry cloth.
6. Do not use this product near water – for example, near a bath tub, wash bowl, kitchen
sink, or laundry tub; in a wet basement, or near a swimming pool, etc.
7. Slots and openings in the cabinet are provided for ventilation and to ensure reliable
operation of the product and to protect if from overheating. Do not block or cover
these openings. Never block by placing the product on a bed, sofa, rug, or other similar
surface. Do not place this product in a built-in installation such as a bookcase or rack
unless you provide proper ventilation or are adhering to the manufacturer’s instructions.
8. For added protection for this product during a lightning storm, or when it is left
unattended and unused for long periods of time, unplug it from the wall outlet and
disconnect the antenna or cable system. This will prevent damage to the product due to
lightning and power-line surges.
9. Do not overload wall outlets, extension cords, or integral convenience receptacles as
this can result in a risk of fire or electric shock.
CAUTION WARNING: To reduce the risk
of fire or shock hazard, do not
expose this product to rain or
moisture.
CAUTION: TO REDUCE THE RISK OF ELECTRIC SHOCK, DO NOT REMOVE THE
COVER OR BACK. NO USER-SERVICEABLE PARTS INSIDE. REFER SERVICING TO
QUALIFIED PERSONNEL.
The lightning symbol is intended to alert you to the presence of
uninsulated, dangerous voltage within this product’s enclosure that
might be of sufficient magnitude to constitute a risk of electric shock.
Do not open the product’s case.
The exclamation symbol is intended to inform you that important
operating and maintenance instructions are included in the literature
accompanying this product.
!
RISK OF ELECTRIC SHOCK
DO NOT OPEN
!
CAUTION: This product contains a button (or coin) cell battery that might be
ingested by children. Do not leave button cell batteries accessible to children.

67
Setup
Features
Delivers well-balanced stereo sound while simultaneously charging your iPod or iPhone.
Dual alarms to wake up at separate times with songs from an iPod or iPhone, an FM
radio station or a buzzer.
Ten presets provide quick access to your favorite radio stations.
Package Contents
Clock Radio D AC Adapter
Remote Control with Battery D Cradles (7)
User’s Guide D Quick Start
10. Never push objects of any kind into this product through openings as they may touch
dangerous voltage points or short-out parts that could result in a fire or electric shock.
Never spill liquid of any kind on the product.
11. Do not attempt to service this product yourself as opening or removing covers may
expose you to dangerous voltage or other hazards. Refer all servicing to qualified
service personnel.
12. When replacement parts are required, be sure the service technician has used
replacement parts specified by the manufacturer or have the same characteristics as
the original part. Unauthorized substitutions may result in fire, electric shock, or other
hazards.
SAVE THESE INSTRUCTIONS

8
Setup
9
Setup
Setup
Power Your Clock Radio
Install Backup Batteries
Install two AAA alkaline batteries (not supplied) to
provide backup power to maintain the correct clock time
in the event of an AC power interruption.
1. Press the tab and lift the battery compartment door
at the bottom of your clock radio.
2. Insert two AAA batteries into the battery
compartment, matching the polarity symbols (+ and
–) marked inside.
3. Replace the door.
Prepare Remote Control
The remote control comes with a battery installed. Remove the
plastic tab before using the remote. Replace the battery if your
remote control stops operating properly.
1. Press the battery compartment tray tab and slide the battery compartment out.
2. Insert a new CR2025 battery, positive (+) side up, and slide the tray back until it clicks.
b Battery Notes
For optimum battery performance, use alkaline batteries for the main unit.
Insert or replace batteries when ( appears on the clock radio display.
Keep button-cell battery away from children. Swallowing a button-cell battery can be fatal.
Dispose of batteries promptly and properly. Do not burn or bury them.
Use only fresh batteries of the required size and type. Do not mix old and new batteries, different
types of batteries (alkaline, or rechargeable), or rechargeable batteries of different capacities.
If you do not plan to use the clock radio for a long time, remove the battery. Batteries can leak
chemicals that can damage electronic parts.
Batteries (battery pack or batteries installed) shall not be exposed to excessive heat such as
sunshine, fire or the like.
Connect to AC power
Connect the supplied AC adapter
to the DC IN 9V jack on the
rear of the unit and plug into a
standard AC outlet. The clock
radio enters standby mode and
the time appears on the display.

10
Setup
11
Setup
,
Enter/ Exit alarm setting mode.
Select alarm source: Buzzer, Radio, iPod.
Turn on/off alarm.
TIME SYNC
Synchronize the time
with iPod/iPhone.
,
Tune stations.
Set the hour.
Select previous/next track.
Fast forward/rewind a track.
SOURCE
Select sound source: Radio,
Aux, iPod.
PRESET
Store FM stations.
Select preset radio
station.
TIME SET
Enter/Exit time setting
mode.
Stop playback.
Play or pause playback.
/
Volume up/down.
Set the minutes.
1
Turn on or switch to
standby.
SNOOZE/ SLEEP/
DIMMER
Silence the alarm for 10 to
60 minutes when the alarm
sounds.
Adjust sleep period.
Adjust display brightness.
1
Turn on or switch the clock
radio to standby. SOURCE
Select sound source: Radio,
Aux, iPod.
UP/DOWN
Navigate the iPod menu.
MENU
Access iPod menus.
,
Tune stations.
Set the hour.
Select previous/next track.
Fast forward/Rewind a track.
Play or pause playback.
SELECT
Confirm menu selection in
iPod mode.
SLEEP
Adjust sleep period.
AL, AL
Enter/ Exit alarm setting mode.
Select alarm source: Buzzer,
Radio, iPod.
Turn on/off alarm.
PRESET
Store FM stations.
Select preset radio station.
Turn sound on/off.
/
Volume up/down.
Set the minutes.
SNOOZE/ DIMMER
Silence the alarm for 10 to
60 minutes when the alarm
sounds.
Adjust display brightness.

12
Operation
13
Operation
Basic Operation
Activate/Deactivate Standby Mode
1. In standby mode, press G to turn on the clock radio.
2. After one second, the system automatically enters iPod
mode.
3. Press G again to switch to standby mode. The current
clock time appears on the display.
nNotes:
When you turn on the system for the first time, iPod mode activates by default.
The system activates the last source used when you power on again if your iPod/iPhone is not
docked.
If no batteries are installed or battery power is low, ( will display.
Volume Up or Down
Press or to increase or decrease the volume (0 to 16).
MUTE
1. Press to decrease the volume to the minimum or press on remote control to
mute directly.
2. Press , or to exit mute mode.
Listen to the Radio
1. Fully extend the FM antenna wires.
2. Press SOURCE to enter radio mode. The radio frequency appears after one second.
3. Adjust the antenna to get the best radio reception.
Manual Tuning
Press or briefly to tune to a higher or lower frequency.
Auto Tuning
Press and hold or for more than 1 second to automatically tune to a higher or lower
frequency. Tuning automatically stops when it detects a station signal.
n Note: If there is no station found, auto tuning will stop at the starting frequency.

14
Operation
15
Operation
Store and Recall Preset Stations
You can store up to 10 preset FM stations.
In radio play mode,
1. Press or to select a station.
2. Press and hold PRESET for 2 seconds to enter program
mode. PRESET displays and the memory digits flash.
The clock radio will exit preset mode automatically if no
buttons are pressed within 4 seconds.
3. Press PRESET repeatedly to select a desired preset
location (01 to 10) to store the station.
4. Press and hold PRESET to confirm.
5. Repeat steps 1 to 4 to program.
6. Press PRESET repeatedly to listen to your preset radio station.
Listen to Music on Your iPod/iPhone
Docking and Charging Your iPod/iPhone
1. Press SOURCE to select iPod mode. The icon IPOD appears in the display.
2. Insert the cradle that fits your iPod/iPhone model, then plug
in your iPod/iPhone. The table below shows cradle markings
(on the back of the cradle) and iPod models. The iPod/iPhone
charges automatically while it is connected.
Marking iPod Model
10 5G iPod with video (60GB/ 80GB)
iPod classic (160GB)
15 iPhone 3G (8GB/ 16GB)
iPhone 3Gs (16GB/ 32GB)
16 iPod Touch 2G (8GB/ 16GB/ 32GB)
iPod Touch 3G (16GB/ 32GB/ 64GB)
17 iPod Nano 4G (8GB/ 16GB)
18 iPod Nano 5G (8GB/ 16GB)
19 iPhone 4 (16GB/ 32GB)
20 iPod Touch 4G (8GB/ 32GB/ 64GB)
iPod Nano 6G

16
Operation
17
Advanced
Play Your Music
1. Dock your iPod/iPhone to the clock radio.
2. The clock radio automatically switches to iPod mode. If your iPod is playing, the clock
radio will play the iPod automatically. Otherwise press play on your iPod or on the
clock radio or remote control to start playback.
3. Press or to adjust the volume.
4. Press or to skip the track forward / backward. Press and hold or to fast
forward / backward.
5. Press to pause the playback. Press again to resume playback. Press TIME SET
to stop the playback.
Listen to an External Audio Source
1. Use a 1/8” (3.5 mm) audio cable (not supplied) to connect the audio source’s headphone
jack to the AUX IN jack on your clock
radio.
2. Press SOURCE to enter AUX IN mode.
The icon for AUX appears.
3. Use the controls on your connected
device to play.
Advanced Operation
Clock Radio Settings
Setting Clock Time
1. Press and hold TIME SET for 2 sec. The clock digits (hour
and minutes) flash.
2. Press or to set the hour. Then press or to set the minutes.
3. Press TIME SET again to confirm the clock setting.
nNotes:
You can set clock time in radio, aux in or standby mode.
Complete each step within 10 seconds or the clock radio will exit the clock setting mode.
The clock uses a 12 hour format with AM and PM indicators.
Using Time Sync Function
When your iPod/ iPhone is docked in the unit, press TIME SYNC on the clock radio. The time
of the clock radio will synchronize with the time from your iPod/ iPhone.
nNotes:
Make sure you select iPod source when you use time sync function.
Time Sync can be used in most iPod/ iPhone models, except older models such as iPod mini, iPod 3G, 4G.

18
Advanced
19
Advanced
Setting Alarms
Set the alarm time
To set alarm 1:
1. Press and hold on the radio or AL on the remote for 2 seconds to enter the alarm
setting mode. The clock digits flash.
2. Press or to set the hour. Then press or to set the minutes. Make sure to set
AM/PM correctly.
3. Briefly press or AL to confirm.
4. Press or AL repeatedly to select a wake-up mode:
Buzzer ( ), Radio ( ), iPod ( ). The selected alarm
source appears in the display.
Refer to the above steps to set alarm 2, using the buttons or AL instead of or AL.
Stop or cancel the alarm
When the alarm sounds, press , AL, ( , AL) or G once to stop the alarm for 24
hours, and the clock radio goes back to the mode before the alarm activated.
To cancel the alarm completely, press or AL ( or AL) repeatedly until the alarm
indicator disappears.
nNotes:
To wake up to an iPod/iPhone, it must be properly docked and turned off. If your iPod/iPhone is not
docked, the alarm defaults to buzzer.
When you set the wake-up mode to radio/ iPod, the station or the song you last listened to will
switch on at the volume before your clock radio was turned off.
The alarm will automatically stop after 20 minutes if no buttons are pressed.
If two alarms are set, the first alarm automatically enters 24 hour reset when the second alarm
sounds.
Snooze
1. When the alarm sounds, press SNOOZE/SLEEP/
DIMMER. The SNOOZE indicator and 10 appear in the
display to show the snooze time for 5 seconds, then it
reverts back to clock time. The alarm sounds automatically
10 minutes later.
2. Repeatedly press SNOOZE/SLEEP/DIMMER within 5 seconds. Each time you press
the SNOOZE/SLEEP/DIMMER, the snooze time increases by 10 minutes, up to a
maximum of 60 minutes.
3. After snooze is set, press SNOOZE/SLEEP/DIMMER again to view the remaining
snooze time for 5 seconds.

20
Advanced
21
Additional Info
Setting Sleep Timer
1. Press SNOOZE/SLEEP/DIMMER. The SLEEP indicator and
15 appear in the display for five seconds indicating that the
radio will turn off after 15 minutes.
2. Repeatedly press SNOOZE/SLEEP/DIMMER to select a
time period of 15, 30, 45, 60 or 90 minutes.
3. After you set the sleep timer, the display reverts back to clock time. Press SNOOZE/
SLEEP/DIMMER again to view the remaining sleep time for 5 seconds.
4. To cancel the sleep function, repeatedly press SNOOZE/SLEEP/DIMMER until 00
appears.
LCD Dimmer Setting
1. Make sure the radio is in standby mode and the AC adapter is connected.
2. The LCD backlight is default Low. Press SNOOZE/ SLEEP/ DIMMER on the clock radio
repeatedly to adjust the display backlight setting (High/Mid/Low/Off).
n Note: Dimmer can only be adjusted in Standby mode.
Additional Information
Frequently Asked Questions
I adjusted the volume and checked that the power cord is plugged in, but I am not
hearing sound through the speakers.
Verify that the correct source is selected. Press SOURCE to change.
I tuned to my favorite radio station, but I hear some static.
Try adjusting and extending the antenna. Also, move the AC power adapter away from your
radio to reduce interference.
How do I select my preset radio stations?
Press PRESET repeatedly until you see your station.
What is the difference between snooze and sleep?
SLEEP plays your music for a short time before automatically turning off. SNOOZE
temporarily turns off the alarm for a few minutes of extra sleep.
I set my alarm for iPod music, why did the buzzer go off instead?
Check that the iPod is docked securely and that you have a song selected.

22
Additional Info
23
Additional Info
Specifications
Frequency Range............................................................. ............FM 87.5 - 107.9 MHz (200 KHz steps)
Station Preset......................................................................................................................... ........... 10
External Connections.......................................................... ....... 3.5 mm stereo, 30 pin iPod connector
Volume......................................................................................................................... ............ 16 levels
Speaker............................................................................................................................. ........... 2 x 2”
Output power........................................................................................................ .............2W x 2 RMS
Power source............................................................................................. .............DC 9V 1.5A Adapter
Backup batteries................................................................................... .........2 x AAA alkaline batteries
Specifications are subject to change and improvement without notice. Actual product may vary from the images found
in the document.
FCC Information
This equipment has been tested and found to comply with the limits for a Class B digital device, pursuant to Part
15 of the FCC Rules. These limits are designed to provide reasonable protection against harmful interference
in a residential installation. This equipment generates, uses and can radiate radio frequency energy and, if not
installed and used in accordance with the instructions, may cause harmful interference to radio communications.
However, there is no guarantee that interference will not occur in a particular installation. If this equipment does
cause harmful interference to radio or television reception, which can be determined by turning the equipment
off and on, the user is encouraged to try to correct the interference by one or more of the following measures:
Reorient or relocate the receiving antenna.
Increase the separation between the equipment and receiver.
Connect the equipment into an outlet on a circuit different from that to which the receiver is connected.
Consult the dealer or an experienced radio/TV technician for help.
Changes or modifications not expressly approved by Ignition L.P. may cause interference and void the user’s
authority to operate the equipment.
This device complies with Part 15 of the FCC Rules. Operation is subject to the following two conditions: (1) This
device may not cause harmful interference, and (2) this device must accept any interference received, including
interference that may cause undesired operation.
Limited Warranty
Ignition L.P. warrants this product against defects in materials and workmanship under normal use by the
original purchaser for ninety (90) days after the date of purchase. IGNITION L.P. MAKES NO OTHER EXPRESS
WARRANTIES.
This warranty does not cover: (a) damage or failure caused by or attributable to abuse, misuse, failure to follow
instructions, improper installation or maintenance, alteration, accident, Acts of God (such as floods or lightning),
or excess voltage or current; (b) improper or incorrectly performed repairs by persons who are not a Ignition L.P.
Authorized Service Facility; (c) consumables such as fuses or batteries; (d) ordinary wear and tear or cosmetic
damage; (e) transportation, shipping or insurance costs; (f) costs of product removal, installation, set-up service,
adjustment or reinstallation; and (g) claims by persons other than the original purchaser.
Should a problem occur that is covered by this warranty, take the product and the sales receipt as proof of pur-
chase date to the place of purchase. Ignition L.P. will, at its option, unless otherwise provided by law: (a) repair
the product without charge for parts and labor; (b) replace the product with the same or a comparable product; or
(c) refund the purchase price. All replaced parts and products, and products on which a refund is made, become
the property of Ignition L.P. New or reconditioned parts and products may be used in the performance of war-
ranty service. Repaired or replaced parts and products are warranted for the remainder of the original warranty
period. You will be charged for repair or replacement of the product made after the expiration of the warranty
period.
IGNITION L.P. EXPRESSLY DISCLAIMS ALL WARRANTIES AND CONDITIONS NOT STATED IN THIS LIMITED
WARRANTY. ANY IMPLIED WARRANTIES THAT MAY BE IMPOSED BY LAW, INCLUDING THE IMPLIED

24
Additional Info
25
Additional Info
WARRANTY OF MERCHANTABILITY AND, IF APPLICABLE, THE IMPLIED WARRANTY OF FITNESS FOR A
PARTICULAR PURPOSE, SHALL EXPIRE ON THE EXPIRATION OF THE STATED WARRANTY PERIOD.
EXCEPT AS DESCRIBED ABOVE, IGNITION L.P. SHALL HAVE NO LIABILITY OR RESPONSIBILITY TO THE
PURCHASER OF THE PRODUCT OR ANY OTHER PERSON OR ENTITY WITH RESPECT TO ANY LIABILITY,
LOSS OR DAMAGE CAUSED DIRECTLY OR INDIRECTLY BY USE OR PERFORMANCE OF THE PRODUCT OR
ARISING OUT OF ANY BREACH OF THIS WARRANTY, INCLUDING, BUT NOT LIMITED TO, ANY DAMAGES
RESULTING FROM INCONVENIENCE AND ANY LOSS OF TIME, DATA, PROPERTY, REVENUE, OR PROFIT AND
ANY INDIRECT, SPECIAL, INCIDENTAL, OR CONSEQUENTIAL DAMAGES, EVEN IF IGNITION L.P. HAS BEEN
ADVISED OF THE POSSIBILITY OF SUCH DAMAGES.
Some states do not allow limitations on how long an implied warranty lasts or the exclusion or limitation of
incidental or consequential damages, so the above limitations or exclusions may not apply to you. This warranty
gives you specific legal rights, and you may also have other rights which vary from state to state. You may
contact Ignition L.P. at:
Ignition L.P., 3102 Maple Ave., Suite 450, Dallas, TX 75201 02/09
For product support, call
1-866-315-0426
“Made for iPod” and “Made for iPhone” mean that an electronic accessory has been designed to connect specifically
to iPod or iPhone, respectively, and has been certified by the developer to meet Apple performance standards. Apple
is not responsible for the operation of this device or its compliance with safety and regulatory standards. iPhone, iPod,
iPod classic, iPod nano and iPod touch are trademarks of Apple Inc., registered in the U.S. and other countries.
Complies with the European Union’s “Restriction of Hazardous Substances Directive,”
which protects the environment by restricting specific hazardous materials and products.

©2009. SCK,
Inc. All rights
reserved.
Gigaware is a
trademark used
by SCK, Inc.
,
© 2011. Ignition L.P. All rights reserved. Auvio is a registered trademark used by
Ignition L.P. Package and user’s guide are recyclable. User’s guide contains
recycled material.
Protect the environment by recycling used electronics. Go to
E-CyclingCentral.com to find an electronic recycling center near you.
Get more from your audio and video equipment. See what you’ve
been missing. With Auvio, you control the experience.
Auvio was established by a group of technophiles to provide
high quality audio and video products without the high sticker
price. The Auvio philosophy is for you to experience audio and
video as it was intended to be: pure and distortion free.
We know electronics can be intimidating. Auvio simplifies your
experience by providing the right products, with the right specs,
to work with your equipment.
Be confident about your purchase: your new Auvio product
incorporates the latest technology, is built to the highest quality
standards, and reduces environmental impact by complying
with RoHS environmental restrictions.
Printed
in China
05A11
4000041
Table of contents