AuviTran AV-WALL-DT4oB Dante User manual

AV-WALL-DT4oB User’s manual v1.1 Page 1/ 26
AV-WALL-DT4oB
User’s manual
www.auvitran.com

AV-WALL-DT4oB User’s manual v1.1 Page 2/ 26
Table of contents
1. Legacy...............................................................................................................4
1.1 LIMITATION OF LIABILITY .............................................................................4
1.2 TRADEMARKS .............................................................................................4
1.3 COPYRIGHT.................................................................................................4
1.4 MORE INFORMATION...................................................................................4
2AV-WALL-DT4oB Quick Start...............................................................................5
2.1 Power to Start-up.........................................................................................5
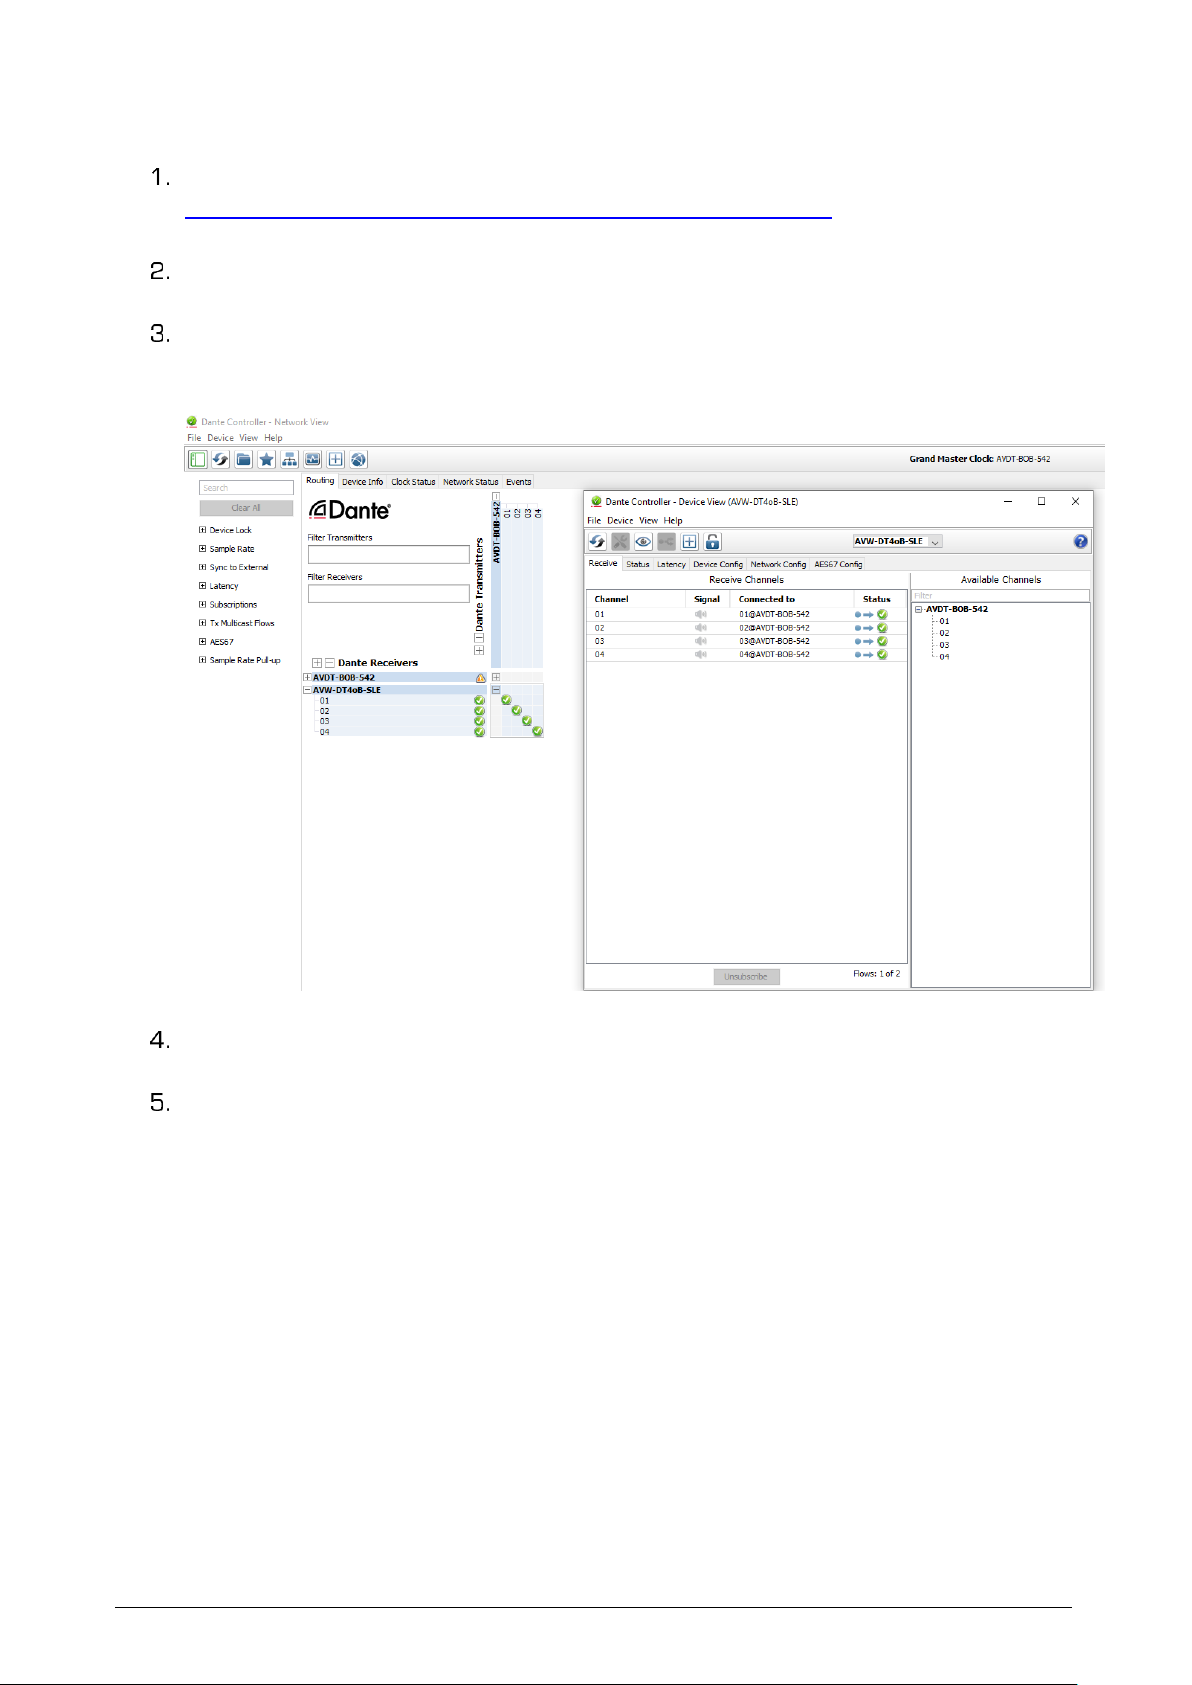
2.2 Connect the AV-WALL-DT4oB to an IP/Dante network ......................................5
2.3 AV-WALL-DT4oB Dante settings ....................................................................6
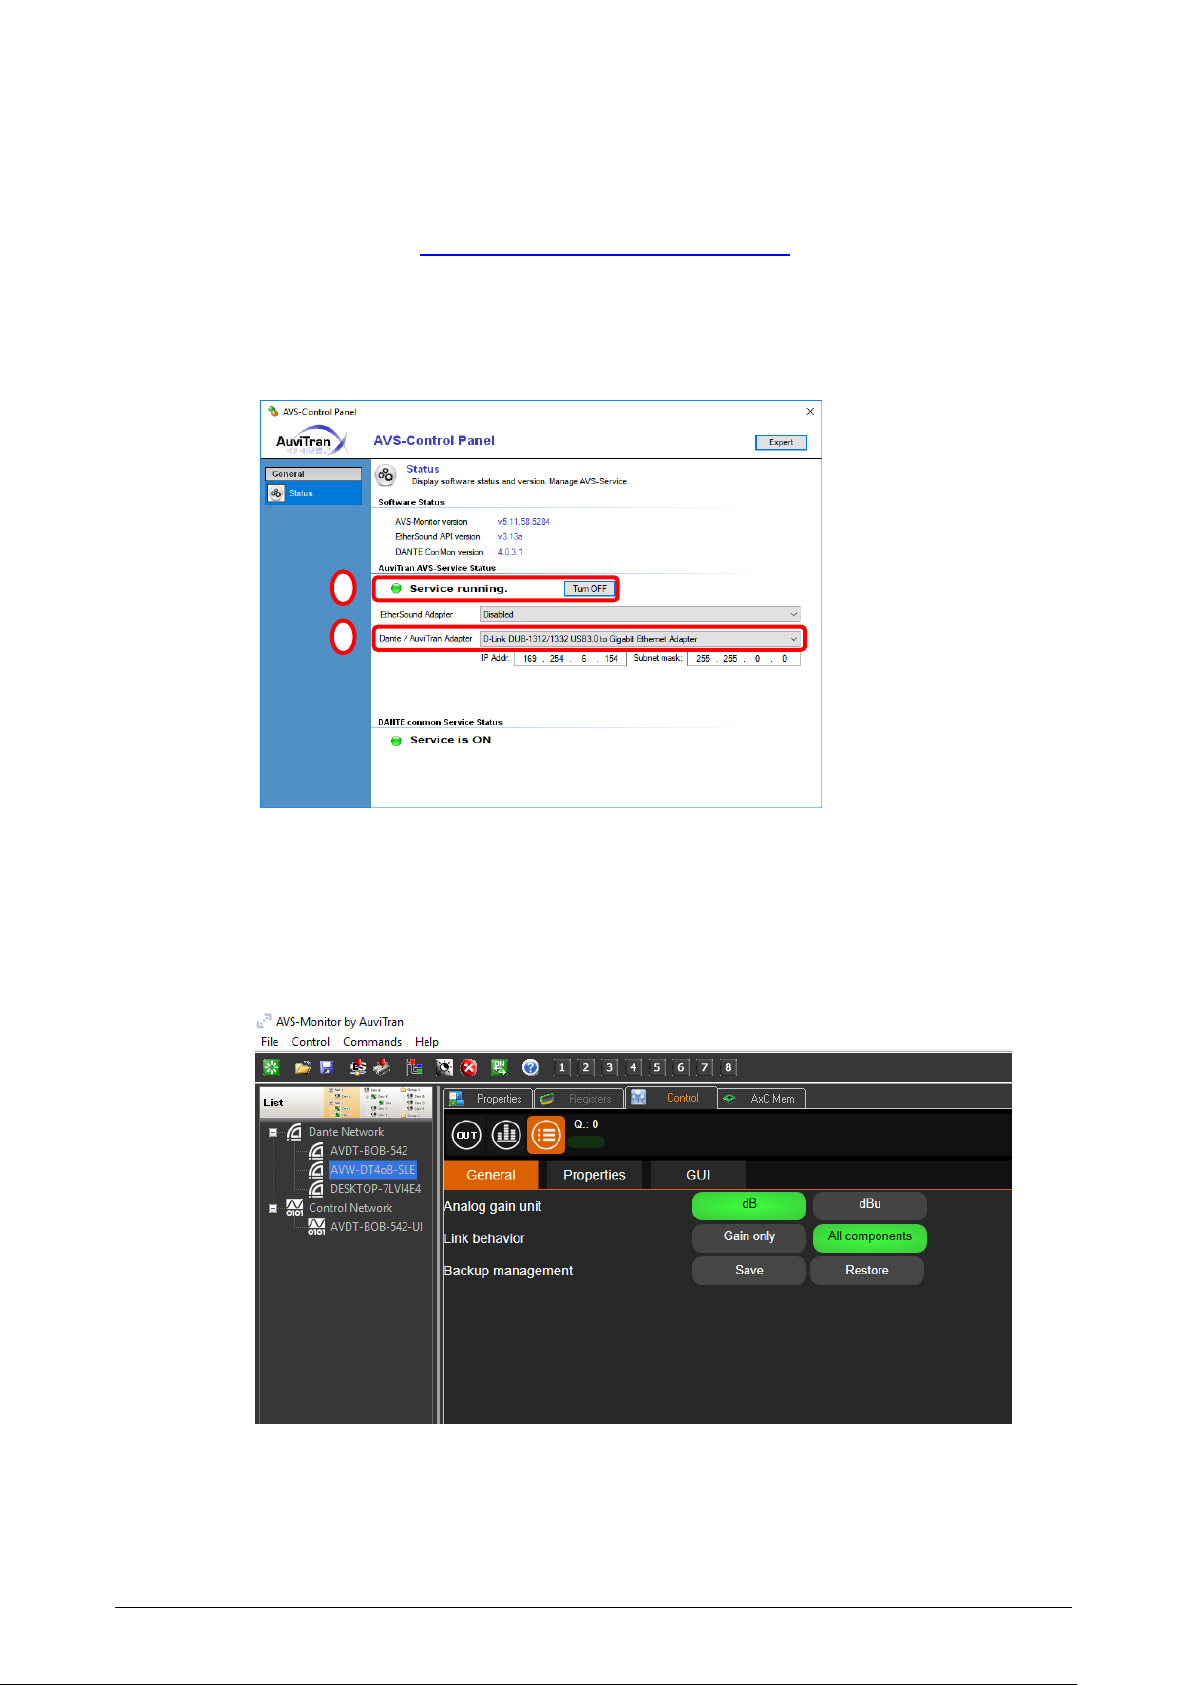
2.4 Access to AV-WALL-DT4oB User Interface via AVSMonitor on Windows OS .......7
3AV-WALL-DT4oB setting via rotative push-button functions .....................................9
3.1 Control mode................................................................................................9
3.1.1 Change the gain ....................................................................................10
3.1.2 Change the source ................................................................................10
3.1.3 Bluetooth Stream Control ......................................................................11
3.1.3.1 Bluetooth device search & pairing......................................................12
3.1.3.2 Bluetooth Playing Status..................................................................12
3.1.3.3 Bluetooth Reset & Unpair ................................................................13
3.2 Configuration mode......................................................................................14
3.2.1 Screen brightness .................................................................................15
3.2.2 LEDs brightness ...................................................................................15
3.2.3 Sources mapping modes.........................................................................15
3.2.3.1 Stereo mode...................................................................................16
3.2.3.2 Grouped mode ................................................................................16
3.2.3.3 Unavailable devices handling & Dante remote control. ..........................16
3.2.4 Gain lock ..............................................................................................17
3.2.5 Source lock ..........................................................................................17
3.3 Other operating modes and options ...............................................................17
4AV-WALL-DT4oB control using AVS-Monitor........................................................19
4.1 “General” menu...........................................................................................19
4.2 “Properties” menu .......................................................................................20
4.3 “GUI” menu ................................................................................................21
4.4 “Out” Interface ...........................................................................................22
5Load labels & Dante patches on AV-WALLs devices ..............................................23
5.1 Launch labels transfers & files syntax............................................................23
5.2 Typical Troubleshooting ................................................................................24
5.2.1 Incorrect syntax....................................................................................25
5.2.2 Unfound devices....................................................................................25
5.2.3 Unauthorized devices.............................................................................26

AV-WALL-DT4oB User’s manual v1.1 Page 4/ 26
1. Legacy
1.1 LIMITATION OF LIABILITY
In no case and in no way, the provider of this software (AuviTran, the distributor or reseller,
or any other party acting as provider) shall be liable and sued to court for damage, either
direct or indirect, caused to the user of the software and which would result from an improper
installation or misuse of the software. “Misuse” and “improper installation” mean installation
and use not corresponding to the instructions of this manual.
AuviTran is constantly working on the improvement of the products. For that purpose, the
products functionalities are bound to change and be upgraded without notice. Please read
carefully the User’s manual as the new functionalities will be described therein.
1.2 TRADEMARKS
All trademarks listed in this manual are the exclusive property of their respective owners.
They are respected “as is” by AuviTran. Any use of these trademarks must receive prior
approval of their respective owners. For any question, please contact the trademark’s owner
directly.
1.3 COPYRIGHT
The information in this manual is protected by copyright. Therefore, reproduction, distribution
of whole or part of this manual is strictly forbidden without the prior written agreement of
AuviTran.
1.4 MORE INFORMATION
Please visit our website for any question of further inquiry concerning our product range.
Updates will also be posted when available.
http://www.auvitran.com

AV-WALL-DT4oB User’s manual v1.1 Page 5/ 26
2AV-WALL-DT4oB Quick Start
2.1 Power to Start-up
To start your AV-WALL-DT4oB, connect the RJ45 port to an active POE device using a
CAT5E/6 cable (100Mb/s connection).
When powered, the 6 White led lights on the AV-WALL-DT4oB front face will flash and then
the lights will flash alternatively until the device is switched on.
2.2 Connect the AV-WALL-DT4oB to an IP/Dante network
The connection of your AV-WALL-DT4oB to the IP/Dante network is done via the same
Ethernet CAT5e/6/7 cable used for the power supply.
AV-WALL-DT4oB has a unique IP network addresses and a unique name to control Dante
and AV-WALL-DT4oB settings:
The IP address is preset by default at factory to be set automatically using a DHCP
server or using APIPA address (169.254.xxx.xxx/16) if no DHCP server is detected
by the device. The IP address can be fixed using the Dante controller
The AV-WALL-DT4oB name is preset at factory at “AV-WALL-#” where # is its serial
number. The Dante name of an AV-WALL-DT4oB can be changed by the Dante
Controller.
AV-WALL-DT4oB serial number 145 has Dante name “AV-WALL-145” as factory
preset
The AV-WALL-DT4oB setting can be done locally via the front face rotative button of
the AV-WALL-DT4oB or via AVSMonitor (Software downloadable on
www.auvitran.com)

AV-WALL-DT4oB User’s manual v1.1 Page 6/ 26
2.3 AV-WALL-DT4oB Dante settings
The AV-WALL-DT4oB Dante settings are done via the standard Audinate Dante Controller.
Download Dante Controller on the Audinate web site at the following web address
https://www.audinate.com/products/software/dante-controller
Install Dante Controller by double clicking on the download file.
Start Dante Controller to detect your AV-WALL-DT4oB Dante devices and control
settings
To change AV-WALL-DT4oB name, Double click on the device label
Select “Device Config” tab in the new windows and modify the “Rename Device” field

AV-WALL-DT4oB User’s manual v1.1 Page 7/ 26
2.4 Access to AV-WALL-DT4oB User Interface via AVSMonitor on Windows
OS
The AV-WALL-DT4oB User Interface can be accessed using AVSMonitor on Windows OS:
1. Download AuviTran AVS-Monitor free software for windows 7/8/10 available at the
following web address https://www.auvitran.com/software
2. Install AVS-Monitor by double clicking on the download file.
3. Using AVS-Control Panel
3.1. Select the NIC card that must be used by Dante /AuviTran Adapter
3.2. Run the service
4. Start AVS-Monitor
4.1. The AV-WALL-DT4oB connected to the network will automatically appears in
the “Dante Network”
4.2. Select the AV-WALL-DT4oB in the left list called “Dante network”and”
“Control” Tab in the right windows as describe bellow
4.3. See chapter 4 for interface description
Notice:
1
2

AV-WALL-DT4oB User’s manual v1.1 Page 8/ 26
-If your device doesn’t appear, your network configuration is probably not good.
Return to AVS-Control-Panel using “Edit/Control panel” menu and reselect another
network or check if your PC is in the same network that the AV-WALL-DT4oB

AV-WALL-DT4oB User’s manual v1.1 Page 9/ 26
3AV-WALL-DT4oB setting via rotative push-button functions
The AV-WALL-DT4oB DT4oB has 2 modes of operation sequences:
-The “Control” mode
-The “Configuration” mode
3.1 Control mode
The Control mode is activated by pressing the push-button briefly. The parameter we are
acting on is flashing. Another brief press will pass to the next parameter and the next LED
will flash.
The Control mode permits to act on the AV-WALL-DT4oB DT4oB:
-Change the gain
-Change the source of outputs
-Play / Pause a paired Bluetooth device
Control
Mode
Configuration
Mode
Long press on
button (5s)
Long press on
button (5s)
No action during
30s

AV-WALL-DT4oB User’s manual v1.1 Page 10 / 26
3.1.1 Change the gain
Screen
LED
Actives
Stream
changed
Action on
the button
Action
Out 1:
Outdoor-
Stage3
G: -3db
Gain On
+
1 blinking
Out1
(XLR)
Turn left
Decrease the gain
Turn right
Increase the gain
Push
Go to “Out1” source control
Out 2:
Outdoor-
Stage4
G: 0db
Gain On
+
2 blinking
Out2
(XLR)
Turn left
Decrease the gain
Turn right
Increase the gain
Push
Go to “Out2” source control
Out Blu:
Entrance
Speaker
G: +5db
Gain On
+
3 blinking
Out3 L/R
(Mini jack or
Bluetooth)
Turn left
Decrease the gain
Turn right
Increase the gain
Push
Go to “Out Bluetooth” source control
Notices:
-The gain is highlighted when changing its value.
-The gain LED is “On”when acting on the gain.
-The stream’s LED we are acting on is blinking.
3.1.2 Change the source
Screen
LED
Actives
Stream
changed
Action on
the button
Action
Out 1:
Outdoor-
Stage3
G: -3db
Source
On +
1 blinking
Out1
(XLR)
Turn left
Go to the next Dante device
Turn right
Go to the previous Dante device
Push
Go to “Out2” gain control
Out 1:
Outdoor-
Stage4
G: 0db
Source
On +
2 blinking
Out2
(XLR)
Turn left
Go to the next Dante device
Turn right
Go to the previous Dante device
Push
Go to “Out Bluetooth” gain control
Out 1:
Entrance
Speaker
G: +5db
Source
On +
3 blinking
Out3 L/R
(Mini jack or
Bluetooth)
Turn left
Go to the next Dante device
Turn right
Go to the previous Dante device
Push
Go to Bluetooth Control
If the labels characters number is inferior or equals to 7 the device switch automatically to a
larger font as show below.
Other behavior and display configuration are also available, refers to the section 3.3 to know
more about it.
Short labels
display
Out 1:
STAGE 0
G: +5db

AV-WALL-DT4oB User’s manual v1.1 Page 11 / 26
3.1.3 Bluetooth Stream Control
If an output Bluetooth device is paired (Bluetooth speakers, earphones) the user can set the
pairing status by turning left or right the button.
Action on the
button
Action
Turn left
Select the next Bluetooth menu action
Turn right
Select the previous Dante device
Push
Go to the selected option
Screen
Action
NEXT
PHANTOM
Speaker
Playing
Go to Bluetooth status (play/pause)
setting
SEARCH
PHANTOM
Speaker
Playing
Search for Bluetooth device to be paired
RESET
PHANTOM
Speaker
Playing
Reset Bluetooth, force disconnection of
the Bluetooth devices

AV-WALL-DT4oB User’s manual v1.1 Page 12 / 26
Bluetooth handle errors:
ERROR PA: Device fails to pair, probably the device is already used by another equipment or
is no more connected.
ERROR OP: Device fails to open; the device might not support audio Bluetooth playback.
If these errors occur, it is strongly recommended to reset the Bluetooth module and all the
connections. To reset the Bluetooth device refers to the section Bluetooth Configuration:
Reset & Unpair ALL
3.1.3.1 Bluetooth device search & pairing
When “SEARCH is chosen the Bluetooth discovery process begin.
Wait message is displayed with a countdown of 8s until a device is found. After the discovery
the user can select a device to be paired in the list. The number of found devices and the
current selected devices is indicate under the name of the Bluetooth device.
Screen
Action on the
button
Action
Device 1
1/2
Turn left
Go to the previous Bluetooth
discovered device
Device 2
2 /2
Turn right
Go to the next Bluetooth
discovered device
The user has the option to not pair to Bluetooth device by selecting the item number 0 “Not
Paired”
3.1.3.2 Bluetooth Playing Status
Action on the
button
Action
Turn left
Select the next Bluetooth menu action
Turn right
Select the previous Dante device
Push
Go to the selected option
Screen
Pairing
PHANTOM
Speaker
NEXT

AV-WALL-DT4oB User’s manual v1.1 Page 13 / 26
The default status of the Bluetooth after pairing is pause. If pairing is successful, user can
set Play or Pause action on the Bluetooth stream
Screen
Correctly Paired Device
PAUSE
PHANTOM
Speaker
Play
Go to Bluetooth status (play/pause)
setting
PLAYING
PHANTOM
Speaker
Pause
Search for Bluetooth device to be paired
If no device is set, or error occur during pairing the user can continue and go to the passive
state of the device or go back to the Bluetooth menu by selecting and pressing retry.
Screen
No Paired Bluetooth Device / Pairing
Error
ERROR
PHANTOM
Speaker
NEXT
Go to passive state
ERROR
PHANTOM
Speaker
RETRY
Go to Bluetooth menu
OFF
NO
DEVICE
NEXT
Go to passive state
OFF
NO
DEVICE
RETRY
Go to Bluetooth menu
3.1.3.3 Bluetooth Reset & Unpair
If some pairing errors occurs, it is safer to reset the Bluetooth module. To do so, select the
“RESET” option. It may take few seconds before all connections close and the module reboot.

AV-WALL-DT4oB User’s manual v1.1 Page 14 / 26
3.2 Configuration mode
The Configuration mode is activated by pressing the push-button for at least 5s.
When in configuration mode, the user can set these parameters in this order:
-Screen brightness
-LEDs brightness
-Output sources selection mapping modes
-Gain locking
Note: Each parameter access can be disactivated. If no access to any of those parameters
is given, the configuration menu is bypassed, and device remains in control mode.

AV-WALL-DT4oB User’s manual v1.1 Page 15 / 26
3.2.1 Screen brightness
Brightness change are directly visible on the screen. Adjust range goes from 0 to 15.
-Turn left to decrease the screen’s brightness
-Turn right to increase the screen’s brightness.
-Press shortly the button to set the next option: LEDs brightness.
-Press the button for 5s to exit the configuration mode and return to control mode
Screen
OLED 7
LED 3
Mono
3.2.2 LEDs brightness
During this setting all LEDs are activated:
-Turn left for decreasing the brightness
-Turn right to increase the brightness
-Press shortly the button to set the next option: Sources mapping modes.
-Press the button for 5s to exit the dimmer mode and return to control mode
Screen
OLED 7
LED 3
Mono
3.2.3 Sources mapping modes
Source mapping modes: 3 modes are available currently:
-Mono: Outputs sources and gains are mapped independently
-Stereo: Outputs sources are mapped by group of 2 channels.
oOut1: Radio Left, Out2: Radio_Right.
oGain of Out1 and Out2 are set equals when changed on AV Wall DT4O device.
-Grouped: Set all the outputs to the same source.
oGain of Out1 and Out2 and Out3 L/R are set to equals when changed on the
AV Wall D4TO device.
Screens
OLED 7
LED 3
Mono
OLED 7
LED 3
Stereo
OLED 7
LED 3
Group

AV-WALL-DT4oB User’s manual v1.1 Page 16 / 26
3.2.3.1 Stereo mode
Screen
LED Actives
Stream
changed
Action on
the button
Action
Out 1+2:
Outdoor-
Stage3
G: -3db
Led SRC On
Led 1+2 blink-
ing
Out1
(XLR)
Turn left
Go to the next Dante device
Turn right
Go to the previous Dante device
Push
Go to “Out2” gain control
Out Blu:
Outdoor-
Stage4
G: 0db
Led SRC On
Led 3 blinking
Out2
(XLR)
Turn left
Go to the next Dante device
Turn right
Go to the previous Dante device
Push
Go to “Bluetooth” gain control
3.2.3.2 Grouped mode
Screen
LED Actives
Stream
changed
Action on
the button
Action
Group:
Concert
Hall
G: +5db
Led SRC On
Led 1+2+3
blinking
Out1, Out2,
Out3 (L/R )
Mini jack or
Bluetooth
Turn left
Go to the next Dante device
Turn right
Go to the previous Dante device
Push
Go to Bluetooth Control
3.2.3.3 Unavailable devices handling & Dante remote control.
If a source is not available on the network the user is notified after few
seconds by a question mark on the output title.
•If the current source is changed remotely via Dante controller, there
is 2 different case:
oThe source is already register as a preset, then its label is normally displayed.
oThe source isn’t register as a label then the Dante channel and device currently
connected are displayed.
Unavailable
device
Group:?
Concert
Hall
G: +5db
Unregister
devices
sources
appearance
Group:
01@AVDT-
BOB-542
G: +5db

AV-WALL-DT4oB User’s manual v1.1 Page 17 / 26
3.2.4 Gain lock
Once the gain lock is set the user cannot change the output gain on the device, however it is
still possible to do it on AVS Monitor.
-Turn right to unlock the gain control
-Turn left to lock the gain control
Screen
Action on the
button
Action
Gain Off
Turn left
Lock the gain control
Gain On
Turn right
Unlock the gain control
3.2.5 Source lock
Once the source lock is set, for every output, the user cannot change the sources.
-Turn right to unlock the source control
-Turn left to lock the source control
Screen
Action on the
button
Action
Src Off
Turn left
Lock the source control
Src On
Turn right
Unlock the source control
3.3 Other operating modes and options
An operating mode set automatically a group of parameters and redefine the general behavior
of the AVWALL i.e. display modes, audio mapping modes, gain control and LEDs controls
behaviors.
AVWALL display modes is option which change the look of the control modes:
gain and source control on the same screen or not.
For instance, you can see how looks an interface configured in source and gain on separate
screen, with a custom channels mapping behavior:
-Gain control:
Screen
LED
Actives
Stream
changed
Action on
the button
Action
Gain:
-9db
Gain On
+
1 blinking
Out 3-4
(mini
jack)
Turn left
Decrease the headphone output gain
Turn right
Increase the headphone output gain
Push
Go to source control
-Source control:

AV-WALL-DT4oB User’s manual v1.1 Page 18 / 26
Screen
LED
Actives
Stream
changed
Action on
the button
Action
MIC1
Source
On +
1 blinking
All
outputs
(XLR +
mini jack)
Turn left
Go to the next Dante device
Turn right
Go to the previous Dante device
Push
Go to headphone gain control
In this mode labels size are automatically set as show below:
-It is possible to disable or enable the access to the configuration menu or only some
options from it.
-One can also disable/enable access to the Bluetooth control.
Labels appearance
Short labels
Medium
labels
Long
labels
MIC1
Arbitra
tor 4
FRANCE
TELVISIO
N 2
Up to 4
characters
Up to 14
characters
Up to 32
characters

AV-WALL-DT4oB User’s manual v1.1 Page 19 / 26
4AV-WALL-DT4oB control using AVS-Monitor
4.1 “General” menu
This menu enables to change the behavior of the interface
1. Analog gain unit defines the unit of gain:
1.1. Can be select in dB or dBu
2. Link Behavior defines which parameter are linked when the link button is set in the”
In” interface
2.1. Only Gain when “Gain Only” is Green (i.e. selected)
2.2. All parameters are linked when “All components” is Green (i.e. selected)
3. Backup management
3.1. Save the current memory configuration of the AW WALL DT4O device.
3.2. Reload a previously saved memory configuration of the AW WALL DT4O device.

AV-WALL-DT4oB User’s manual v1.1 Page 20 / 26
4.2 “Properties” menu
This menu shows information on the selected AV-WALL
Other manuals for AV-WALL-DT4oB Dante
2
Table of contents