Avantco Equipment 77P78 User manual

User Manual
www.AvantcoEquipment.com 1
Panini Grills
Models: 177P78, 177P84, 177P70S, 177P75SG, 177P85S, 177P88SG
Please read and keep these instructions. Indoor use only.
04/2020
User Manual

User Manual
2 www.AvantcoEquipment.com
Thank you for purchasing and using our Panini/Sandwich Grill. To make best use of this product and avoid damage
and injury, please read this manual carefully before using the machine, and keep it handy for future reference. The
Sandwich Grill design combines the advantages of stylish design, efficient construction, ease of operation and simple
maintenance. The grill temperature can be easily adjusted to suit cooking requirements, and, while mainly used for
sandwich grilling, the grill may be used for other foods.
WARNING: Any modifications or incorrect installation, unauthorized adjustments or maintenance by unauthorized per-
sonnel may result in property loss or injury. Please contact the supplier for any
necessary adjustment or repair, which should only be done by trained professionals.
CAUTION: For your safety, do not place or store any flammable liquid or gas items near the sandwich grill.
WARNING: This equipment must be connected to a grounded power outlet for your safety.

User Manual
www.AvantcoEquipment.com 3
Notes
1. This product is intended for commercial use only.
2. Do not disassemble or modify the machine.
3. Lift the upper grill assembly smoothly; jerking it up may cause damage or injury.
4. Before cleaning, disconnect power and allow machine to cool.
5. Do not immerse in water or spray water onto the grills. Water may cause short circuit and injury or damage.
6. To avoid damage, do not jam materials onto the grill or place heavy objects there.
7. When the machine is in use, the body and grill plates are hot, and will cause burns if touched.
8. Do not use an ungrounded power supply cord.
Cautions
1. It is recommended that the machine be unplugged during thunderstorms to avoid potential damage from nearby
lightning strikes.
2. Avoid damaging the controls or grill surfaces with sharp or heavy objects.
3. Turn off power after daily use.
4. Do not use the machine with a damaged power cord.
5. Any internal repair or maintenance should be performed by a factory authorized repair technician.
Important Features
1. Convenient independent temperature controls are easy to set and may result in overall power savings (double unit).
2. Grill temperatures may be set for different uses at the same time (double unit).
3. External shell and grease collector tray are stainless steel.
4. The grills are designed to be easy to use and maintain.

User Manual
4 www.AvantcoEquipment.com
Specifications
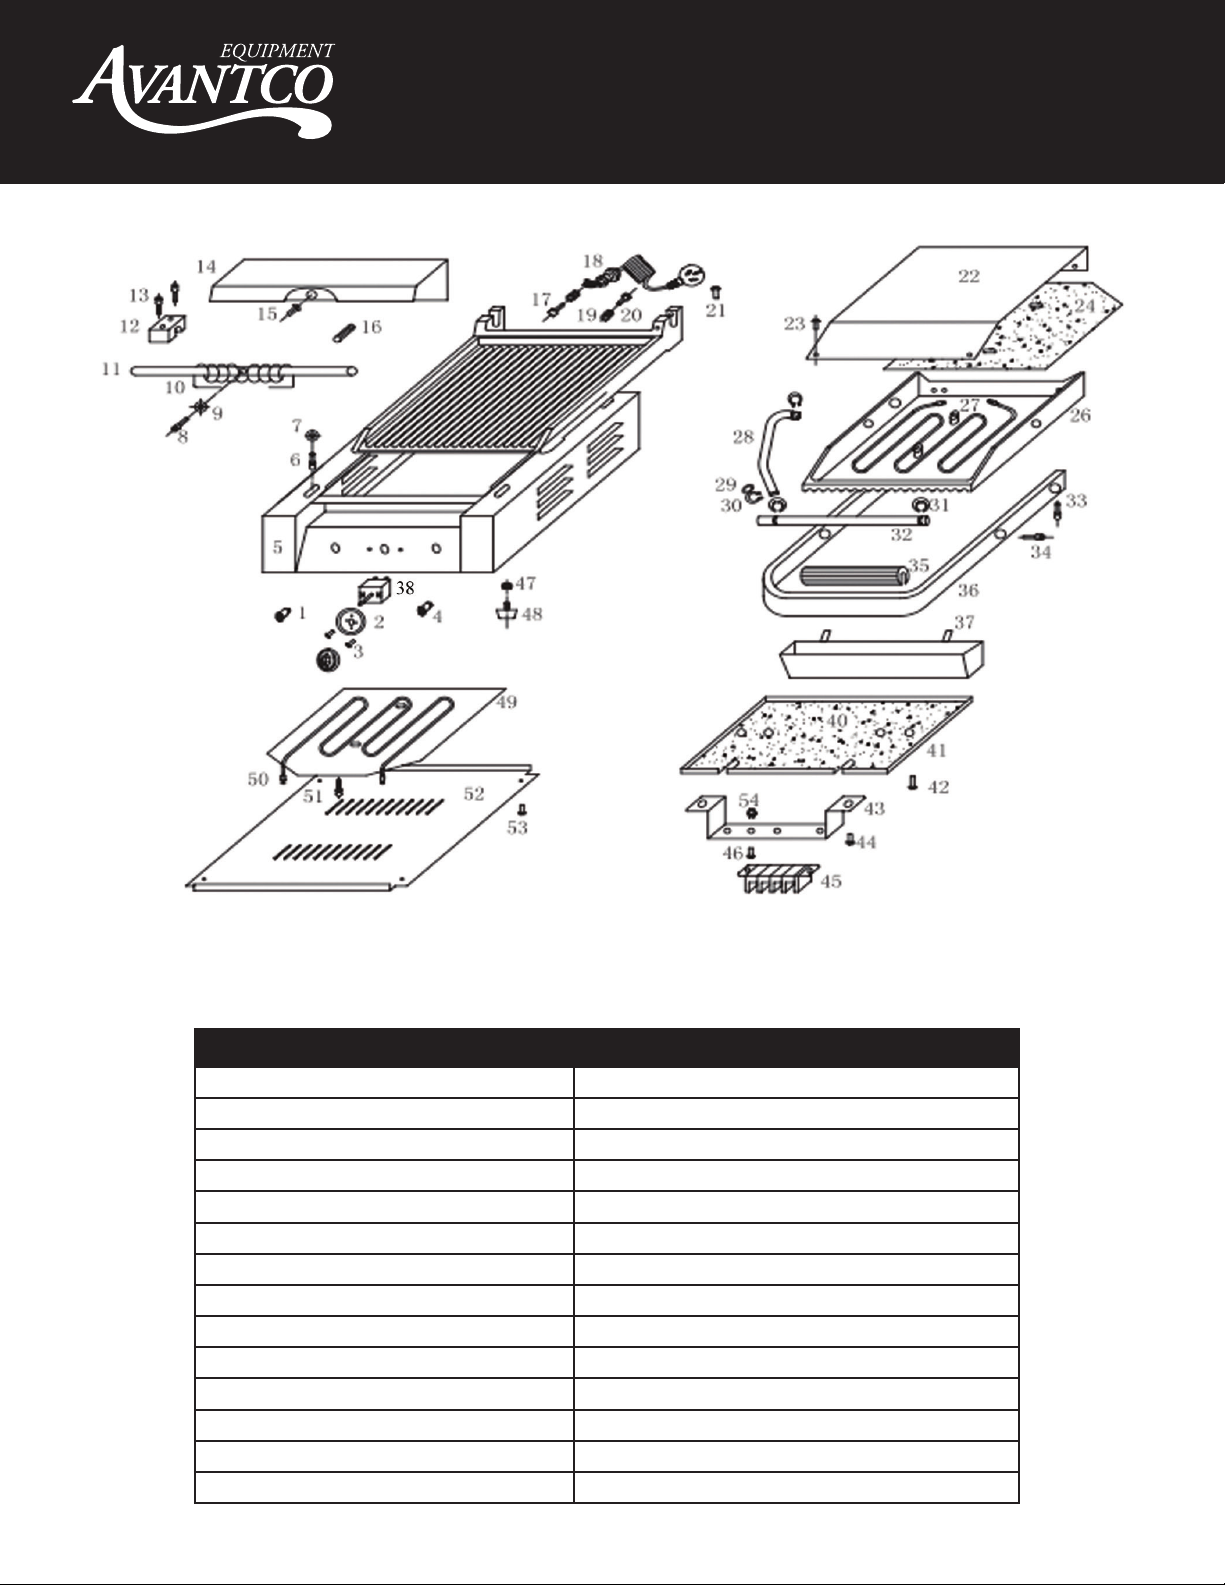
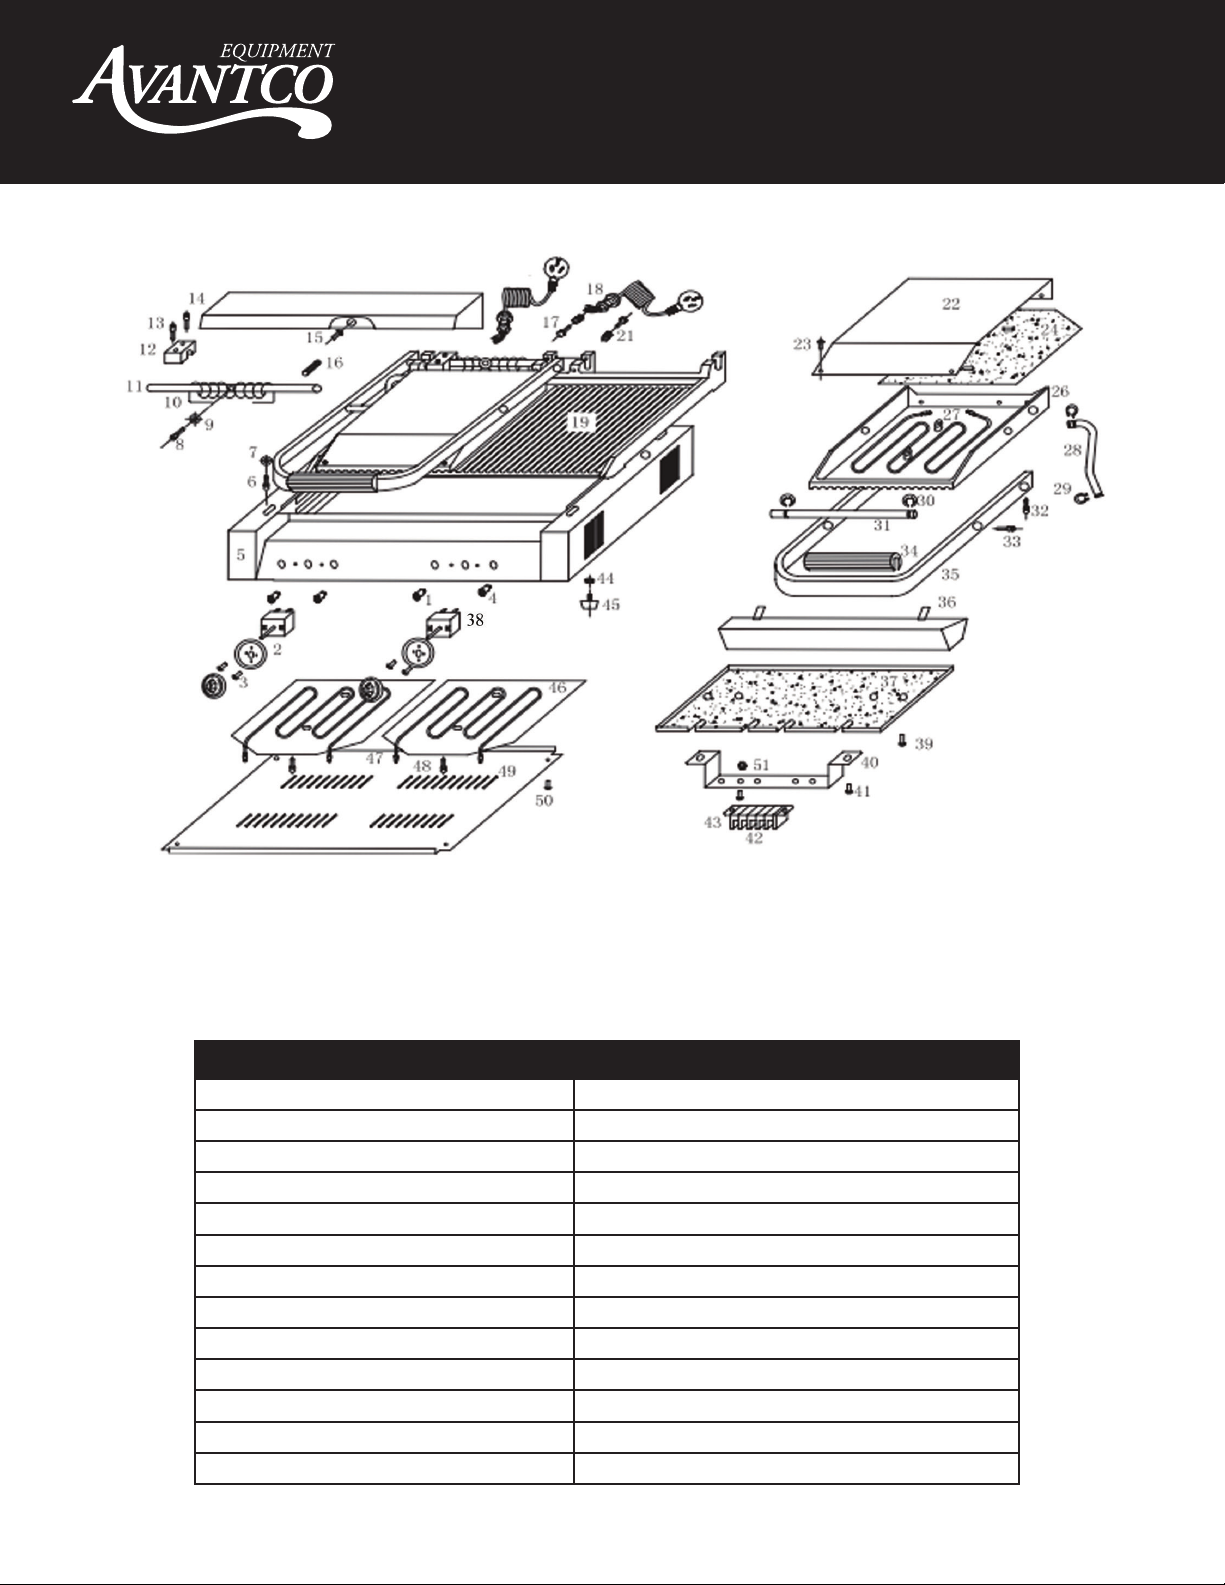
Single Panini Grill Single Panini Grill Double Sandwich Grill
Model Number P60S, P65SG, P68 P78, P70S, P75SG P84, P85S, P88SG
Voltage 120V, 60 Hz 120V, 60 Hz 120V, 60 Hz
Power 1.75 Kw 1.75 Kw 2x1.75 Kw
Temp. Controls 1 1 2
Temp. Range 120 F - 570 F 120 F - 570 F 120 F- 570 F
Upper Grill (overall) 8 1/2"x 8 1/2" 13"x 8 3/4" 8 7/16"x 16 7/8"
Lower Grill 8 1/2"x 8 1/2" 13"x 8 3/4" 9 1/16"x 18 3/16"
Overall Size 17"x 12"x 10" 17"x 12"x 10" 22 7/16"x 15 9/16"x 8 1/4"
Notes
1. This machine is intended for use at 120V 60 Hz only.
2. A suitable circuit protector (fuse, circuit breaker, etc. ) should be located near the machine.
3. Be certain cable is properly connected to voltage source.
4. Do not place any hard objects on the grill. Do not slam the grill closed.
5. Recommended temperature range for normal use is 392°-482°F.
6. The machine is intended for use where room temperature is below 113°F and humidity below 85%.
7. Do not use caustic or abrasive products for cleaning.
Operating Instructions
1. Be sure power cord is properly connected to a proper source (120V, 60 Hz)
2. Power indicator should indicate power available (light on).
3. Set to desired temperature (heating indicator will come on). Warm-up time is approximately 20 minutes. Heating
indicator will cycle at set temperature.
4. When set temperature is reached, lift top grill, using black handle, and lightly grease grill plates with vegetable oil.
Place food on grill and lightly press handle down. Excess oil will collect in the grease collection tray. Remove food
when cooked. The heating elements will automatically cycle as needed.
5. Turn machine off when no longer needed and unplug from power source.
Instructions for First Time Use
In order to protect the plates of your new grill during transportation, a layer of food-safe oil was coated on the surface
prior to shipment. This oil is harmless, but must be removed before you begin to use. To remove, preheat the grill until
the oil liquifies. Next, carefully wipe away the melted oil with a clean, soft cloth. Once all of the oil is removed you can
begin to use your grill

User Manual
www.AvantcoEquipment.com 5
Cleaning and Maintenance
1. Disconnect machine before cleaning and allow to cool.
2. Use only a damp towel with non-corrosive cleaner. Do not immerse or flush with water.
3. Wipe down outside surface to remove any soil.
4. Store in a dry clean area when not in use.
Daily Check
Before using the machine, visually inspect for any signs of damage or frayed power cord.
Be certain machine is on a level countertop.
After turning it on, check for anything unusual before you use it.
Inspect the machine every day before using.
If there is any question about operation, do not use.
Attack tough grease, oil, and carbon with this ready to use decarbonizer
and degreaser. Its unique formula is designed to clean ovens, grills,
hoods and a wide variety of other surfaces.

User Manual
6 www.AvantcoEquipment.com
Troubleshooting
Problem Possible Cause Action
Grill plates do not heat even though power
indicators are lit.
Defective controller Replace controller
Defective heater(s) Replace heater(s)
Temperature can not be controlled. Defective controller Replace controller
Heating appears normal but power indicators
are not lit.
Defective indicator(s) Replace
No action when power is turned on. Defective fuse or open circuit
breaker
Replace fuse or reset circuit
breaker
Do not use the machine if any of the above occur.
Any troubleshooting corrections should be performed by a qualified technician.
Hinge Adjustments
Issue: Opening hinge is too tight, making it difficult to open and shut the top shell. Or opening hinge is too loose,
which can cause the top shell not to close correctly.
Solution:
Step 1 - Open the back cover
using a philips head screw driver
Step 3 - Close the back cover
using a Phillips head screwdriver.
Step 2 - Using an Allen wrench,
adjust the tightness to feel.
Open and shut the top shell until
the tightness feels natural while
opening closing the lid. Your
manual bag includes this tool
and grease. Add the grease
while moving the top shell to
lubricate the hinge.

User Manual
www.AvantcoEquipment.com 7
Diagram # and Part Name Replacement Part Item #
1. Green "Power" Light 177PLIGHTGRN (P60S, P65SG, P68, P78, P75SG, P70S)
2. Temperature Control Knob 177PKNOB (P60S, P65SG, P68, P78, P75SG, P70S)
3. Screw M4x6
4. Orange "Hot" Light 177PLIGHTORG (P60S, P65SG, P68, P78, P75SG, P70S)
5. Lower Case
6. Internal Wrenching Screw M6x10
7. Flat Washer
8. Internal Wrenching Screw M5x25
9. Flat Spacer
10. Spring 177PSPRING (P60S, P65SG, P68, P78, P75SG, P70S)
11. Rear Shaft
12. Shaft Retainer
13. Internal Wrenching Screw M6x40
14. Rear Upper Cover
Parts Key Single Grill

User Manual
8 www.AvantcoEquipment.com
Diagram # and Part Name Replacement Part Item #
15. Slotted Screw M4x8
16. Spring Pin
17. Ground Screw M6x15
18. Power Cord 177FCORD (P60S, P65SG, P68, P78, P75SG, P70S)
19. Bottom Plate 177P7BTMFLT (flat), 177P7BTMGRV (grooved),
(P78, P75SG, P70S)
20. Upper Grill Cover
21. Slotted Screw M4x8
22. Top Cover
23. Slotted Screw M4x8
24. Upper Insulator
26. Top Grill Plate 177P7UPRFLT (flat), 177P7UPRGRV (grooved),
(P78, P75SG, P70S)
27. Top Heating Element 177P7TOPELM (P60S, P65SG, P68, P78, P75SG, P70S)
28. Wiring Guide Tube
29. Wiring Guide Tube Stop
30. Guide Tube Retainer
31. Retaining Ring
32. Upper Plate Shaft
33. Internal Wrenching Screw m6x8
34. Internal Wrenching Screw m6x8
35. Handle 177P7HANDLE (P60S, P65SG, P68, P78, P75SG, P70S)
36. Grease Collector
37. Drip Tray 177P6RAY (P60S, P65SG, P68)
177PTRAY (P78, P75SG, P70S)
38. Thermostat 177PTHERM (P60S, P65SG, P68, P78, P75SG, P70S)
40. Bottom Insulator
41. Bottom Pan
42. Slotted Screw M4x8
43. Barrier Strip Mounting Plate
44. Slotted Screw M4x8
45. Ceramic Termical Board
46. Hex Head Screw M6x20
47. Hex Nut M4
48. Rubber Foot
49. Rubber Heater Pressure Plate
50. Bottom Heating Element 177P7BTMELM (P78, P75SG, P70S)
51. Internal Wrenching Screw M6x8
52. Bottom Cover
53. Philips Head Screw M4x8
54. Hex Nut

User Manual
www.AvantcoEquipment.com 9
Diagram # and Part Name Replacement Part Item #
1. Green "Power" Light 177PLIGHTGRN (P84, P85S, P88SG)
2. Temperature Control Knob 177PKNOB (P84, P85S, P88SG)
3. Screw M4x6
4. Orange "Hot" Light 177PLIGHTORG (P84, P85S, P88SG)
5. Lower Case
6. Internal Wrenching Screw M6x10
7. Flat Washer
8. Internal Wrenching Screw M5x25
9. Flat Spacer
10. Spring 177PSPRING (P84, P85S, P88SG)
11. Rear Shaft
12. Shaft Retainer
13. Internal Wrenching Screw M6x40
Parts Key Double Grill

User Manual
10 www.AvantcoEquipment.com
Diagram # and Part Name Replacement Part Item #
14. Rear Upper Cover
15. Slotted Screw M4x8
16. Spring Pin
17. Ground Screw M6x15
18. Power Cord 177FCORD (P84, P85S, P88SG)
19. Bottom Grill Plate 177P8BTMFLT (flat), 177P8BTMGRV (grooved),
(P84, P85S, P88SG)
20. Upper Grill Cover
21. Slotted Screw M4x8
22. Top Cover
23. Slotted Screw M4x8
24. Upper Insulator
26. Top Grill Plate 177P8UPRFLT (flat), 177P8UPRGRV (grooved),
(P84, P85S, P88SG)
27. Top Heating Element 177P8TOPELM (P84, P85S, P88SG)
28. Wiring Guide Tube
29. Guide Tube Retainer
30. Retaining Ring
31. Upper Platen Shaft
32. Internal Wrenching Screw m6x8
33. Internal Wrenching Screw m6x8
34. Handle 177P8HANDLE (P84, P85S, P88SG)
35. Handle Frame
36. Drip Tray 177P8TRAY (P84, P85S, P88SG)
37. Bottom Insulator
38. Thermostat 177PTHERM (P84, P85S, P88SG)
39. Slotted Screw M4x8
40. Barrier Strip Mounting Plate
41. Slotted Screw M4x8
42. Ceramic Terminal Board
43. Hex Head Screw M6x20
44. Hex Nut M4
45. Rubber Foot
46. Rubber Heater Pressure Plate
47. Bottom Heating Element
48. Internal Wrenching Screw M6x8
49. Bottom Cover
50. Philips Head Screw M4x8
51. Hex Nut M6

User Manual
www.AvantcoEquipment.com 11
User Manual
8 www.AvantcoEquipment.com

User Manual
12 www.AvantcoEquipment.com
User Manual
www.AvantcoEquipment.com 9

User Manual
www.AvantcoEquipment.com 13
Equipment Limited Warranty
To Make a Warranty Claim:
For Warranty Inquiries contact the locaon where you purchased the product:
• WebstaurantStore.com: Contact help@webstaurantstore.com. Please have your order number ready.
• The Restaurant Store: If you purchased this unit from your local store, please contact your store directly.
• TheRestaurantStore.com: Online purchases, call 717-392-7261. Please have your order number ready.
Failure to contact the designated locaon prior to obtaining equipment service may void your warranty.
Avantco makes no other warranes, express or implied, statutory or otherwise, and HEREBY DISCLAIMS ALL IMPLIED
WARRANTIES, INCLUDING THE IMPLIED WARRANTIES OF MERCHANTABILITY AND OF FITNESS FOR A
PARTICULAR PURPOSE.
This Limited Warranty does not cover:
• Equipment sold or used outside the Connental United States
• Use of unltered water (if applicable)
• Avantco has the sole discreon on wearable parts not covered under warranty
• Equipment not purchased directly from an authorized dealer
• Equipment used for residenal or other non-commercial purposes
• Equipment that has been altered, modied, or repaired by anyone other than an authorized service agency
• Equipment where the serial number plate has been removed or altered.
• Damage or failure due to improper installaon, improper ulity connecon or supply, and issues resulng from
improper venlaon or airow.
• Defects and damage due to improper maintenance, wear and tear, misuse, abuse, vandalism, or Act of God.
Any acon for breach of this warranty must be commenced within 1 year of the date on which the breach occurred.
No modicaon of this warranty, or waiver of its terms, shall be eecve unless approved in a wring signed by the
pares. The laws of the Commonwealth of Pennsylvania shall govern this warranty and the pares’ rights and dues under
it. Avantco shall not under any circumstances be liable for incidental or consequenal damages of any kind, including but
not limited to loss of prots.
Avantco warrants its equipment to be free from defects in material and workmanship for a period of 1 year. This is the sole
and exclusive warranty made by Avantco covering your Avantco brand equipment. A claim under this warranty must be made
within 1 year from the date of purchase of the equipment. Only the equipment’s original purchaser may make a claim under
this warranty. Avantco reserves the right to approve or deny the repair or replacement of any part or repair request. The
warranty is not transferable. Avantco Equipment installed in/on a food truck or trailer will be limited to a period of 30 days
from the original date of purchase.
This manual suits for next models
5
Table of contents
Other Avantco Equipment Grill manuals
Popular Grill manuals by other brands

heute wohnen
heute wohnen HWC-K92 manual

Outback
Outback Modern Classic Trooper Assembly and operating instructions

PALSON
PALSON RANGER - brochure

Nexgrill
Nexgrill 720-0670D Assembly & operating instructions

Kasanova
Kasanova GRILL FOR ALL instruction manual

Galaxy Outdoor
Galaxy Outdoor Kamado Rocket manual