Avanti WDB101 User manual

1
INSTRUCTION MANUAL
MANUAL DE INSTRUCCIONES
Model Number/ No. de Modelo: WDB101
CLOTHES DRYER STACKING BRACKET
CAUTION:
BEFORE USE, PLEASE READ AND FOLLOW ALL SAFETY RULES AND OPERATING
INSTRUCTIONS.
Avanti has a policy of continuous improvement on its products and reserves the right to change materials and
specifications without notice.
Avanti Products
P.O. Box 520604 - Miami, Florida 33152
www.avantiproducts.com

2
Beforebeginningtoassemblethisproduct,reviewandensurethatyouhavereceivedallofthepartsas
listed/shownbelow:
**PartI:2additionalpiecesaresuppliedasspares.
ComponentsIncluded
PartCode:Description Quantity
ABottomSupportFrame 1
BMiddleSupportFrame 1
CTopShel
f
1
DRearLeg(Bottomsection) 2
EFront/RearLeg(Topsection) 4
FFrontLeg(Bottomsection) 2
GAnti‐TipSafetyBracket(Part1of2) 2
HAnti‐TipSafetyBracket(Part2of2) 2
IShelf/FrameSupportClips 30**
JSpannerWrench 1
KNut(ForAnti‐TipSafetyBracketAssembly) 2
LWallAnchor2
MPhillipsHeadSel
f
‐TappingScrew 2
NPhillipsHeadMetalScrew (ForAnti‐TipSafetyBracket
Assembly)
2
OLogo/SupportBar 1
PFront/RearLeg(Middlesection) 4
QPlasticPad
(Notforinstallation.Forpackingprotectiononly)
4

3
AssembledDimensions

4
YourWasher/DryerStackingBracketisdesignedtoaccommodatebothtoploadingorfrontloading
washingmachines.Followtheassemblyinstructionsbelowtoassemblethebrackettofityourspecific
washingmachinetype.ImagesshowninthisinstructionguideareforassemblyforusewithaTOP‐Load
washer.
Step1:Assemblingthelegs:
WhenusingwithaTOP‐Loadwasher.
Assembletherearlegsbyscrewingtogetherallthreesectionsofthe
rearleg.
PartD–RearLeg(Bottomsection)
PartP–Front/RearLeg(Middlesection)
PartE–Front/RearLeg(Topsection)
Assemblethefrontlegsbyscrewingtogetherallthreesectionsofthe
frontleg.
PartF–FrontLeg(Bottomsection)
PartP–Front/RearLeg(Middlesection)
PartE–Front/RearLeg(Topsection)
WhenusingwithaFRONT‐Loadwasher.
Assembletherearlegsbyscrewingtogetheronlythebottomandtop
sectionsoftherearleg
(PartsD&E).
Assemblethefrontlegsbyscrewingtogetheronlythebottomandtop
sectionsofthefrontleg
(PartsF&E).
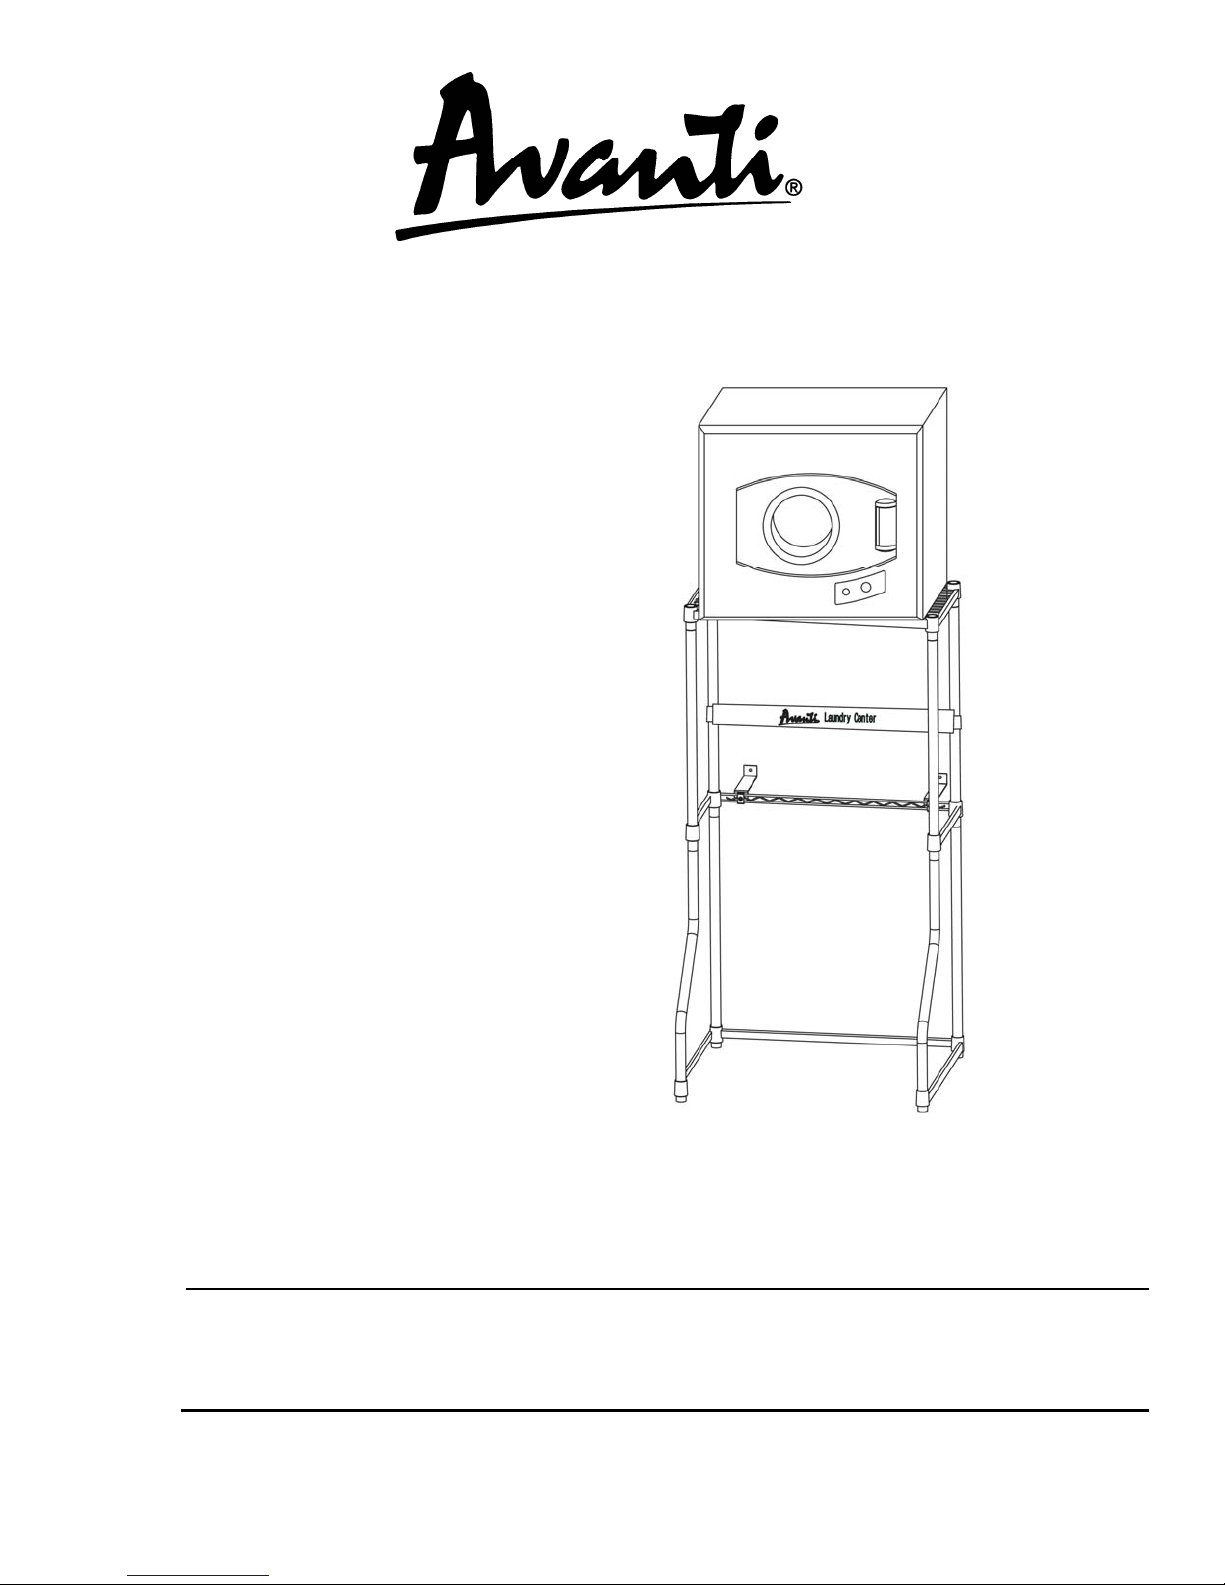
Step2:AssemblingtheBottomSupportFrame.
WesuggestthatyouputtheUshapedbottomsupportframe
(PartA)inaverticalposition.Asthiswillallowyoutoinsert
thelegsandtheShelf/Framesupportclipswithease.
a) LaytheBottomsupportframe(PartA)onitsbackwith
eachsidebarfacingupwards.
b) Inserteachoftherearlegs(assembledinstepone)
intotheholesatbothrearcornersofthesupport
frame.
c) UsingtheShelf/Framesupportclips(PartI)insertthe
plastictaperedclipsintotheappropriategrooveson
eachleg.(Seetheimage).
d) Slightlypressthebottomsupportframedownwardon
tothesupportclips.
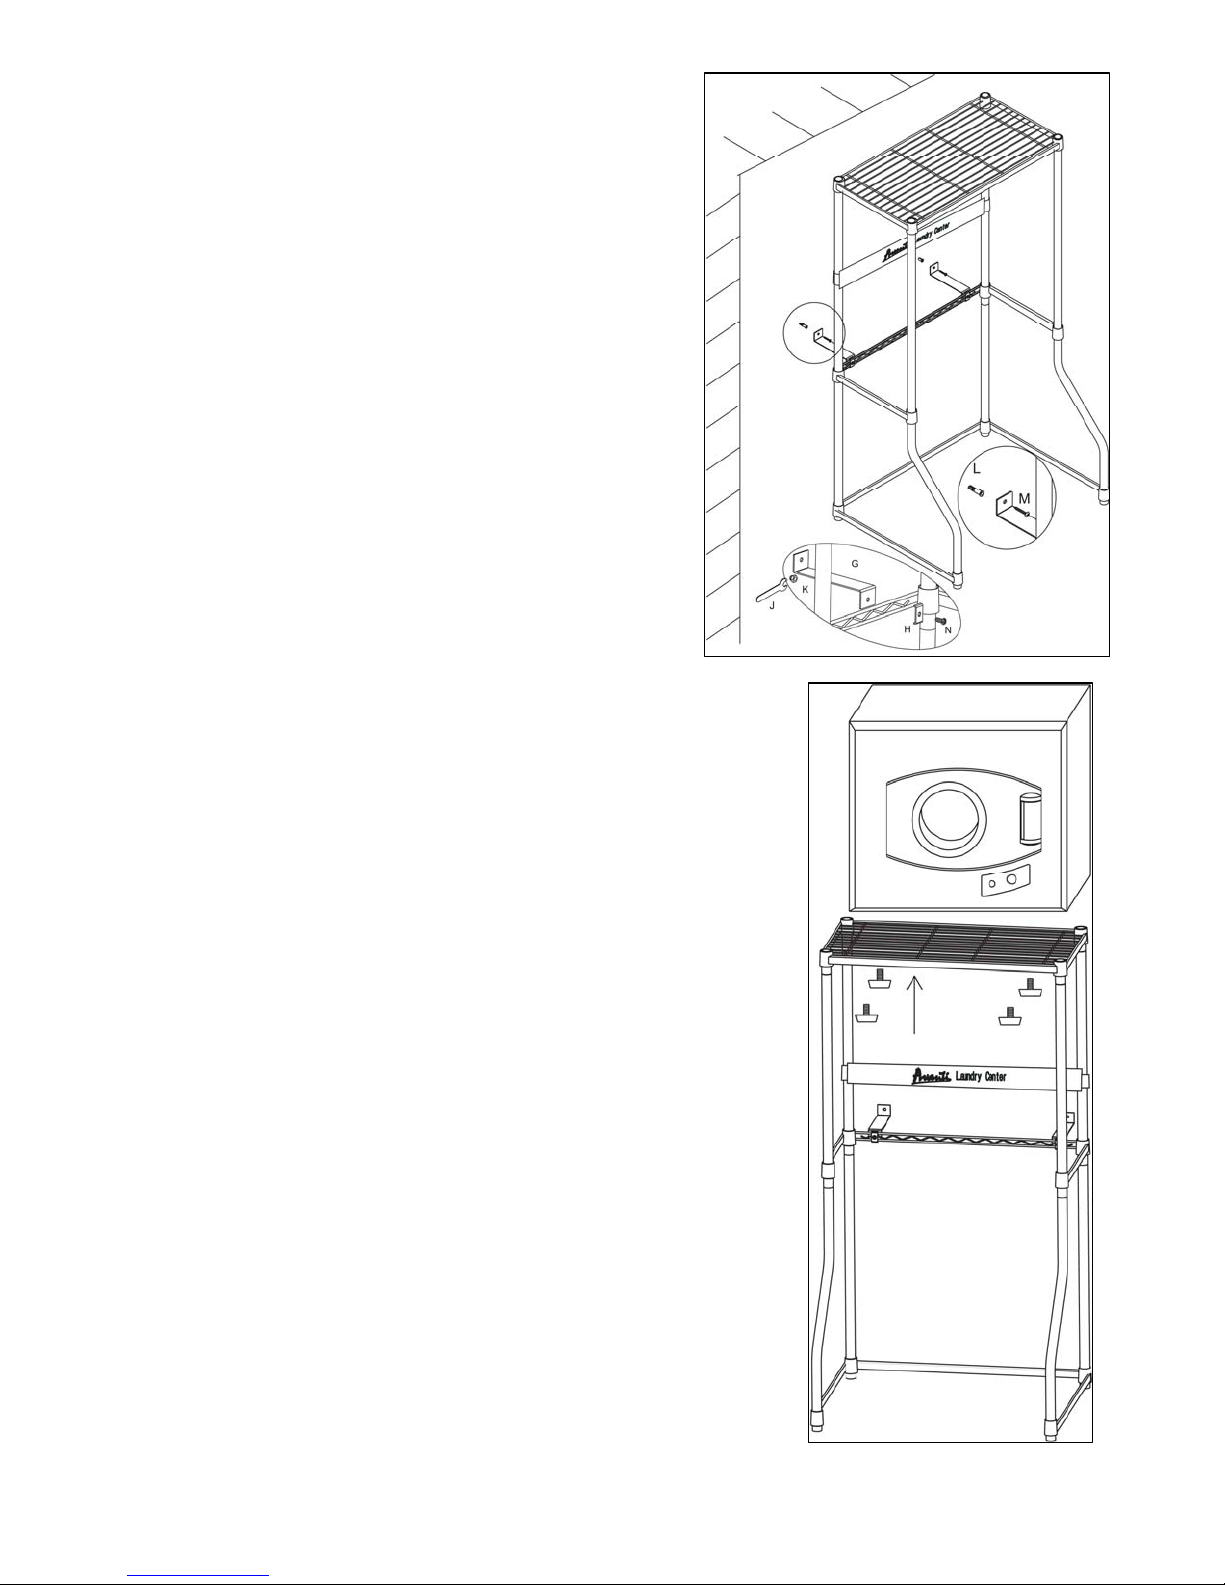
e) InserteachoftheFRONTlegsintheremainingcorner
holesofthesupportframeandrepeatStepC.
f) Standtheunituprighttocontinuetheremainderof
thisassembly.
g) Presseachcornerdownwardfirmlytoensurethe
supportframeisfullylockedintoposition.

5
Step3:AssemblingtheMiddleSupport
FrameandLogo/SupportBar.
TheMiddlesupportframe(PartB)MUSTbeinstalledto
maintainthestackingbracketsquareandstable.
a) UsingtheShelf/Framesupportclips(PartI)insert
theplastictaperedclipsintotheappropriate
groovesoneachleg.(Seetheimage).
b) AlignthecornerholesoftheMiddlesupport
frame(PartB)witheachofthelegsandgently
lowerontothesupportclips.Presseachcorner
downwardfirmlytoensurethesupportframeis
fullylockedintoposition.
c) UsingtheShelf/Framesupportclips(PartI)insert
theplastictaperedclipsintotheappropriate
groovesoneachoftherearlegs.(Seetheimage).
d) AligntheholesoneachendoftheLOGO/Support
Bar(PartO)witheachoftherearlegsandslightly
lowerontothesupportclips.
Step4:AssemblingtheTopShelf:
a) UsingtheShelf/Framesupportclips(PartI)insert
theplastictaperedclipsintotheappropriate
groovesoneachoftherearlegs.(Seetheimage).
b) AligntheholesateachcorneroftheTopShelf
(PartC)witheachofthelegsandgentlylower
ontothesupportclips.

6
Step5:InstallingtheAnti‐TipSafetyBracket:
a) AttachtheAnti‐TipSafetyBracket(PartsGandH)to
theStackingbracketasshown.Byjoiningthetwo
(2)partsusingthePhillipsHeadScrewandNut
(PartsKandN).
b) AligntheassembledStackingbracketinplaceand
markwheretheAnti‐TipSafetyBracketistobe
attachedtothewall.
c) UsingtheWallAnchorsandSelfTappingPhillips
headscrews(PartsLandM)includedtoattachthe
assembledStackingbrackettothewall.
Step6:InstallingYourAvantiDryer(ModelD110)tothe
topshelf.
InordertoplaceyourAvantiDryer(ModelD110)onthestackingkityou
mustfirstremovethefour(4)levelinglegsfromthebottomofthedyer.
a) PlacetheDryeronthetopshelf.
b) Re‐installthefour(4)levelinglegspreviouslyremovedthrough
theundersideofthetopshelfandtightenuntilthedryeris
secure.
Table of contents
Other Avanti Laundry Accessories manuals
Popular Laundry Accessories manuals by other brands

MELICONI
MELICONI BASE SPACE BASKET Mounting instructions

American Dryer Corp.
American Dryer Corp. EURO-35 parts manual

Smeg
Smeg KITSPF-1 Instruction booklet

Everhard Industries
Everhard Industries NUGLEAM 35L INSTALLATION & CARE INSTRUCTIONS

American Dryer Corp.
American Dryer Corp. ML-175DR Phase 7 installation manual

Remington
Remington D52SC user guide