Avaris Odysey User manual

ELECTRIC BICYCLE OWNER ORIGINAL INSTRUCTION
AVARIS LTD
Group First House, Mead Way, Padiham, BB12 7NG Lancashire, United Kingdom
Model number :220322ODY-17&220322ODY-19

INDEX
Section One Profile
A. General Warning
B. A note for parents
Before the first ride
A. Bike fit
B. Out Of Box Assembly
C. Safety first
D. Mechanical Safety Check
E. First ride
Section Two Safety
A. Basics
B. Riding Safety
C. Wet Weather Riding
D. Night Riding
Section Three Bicycle Fit & Sizing
A. Pedals
B. Stand over height
C. Saddle position
D. Attach & Adjust the Handlebar
Section Four Introduction to Components
A. Power Assistant System
B. Battery Pack
C. Battery Charger
D. Power Indicator
E. eBike Motor
F. Brake
G. Gear
H. Instrument Panel & Controller
I. Electric Bicycle Specification:
Section Five Components Continued
A. Wheels

B. Seat post Quick Release
C. Brakes
D. Shifting gears
E. Tyres and Innertubes
Section Six Service
A. Service Intervals
B. If your electric bicycle sustains an impact
Section Seven General Warranty Terms & Conditions
SECTION ONE:
GENERAL WARNING
The following operation manual is a guide to assist you ONLY. This manual is not a complete document on all aspects
around the maintenance and repair of your new electric bicycle. The electric bicycle you have purchased is not a
complex object, however, it is recommended that you consult with a bicycle repair specialist, if you have concerns as
to your ability to assemble, repair, or maintain this product.
It is important for you to understand your new electric bicycle. Reading this manual completely before your first ride,
will help you with overall performance and enjoyment from this product. Actioning the recommending checks and
ongoing maintenance advice, will also help to extended the life of your electric bicycle and its components. This
operational manual should remain an integral part of the product. Changes to any recommended actions found in
pictures, specifications and descriptions are strictly prohibited.
Like any sport, cycling involves risk of injury and damage. By choosing to ride this electric bicycle, you assume the
responsibility for that risk, therefore it is good practice to understand and action; the rules of safe and responsible
riding and proper use and maintenance of your electric bicycle. Proper use and maintenance of your electric bicycle,
reduces risk of injury.
This Manual contains many “Warnings” and “Cautions” concerning the consequences of failing to maintain or
inspect your electric bicycle, and to follow safe cycling practices...
The combination of the ‘safety alert symbol’ and the word ‘WARNING’, indicates a potentially hazardous
situation, which if ignored, could result in serious injury or death.
The combination of the ‘safety alert symbol’ and the word ‘CAUTION’, indicates a potentially hazardous
situation, which if ignored, may result in minor or moderate injury, or is an alert that unsafe practices are
taking place.
The word ‘CAUTION’ used without the ‘safety alert symbol’ indicates a situation, which if ignored, could
result in serious damage to the bicycle and the voiding of your warranty.
Many of the ‘Warnings’ and ‘Cautions’ say “you may lose control and fall”, because any fall can result in serious
injury or even death. We do not always repeat the warning of ‘possible injury or death’, because it is impossible to
anticipate every situation or condition which can occur whilst riding. This Manual makes no representation about the
safe use of the bicycle under all conditions. There are risks associated with the use of any bicycle, which cannot be
predicted or avoided, and therefore it is the sole responsibility of the rider to judge the immediate riding conditions
accordingly.
Please wear a safety helmet to avoid injury. Personal protective equipment is required.
Please observe your local traffic laws and regulations when driving the electric bicycle.
If the charger cord is damaged, have it repaired by the manufacturer, or seek a professional to get it serviced,
in order to avoid any hazard.

The cord should always be readily accessible.
The electric bicycle is not intended for use by persons (including children) with physical, sensory or mental
disabilities. Persons who have not read the manual, unless they have received explanations by a person
responsible for their safety and supervision, should not use this electric bicycle.
Children should be monitored to ensure that they do not play with the electric bicycle.
The device should always be stored safely and be readily accessible.
The device should not be exposed to dripping or splashing water.
Open objects filled with liquids, such as open vases, should not be placed near the device.
Always leave a minimum distance of 10 cm around the unit to ensure sufficient ventilation.
Open flame sources, such as candles, should not be placed near the device.
The device is intended for use only in a temperate climate.
The charging socket outlet, should be near the equipment and should be easily accessible.
The charger is not intended for use by persons (including children) with physical, sensory or mental
disabilities. Persons who have not read the manual, unless they have received explanations by a person
responsible for their safety and supervision, should not use the charger.
Children should be monitored to ensure that they do not play with the charger.
Please remove the battery during maintenance.
Please follow the instructions on the charger nameplate
Please ONLY use the original parts for change . Failure to do this will result in damage to the parts, affecting
overall service life.
CAUTION: Danger of explosion if battery is incorrectly replaced or not replaced by the same type or equivalent.
The battery should not be exposed to excessive heat, such as sunshine, fire or similar.
Different types of batteries should not be mixed (e.g., new or used, other battery manufacturers).
The battery must be installed correctly, according to the polarity.
If the battery is worn, it must be removed from the product.
The battery must be disposed of safely and correctly. Always use the collection bins provided (check with
your local authority), to protect the environment.
The battery can’t be replaced by the user, but only by the maker of this product, the after sales department
or a qualified person.
Take care to prevent unauthorized use of the electric bicycle (e.g. using electric bicycle locks)
CAUTION: The use of this product requires special precautions, please refer to the local regulations applicable within
the UK.
A NOTE FOR PARENTS
Use of this product is restricted to persons 14 years of age or older. As a parent or guardian, you are responsible for
the activities and safety of your minor child. This includes making sure that the electric bicycle is properly fitted to
the child, and that it is in good repair and safe operating condition. You should also make sure that you and your
child thoroughly understand the safe operation of the electric bicycle; and that you and your child thoroughly
understand and obey not only the applicable local motor vehicle, bicycle and traffic laws, but also the common-
sense rules of safe and responsible cycling. As a parent, you should read this manual with your child and review its
warnings and cautions, along with the electric bicycle functions and operating procedures, before letting your child
ride the electric bicycle.
BEFORE THE FIRST RIDE
NOTE: We strongly urge you to read this Manual in its entirety before your first ride; but at the very least, read
and make sure that you understand each point in this section, and refer to the cited sections on any issue which
you don’t completely understand.
Correct Bike fit:

1. Is your bike the right size? To check, see Section 3. If your electric bicycle is too large or too small for you,
you may lose control and fall.
2. Is the saddle at the right height? To check, see Section 3. If you adjust your saddle height, make sure that
you follow the ‘minimum insertion’ instructions in Section 3.
3. Are the saddle and seat post securely clamped? A correctly tightened saddle will allow no saddle movement
in any direction. See Section 3 for details.
4. Are the stem and handlebars at the right height for you? more info can be found in section 3.
5. Can you comfortably operate the brakes? If not, you may be able to adjust their angle and reach.
Out Of Box Assembly:
1. Carefully remove the outer cardboard packaging, taking care not to scratch the eBike underneath.
2. Take your time to become familiar with the bicycle and the next steps. Assess the bicycle and take note of
the protective covers and cable ties, which have been used to hold some parts of the bicycle in place during
transit. Take note of any cables (brake cables & gear cables) that may be hidden by the protective packaging,
so that when you remove the packaging, you not do not kink or snag them.
3. Once you are clear on the above, carefully start to remove all the protective packaging, tapes and cable ties,
avoiding any scratches to the frame or damage to any parts during this process.
4. Attach the pedals to the cranks. Pedals are marked ‘L’ and ‘R’, screw the pedal marked ‘L’ into the left side
crank, and ‘R’ to the right-side crank. The right pedal attaches to the chain side crank arm with (clockwise)
thread. The left pedal attaches to the other crank arm and has a left-hand (counter-clockwise) thread.
(L) (R)
CAUTION: Make sure you have the pedal thread aligned accordingly with the thread in the crank. DO NOT force the
pedal onto the crank when not aligned, this will cause damage to the bicycle.
5. Loosen the two stem bolts slightly, and rotate the handlebar 90 degrees so that it now faces forward.
The two images above are both pics of the same stem, with arrows to help you identify the two stem bolts.
DO NOT confuse a stem bolt for the ‘top cap clamp bolt’ located on top of the stem, this bolt SHOULD NOT
be tampered with.

6. Once you have rotated the handlebar 90 degrees (make sure the forks and wheel are also rotated the
correct way round, the disc rotor and brake cable should be running down the non-drive side), re-tighten
the two stem bolts in-line and central to the front wheel, to a torque setting of 6Nm (Newton meters).
Tighten each bolt incrementally (swapping between the two bolts after each incremental turn) until you
reach the desired torque setting.
The ‘out of box’ assembly is now complete and should resemble the image on the front of this manual. For further
visual help and guidance, be sure to check out our video instruction, available via the Avaris website.
Safety first:
1. Do you have all the required and recommended safety equipment (helmet, clothing, etc) It’s also your
responsibility to familiarise yourself with the local laws within the areas you intend to ride, and thus; to
comply with said applicable laws.
2. Do you know how to check that your wheel is secured accordingly (see ‘Mechanical Safety Check’ for advice)?
The bolts and nuts should be torqued accordingly. Riding with a loosely tightened wheel can cause it to
wobble or disengage from the bicycle, potentially resulting in serious injury or death.
3. If your bicycle has toe clips and straps, or clipless (“step-in”) pedals, make sure you know how they should be
installed correctly. Speak with a local specialist for advice if unsure, or follow the pedal manufacturer’s
instructions for use, adjustment and care.
4. Suspension can change the way a bicycle performs. Follow the suspension manufacturer’s instructions for
use, adjustment and care.
5. Do you have “foot overlap”? On bicycles that have been sized incorrectly with regards to correct height (see
‘Section 3’), framed bicycles that are too small, would potentially mean that your foot could come into
contact with the front wheel when a pedal is all the way forward and the wheel is turned, potentially
resulting in serious injury or death.
Mechanical Safety Check:
You should always routinely check the condition of your bicycle before every ride…
Nuts, bolts & straps: Make sure nothing is loose and all fittings are secure and torqued accordingly. Lift the
front wheel off the ground by four or five centimetres, then let it bounce on the ground. Does anything
sound differently, or does something feel or look loose? Do a quick visual and tactile inspection of the whole
bicycle. Any loose parts or accessories? If so, secure them. If you’re not sure, ask someone with experience
to check.
Tyres & Wheels: Make sure both tyres are correctly inflated (see ‘Section Five’ for advice). Check by putting
one hand on the saddle and one on the stem of the handlebar, then bounce your weight on the bike while
looking for tyre deflation. Compare what you see with how it looks when you know the tyres are correctly
inflated; and adjust if necessary. Tyres in good shape? Spin each wheel slowly and look for cuts in the tread
and sidewall. Replace damaged tyres immediately before riding the bike. Do your wheels spin true? Spin
each wheel and check for brake clearance and any side-to-side wobble. If a wheel wobbles side to side even
slightly, or rubs against the brake pads, take the bicycle to a qualified technician to have the wheel trued.
Are your wheels secured correctly on the forks and on the rear dropout? There should be no lateral play
whatsoever, check that your wheel quick release axels are torqued up securely.
CAUTION: Wheels must be true for the brakes to work effectively. Wheel truing is a skill which requires special tools
and experience. Do not attempt to true a wheel unless you have the knowledge, experience and tools needed to do
the job correctly.
Brakes: Check the brakes for proper operation (see also ‘Section Five’). Squeeze the brake levers, do they
feel right? Do the brake pads within the callipers touch the disc rotor? Do the brake pads look worn? Are all
the control cables seated and secure? Can you apply full braking force at the levers without having them
touch the handlebar? If not, your brakes might need adjusting, or new parts might be needed due to natural
wear and tear.

WARNING: Do not ride the bicycle until the brakes are properly adjusted. Seek professional help if necessary. Riding
the bicycle without the brakes working accordingly, could potentially result in serious injury or death.
Quick Release Mechanisms: Make sure the front wheel, rear wheel and seat post quick release mechanisms
are properly adjusted and in the locked positions before setting off.
Handlebar and saddle alignment: Make sure the saddle and handlebar stem are parallel to the bike’s centre
line and clamped tight enough so that you can’t twist them out of alignment (See Section Three for further
advice), if not set correctly, re-align and tighten them accordingly.
Handlebar ends: Make sure the handlebar grips are secure and in a good condition. If not, replace them.
Make sure the handlebar ends and extensions are plugged in. If not, plug them before you ride. If the
handlebars have bar end extensions, make sure they’re clamped tight enough so you can’t twist them. If not,
tighten them accordingly.
WARNING: Loose or damaged handlebar grips or extensions can cause you to lose control and fall. Unplugged
handlebars or extensions could potentially cut your body, causing serious injury or death.
First Ride:
When you buckle on your helmet and go for the first ride on your new electric bicycle, be sure to pick a
controlled environment away from cars, other cyclists, obstacles, or any other potential hazards. It is
important that your initial ride is used to familiarise yourself with the controls, features and performance of
your new electric bicycle.
Familiarise yourself with the braking action of the bicycle (see ‘Section Five’ for further info). Test the brakes
at slow speed, putting your weight toward the rear and gently applying the brakes. Good practice is to start
by applying the rear brake first, then the front brake not too long afterwards.
WARNING: Sudden or excessive application of the front brake could pitch you over the handlebars. Applying brakes
too hard can lock up a wheel, which could cause you to lose control and fall.
If your bicycle has toeclips or clipless pedals, practice getting in and out of the pedals.
If your bike has suspension, familiarise yourself with how the suspension responds to braking application
and rider weight shifts.
Practice shifting the gears.
WARNING: Never action the shifter if you’re pedalling backwards (accidentally), nor should you pedal backwards
after having actioned the shifter. This could jam the chain and cause serious damage to the bicycle and may cause
you to lose control and fall.
Check out the handling and responsiveness of the bicycle; and check for comfort whilst riding the bicycle.
Have you set the riding height correctly?
SECTION TWO:
SAFETY
Basics:
1. Always do the Mechanical Safety Check (see ‘Section One’ for info) before you get on the bicycle.
2. Be thoroughly familiar with the controls of your bicycle: brakes, pedals, shifting, electrical control panel etc.
3. Be careful to keep body parts and other objects away from the sharp teeth of the front chainring or rear
cassette, the moving chain, turning pedals and cranks, or the spinning wheels of your electric bicycle.
4. Always wear shoes that will stay on your feet and will grip the pedals. Never ride barefoot or while wearing
open shoes, for example; sandals.
5. Always wear bright visible clothing, which isn’t loose so that it could potentially become tangled in the
bicycle, or potentially snagging objects at the side of the road or trail whilst riding.

6. Wear protective eyewear to protect against airborne dirt, dust and bugs. Tinted protective eyewear should
be used when the sun is bright, clear protective eyewear when it’s not.
7. Ride at a speed which is appropriate for the current conditions. Increased speed will always mean there is a
higher risk of an accident occurring.
Riding Safety:
1. Observe all local bicycle laws and regulations. Observe regulations about the licensing of electrical bicycles (if
applicable), riding on sidewalks, laws regulating correct bicycle pathways and trail use and so on.
2. If you are sharing the road or the path with others, for example motorists, pedestrians and/or other cyclists,
respect their rights also.
3. Always ride cautiously, assume that others do not see you.
4. Look ahead and be ready to avoid vehicles slowing or turning, vehicles entering the road or the lane ahead of
you, or vehicles coming up behind you.
5. Look out for parked car doors opening or pedestrians stepping out in front of you. Are there children or pets
playing near the road? If so, take the necessary extra care needed to pass safely.
6. Look out and avoid potential hazardous potholes, sewers, railroad tracks, expansion joints, road or sidewalk
construction, debris and other obstructions that could cause you to swerve into traffic, catch your wheel or
otherwise cause you to lose control, causing a potential accident.
7. Ride in designated bicycle lanes or paths where possible. Ride as close to the edge of the road as is safely
possible, in the direction of the traffic flow or as directed by local laws.
8. Stop at ‘stop signs’ and traffic lights; slow down and look both ways at street intersections. Remember that a
bicycle always loses in a collision with a motor vehicle… For your own safety, be prepared to yield even if you
believe you have the right of way.
9. Use approved hand/arm signals for turning and stopping.
10. Never ride with headphones on… They can mask traffic sounds and emergency vehicle sirens, whilst also
distracting you from what’s going on around you. The headphone wires can also tangle in the moving parts
of the electric bicycle, causing you to lose control.
11. Never carry a passenger unless it is a small child wearing an approved helmet and secured in a correctly
mounted child carrier or a child-carrying trailer. Follow the child carrier or child carrying trailer’s
manufacturer’s recommendations regarding recommended usage and weight limits.
12. Never carry anything which obstructs your vision or the complete control of the electric bicycle, or anything
which could become entangled in the moving parts of the electric bicycle.
13. Never hitch a ride by holding on to another vehicle.
14. Don’t do stunts, wheelies or jumps. They can cause you injury and damage your electric bicycle.
15. Don’t weave through traffic or make any moves that may surprise people with whom you are sharing the
road.
16. Observe and yield the right of way.
17. Never ride your bicycle while under the influence of alcohol or drugs.
18. If possible, avoid riding in bad weather, or when visibility is obscured, for example in fog, dusk or in the dark.
19. Never ride when extremely tired. Each of these conditions in points 17, 18 and 19 increases the risk of an
accident occurring.
Wet Weather Riding:
WARNING: Wet weather impairs traction, braking and visibility, both for the cyclist and for other vehicles sharing the
road. The risk of an accident is dramatically increased in wet conditions.
Under wet conditions, the stopping power of your brakes (as well as the brakes of other vehicles sharing the road) is
dramatically reduced and your tyres don’t grip nearly as well as they would in dry conditions. This makes it harder to
control speed and thus; easier to lose control. To make sure that you can slow down and stop safely in wet
conditions, ride more slowly and apply your brakes earlier, gradually applying the brake until you come to the
desired speed or a complete stop.
Night Riding:

Riding a bicycle at night is more dangerous than riding during the day. Due to the natural reduction in visibility, it can
be very difficult for motorists and pedestrians to see a cyclist. Therefore, children should never ride at dawn, at dusk
or at night. Adults should not ride at dawn, at dusk or at night unless it is necessary.
WARNING: Reflectors are not a substitute for required lights. Riding at dawn, dusk, night time, or at other times of
poor visibility, without an adequate bicycle lighting system and without reflectors is dangerous and may result in
serious injury. It is important that if you need to ride in scenarios that present reduced visibility, that you observe
the local laws around illumination of yourself and your bicycle, whilst riding is said conditions.
Bicycle reflectors are designed to pick up and reflect streetlights and car lights in a way that may help you to be seen
and recognised as a moving cyclist…
CAUTION: Check reflectors and their mounting brackets regularly to make sure that they are clean, straight,
unbroken and securely mounted.
Whilst riding at dawn, dusk or at night time:
Ride slowly.
Avoid dark areas and areas of heavy or fast-moving traffic.
Avoid road hazards.
If possible, ride on familiar routes.
Observe local laws and regulations for the correct illumination of you ‘the rider’ and ‘your bicycle’.
SECTION THREE:
BICYCLE FIT & SIZING
CAUTION: Make sure the bike fits. A bike that’s too big or too small is harder to control and can be uncomfortable to
ride.
Pedals:
Before you start, you need to have mounted the pedals and the handlebar.
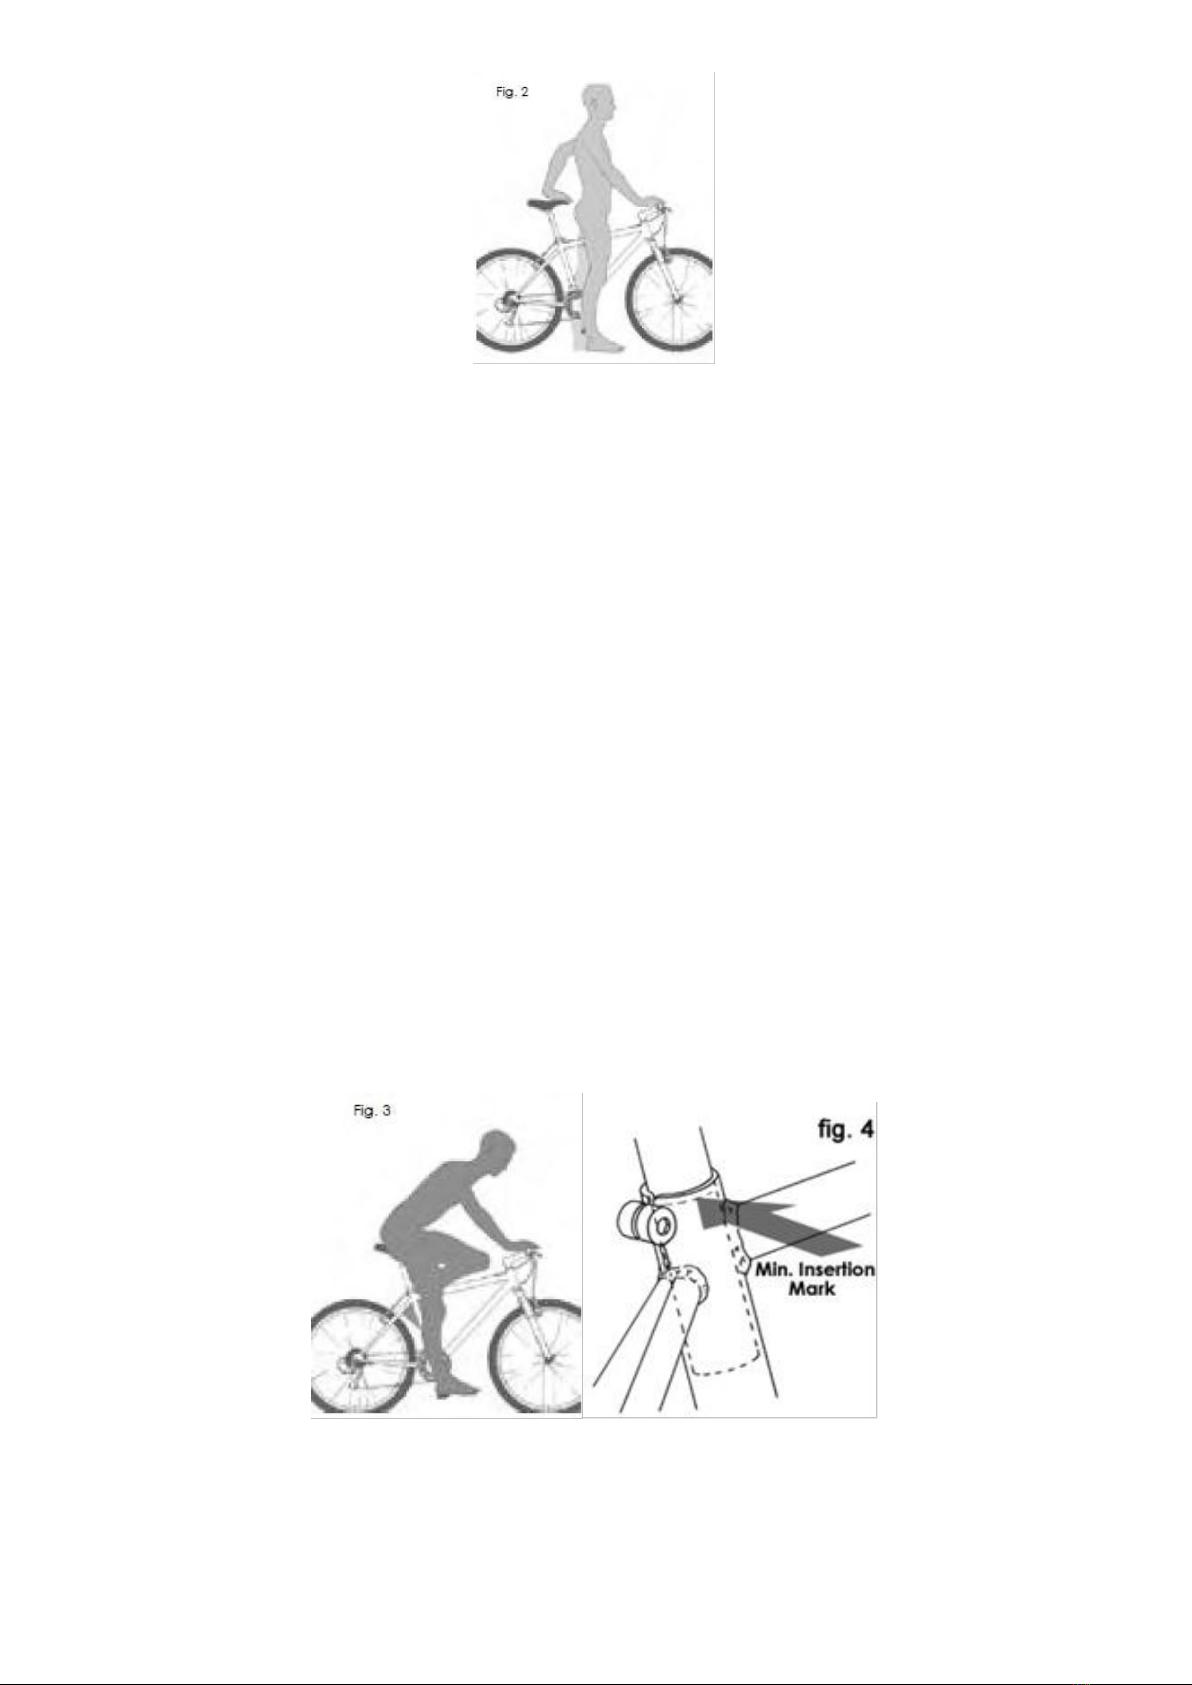
Stand over height:
Stand over height is the basic element of correct bike fit (see fig. 2). It is the distance from the ground to the top of
the bicycle’s frame (top tube – see fig. 1), at the point where your crotch would be if you were straddling the bike,
standing halfway between the saddle and the handlebars (see fig 2). To check for correct stand over height, straddle
the bike while wearing the kind of shoes in which you’ll be riding, and then bounce vigorously on your heels. If your
crotch touches the frame, the bicycle is too big for you.
For this electric bicycle which is tailored for both paved and light unpaved surfaces, you should give yourself a
minimum of seven and a half centimetres of stand over height clearance.
Fig. 1
Saddle position:
Correct saddle adjustment is an important factor in getting the best performance and comfort from your bicycle. The
saddle can be adjusted in three directions:
1. Up and down adjustment.
2. Front and back adjustment.
3. Seat angle/level adjustment.
To check for correct saddle height (up and down) adjustment (see fig. 3):
Sit on the saddle.
Place one heel on a pedal.
Rotate the crank until the pedal with your heel on, is in the down position and the crank arm is vertical.
If your leg is completely straight (knee is locked) when your foot is flat on the centre of the pedal, your saddle height
is too high and needs to be adjusted. If your hips rock for the heel to reach the pedal whilst riding, the saddle is too
high and needs to be adjusted.
Adjust the height via the quick release mechanism located at the top of the seat tube (fig. 1). With your leg fully
extended and your foot on the pedal whilst the crank is in the vertical position (six o’clock), there should only be a
“slight” bending at the knee (thus when riding, preventing lockout of the knee), whilst your foot is flat on the centre
of the pedal. Excessive bending at the knee will likely mean that your saddle height is now too low.
WARNING: When setting your saddle height, take note of the ‘Minimum Insertion or Maximum Extension mark (see
fig. 4) located on the seat post (see Fig.1). Adjusting saddle height beyond these markers is dangerous and could
lead to the breaking of the seat post, which could cause you to lose control and fall.
Adjust front and back adjustment, along with seat angle adjustment, to help you get the optimal position on the
bicycle. This can be achieved by loosening the two bolts located under the saddle (see Fig. 1), which attach the
saddle to the seat post. Once loosened, adjust the saddle and re-tighten the bolts accordingly.

Attach & Adjust the Handlebar:
Your handlebars have two main parts, the bar itself and the stem. If your bar has been removed for shipping,
position the bar in the centre of the stem and check to be sure that your grips are in the right place, and that the
angle of the bar is comfortable, whilst also enabling you to shift gears and apply the brakes accordingly. Tighten the
stem clamp bolts to hold the handlebar in the desired setting. Apply an even torque load to each of the clamp bolts.
DO NOT over tighten. Ensure that all cables are clear and out of the way.
SECTION FOUR:
INTRODUCTION TO COMPONENTS
Power Assistant System:
This is a power assisted bicycle. It equips a 1:1 speed type power assistant transducer, to control the rotation
of the power system. (Fig. 6).
The following statement: The A-weighted emission sound pressure level at the driver ears is less than 70
dB(A)
Fig. 6
Battery Pack:
The electric bicycle is equipped with a Li-ion battery pack. (Li-ion 36V/20Ah) for a 29” MTB bike.
The battery can be used at temperatures between -20 degrees and 50 degrees
Battery storage is between 20 and 25 degrees
Battery Charger:
When charging, the battery charger and the battery should be set at least 10 centimetres away from its charging
point. When wanting to charge the battery, please follow these steps accordingly:
1. Connect the charger cable output plug into battery input socket.
2. Connect the charger cable input plug into the electrical output supply socket.
3. Turn on the charger power switch to charge the battery, the red light should come on.
4. When the red light turns to green, the battery is fully charged.
5. Turn off the charger power switch and unplug the cable.
WARNING: Please ONLY use the original battery charger for charging of the battery. Failure to do this will result in
damage to the battery, affecting overall battery service life.
Power On Display:
When the battery power level goes below 50%, be sure to place the battery on charge asap. Never let the
battery deplete to 0%, otherwise the service life of the battery will be affected, because it has over discharged.

eBike Motor:
36V 250W Center Brushless DC motor
Brake:
The braking system on this electrical bicycle are Shimano front (right hand) and rear (left hand) hydraulic disc
brakes.
WARNING: Do not lubricate (directly or indirectly) the brake pads or brake discs, keep them clean and free of dirt at
all times. Failure to do so could result in brake failure. Check the hydraulic hoses for kinks in the line or damage to
the hose. A leaking system will also lead to brake failure. Seek professional advice and replace any damaged parts
immediately. For this disc brake type, do not touch high temperature parts.
Gears:
Shimano x9 speed
Instrument Panel & Controller:
LCD display is used to access all control systems (on/off, help, units displayed, etc) on this electrical bicycle,
please refer to the separate dedicated manual for further info.

Electric Bicycle Specifications:
General
1. Dimension: L. x W. x H. - 2000 × 240 × 1255 mm
2. Wheel base distance - 1180 mm
3. Weight - 33.2 kg
4. Maxi. loading - 120 kg
5. Maxi. speed - ≤25 km/h
6. Maxi riding distance - PAS≥80 km
7. Consumption max - <250W
Battery Pack
1. Battery cell - Li-ion
2. Volume - 36V/20Ah
3. Voltage - 36V
Motor
1. Motor - Brushless Centre Motor
2. Power - 250W
3. Voltage - 36V
4. Rated Speed(RPM) - 92
5. Torque - 80Nm
Controller
1. Low voltage protection - 31V ±0.5V
2. Max current protection - 20 A ±1A
Battery Charger
1. Input voltage - AC 100V-240V~1.8A 47-63Hz
2. Output voltage - DC 42.0V 2.0A
3. Charging time - 5-6 hours
4. Rated Voltage - DC 42.0V 2.0A
Frame
1. Material - Alloy
2. Size - 29”
3. Height - 432mm-483mm
Suspension
1. Material - Alloy
2. Size - 29”
Brake
1. Model - Hydraulic Disc Brake
2. Lever Material - Alloy
SECTION FIVE:
COMPONENTS CONTINUED
Wheels:

Any changing of wheel components or truing of wheels, should be carried out by a trained professional, using the
correct applicable tools.
WARNING: Incorrect tampering or re-application of the wheel components, and/or failure to properly adjust a wheel
accordingly, can cause the wheel to wobble or disengage, which could cause you to lose control and fall. Take your
time to make sure that your wheels are securely in place before each ride. Mentioned earlier in this document under
‘Mechanical Safety checks’.
Brakes:
WARNING: Riding with incorrectly adjusted brakes and/or worn brake pads, is dangerous and can result in serious
injury or death. Applying brakes too hard or too suddenly can lock up a wheel, which could cause you to lose control
and fall. Sudden or excessive application of the front brake may pitch the rider over the handlebars, which may
result in serious injury or death.
Hydraulic disc brakes are extremely powerful, take extra care when becoming familiar with these brakes, and
exercise particular care when using them. Disc brakes can get extremely hot with extended use. Be careful not to
touch a disc brake rotor until it has had plenty of time to cool.
Shifting Gears:
Shifting gears on your electric bicycle is controlled by the right shifter (see pic below). The function of the right
shifter is to control the rear derailleur, so that it can move the chain from one gear sprocket to another. The smaller
sprockets on the rear cassette produce higher gear ratios. Pedalling in a higher gear requires greater effort but takes
you a greater distance with each revolution of the pedal cranks. The larger sprockets produce lower gear ratios.
Riding in these gear ratios requires less pedalling effort, but takes you a shorter distance with each pedal crank
revolution. Often a rider would be in higher gear ratios when travelling downhill and lower gear ratios when
travelling uphill.
WARNING: Never shift a derailleur onto the largest or the smallest sprocket if the derailleur is not shifting smoothly.
The derailleur may be out of adjustment and the chain could jam, causing you to lose control and fall. Seek
professional advice immediately.
Your bicycle has a 1x9 speed drivetrain made up of the following:
A x9 speed rear cassette.
A x9 speed rear derailleur.
A single speed front chainring attached to the drive unit.
A single RH x9 speed shifter (see an example pic below).
A x9 speed chain.
Caution: Never action the shifter if you’re pedalling backwards (accidentally), nor should you pedal backwards after
having actioned the shifter. This could jam the chain and cause serious damage to the bicycle and may cause you to
lose control and fall. Always allow an initial change of gear to take place, before actioning a second desired change.
Tyres and Innertubes:
Electric bicycle tyres are available in many designs and specifications, ranging from general purpose designs to tyres
designed to perform best under very specific weather and/or terrain conditions. Once you’ve gained experience with

your new electric bicycle, if you feel that a different tyre might better suit your riding needs, you can discuss the
alternative options with a professional bicycle tyre dealer.
Tyre size, pressure rating and specific recommended use, should be marked on the sidewall of the tyre (see example
pic on next page).
The information which is most important to you is the maximum tyre pressure.
WARNING: Never inflate a tyre beyond the maximum pressure marked on the tyre’s sidewall. Exceeding the
recommended maximum pressure may blow the tyre off the rim, which could cause damage to the bike and injury to
the rider and any bystanders.
The safest way to inflate a bicycle tyre to the correct pressure is with a bicycle pump that has a built-in pressure
gauge.
A suitable pressure for the tyre on this bicycle, is anywhere between 35 and 40psi.
The tyre size used on this bicycle is 29”x2.20”.
The innertubes used within these tyres are 29”.
WARNING: There is a safety risk in using petrol station forecourt air hoses, or other high pressure air compressors.
They are not made for bicycle tyres. They move a large volume of air very rapidly and will raise the pressure in your
tyre very rapidly, which could cause the innertube/tyre to explode.
SECTION SIX:
SERVICE INTERVALS
Some service and maintenance procedures can and should be performed by the owner. They require no special tools
or knowledge beyond what is presented in this manual.
The following are examples of the type of services you should perform yourself. All other service, maintenance and
repair should be performed in a properly equipped facility by a qualified electric bicycle mechanic, using the correct
tools and procedures specified by the manufacturer.
1. Break-in Period: Your bike will last longer and work better if you break it in before riding it hard. Control
cables and wheel spokes may stretch or “seat” when a new bike is first used, and therefore may require re-
adjustment. Actioning a ‘Mechanical Safety Check’ (Section 1) will help you identify components that may
need re-adjusting. Even if everything seems fine to you, it’s still best practice to take your electric bicycle to a
professional for the initial first check-up. Another way to judge when it’s time for the first check-up, is to
bring the bicycle in after three to five hours of hard off-road use, or about 10 to 15 hours of on-road or more
casual off-road use. But if you think something is wrong with the bicycle before then, take it to a local
professional before riding it again.
2. Before every ride: Carry out a Mechanical Safety Check (see Section 1).
3. After every long or hard ride: if the bike has been exposed to water or grit; or at least every 100 miles: Clean
the bike and lightly oil the chain. DO NOT use high pressure water streams to clean your electrical bicycle.
Wipe off excess oil. Re-lubricate relevant parts according to your riding climate (wet, dry etc)

4. After every long or hard ride or after every 10 to 20 hours of riding: Squeeze the front brake and rock the
bike forward and back. Everything feel solid? If you feel a clunk with each forward or backward movement of
the bike, you probably have a loose headset.
5. Lift the front wheel off the ground and swing it from side to side. Feel smooth? If you feel any binding or
roughness in the steering, you may have a tight headset.
6. Grab one pedal and rock it towards and away from the centreline of the bike; then do the same with the
other pedal. Anything feel loose? If so, have a professional check it.
7. Take a look at the brake pads. Starting to look worn or not hitting the disc rotor squarely? Time to
replace them.
8. Carefully check the control cables and cable housings. Any rust? Kinks? Fraying? If so, replace them.
9. Squeeze each adjoining pair of spokes on either side of each wheel between your thumb and index
finger. Do they all feel about the same? If any feel loose, have your dealer check the wheel for tension and
trueness.
10. Check the frame, particularly in the area around all tube joints; the handlebars, the stem and the seat post
for any deep scratches, cracks or discolouration. These are signs of stress-caused fatigue and could indicate
that a part is at the end of its life and needs to be replaced.
11. Check to make sure that all parts and accessories are still secure, and tighten any which are not. Take note
that all the bolts and fixings are torqued to certain load measurements, over or under loading can severely
damage the bicycle.
12. If either brake lever fails the Mechanical Safety Check (Section 1), don’t ride the bike. Have a professional
check the brakes.
13. If the chain won’t shift smoothly and quietly from gear to gear, the derailleur is out of adjustment. Again, it
could be time for a professional to check.
IF YOUR BICYCLE SUSTAINS AN IMPACT
First, check yourself for injuries and take care of them as best you can. Seek medical help if necessary. Next,
check your bike for damage and fix what you can so you can get home.
WARNING: If there is any noticeable structure or mechanical damage, abnormal sounds, or grinding of parts, DO
NOT attempt to ride your bike again, until you have sought professional advice.
SECTION SEVEN:
GENERAL WARRANTY TERMS AND CONDITIONS
The products have a contractual warranty of two 2 years from the date they were purchased by the consumer.
The phone number of the after-sales service centre is 01282 422365. The consumer’s call will be attended to in order
to determine whether the problem is under warranty or not, and whether a return of the product is necessary.
The warranty is limited to the replacement or repair of non-compliant or defective products, excluding any
compensation.
In case the product is not repaired, it may be replaced by a new product of the same reference, or by a product of a
different reference whose technical characteristics are at least equivalent. In case of failure of a product under
warranty - except in case of failure upon unpacking - the Supplier may exchange it with a product of the same
reconditioned reference, taking care to notify the distributor/consumer beforehand. A product with a new
appearance, without trace of use, in its original packaging, which has undergone a technical inspection is called a
"Reconditioned Product".
Any warranty is excluded in case of:
Misuse
Negligence
Lack of maintenance

Normal wear and tear of the product
Force majeure
Abnormal use
Use of the product under conditions different from those for which it was manufactured, in particular, in
case of non-compliance with the conditions prescribed in the operating manual
Deterioration
Accident from shock or fall
Lack of supervision
Modification of the product
Improper use (such as the transportation of several persons on the same vehicle, descending from the
pavement, negligence, accidents, exposure to extreme temperatures or water, lack of regular maintenance,
without this list being exhaustive…)
Fault or failure resulting from a repair performed by a non-professional,
Fault or failure resulting from the addition of another item to the product.
For the problems listed above, a repair estimate will be sent to the consumer. Upon receipt of the estimate, the
consumer will have a period of five (5) working days to give his/her written consent to it. In case the consumer fails
to reply within this period, the product will be returned to the consumer at his/her own expense.
If the consumer gives his/her consent to the said estimate, the supplier will have a period of thirty (30) working days
to perform the repair.
In order to benefit from this warranty, the purchase invoice and a warranty claim including the delivery charges will
be borne by the customer.
WARNING: A crash or other impact can put extraordinary stress on electric bicycle components, causing them to
fatigue prematurely. Components suffering from stress fatigue can fail suddenly and catastrophically, causing loss of
control, serious injury or death.
An advisory note to draw the attention of the rider to possible damage due to intensive use and to recommend
periodic inspections of the frame, fork, suspensions joints (if any), and composite components (if any).
WARNING: As with all mechanical components, the electric bicycle is subjected to wear and high stresses. Different
materials and components can react to wear or stress fatigue in different ways. If the design life of a component has
been exceeded, it can suddenly fail, possibly causing injuries to the rider.
Any form of crack, scratches or change of colouring in highly stressed areas indicate that the life of the component
has been reached and it should be replaced.
For composite components, impact damage can be invisible to the user, the manufacturer shall explain the
consequences of impact damage and that in the event of an impact; composite components should either be
returned to the manufacturer for inspection or destroyed and replaced
This manual suits for next models
2
Table of contents


