BLUEFIN Fitness TOUR LITE User manual

B I K E
INSTRUCTION MANUAL
DE BEDIENUNGSANLEITUNG
ES MANUAL DE INSTRUCCIONES
FR GUIDE D’UTILISATION
IT MANUALEDELLE ISTRUZIONI
NL HANDLEIDING
SE BRUKSANVISNING

0 2 //

004
024
044
064
084
104
124
TOU R L ITE// 0 3
// E N

// E N
DEAR CUSTOMER
THE BLUEFIN FITNESS TEAM
FACEBOOK FACEBOOK.COM/BLUEFINFITNESS
INSTAGRAM
TWITTER
LINKEDIN
0 4 //
W E L C O M E T O T H E
B L U E F I N F I T N E SS C O MMUNITY
THANK YOU FORCHOOSING THE BLUEFIN FITNESS TOUR LITE.TO
ENSURE YOU GET THE MOST OUT OF YOUR NEW TOUR LITE, PLEASE
ENSURE THATALL PERSONS USING THE EQUIPMENT READ AND
UNDERSTAND THE FOLLOWING MANUAL CAREFULLY BEFORE USE.
BLUEFIN FITNESS ASSUMES NO LIABILITY FOR DAMAGESCAUSED BY
IMPROPER USE OR INCORRECT OPERATION.
WE HOPE YOU ENJOY USING YOUR NEWTOUR LITE. SHOULD YOU BE
INTERESTED IN KEEPINGUP WITH OUR EVER-GROWING FITNESS
EQUIPMENT RANGE, TAKEA LOOK AT OUR WEBSITE:
WWW.BLUEFINFITNESS.COMAND FOLLOW US ON OUR SOCIALS:

T O U R L I T E // 0 5
// E N
- The manufacturer shall indicate the total mass and the total surface area (e.g. foot print) of equipment.
- Indication that the free area shall be not less than 0,6 m greater than the training area in the directions from which the
equipment is accessed. The free area must also include the area for emergency dismount. Where equipment is positioned
adjacent to each other the value of the free area may be shared. The free area and training area shall be illustrated with a
dedicated figure.
- It shall also include a review of the warnings label.
- The effect that the safety level of the equipment can be maintained only if it is examined regularly for damage and wear, e.g.
ropes, pulleys, connection points;
- Replace defective components immediately and/or keep the equipment out of use until repair;
- Special attention to components most susceptible to wear.
- WARNING — This stationary training equipment is not suitable for high accuracy purposes.
- Indication of the minimum insertion depth of adjustable seat and adjustable handlebars
- Information on braking system
- For consumer use only
WARNING:
This product can expose you to chemical including [lead], which is known to the State of California to cause cancer, and
[Bisphenol A], which is known to the State of California to cause birth defects or other reproductive harm. For more
information go to www.P65Warnings.ca.gov.
PLEASE READ THIS USER GUIDE BEFORE FIRST USING YOUR TOUR LITE.
IT IS IMPORTANT TO KEEP THESE INSTRUCTIONS FOR FUTURE REFERENCE.
- This appliance can be used by children aged from 8 years and above and person with reduced physical or sensory or
mental capabilities or lack of knowledge if they have been given supervision or instruction concerning use of the appliance
in a safe way and understand the hazards involved.
- Children should not play with the appliance.
- Cleaning and user maintenance shall not be made by children without supervision.
- If the supply cord is damaged, it must be replaced by the manufacturer, its service agent or similarly qualified persons in
order to avoid a hazard.
- Only use accessory items recommended by the manufacturer.
- CAUTION the instructions must be followed carefully in the assembly, use and maintenance of the equipment.
- Keep hair, fingers and loose clothing away from moving parts to avoid serious injury.
- This product is intended for home use only.
- Always consult your SP before undertaking any exercise programme.
- This product is not suitable for therapeutic purposes.
- Do not use the product in humid or dusty environments to avoid any risk of electric shock.
- Do not use the product if temperature exceeds 40°C/104°F.
- Ensure the product is on a flat and dry surface before use.
- Only use accessory items recommended by the manufacturer.
Home use only. This equipment should not be stored outdoors, in a garage or an outbuilding.
Keep the equipment in a dry place with as little temperature variation as possible.
SAFETY INFORMATION

0 6 //
OPEN END WRENCH ALLEN KEY(5MM)AA BATTERY SCREW(M6*40MM)
INSTRUCTION
MANUAl
MAIN FRAME
FRONT PADDING
TUBE WITHWHEELS REAR PADDING
TUBE
LEFT PEDAL RIGHT PEDAL ELECTRONICWATCH
SEAT BACKREST
SEAT PADDING
TUBE
HANDLEBAR
SEAT HANDLE
BACKREST TUBE
COMPONENT LIST

TOUR LITE// 0 7
// E N
0 8 //
A S S E M B L Y I N S T R U C T I O N S
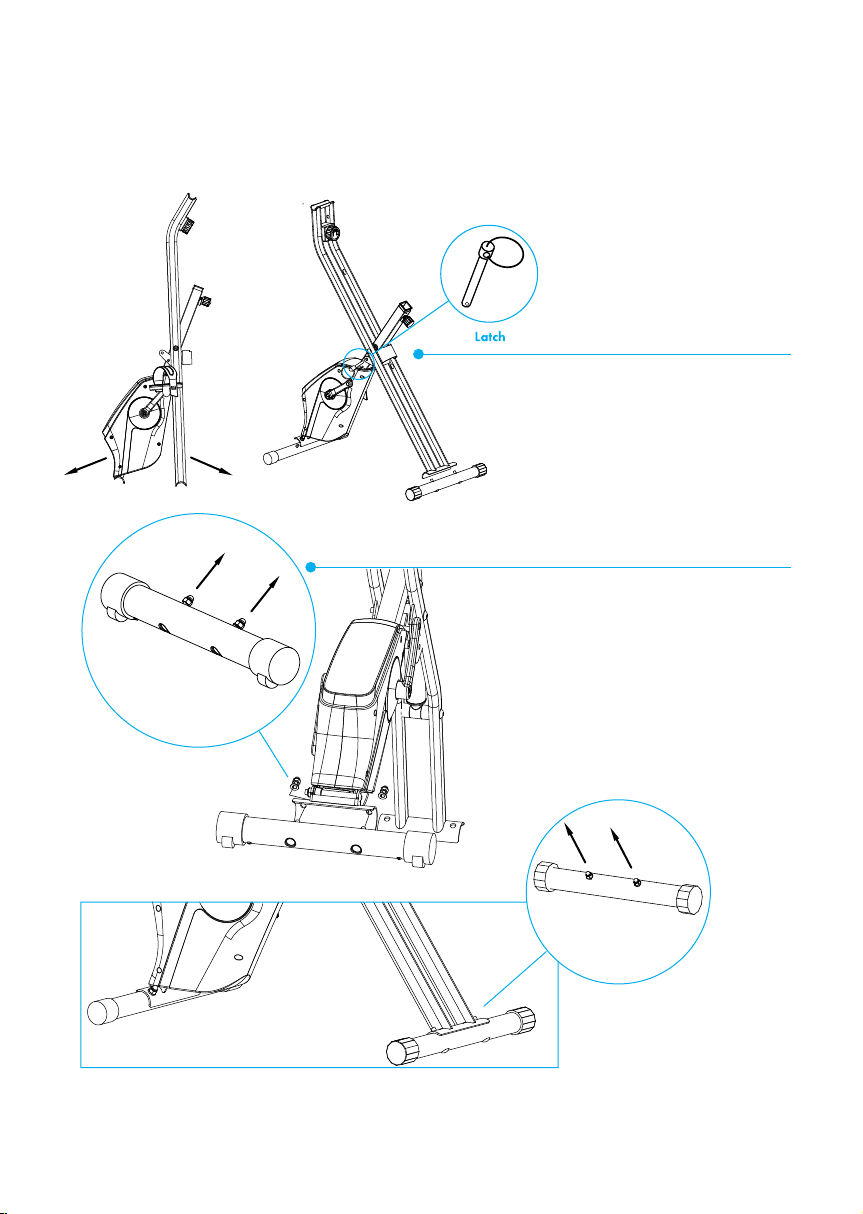
Open up the main frame. Use the
latch to affix. Insert the latch into
the fixing hole.
1.
Affixing the support tube with the wheels:
Remove the nuts from the bolts first, then align
the support tube with the holes on the main
frame. Use spacers and tighten the nuts back on.
Fix the support tube with the octagonal nut to
the main frame: Remove the nuts from the
support tube. Align and thread the bolts through
the fixing hole to affix the support tube. Use
spacers and the nut to affix. Straighten the entire
frame and make sure it is on an even and stable
surface.
2.
TOUR LITE// 0 9
// E N
ASSEMBLY INSTRUCTIONS
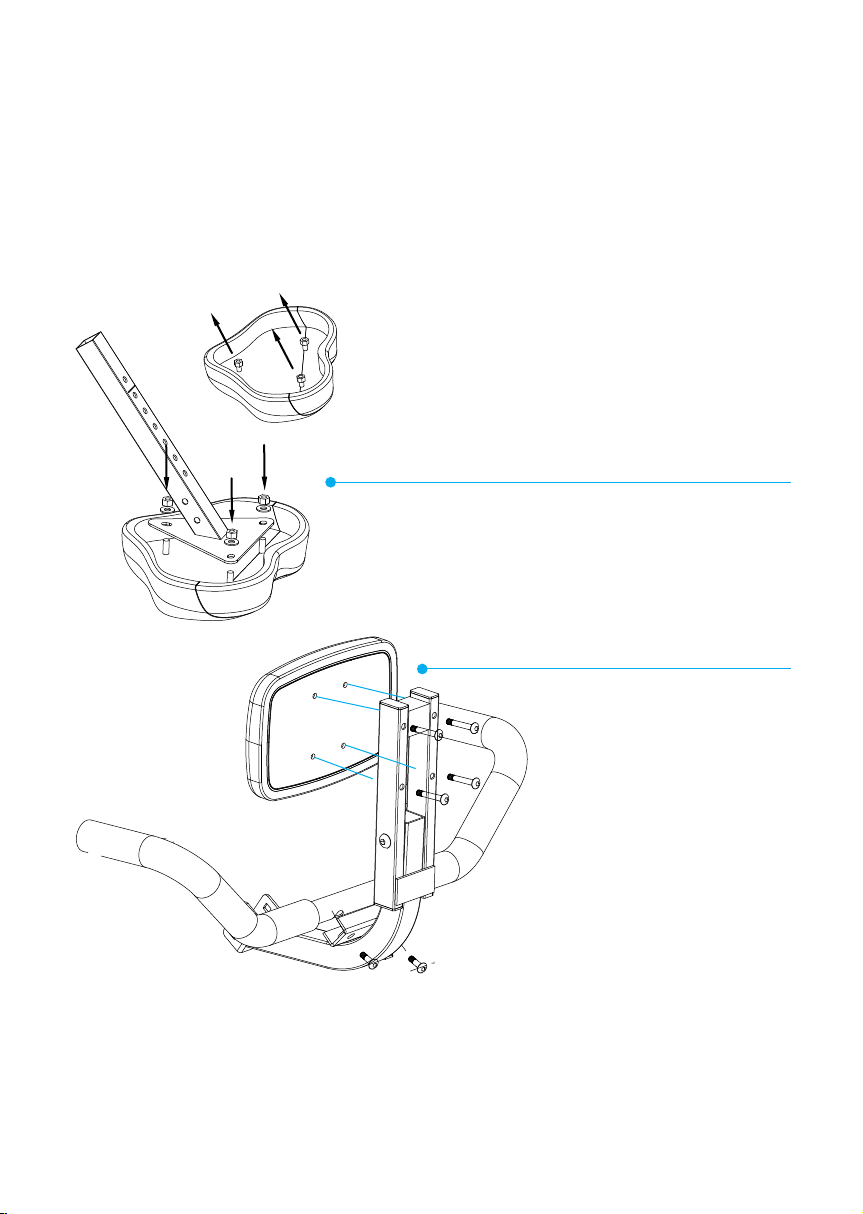
Fix the seat onto the extension tube. Remove
the nuts from the bolts on the seat, align and
thread the bolts on the seat through the fixing
holes, then use the nuts to fix the seat onto
the fixing plate.
3.
Install the seat cushion armrest and
backrest, and assemble the backrest to
the backrest frame. Fix the handrail
with (m6*40) screws and (m8*15)
screws.
4.

1 0 //
ASSEMBLY IN S TRUCTIONS
Fix the backrest assembly onto
the extension tube: Loosen and
remove the
bolts from the backrest tube,
align the backrest assembly to
the extension tube,
then affix with the bolts.
5.
Fix the seat assembly onto the main frame:
Unscrew the spring pull pin and insert the
seat assembly onto the tube. Adjust the
height then tighten the spring pull pin.
Install the armrest onto the rack and fix it
with (m8*40) screws.
6.
T O U R L I T E // 1 1T O U R L I T E //
// E N
A S S E M B L Y I N S T R U C T I O N S
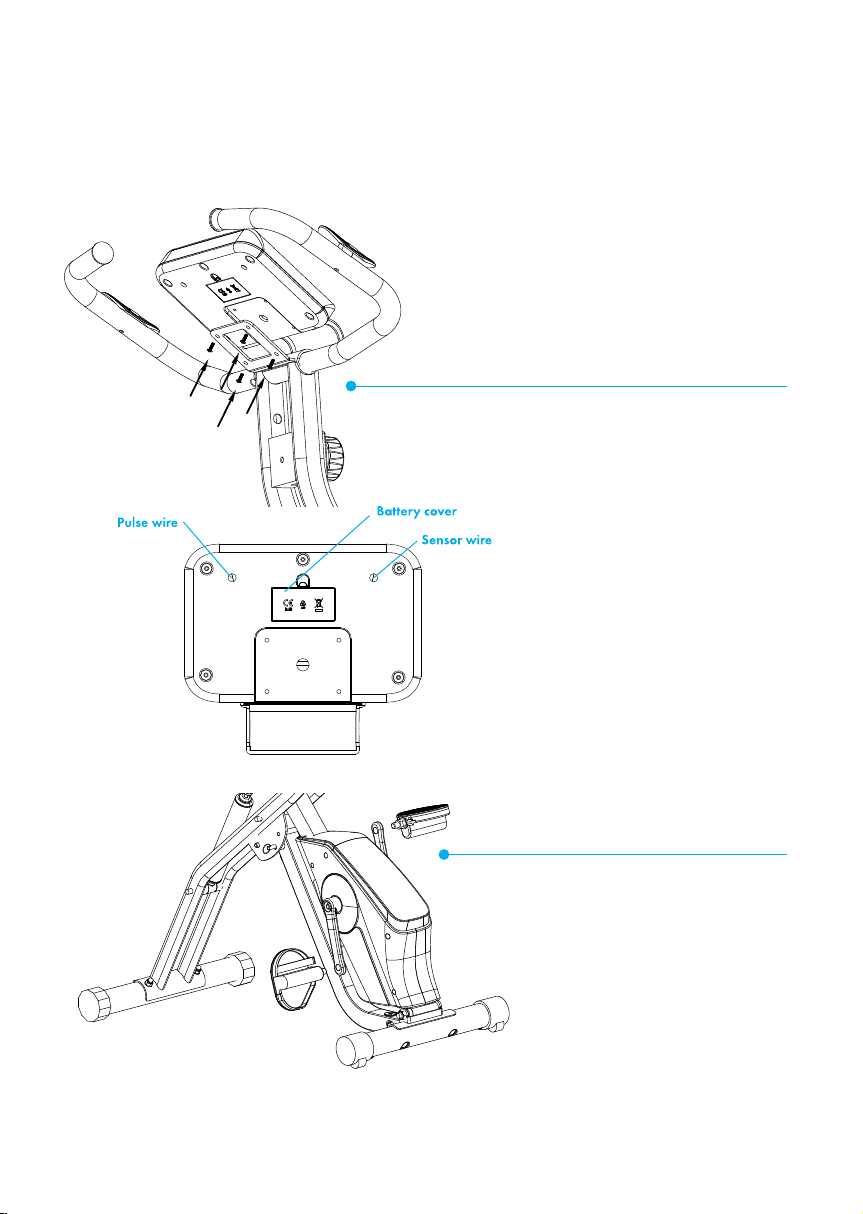
Install the console on the armrest
and fix it with m5*12 screws.
Connect the wire to the fixed
position.
7.
Install the left and right pedals.
Please check and ensure all the
screws and bolts are tightly
fixed before using the product.
8.

1 2 //
CON S O L E DISP L A Y
D - Calories
Speed E - Pulse
Time 41 -
Distance 42 -
43 -
MODE BUTTON
SET BUTTON
RESET BUTTON
You can select the speed, Time, Distance, Calories and pulse functions by pressing the MODE button.
When a function has been selected by pressing the function button, it starts flashing on the display.
The values will be shown in the following sequence with each oress of the MODE button:
SPEED - TIME - DISTANCE - CALORIES - PULSE
Press and hold the function button for at least two seconds to restart the display with tablet holder.
You can use the SET button to preset your workout target for the following functions:
TIME, DISTANCE, CALORIES, PULSE.
1. Use the MODE button to select a function and press the SET button repeatedly until the desired
value of your workout target is shown on the display.
2. To confirm the value, push the MODE button. The display starts counting down at the beginning of
your workout.
Press the RESET button to reset the currently selected value.
Press and hold the RESET button down for the 2 seconds to reset all the values and settings.
I N P U T F U NCTI O N S

TOUR LITE// 1 3
// E N
DISPL A Y V ALUES
SPEED
TIME
DISTANCE
CALORIES
PULSE
AUTO ON
AUTO OFF
SCAN
This function shows the current training speed.
To display the current speed, press the MODE button until the function speed flashes and is shown
on the display. If no signal is sent to the product during your workout, the display will show a SPEED
value of "0.0"
This function automatically measures the training time as soon as you start training.
To display the current workout duration, press the MODE button until the function time flashes and is
shown on the display. If you do not preset a specific value, the time will be counted like a traditional
stopwatch. If you use the SET button to preset a specific target value, time is counted down until the
value "0:00" is reached.
This function shows the distance you have covered during the workout so far.
To display the distance you have covered so far, press the MODE button until the function Distance
flashes and is shown on the display. If you do not preset a specific distance the display will show the
distance you have covered during your workout. If you use the SET button to preset a specific target
value, time is counted down until the value "0:00" is reached.
This function shows the calories you have burned so far.
To display the calories you have burned so far, press the MODE button until the finction Calories
flashes and is shown on the display. If you do not preset a value, the display will show the
approximate amount of calories you have burned durning your workout. If you use the SET button to
preset a target value, the set value is counted down until the value "0.00" is reached.
This function automatically records and displays your respective heart rate during the workout.
To display the currnt heart rate, press the MODE button until the function Pulse flashes and is shown
on the display. To measure your pulse, use both hands to grasp the handlebars at the point of the
heart-rate contact sensors.
Notice: The pulse monitor is a workout aid, not a medical device.
WARNING: The heart-rate monitoring system my be faulty. Working out too often or too intensively
can lead to dangerous injuries or death. If you experience an unusual severe reduction in
performance, stop training immediately. If you do not preset a value, the current heart rate in beats
per minute is shown on the display. Use the SET button to set a target heart rate. Once the target is
exceeded you should reduce the speed or selected resistance until your heart rate drops below the
target value. If no pulse signal is sent to the product durning your workout, the display will show a
PULSE value of "P"
To start the display, press the MODE button or start pedaling.
The display will turn off automatically if you do not press any buttons or turn the pedals for four
minutes.
This mode automatically cycles through all the functions. In this mode, the individual values appear
one after another on the display. To display all functions on the display in sequence, press the MODE
button until the Scan function appears in the upper left corner of the display. The current values of
the functions Speed, Time, Distance, Calories and Pulse are shown on the display in sequence for
about five seconds each.

1 4 //
K I N O M A P F ITN E S S A P P
ADDING THE APP
• Search for KINOMAP on your smartphone’s app store and download.
• A er the download is complete, open the KINOMAP app and register
your personal details.
• Turn Bluetooth on and ensure that the TOUR LITE console is powered on
and in the wake-up state.
• Sync your TOUR LITE to the KINOMAP app as follows:

01 02
Press MORE to bring up the
Equipment page, select
Equipment Management.
Press the + icon.
TOUR LITE// 1 5
// E N
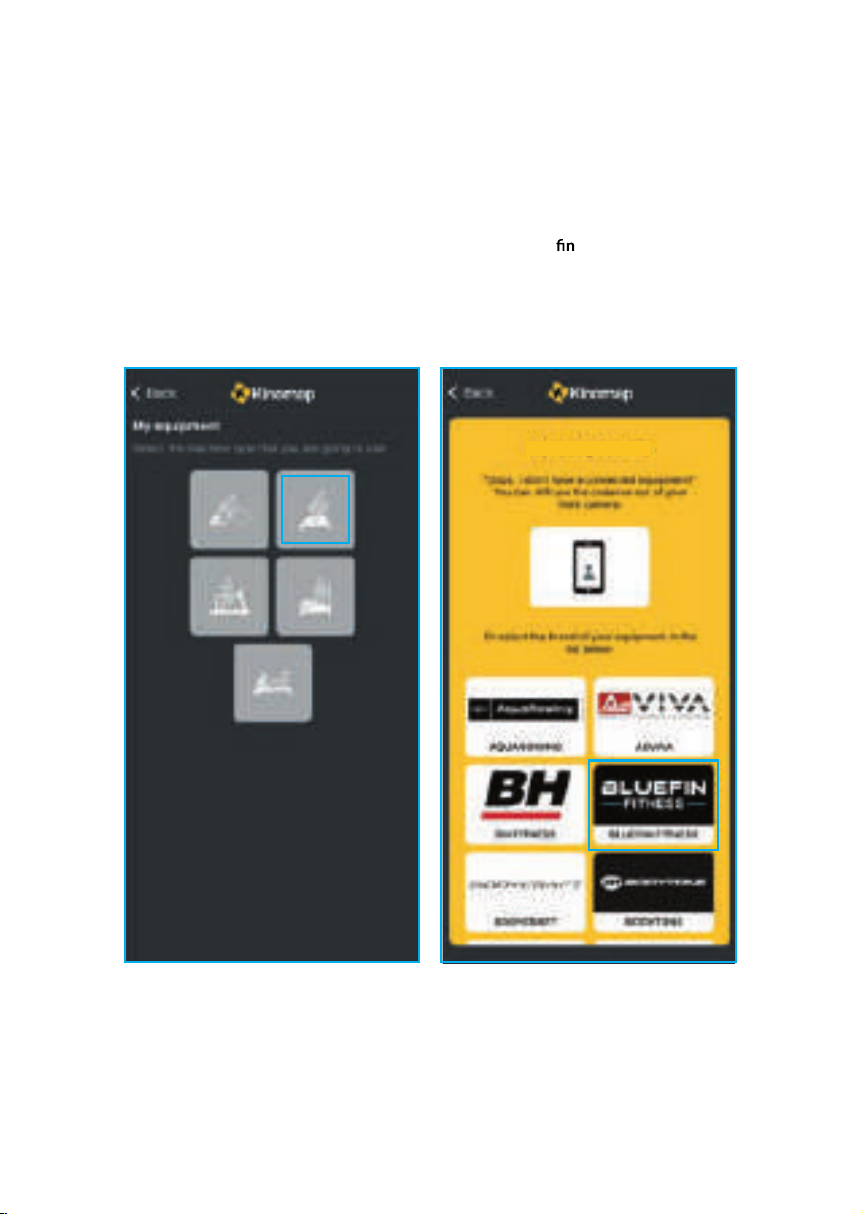
03 04
Select the bikeicon. Select the Blue Fitness icon.
1 6 //
My bike
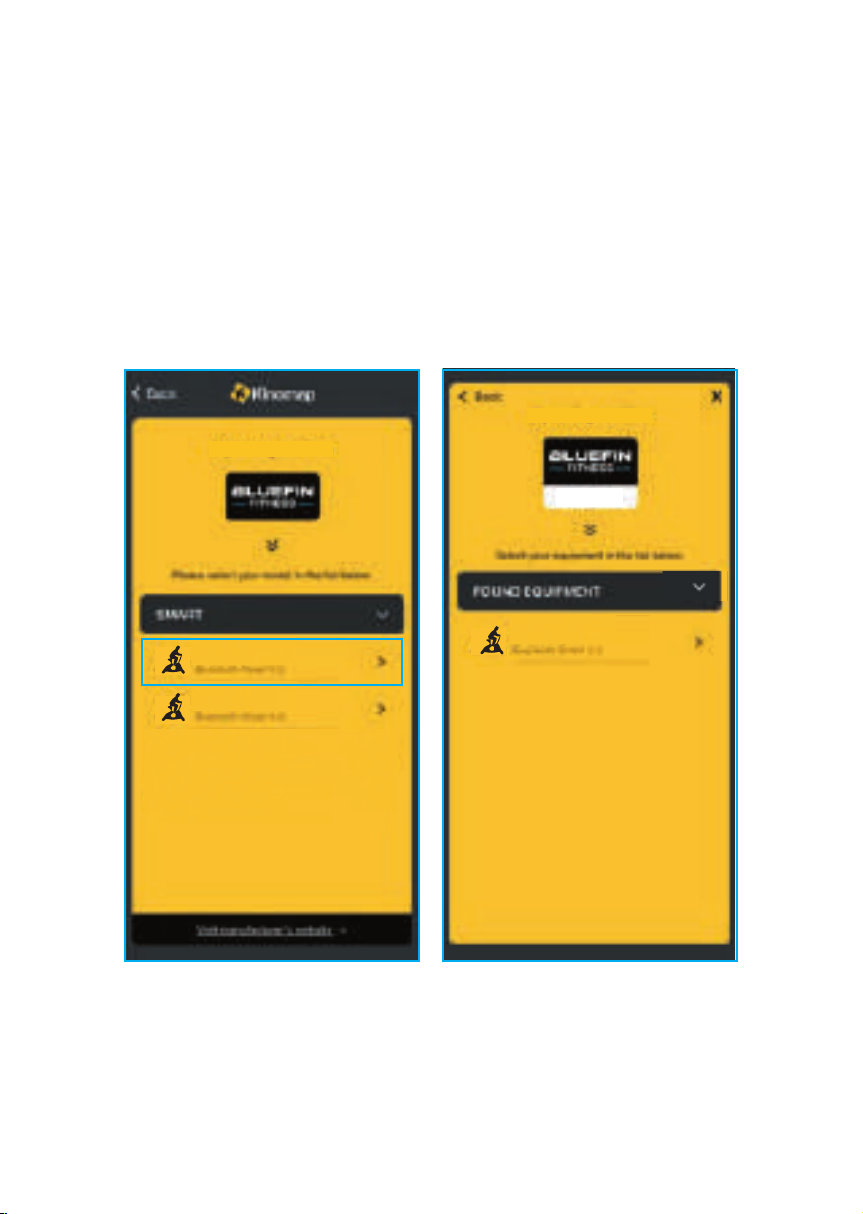
05 06
Select TOUR LITE. Add your TOURLITE to complete,
start your exercise.
TOUR LITE// 1 7
// E N
Blade Aqua M-1TOURLITE
TOURFIT
TOURLITE
My bike
My bike
TOURLITE
1 8 //
.
W A R M U P A ND C O O L D O W N
EACH WORKOUT.
WE RECOMMEND THE FOLLOWING STRETCHES, WHICH WILL REDUCE
NEVER OVERSTRETCH OR PULL YOUR MUSCLES.
SIDE BENDS
Pass one arm up and over your head, bending your upper body in the same
direc on. Hold this posi n for 10 to 15seconds and slowly straighten
yourself back up. Repeat this 3 es for each side.
TOE TOUCH
Slowly bend forward from your waist, le ng your back and shoulders relax
as you stretch towards your toes. Reach down as far as you can go and hold
for 15 seconds. Then relax and repeat 3 s
T O U R L ITE// 1 9
// E N
// E N
Lean against a wall with your le leg in front of the right and your arms on
the wall. Keep your right leg straight and your le foot on the r, bend the
le leg and lean forward by moving your hips toward the wall. Hold,then
repeat on the other leg for 15 seconds. Repeat 3 mes for each leg.
QUADRICEPS STRETCH
With one hand against a wall for balance, reach behind you and pull
your right foot up. Bring your heel as close to your buocks. Hold for
10-15 seconds. Repeat three mes for each foot.
INNER THIGH STRETCH
Sit with the soles of your feet together and your knees poin ng outwards.
Pull your feet as close to your groin as possible. Gently push your knees
towards th oor. Hold for 15 seconds. Then relax and repeat 3 .

2 0 //
TROUBLESHOOTING
Er01: indicates abnormal communication between electronic watch and electronic control
The console wire is not connected properly
Er02: indicates abnormal indication of voltage no. between the down control and motor
The motor wire is not connected properly
Er03: indicates the indication of speed anomaly detected by down-control
PWM drive circuit on the down control board failure
Er04: indicates the overvoltage protection information of the down control.
The input voltage of the treadmill exceeds the rated operating voltage of the motor.
E05: indicates that the driving power voltage is too high and an abnormal phenomenon is indicated
The input voltage of the treadmill exceeds the rated operating voltage of the motor.
E06: indicates that the driving power voltage of the lower control no. is too low and an abnormal
phenomenon is indicated
The supply voltage is too low
E07 : indication that the console security lock is not connected properly
The magnetic safety key is not attached properly.
Table of contents
Languages:


