Aventura IPE Series User manual

IPE Series Camera Manual
User Manual v1.2

IPE Series Camera Manual
2/50
Preface
Thank you for purchasing our product. If there are any questions, or requests, please
don’t hesitate to contact your product dealer or the Aventura technical department. This
manual applies to the Aventura IP box camera, dome camera, bullet camera, and
speed dome camera.
The built-in web server allows for easy real-time monitoring, viewing, and remote control
of your network camera via Internet Explorer browser.
Content is subject to change without notice. We readily improve and update the products
and procedures described in this manual. Updates will be added to new versions of this
manual and provided upon request.
Notes:
“Click”: Press the left mouse button once.
“Double-click”: Press the left mouse button twice.
“[ ]”: Depicts a window name, menu name, or data sheet.

IPE Series Camera Manual
3/50
Table of Contents
1 Download and install ActiveX...................................................................................................................... 4
2 Login............................................................................................................................................................. 7
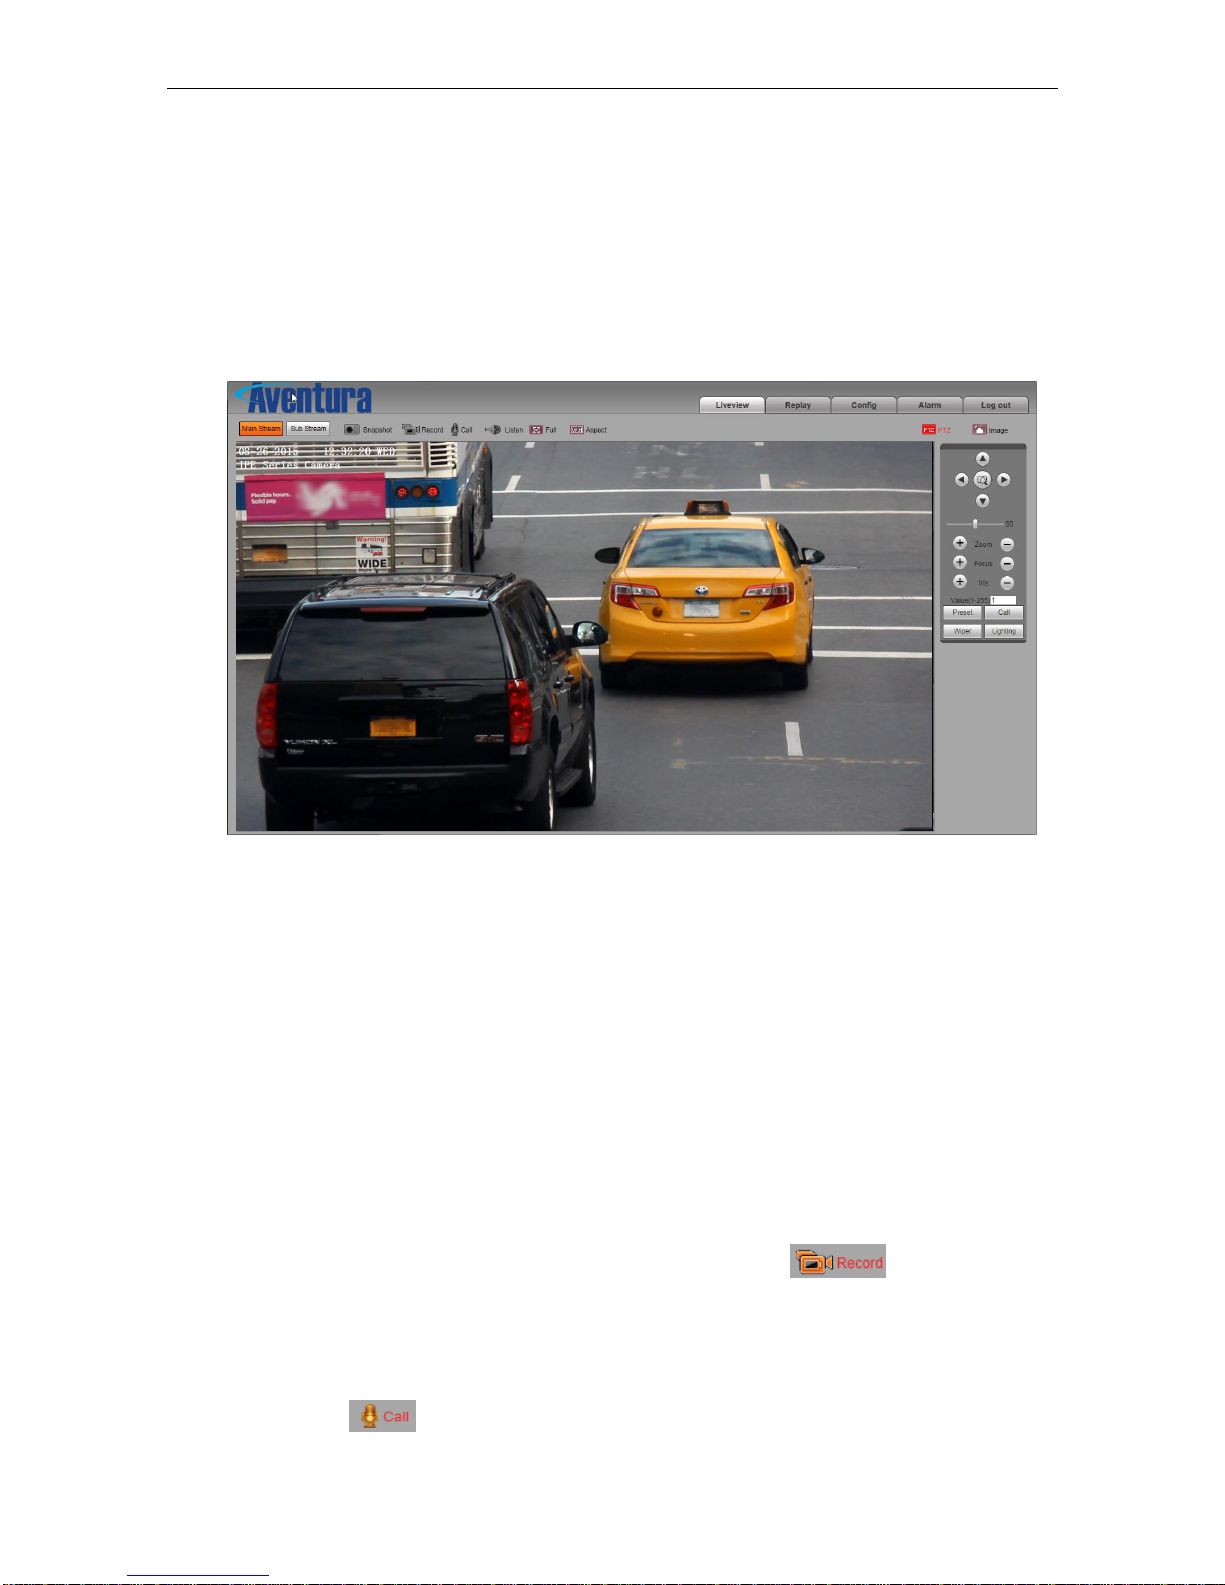
3 Live Preview................................................................................................................................................ 8
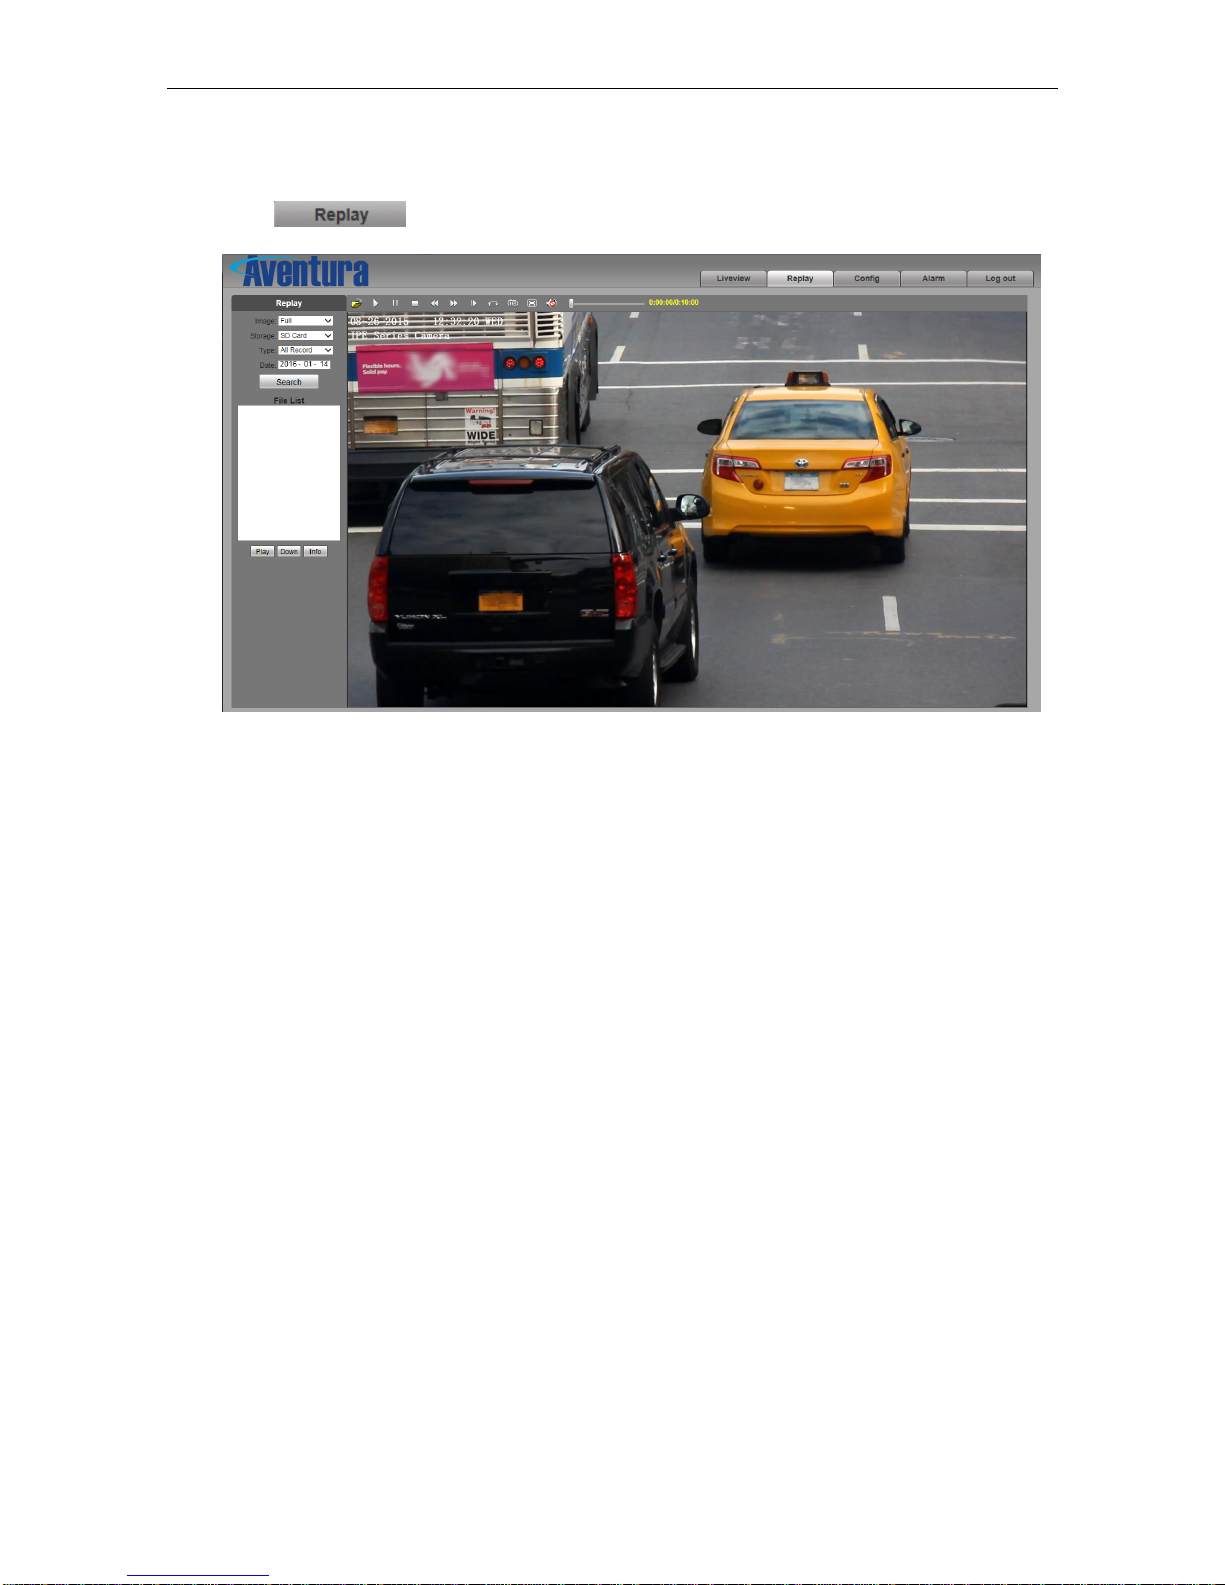
4 Replay............................................................................................................................................................. 10
5 Set System Parameters................................................................................................................................ 12
5.1 Local config........................................................................................................................................... 12
5.2 Audio Setting......................................................................................................................................... 13
5.3Video Settings.........................................................................................................................................14
5.3.1 Text Overlay............................................................................................................................. 14
5.3.2 Video Encoding....................................................................................................................... 15
5.3.3 Video Mask.............................................................................................................................. 17
5.3.4 Video Parameters................................................................................................................... 17
5.3.5 Picture Parameter................................................................................................................... 21
5.4 Network Settings................................................................................................................................... 21
5.4.1 Basic Setting............................................................................................................................ 21
5.4.2 LAN Setting.............................................................................................................................. 22
5.4.3 Wireless Setting...................................................................................................................... 22
5.4.4 PPPOE Setting........................................................................................................................ 25
5.4.5 UPNP setting........................................................................................................................... 26
5.4.6 Email setting............................................................................................................................ 27
5.4.7 FTP setting............................................................................................................................... 28
5.4.8 DDNS setting........................................................................................................................... 29
5.4.9 VPN setting.............................................................................................................................. 29
5.4.10 RTSP setting.......................................................................................................................... 30
5.4.11 Public IP noticed by email.................................................................................................... 32
5.4.12 Connect setting..................................................................................................................... 32
5.5 Storage Settings..................................................................................................................................... 33
5.5.1 Device Setting......................................................................................................................... 33
5.5.2 Record Setting......................................................................................................................... 35
5.5.3 Snap Setting............................................................................................................................ 35
5.6 Alarm Settings....................................................................................................................................... 36
5.6.1 Motion detection...................................................................................................................... 36
5.6.2 Sensor Detection..................................................................................................................... 38
5.6.3 Network Detection...................................................................................................................39
5.7 COM Setting..........................................................................................................................................41
5.8 System Setting.......................................................................................................................................42
5.8.1 System Info.............................................................................................................................. 42
5.8.2 System Time............................................................................................................................ 43
5.8.3 User Manage........................................................................................................................... 44
5.8.4 Upgrade.................................................................................................................................... 45
5.8.5 PTZ Upgrade........................................................................................................................... 45
5.8.6 Restore..................................................................................................................................... 46
5.8.7 Reboot...................................................................................................................................... 46
5.8.8 System log............................................................................................................................... 47
Appendix 1 Network IP Camera Interface..................................................................................................... 48
Appendix 2 Default Network Parameters...................................................................................................... 48
Appendix 3 FAQs.............................................................................................................................................. 48

IP Camera User’s Manual
4/50
1Download and install ActiveX
You will need to install the ActiveX controls when connecting to your IP camera for the
first time.
ActiveX Installation:
1. Go to the webpage of your IP camera by typing its IP address into your Internet
Explorer address bar. (See Figure 1)
2. Click the [Blue Text] to download the ActiveX plugin:
Figure 1
You can download the ActiveX manually by selecting the [Blue Text] or by selecting
“Install” in the system prompt.(see Figure 2)
Figure 2

IP Camera User’s Manual
5/50
NOTE: If you are unable to install the ActiveX plugin and receive the window found in
Figure 3:
Figure 3
Change the security level of Internet Explorer by going to: IE tools-> Internet
options->Security->Custom level. (Figure 4).
Figure 4

IP Camera User’s Manual
6/50
Change the parameters as shown in Figure 5 and Figure 6:
Figure 5
Figure 6
Restart Internet Explorer and attempt to reinstall theActiveX plugin.

IP Camera User’s Manual
7/50
2 Login
Restart Internet Explorer after the ActiveX installation completes. Input the IP
address of the camera to open the login page. Enter in your username and password
(Default: admin/admin) and click login. (See Figure 7):
Figure 7

IP Camera User’s Manual
8/50
3 Live Preview
Features:
- Snapshots
- Manual Recording
- Audio (Listen & Call)
- Clear Alarms
- Digital Zoom
- Full-screen Viewing
- PTZ & Lens Control
Figure 8
[Main Stream]: Show the main stream of camera for the best quality.
[Sub Stream]: Show the sub stream of camera. This is a lower resolution for better performance
on a slower network.
[Snapshot]: Take a snapshot of the current image and save it in .JPG format to the default
image storage directory.
[Record]: Manually record video and save in x264 format to the default video storage
directory. If you are currently recording the icon is shown as:
[Call]: Your mic will be transmitted to the IP camera. Audio can be heard at the camera if
the proper audio module is installed in the IP camera. The following icon will be shown
upon activation:
[Listen]: Your PC will receive audio transmitted through the mic on the camera. The

IP Camera User’s Manual
9/50
following icon will be displayed upon activation:
[Digital Zoom]: Manually click and drag a video display area to digitally zoom in on a
specific area.
[Full]: Display video in full-screen. Right click or press “Esc” on your keyboard to exit full
screen mode.
[Aspect]: Click “W:H”to display the actual aspect ratio of the video, avoiding image distortion
when stretched to the size of your display. Click again to return to the default setting.
[Replay]: Display the replay window to search for and playback recorded files and
snapshots.
[Alarm]: When there is an alarm you will see the following:
Select [Alarm] to cancel the alarm message manually and display the log window.
The maximum message capacity is 512 entries. When the number of entries exceeds 512,
the system will automatically delete earlier records as new ones come in.
[PTZ ]: Opens the PTZ window for pan, tilt, zoom, focus, iris, preset, and wiper controls.
[Image]: Opens the Image Settings window allowing the user to adjust brightness, contrast, hue
and saturation of the video in real-time.

IP Camera User’s Manual
10/50
4 Replay
Click enter into video playback page (see Figure 9).
Figure 9
Search for recorded video or images on your local PC or storage device, organized by
date.
[Image]: Select the aspect ratio to display video in the playback window.
[Storage]: Search for recorded video and/or snapshots in either your PC or an SD Card.
[Type]: Select whether to display all recordings, alarm-based recordings, schedule-based
recording, or snapshots.
[File List]: Shows the recorded image files or snapped pictures searched in the File List.
The way to search for recorded image files or snapped pictures of a specific period
(see Figure 10):

IP Camera User’s Manual
11/50
Figure 10
[Play]: Choose the recorded image or snapped picture in file list, right click the file or picture
or click “play” button to play. The contents will be displayed in the right window, users can
view the playing information and control the process(see Figure 11):
Figure 11
[Down]: Select the recorded files or snapped pictures searched from SD card in the
file list, click “download” button to download the files to PC.
[Info]: Users can then view the information downloaded (see Figure 12):
Figure 12
List all recording files or images
Select the storage media SD card or PC
which keep the recording and images

IP Camera User’s Manual
12/50
Click [Start] to start downloading recording files or pictures from SD card to PC
manually, click [Cancel] to stop the download action. If you close the Download
Information window and click ,you can continue to view the information about
download.
5 Set System Parameters
5.1 Local config
See Figure 13 for the “System Settings” interface:
Figure 13
[Preview mode]: Users can choose Real time priority or Fluency priority mode.
[Reset Mosaic]: Select this option to make image quality better (increases CPU use).
[Record file packing time]: Set max-length (time) of recorded files for local PC.
[Record file path]: set the storage directory for local recording and image snapshots.
After you set these parameters, please click

IP Camera User’s Manual
13/50
5.2 Audio Setting
See Figure 14 for the “Audio Settings”interface.
Figure 14
[Enable]:Turn on or turn off the audio of IP camera (disabling audio saves DSP and
network resources). Audio is disabled by default.
[Audio Input]: Choose MIC or Line In input.
[Compression Type]: Select compression format: G.726, G.711A, G.711U.
[Sampling Rate]: Supports audio sample rates from 8k to 32k.
[Input Volume]: Adjust the device’s input volume (Listen).
[Output Volume]: Adjust the device’s output volume (Call).
After you set these parameters, please click

IP Camera User’s Manual
14/50
5.3Video Settings
5.3.1 Text Overlay
See Figure 15 for the “Video Settings” interface:
Figure 15
[Title]: The name of video channel, displayed at the bottom left of image (movable), maximum
characters allowed: 32.
[Color]: Select text color.
[OSD]: Enable/disable display of Title, Date, Time, Week, Date Format and Frame/Bitrate
of channels.
[Position]: Adjust the display position of video title and Date,Time,Week.
After you set these parameters, please click

IP Camera User’s Manual
15/50
5.3.2 Video Encoding
See Figure 16 for the “Video Encoding” interface:
Figure 16
[Coding Level]: Baseline and Main profile available, only for H.264 compression format.
Baseline optimizes for minimum delay, Main profile optimizes for maximum quality.
[Coding]: H.264 and MJPEG.
[Resolution]: Set image resolution.
Main Stream: Supports up to the camera’s maximum resolution.
Sub Stream: Supports 720*576/640*480/640*352/320*240.
[Quality]:Fine, Normal, Basic, or [advanced] (user defined).
[Rate control]: CBR (constant bitrate) or VBR (variable bitrate)
[Quality]: Under CBR: Set the maximum allowable variance from ±10%~±50% or select
self-adaption to scale as needed. Under VBR: Set the image quality via 6 available levels,
from best to worst.
[Bitrate]: Set the baseline bitrate of the camera from 30~16,384 Kbps. Higher bitrate
setting can generate better image quality, but it requires more bandwidth.
[Frame rate]: Set encoding frame rate per second. Under poor network conditions, frame
rate can be reduced to control encoding bitrate to make motion images flow more
smoothly.

IP Camera User’s Manual
16/50
[GOP]: Adjustable between 1~200 (Main Stream), 1~200(Sub Stream). Smaller I frame
interval means higher bitrate and better image quality.
[LAN default value]:
Main stream:H.264 Coding: GOP: 75, frame rate: 25, rate control: VBR, image
quality:better 720P:2048kps, 1080P:4096kps
MJEPG Coding: GOP: 75, frame rate:25, rate control: VBR, image quality:better
720P:9216kbps, 1080P:10240kbps
Sub Stream:
H.264 Coding: GOP: 50, frame rate: 25, bitrate: VBR, 512kbps, image quality:Bad;
MJPGE Coding: GOP: 50, frame rate: 25, bitrate: VBR, 4096kbps, image quality:Bad;
[WAN default value]:
H.264 Coding: GOP: 25, frame rate: 5, bitrate: CBR, 384kbps, image quality:Bad;
MJPEG Coding: GOP: 25, frame rate: 5, bitrate: CBR, 4096kbps, image quality:Bad;
After you set these parameters, please click
(After change the device may restart automatically).
Note: Use “Advanced Settings” with caution.

IP Camera User’s Manual
17/50
5.3.3 Video Mask
See Figure 17 for the “Privacy Mask” interface:
Figure 17
[Enable Mask]: Enable or disable video masking.
[Mask area set]: Click and move cursor to set image masking area, an image can be
entirely or partially masked, maximum 4 areas supported.
[All]: Mask the whole image.
[Cls]: Clear masked areas.
After you set these parameters, please click
5.3.4 Video Parameters
See Figure 18 for the “Video Parameters”interface:

IP Camera User’s Manual
18/50
Figure 18

IP Camera User’s Manual
19/50
[Images Color]: Adjust the Brightness, Contrast, Hue, Saturation, Acutance, and Gamma.
Image mode:Transparent and True Color.
[Basic]
Mirror: Set mirror, horizontally rotate the video
Flip: set flip, vertically rotate the video
50HZ/60HZ: If the image appears to flicker, select 50HZ or 60HZ according to the
frequency of local electric power. 50HZ is suitable for PAL video, 60HZ is suitable for NTSC
CTB: Set CTB to automatically activate the camera’s Day/Night mode
WDR: Set WDR to enhance the image quality in areas with a strong light source (sunlight,
lamps or reflectors, etc.), dark shadows, high-brightness, and backlighting conditions.
3D-DNR: Set 3D Noise Reduction to get a clearer picture in low-light environments by
effectively eliminating video noise and color noise.
WB: Select Manual WB (White Balance) or AWB (Auto White Balance) mode.
Iris: Manual Iris mode can be used with non-auto iris lenses. Set DC Auto Iris for most
lenses. Adjust the auto-iris level to control the luminous flux.
[IR]
IR Mode: This function applies to cameras with active infrared illuminators. It supports
3 kinds of detection, suitable for different infrared lights and situations.
Time Detection: Schedule day (color) and night (B/W) modes
Video Detection: for this mode, the sensor will detect the lighting conditions, and
decide turn to B/W mode or not. The lager the value is, more sensitive about turn to
B/W mode.
IR Detection: for this mode, the photo-resistor will detect the lighting conditions
and can support 3 modes:
Low level mode, when the device get low level voltage from Infrared light board,
the device will turn to B/W mode.
High level mode, when the device get high level voltage from infrared light
board, the device will turn to B/W mode.
Auto detection mode, when the device powers on it will take sample of light
and IR board voltage, then adjust to day mode or B/W mode

IP Camera User’s Manual
20/50
Black-color: Determines when to switch back to color mode from B/W.
Color-black: Determines when to switch to B/W mode from color.
ICR Setting the control level of the IR-CUT filter according to the IR-CUT control level.
IR this function relates only to cameras with IR-CUT filter and infrared light board. eg:
for ICR, when low level is set the device sends a low level voltage to the IRCUT module,
causing the IR-CUT to switch into B/W mode.
[Advanced]]
Rotation: support 90 degree and 270 degree rotation.
Gain value: change the value of AGC to adjust the effect of image in low light.
Exposure: Set the value of Shutter to control exposure time
WB: You can choose Manual WB or AWB mode to adjust white balance, AWB is default
open.
AntiFogging: The ISP will change the brightness and contrast to improve the quality of
image in foggy conditions.
AntiFalseColor: Cancels the Moore profile effect in high frequencies.
After you set these parameters, please click
Table of contents