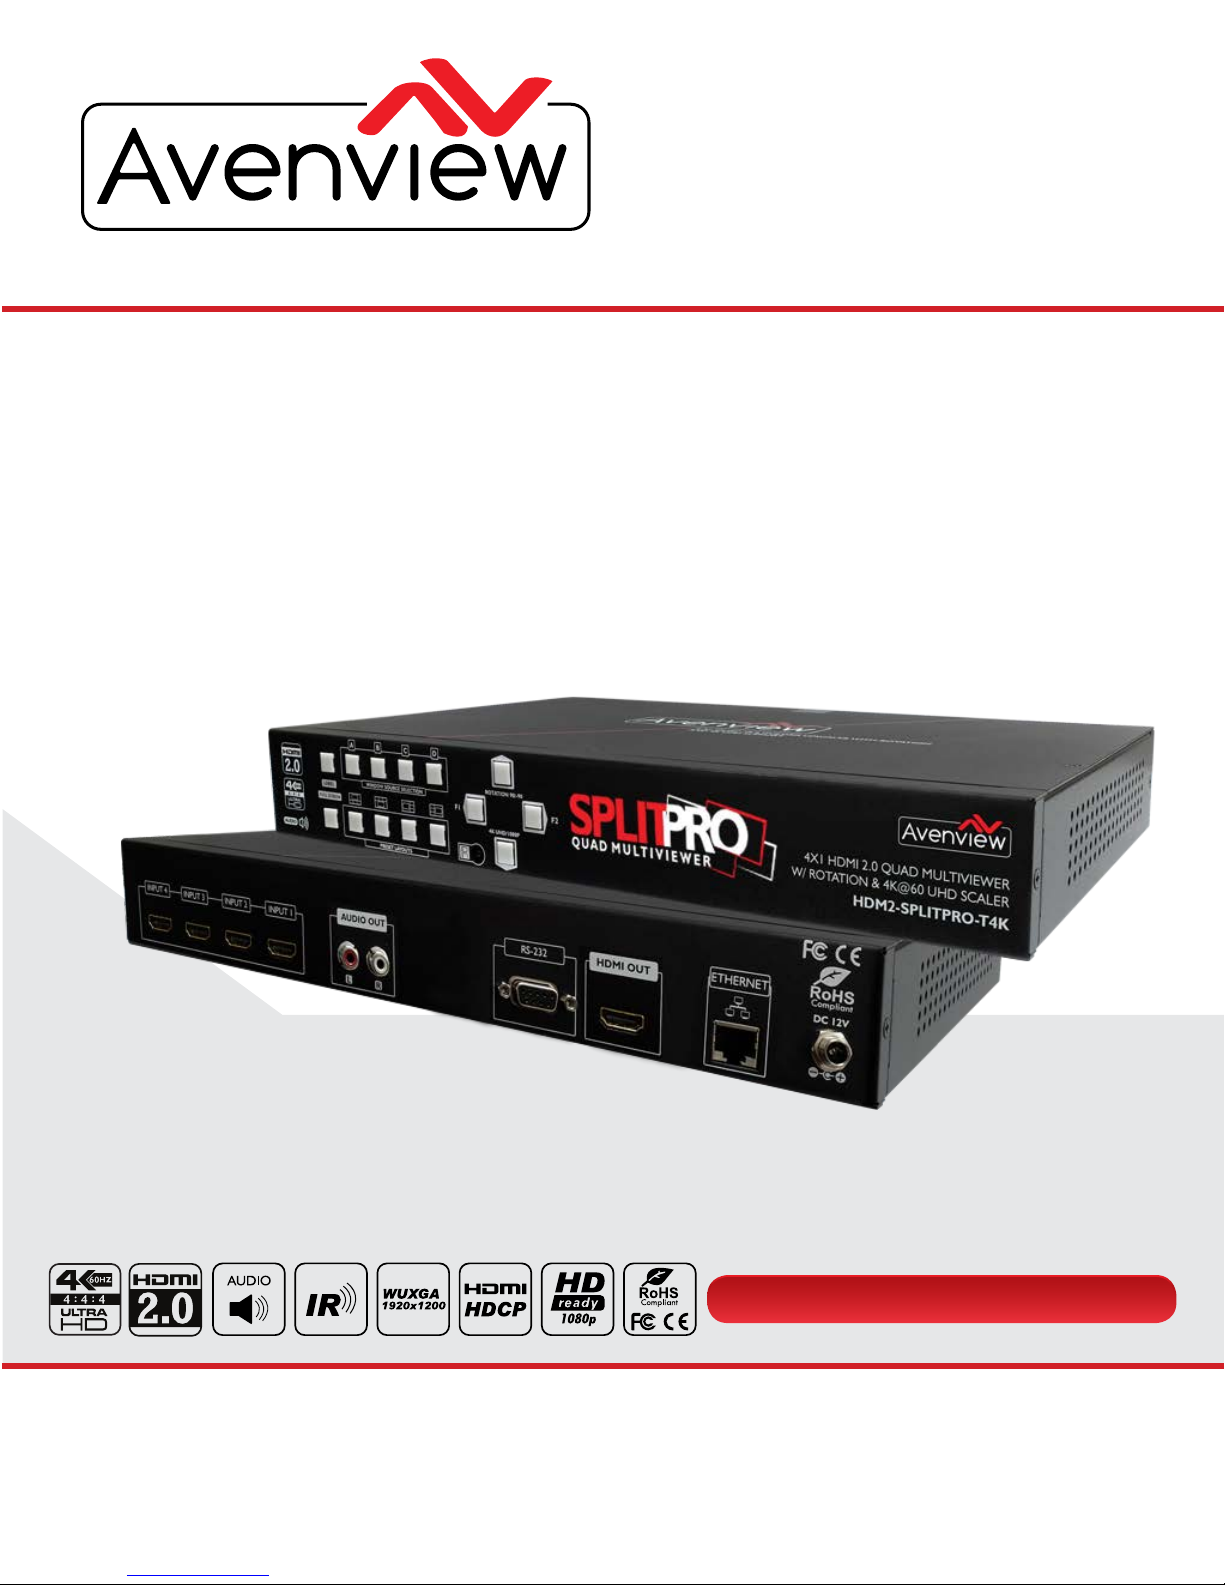
Avenview HDM2-SPLITPRO-T4K User manual
VIDEO WALLS VIDEO PROCESSORS
VIDEO MATRIX SWITCHES
EXTENDERS SPLITTERS WIRELESS
CABLES & ACCESSORIES
Control Your Video
4x1 HDMI 2.0 Quad Multiviewer with
4K@60 UHD Scaler on Output
© 2016 Avenview Inc. All rights reserved.
The contents of this document are provided in connection with Avenview Inc. (“Avenview”) products. Avenview makes no representations or
warranties with respect to the accuracy or completeness of the contents of this publication and reserves the right to make changes to specifications
and product descriptions at any time without notice. No license, whether express, implied, or otherwise, to any intellectual property rights is granted
by this publication. Except as set forth in Avenview Standard Terms and Conditions of Sale, Avenview assumes no liability whatsoever, and claims any
express or implied warranty, relating to its products are is strictly prohibited.
Model #: HDM2-SPLITPRO-T4K
HDM2-SPLIPRO-T4K

www.avenview.com Page
2
TABLE OF CONTENTS
1. GETTING STARTED ..........................................................................................................................1
1.1 IMPORTANT SAFEGUARDS ..............................................................................................................1
1.2 SAFETY INSTRUCTIONS. ..................................................................................................................1
1.3 REGULATORY NOTICES FEDERAL COMMUNICATIONS COMMISSION (FCC) ........................... 2
2. INTRODUCTION ..............................................................................................................................3
2.2 PACKAGE CONTENT... .....................................................................................................................5
2.3 BEFORE INSTALLATION ...................................................................................................................5
2.4 APPLICATION DIAGRAM ..................................................................................................................6
3. PANEL DESCRIPTION........................................................................................................................7
3.1 INPUT PANEL (HDM2-SPLITPRO-T4K) FRONT.............................................................................7
3.2 INPUT PANEL (HDM2-SPLITPRO-T4K) REAR.................................................................................7
4. IR REMOTE CONTROL.....................................................................................................................8
4.1 INSTALLATION AND CONTROL SOFTWARE................................................................................9
5. SPECIFICATIONS .............................................................................................................................20
2.1 FEATURES ..........................................................................................................................................4

www.avenview.com Page
1
SECTION 1: GETTING STARTED
1.1 IMPORTANT SAFEGUARDS
Please read all of these instructions carefully before you use the device. Save this manual for future reference.
What the warranty does not cover
• Any product, on which the serial number has been defaced, modified or removed.
•Damage, deterioration or malfunction resulting from:
•Accident, misuse, neglect, fire, water, lightning, or other acts of nature, unauthorized product modification, or failure to
follow instructions supplied with the product.
•Repair or attempted repair by anyone not authorized by us.
•Any damage of the product due to shipment.
•Removal or installation of the product.
•Causes external to the product, such as electric power fluctuation or failure.
•u se of supplies or parts not meeting our specifications.
•Normal wear and tear.
•Any other causes which does not relate to a product defect.
•Removal, installation, and set-up service charges.
1.2 SAFETY INSTRUCTIONS
The HDM2-SPLITPRO-T4K 4x1 Quad multiviewer with 4K UHD support on the output and audio has been tested for
conformance to safety regulations and requirements, and has been certified for international use. However, like all electronic
equipments, the HDM2-SPLITPRO-T4K should be used with care. Read the following safety instructions to protect yourself
from possible injury and to minimize the risk of damage to the unit.
! Do not dismantle the housing or modify the module.
! Dismantling the housing or modifying the module may result in electrical shock or burn.
! Refer all servicing to qualified service personnel.
! Do not attempt to service this product yourself as opening or removing housing may expose you to dangerous voltage
or other hazards
! Keep the module away from liquids.
! Spillage into the housing may result in fire, electrical shock, or equipment damage. If an object or liquid falls or spills on
to the housing, unplug the module immediately.
! Have the module checked by a qualified service engineer before using it again.
! Do not use liquid or aerosol cleaners to clean this unit. Always unplug the power to the device before cleaning.

www.avenview.com Page
2
1.3 REGULATORY NOTICES FEDERAL COMMUNICATIONS COMMISSION (FCC)
This equipment has been tested and found to comply with part 15 of the FCC rules. These limits are designed to
provide reasonable protection against harmful interference in a residential installation.
Any changes or modifications made to this equipment may void the user’s authority to operate this equipment.
Warning symbols Description
ONLY USE THE PROVIDED POWER CABLE OR
POWER ADAPTER SUPPLIED. DO NOT TAMPER WITH
THE ELECTRICAL PARTS. THIS MAY RESULT IN
ELECTRICAL SHOCK OR BURN.
DO NOT TAMPER WITH THE UNIT. DOING SO WILL
VOID THE WARRANTY AND CONTINUED USE OF
THE PRODUCT.
THE VIDEO BOARDS ARE VERY SENSITIVE TO STATIC.
PLEASE ENSURE IF RACK MOUNTED OR INSTALLED ON
A SURFACE, IT SHOULD BE IN A GROUNDED
ENVIROMENT.

www.avenview.com Page
3
2. INTRODUCTION
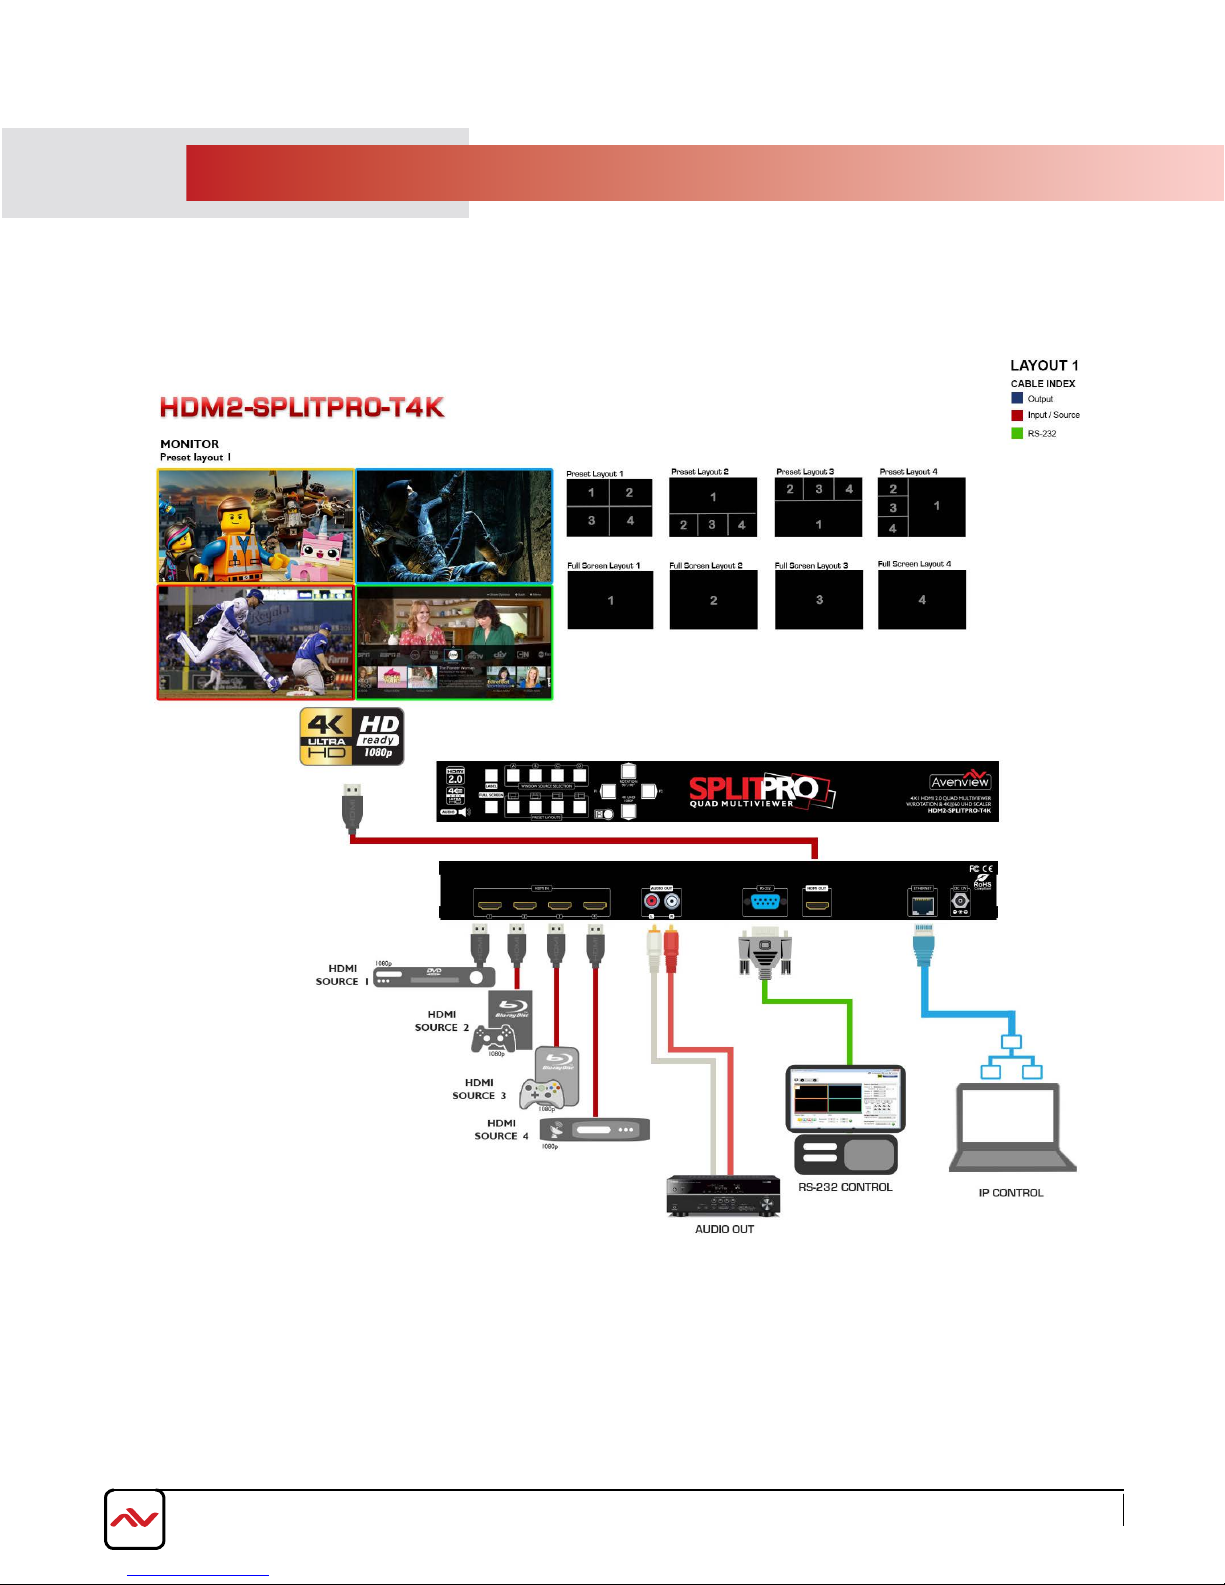
This 4 x1 multiviewer Scaler was developed for the purpose of supporting higher output resolution (4K@60) for multiple
sources on a single screen.
This HDMI device can accept 4 HDMI input digital sources and combine (4) four video signals onto a single HDMI UHD or
HD monitor The user can easily manage each input via the supplied Control Software and create any layout and position of
any of the 4 (four) Inputs on a single monitor. This device supports full range of input video resolutions up to WUXGA@60
(RB) or full HD1080p and audio RCA breakout supported for external audio distribution systems. Audio channels can be
selected to playback with input or can be muted.
Fast Switching – This device can input any 4 HDMI input digital sources and then combine, (4) four video signals onto a
single HDMI HD monitor. The user will benefit with from its processing power to switch between the 8 user defined function
via IR Remote, Ethernet or RS232.
Crop – This device can Crop any 4 HDMI input digital sources to remove black bars and then combine, (4) four video signals
onto a single HDMI HD monitor. This device can be configured using the supplied Control software via Ethernet or RS232 to
set the desired layout on the connected screens.
PIP,PAP, Overlay – This device can input any 4 HDMI digital sources and then combine, (4) four video signals onto a single
HDMI HD monitor, which the user can select picture In picture (PIP) , picture Aside picture (PAP) or overlay with the
supplied Control Software via Ethernet or RS232 to set the desired layout configuration.
Window Scale and Position – The user can easily change the individual channel size and choose different position and
layout on the single monitor with the Control Software via Ethernet or RS232 to set the desired layout configuration.
Scalable Rotation (90˚ & -90˚) – The user can easily Rotate/Scale only a single input/window image 90˚ left and right. This
device can be configured with the Control Software, IR Remote, Ethernet, RS232 or front panel buttons .

www.avenview.com Page
4
- Fast switching between input channels and combined multiple images on single HD monitor;
- Crop the (4) four HDMI Input Channels;
- Supports PIP, PAP and multi-windows layout configurations;
- Single Input Rotation (90˚ left & right ) functions;
- 8 preset Hot keys with 4 Custom layouts and 4 Full screen layouts within the supplied control software;
- 8 Custom saved layout buttons via the IR Remote;
- Input resolution support full range of video resolutions up to WUXGA@60 (RB) or full HD1080p;
- Output resolution support Full HD or upscale to 4K@60 (3840x2160);
- Audio dembedded via RCA Left and Right audio connectors
- RS 232 port for Service mode and firmware upgrade;
- Supports RS 232,Ethernet, IR Remote and front panel buttons;
- Factory Reset feature.
2.1FEATURES
www.avenview.com Page
5
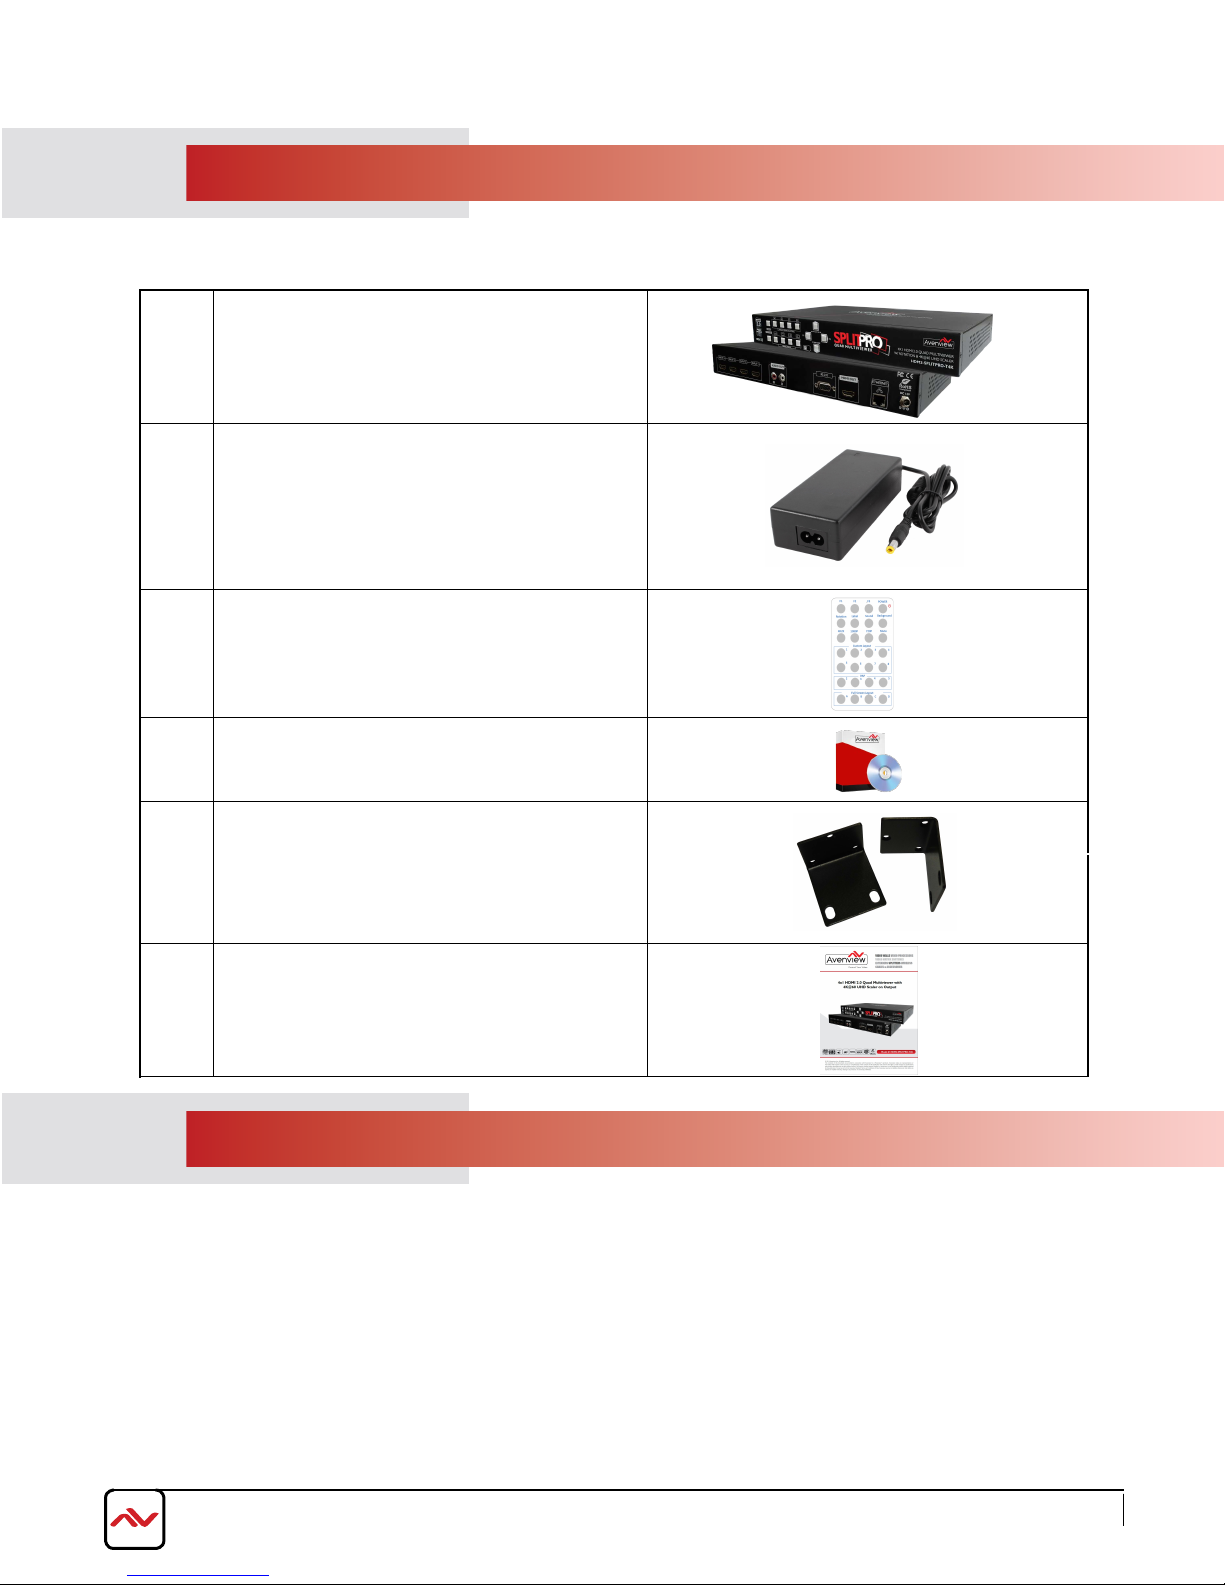
2.2 PACKAGE CONTENTS
Before you start the installation of the converter, please check the package contents.
1HDM2-SPLITPRO-T4K X 1
2POWER SUPPLY (12V 5A) X 1
3IR REMOTE X 1
5RACKMOUNT BRACKET X 2
2.3 BEFORE INSTALLATION
•Put the product in an even and stable location. If the product falls down or drops, it may cause an injury or malfunction.
Don’t place the product in too high temperature (over 50°C), too low temperature (under 0°C) or high humidity.
•Use the DC power adapter with correct specifications. If inappropriate power supply is used then it may cause a fire.
•Do not twist or pull by force ends of the video cable. It can cause malfunction.
4SOFTWARE X 1
6USER MANUAL X 1
www.avenview.com Page
6
2.4 APPLICATION DIAGRAM
www.avenview.com Page
7
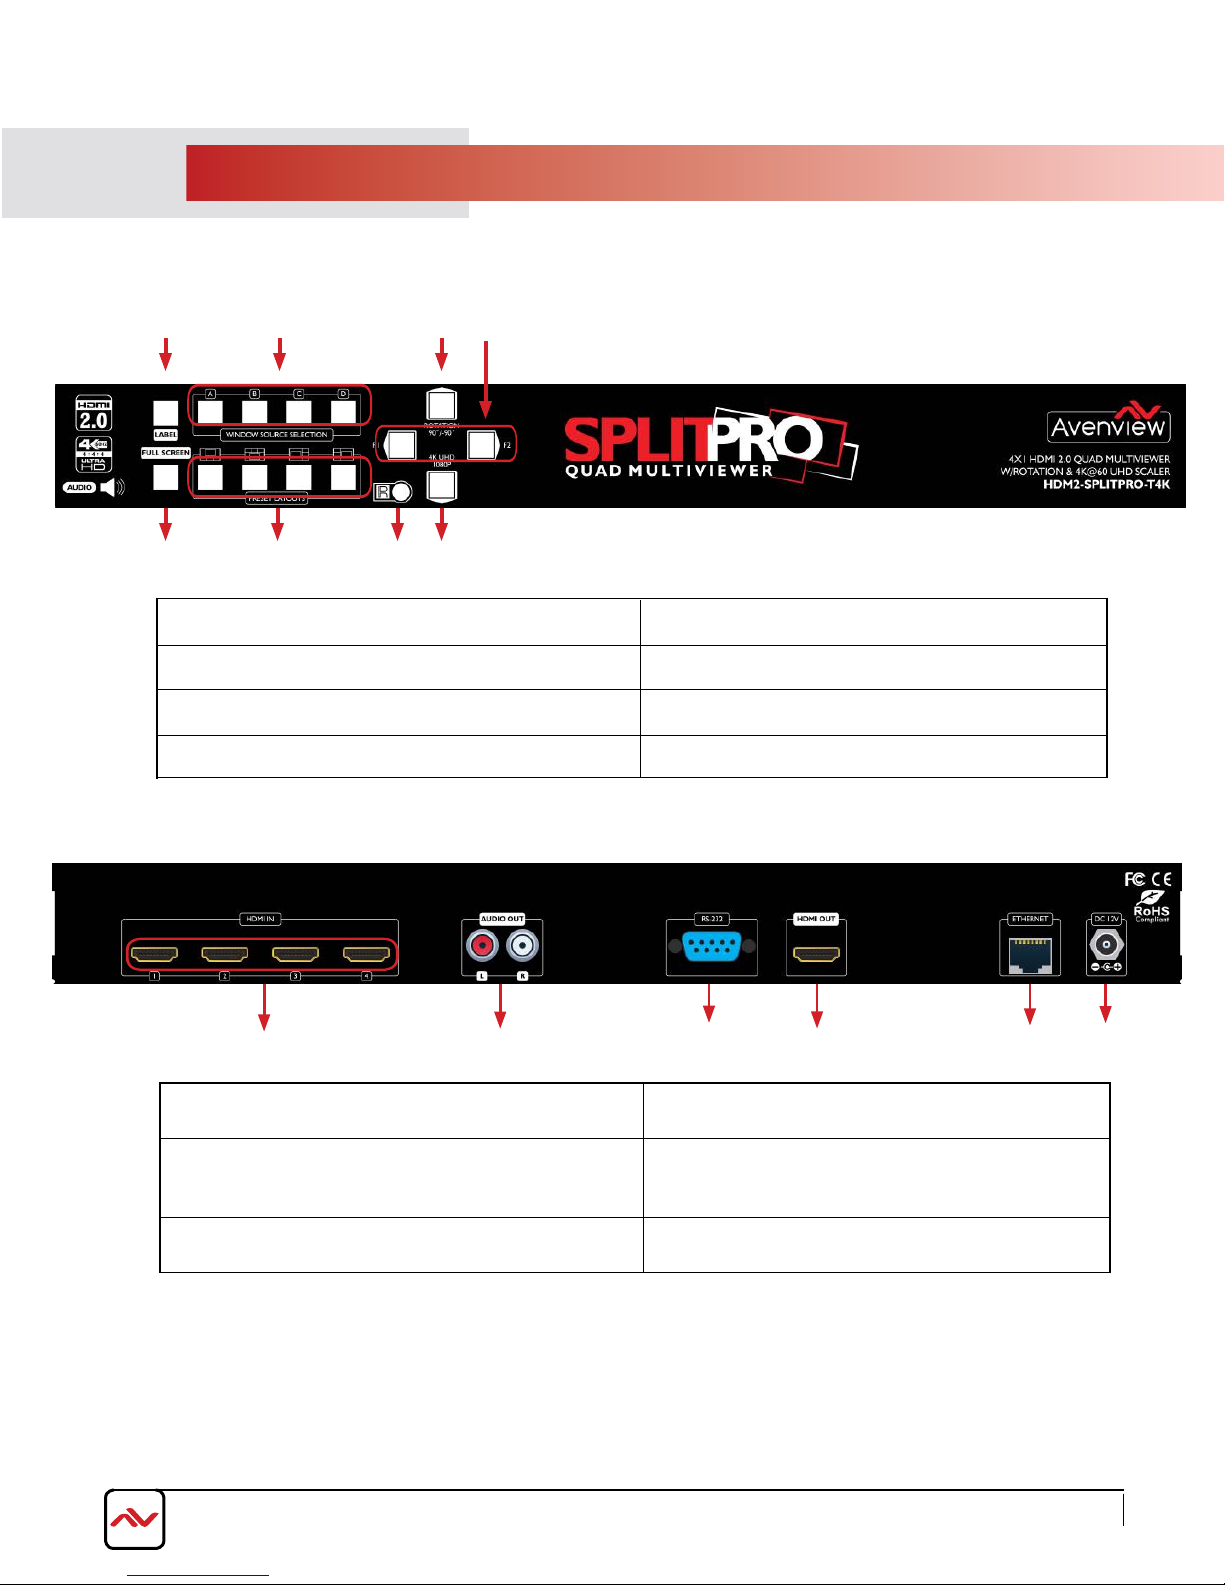
3. PANEL DESCRIPTION
3.1 INPUT PANEL (HDM2-SPLITPRO-T4K) Front
*Some display/monitor brands the window border may have interference, adjusting the display's motion setting may
resolve the interference issue.
3
3.2 INPUT PANEL (HDM2-SPLITPRO-T4K) Rear
9.HDMI IN 1-4: Connect up to 4 HDmI devices to the
INpu T ports 1-4( Blu-ray /Set-Top Box or PC)
10.
HDMI OUT: Connect a single HDmI HD monitor/
Display to view the four inputs connected.
11.
Stereo Audio L/R: Connect red white audio RCA
jacks to extract audio to an external audio source.
12.
RS-232: D-Sub 9pin port for sending and controlling
the unit by PC/Notebook via RS232 cable.
13.Ethernet: RJ45 jack for sending and controlling the
unit by pC/Notebook via ethernet cable.
14.DC 12V: plug the 12V DC power supply into the
unit supplied to an AC 110v outlet.
12
11 13 14
10
9
124
5678
1.
Reserved Buttons: F1 & F2
5.
Full Screen Button 2.Preset Layouts: PAP1/2/3/4
3.IR Sensor: Receive IR commands from IR remote 4.Resolution Button: 4K UHD/1080p
Rotation Button: +90 & -90
6.
Window Source Selection: Source A/B/C/D
7.Window Label Button: Label ON/OFF
8.
www.avenview.com Page
8
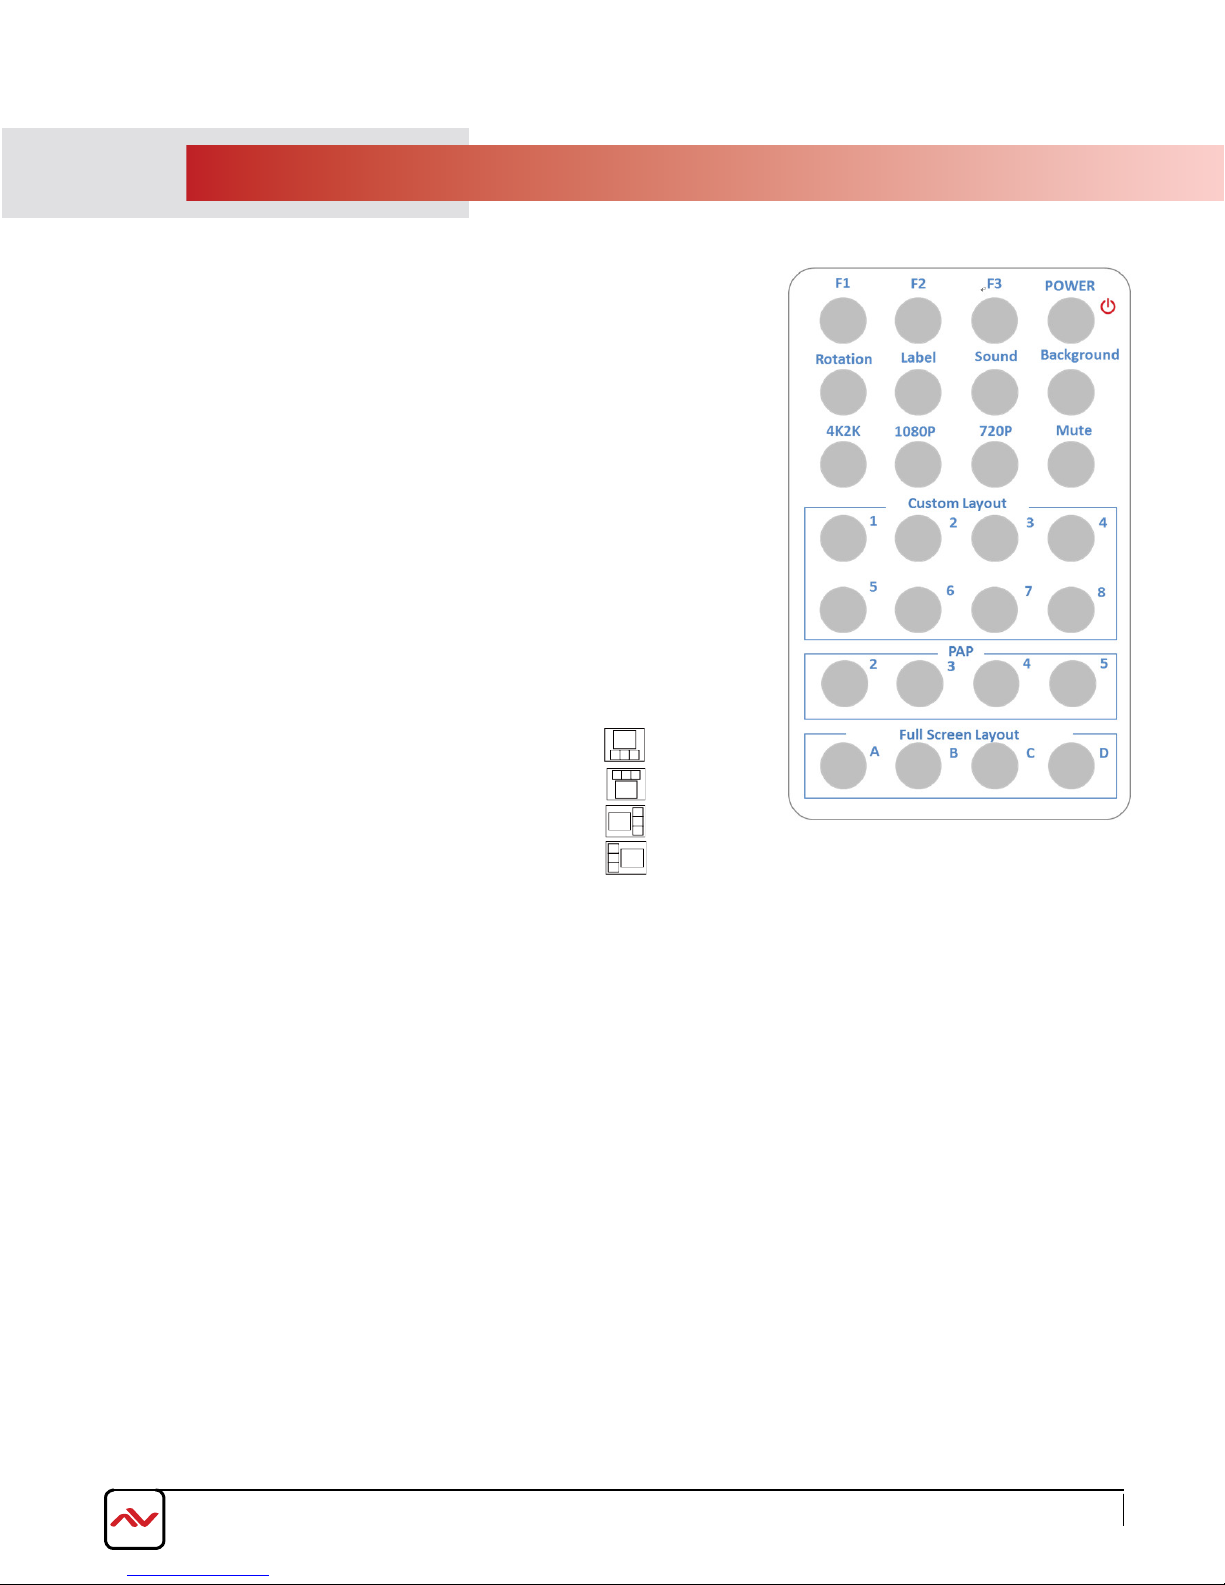
4. IR REMOTE CONTROL
1. F1: 1st press activate DVI / 2nd press activate HDMI mode.
2. F RESERVED: N/A
3.
4. POWER: To power ON or OFF the unit
5. ROTATION: Rotate Window A only +90 or -90.
6. LABEL: To toggle window label ON/OFF
7. SOUND: Easily switch between input audio source.
8. BACKGROUND: To enable and setup background picture.
9. 4K2K: Enable 4k@60 UHD resolution on the output.
10. 1080p: Enable 1080p@60 resolution on the output.
11. 720p: Enable 720p@60 resolution on the output.
12. MUTE: To mute the audio on output
13. CUSTOM LAYOUT 1-8: Enables the configured user defined layout1-8
14.
*Audio function only work under A to D.
F RESERVED: N/A
QUAD LAYOUT 1: Enables the predefined layout 1
15.QUAD LAYOUT 2: Enables the predefined layout 2
16.QUAD LAYOUT 3: Enables the predefined layout 3
17.QUAD LAYOUT 4: Enables the predefined layout 4
18.FULL SCREEN LAYOUT 1-4: Enables the source input to full screen window mode A-D
Other manuals for HDM2-SPLITPRO-T4K
1
Table of contents
Other Avenview Accessories manuals


