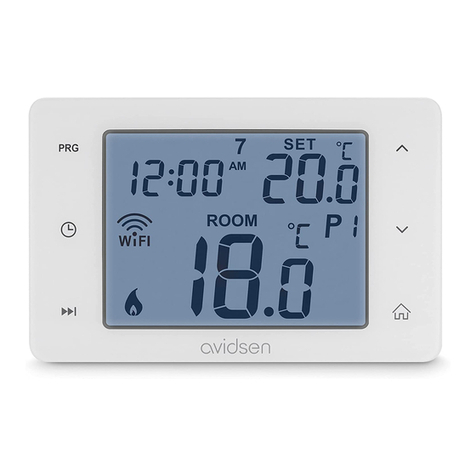
Avidsen HomeFlow WL User manual

WIRELESS WIFI
SMART THERMOSTAT
FOR BOILERS
HomeFlow WL
Ref.127047
www.avidsen.com
V1
EN


EN3
TABLE OF CONTENTS
A - SAFETY
INSTRUCTIONS
1 - OPERATING PRECAUTIONS 04
2 - WARNING 04
3 - MAINTENANCE AND CLEANING 04
4 - RECYCLING 04
B - PRODUCT
DESCRIPTION
1 - KIT CONTENTS 05
2 - LCD DISPLAY 05
C - INSTALLATION
1 - WIRING AND MOUNTING 06
2 - SETTINGS 07
F - OPERATION WITH
THE APP
1 - CONNECTION 9
1.1 - Installing the mobile application and
creating an account 9
1.2 - Connecting the thermostat 10
E - USE
1 - USE VIA THE APP 12
2 - WEEKLY PROGRAMME 12
3 - WEEKLY PROGRAMME 13
4 - WEEKLY PROGRAMME 13
F - TECHNICAL AND
LEGAL INFORMATION
1 - TECHNICAL CHARACTERISTICS 14
2 - WARRANTY 15
3 - HELP AND ADVICE 15
4 - DECLARATION OF CONFORMITY 15

EN 4
A - SAFETY INSTRUCTIONS
1 - OPERATING PRECAUTIONS
• Read this entire manual before starting the
installation.
• Do not allow children to operate the product.
• Do not install this product outside
• Switch off the circuit breaker before working on
the product
2 - WARNING
This product was designed to control a boiler (gas,
heating oil, irreversible heat pump); any other use
of the device is not covered by the warranty or
technical support. Avidsen cannot be held liable for
any use that does not comply with the instructions
in this manual and causes damage. Children
should be supervised to make sure that they do
not play with the device.
3 - MAINTENANCE AND CLEANING
The outer case can be cleaned
periodically.
• Switch off the circuit breaker before working on
the product.
• Do not use abrasive substances, substances
containing alcohol, thinners or other ammable
substances.
• Do not spray any products directly onto the unit.
4 - RECYCLING
This logo denotes that devices no longer
in use should not be disposed of as
household waste. They are likely to
contain hazardous substances that are
dangerous to both health and the
environment. Return the equipment to your local
distributor or use the recycling collection service
provided by your local council.
Pour en savoir plus :
www.quefairedemesdechets.fr

EN5
B - PRODUCT DESCRIPTION
The HomeFlow WL programmable thermostat lets you control your home’s temperature from your
smartphone (Apple and Android). It has a large backlit LCD screen.
Easy to install and use, it will quickly t into your lifestyle. You can congure weekly programmes from the
app or thermostat.
1 - KIT CONTENTS
1Wireless thermostat
2Boiler control module
1Day of Week
2Time
3Room temperature
4P button
5Dial for changing the setpoint temperature
6Manual mode
7Current programme
8
Wireless signal strength (solid when the
thermostat is online, blinking when there is no
connection)
9Buttons locked
10 ‘Flame’ symbol on when heating is enabled
11 Open window function
12 M button
13 On when the heat command has been given
14 On when the module has power
15 Pairing button
16 ON/OFF button
1Wall plug
2Mounting screw
2x11x1
2 - LCD DISPLAY
4x43x4
3
4
2
1
6
15
13
14
7
8
11
12
9
10
5
16

EN 6
C - INSTALLATION
Before the device is permanently installed, make
sure it is within WiFi range of your router. If it is
installed outside WiFi range, you should install a
WiFi repeater to boost the signal.
1 - WIRING AND MOUNTING
Wiring diagram based on the type of installation.
Refer to the manual for your heating equipment.
54321
NC NO
BOILER
COML
L
N
N
54321
NC NO
Electric
valve / pump
Electric heater
COML
L
N
N
Caution: before beginning this step, make sure the
power supply has been cut. When in doubt, please
contact a professional to complete the installation.
NC NO COM LN
NC NO COM LN
NC NO COM LN
Open the boiler module
NC NO COM LN
NC NO COM LN
NC NO COM LN
Fix the module to the wall (select appropriate
screws for the mount)
NC NO COM LN
NC NO COM LN
NC NO COM LN
Complete the connections based on your heating
system and shut the cover.
Open the thermostat’s battery compartment and
insert the batteries
12
COM
UP
NO NC
3
UP
12
COM
UP
NO NC
3
UP
12
COM
UP
NO NC
3
UP
12
COM
UP
NO NC
3
UP
Attach the mount to the wall and clip the thermostat
onto it. You can also set it on a piece of furniture.

EN7
C - INSTALLATION
2 - SETTINGS
- Pairing the temperature sensor with the boiler module
The product is factory paired. If no factory pairing exists, you can complete the pairing following the
steps below:
- Supply power to the thermostat and boiler control module and turn them on
- Press and hold the button until the LED begins blinking quickly
- On the thermostat, press and hold the adjustment dial
- On the new screen that appears, turn the adjustment dial until a 1 appears on the screen.
PM
- Do not touch the product. Wait about 30s for pairing to take place.
- Pairing is complete when the LED stops quickly blinking
- Turning the thermostat on and off
Press dial 5 to turn the thermostat on or off. When it is off, the screen is blank
- Backlighting
Backlighting is activated when the user presses a button. It remains active for 15s after the last press
- Setting the time
- Hold the M button down for 5s until the time begin to ash. Turn dial 5 to set the minutes
- Press M once to change the hour, and turn dial 5 to set it
- Press M once to change the day of the week, and turn dial 5 to set it
- Locking the buttons
- This option is disabled by default. To enable it, go into the settings menu. A lock will appear on the
screen.
- To unlock the screen, press and hold the P button for 5s
- The screen will relock automatically after 10 seconds
- Mode selection
- Manual mode: press M until the symbol turns on. Use the dial to adjust the setpoint temperature,
then wait 15 seconds or press the dial to conrm
- Programme mode: press M until the symbol turns on. Programme mode is now active
- Absence mode: press M until the symbol appears. Use the dial to set the absence mode temperature
- Creating a programme (this can be done from the app)
- Press and hold P for 5s until the time symbol begins blinking.
- The top left number indicates the day of the week: 1 = Monday; 2 = Tuesday; 3 = Wednesday; 4 =
Thursday; 5 = Friday; 6 = Saturday; 7 = Sunday
- The number at the top right indicates the period of the day that will be modied
- Use the dial to change the start time for the new temperature setpoint.
- Press P once, until the time symbol begins blinking. Use the dial to set the desired temperature for this
period.
- Repeat these steps for all periods and days of the week.
- The thermostat’s default values are shown in the table below

EN 8
C - INSTALLATION
Period 1 2 3 4
Time Temp Time Temp Time Temp Time Temp
12345
(Mon-Fri) 07:00 22°C 08:30 19°C 17:00 22°C 22:00 19°C
6 (Sat) 08:00 22°C 08:30 22°C 17:00 22°C 22:00 19°C
7 (Sun) 08:00 22°C 08:30 22°C 17:00 22°C 22:00 19°C
- Temporary temperature change
- Turn dial 5 to set the temperature, then wait 15 seconds or press the dial to conrm. This temperate
will remain set until the next programme.
- Open window detection
- Your thermostat is equipped with open window detection, which activates when the room temperature
drops (2°C in 15 minutes by default). The symbol appears and heating ceases for 30 minutes
The temperature and time can be changed in the technical settings
- Press on a thermostat button to exit this mode
- Technical settings
- Turn off the thermostat
- Press and hold dial 5 for 10 seconds
- The dial allows the values to be adjusted
- Pressing the dial switches between menus
- The settings table for the various menus is below
- Wait 15s to conrm the settings
- You can turn your thermostat back on and use your personalised settings
Menu Description Adjustment Default value
1 Temperature sensor calibration From -8°C to
+8°C 0 °C
2 Maximum setpoint temperature 5°C to 35°C 35°C
3 Minimum setpoint temperature 5°C to 35°C 5°C
5 Frost protection temperature 0°C to 3°C 5°C
9Dead zone (to avoid enabling cooling and heating one after the
other)
0: Room
temperature
1: Setpoint
temperature
0°C
10 Shows the room temperature or setpoint temperature 0: Unlocked
1: Locked 0
11 Buttons locked 0: OFF
1: ON 0
12 Automatic open window detection 2 to 30 min OFF
13 Open window detection time 2, 3 or 4°C 15 min
14 Temperature drop detection if a window is opened 10 to 60 min 2°C
15 Length of time heating will stay off if a window is opened 0: No 30 min
17 Reset
0: No
1: Yes, press
and hold the
button for 5s
and wait for the
thermostat to
restart
0
Software version

EN9
F - OPERATION WITH THE APP
1 - CONNECTION
This product only works with a 2.4Ghz frequency.
During pairing, make sure your smartphone is
connected on that specic frequency. If you are
not sure, check with your Internet service provider.
1.1 - INSTALLING THE MOBILE APP AND
CREATING AN ACCOUNT
Once the thermostat is connected, follow the
instructions below to pair it.
Download the Avidsen Home app from the Android
Play Store or Apple App Store.
Launch the app and log in if you already have
an account. If not, press CREER UN NOUVEAU
COMPTE (CREATE A NEW ACCOUNT) and let
the application guide you.
After accepting the privacy policy, create an
account using an email address.
Choose your country and enter your email address,
then select Obtenir le code de vérication (Get
conrmation code).
In a few seconds, you will receive a conrmation
code in your email inbox. Enter this code to nalise
registration.
Note that this email may go into your spam folder.
If you do not receive a code before the countdown
ends, press renvoyer (resend) and check that your
email address was entered correctly.

EN 10
To complete your registration, set a password
between 6 and 20 characters long with letters and
numbers only. then press Terminé (Finished).
1.2 - CONNECTING THE THERMOSTAT
To start pairing, press AJOUTER [ADD] in the app.
Make sure your phone is connected to your router
or gateway’s 2.4GHz WiFi network. If you already
have a device installed on the application (e.g. IP
camera, smart plug, etc.) click on + in the top right
corner of the application.
Choose the product that you wish to pair: select
HomeFlow WL.
Select your 2.4GHz WiFi network (note: your
smartphone must be connected to the same WiFi
network that your thermostat will use), enter your
network password and press SUIVANT [NEXT].
IMPORTANT: if a location authorisation request
message appears, you need to accept it for your
Android or iOS device to receive your WiFi.
IMPORTANT: This device is compatible with 2.4
GHz - WPA/WPA2 networks. Not compatible
with 5 GHz WiFi or with WEP encryption. Please
check the WiFi settings of your router or contact
your Internet service provider if you experience
connection difculties. If this message appears,
click on Changement [Change] or connect your
smartphone to a 2.4GHz frequency, then click on
Continuer [Continue].
F - OPERATION WITH THE APP

EN11
F - OPERATION WITH THE APP
The app will ask you to restart the device to
continue the pairing process: press and hold
pairing button 15 for 5s and press suivant [next]
in the app.
Please wait while the pairing procedure takes
place. This stage can last several minutes.
Please wait while the pairing procedure takes
place. This stage can last several minutes.
Your thermostat is now operational and will appear
in your app. You can rename it by clicking on the
small pencil to the right of the device name.
You can now control your Avidsen thermostat from
your smartphone.

EN 12
1 - USE VIA THE APPLICATION
To start, select your thermostat on the app’s home
page
The thermostat’s page consolidates the information
and available actions
2
3
1
7
8
6
4 5
1Temperature adjustment
2Setpoint temperature
3ON/OFF button
4Mode selection (auto, manual, absence)
5Weekly programme
6Settings
7Room temperature
8Change the product name, information about the
device
2 - WEEKLY PROGRAMME
- Press the weekly programme button. The below
screen appears
- Select the day of the week you wish to programme
- Select a period. The below screen appears
This page lets you dene:
- The time when the new temperature setpoint
will take effect
- Rename the period
- Period icon
- Desired temperature
E - USE

EN13
E - USE
3 - SETTINGS
From the settings menu, you can change
- The default absence time
- The temperature during holidays or absence
- Temperature calibration
- Restore default values
4- VOICE ASSISTANT COMPATIBILITY
Your new smart thermostat is compatible with both
Google Home and Alexa voice assistants. Refer to
your voice assistant’s instructions to connect your
thermostat.
- Ask the assistant to increase the temperature
- Alexa, increase the temperature by 1°C
- Ok Google, lower the temperature by 1°C
- Ask the assistant to set a temperature
- Alexa, set the temperature to 20°C
- Ok Google, set the temperature to 20°C

EN 14
F - TECHNICAL AND LEGAL INFORMATION
1 - TECHNICAL CHARACTERISTICS
Boiler Module
WIFI radio protocol WIFI 2.4Ghz (802.11 b/g/n)
WiFi range 30 m
RF radio protocol 868MHz (50m range) and 2.4 GHz WiFi (iOS 10.0 minimum and
Android 4.0.3 minimum)
RF range 50m
Use use
Operating T°C 0°C/+40°C
Storage T°C 0°C/+40°C
Power supply 230VAC/50Hz
Switchable current 6A (2A inductive load), 230V
Dimensions 90 x 90 x 26mm
Max. charge 2300W/10A
Protection rating IP20
Temperature sensor
WIFI radio protocol 868MHz
RF range 50m
Use use
Accuracy +/-0.5°C (at 20°C)
Operating T°C 0°C/+40°C
Storage T°C 0°C/+40°C
Adjustable temperature range 5°C/35°C
Power supply 2x AAA batteries
Dimensions 86 x 86 x 26.5mm
Backlighting White
Protection rating IP20

EN15
F - TECHNICAL AND LEGAL INFORMATION
2 - WARRANTY
This product is guaranteed for parts and labour
for 2 years from the date of purchase. Proof of
purchase must be retained for the duration of the
warranty period.
The warranty does not cover damage caused by
knocks or accidents.
3 - HELP AND SUGGESTIONS
• If, despite the care we have taken in designing
our products and drafting these instructions, you
do encounter difculties when installing your
product or you have any questions, we urge you
to contact one of our specialists who will be glad
to help.
• If you encounter operating problems during
the installation or a few days afterwards, it is
essential that you are in front of your installation
when contacting us, so that one of our technicians
can diagnose the source of the problem, as it will
probably be the result of a setting that is incorrect
or an installation that is not to specication. If
the problem is caused by the product itself, the
technician will give you an RMA number so that
you can return the unit to the shop.
Without this RMA number, the shop may refuse
to exchange your product. Need advice for the
installation or start-up of your product?
Contact our after sales service team technicians:
0,35 €
/ min
0 892 701 369
Monday to Friday, 9pm to 12pm, and 2pm to
6pm.
Avidsen undertakes to keep a stock of spare
parts for this product throughout the contractual
warranty period.
4 - DECLARATION OF CONFORMITY
with the RED directive
Avidsen declares that the equipment complies
with the RED 2014/53/EU directive and that its
conformity has been assessed pursuant to the
applicable standards in force:
EN 60950-1:2006+A11:2009+A1:2010+A
2:2011+A2:2013
EN 60730-1:2016
EN 62479:2010
ETSI EN 301 489-1 V2.2.0
ETSI EN 301 489-3 V2.1.1
EN 55032: 2015
EN 55024: 2010+A1:2015
ETSI EN 300 220-1 V3.1.1
ETSI EN 300 220-2 V3.2.1
ETSI EN 300 328 V2.2.0
Tours, 03/09/2020
Alexandre Chaverot, CEO

Avidsen
19 avenue Marcel Dassault - ZAC des Deux Lions
37200 Tours - France
This manual suits for next models
1
Table of contents
Other Avidsen Thermostat manuals