AVIVA M470 User manual

USER MANUAL
M470
VF-ES002A
Portable Power Station

Aviva Customer Service
Email: support@avivapower.com
Visit: www.avivapower.com
WARNING
Keep away from water and fire
Only authorized personel may service this product
Thank you for purchasing an AVIVA M470 portable
power station. The purpose of this manual is to help
you understand your product and its use. You can use
this product at home and away, wherever life takes
you. Many people will use the AVIVA as a central power
source at home, or wherever they need portable power
such as off-grid, or for emergency back-up power.
Save this User Manual
LONG-TERM MAINTENANCE
Fully charge the power station unit prior to long-term
storage. Check and charge the power station unit at least
once every three months.
If in need of service, please do not return this unit
to the store
2

SPECIFICATIONS
BATTERY:
Low-voltage Protection,
solar panel + B42
Lifecycles ≥500 cycles to 80% with full charge/discharge
INPUT PORTS:
USB Ports (4) One (1) USB-C PD port, 60W (5V/3A; 9V/3A;
Cell Chemistry Lithium Ion
Over Temperature Protection,
USB-C PD port One (1) USB-C PD port, 60W (5V/3A; 9V/3A;
Shelf-life Up to 6 months after full charge;
re-charge once every 3-6 months
DC Charging Port (5521) 5V-26V, 3A - normally used to recharge via
12V/3A; 15V/3A, 20V/3A)
Energy Storage Capacity 470Wh (10.8V, 43.5Ah), peak capacity
Short Circuit Protection,
12V/3A; 15V/3A, 20V/3A)
Wattage Compatiblity 300W Continuous, 500W Peak Surge
AC adaptor (included)
One (1) USB-A port with QuickCharge 3.0
Two (2) USB-A port (Total 5V, 3.1A)
Single Cell Equivalent Capacity 130,500 mAh @ 3.6V
Over Current Protection
OUTPUT PORTS:
Battery Management System(BMS) Over Voltage Protection,
DC Port (6530) 13-20V, 6A - normally used to charge optional
Technology (5V/3A; 9V/2A)
TABLE OF CONTENTS
• Specifications
• Product Tour & Functions
• General Info
• How To Charge The Product
• Connecting Devices and Using Your AVIVA
• Safety and Maintenance
• Warranty Statement
4 5

INCLUDED IN THE BOX:
Car Cable
Charger 12V
USB-C Cable
One (1) User Manual
DC Port (6530)
(120W max) regulated
9-12.6V, 6A
Cabinet Durable Aluminum Polycarbonate shell
Warranty 12 months
Pure Sine Wave
Supports 300W Continuous, 500W
Peak Surge
Operating usage temperature
Recharging Temperature
32°-104° F (0°-40° C)
41°-95° F (5°-35° C)
Aviva 60W Solar Panel (option) 8 hrs *Approximate, with direct sunlight
Car Port 12V car port (output): 12V, up to 8A
Color Slate Grey & Black
HOW TO RECHARGE: Approximate recharge times:
GENERAL:
AC Adapter (Included) 110V / 60Hz; 21V 3A 63W rated, 5.5mm
OPTIONAL ACCESSORIES Aviva Portable Solar Panel, 100W
110V AC Inverter Two (2) 110VAC, 60Hz, 1@ 3-pin, 1@ 2-pin
Weight 11.72 lbs. (5.32 kgs)
AC Wall Outlet 8 hrs
Display Panel 4.7” LCD display - clear and modern info
pin-adapter; includes power cord
INCLUDED IN THE BOX One (1) Power Station
One (1) USB-C cable (3’, 1M)
Dimensions (LxWxH) 11.0 x 6.3 x 8.1 in (28 x 16 x 21 cm)
12V car port 15 hrs
relates watt input/output, battery status
Certifications FCC, RoHS, UN38.3
One (1) AC Adaptor with power cable
One (1) 12V car charging cable
76

[ front view ]
[ left view ] [ right view ]
PRODUCT TOUR & FUNCTIONS
a. Power display
b. Charging power display
c. Discharge power display
d. System temperature
status display
1. DC switch button
2. USB-A port
3. DC6530 port
4. QC 3.0 port
8. Vents
9. AC output port
10. AC status indicator
11. Vents
12. Car charger lighter
5. AC switch button
6. DC5521 port
7. USB-C port
Power the USB outputs > Short-press either
AC or DC button
Power off the USB > Long press both AC
and DC buttons simultaneously
Power on/off DC outputs > Long-press the
DC button
Power On/off the AC outputs > Long-press
the AC button
Power off all outputs > Press down the AC
and DC button
Power off Low Battery Alert > Turn off by
pressing either AC or DC button
Power Tips
1.
2.
3.
4.
5.
6.
9

GENERAL INFO HOW TO CHARGE THE PRODUCT
Press the AC and DC power button located on the front
of your AVIVA S180 to activate its power function. Pressing
the DC power button will activate the USB ports. When
not using the AC or DC ports, make sure to turn the power
off to conserve power.
The LED light on the button is illuminated when power
is on.
When power is converted via the inverter, there is some
energy lost and you will experience the full rating of
the battery.
When you first plug in a power source device, such as a
solar panel or a wall charger, the AVIVA S180 may take a
few moments to detect and before it starts drawing power
from the source.
Cold weather use: Due to the battery’s chemical
characteristics, cold weather (below zero degrees Celsius)
will affect the battery’s capacity. If you live in a cold
place and cannot use the AC power from the grid, we
recommend that you store the unit in a temperature-
isolated place.
Recycle: Always return used electronics, batteries, and
packaging materials to dedicated collection points.
Press and hold the DC and AC buttons at the same time
to turn off all system outputs and enter the sleep state,
thereby saving energy.
CHARGE YOUR AVIVA NOW:
Before using or storing, using the included AC adapter, plug
your AVIVA power station into the wall until it is fully charged.
When charging your AVIVA you will notice a flashing light in the
Info Display, indicating that it is charging. Once fully charged,
the battery display indicator will read 100%. We recommend to
charge the unit every 3-6 months.
Charging from the Wall with AC Adapter
Using the included AC Wall Charger and cable, plug your AVIVA
into a household wall outlet. When charging your AVIVA you
will notice a flashing light in the Info Display, indicating that it
is charging. Once fully charged, the battery display indicator
will read 100%. The AVIVA M470 should recharge from zero
capacity in about 7 hours.
1.
2.
3.
4.
5.
6.
7.
[ front view ] [ Wall socket ]
[ AC adapter 12V/3A ]
10 11

Fast Charging from a USB-C Wall Charger
Using the included USB-C cable, plug into the 60W USB-C
Power Delivery port and attach into a compatible third-party
USB-C wall charger. Plug your charger into a household wall
outlet. When charging your AVIVA you will notice a flashing
light in the Info Display, indicating that it is charging. Once fully
charged, the battery display indicator will read 100%.
Charging from Solar Panel
IMPORTANT NOTICE: When solar recharging your AVIVA
M470, pay attention to the voltages of the solar panels and
do not exceed 18V. Exceeding 18V is not compatible and can
cause serious damage to the unit.
The AVIVA M470v solar charging port is a DC6530 with a 6.5mm
port and is designed to work with compatible solar panels up
to 100W of solar. Solar panels with 18V typically range in 40
Watts to 100 Watts.
Position your solar panel where it will get as much direct
sunlight as possible.
Insert the solar panel plug into the DC6530 port of. At
the same time, press and hold the DC button for 1 second
to activate the DC6530 port. You will know the AVIVA is
charging when the icon is flashing on the display. The
AVIVA is fully charged when the battery display indicator
reads 100%.
Some solar panels are chainable to provide more power
to your AVIVA and reduce solar charge times. Note, the
maximum solar AVIVA S180 is capable of taking in is 100W.
1.
2.
3.
[ Input ]
DC13V-20V/8A
[ front view ]
12 13

CONNECTING DEVICES AND USING YOUR AVIVA
IMPORTANT NOTICE: Verify your device is suitable for use with
the AVIVA M470. All of the power station output ports have
their own max power capacity. Check the Specifications to
ensure your device is compatible.
IMPORTANT NOTICE: Press the AC and DC power button
located on the front of your AVIVA M470 to activate its power
function. Pressing the DC power button will activate the USB
ports. When not using the AC or DC ports, make sure to turn
the power off to conserve power.
How to use this product to power DC 12V devices
IMPORTANT NOTICE: Make sure the interface of DC 12V
device is a DC 6530 male connector, with an outer diameter
power plug of 6.5mm. As per the specifications, the DC 6530
port can take in devices that are <8A, peak 10A.
Connect the appliance to the DC6530 interface of
this product.
Press and hold the DC button for 1 second to
power the device.
Press and hold the DC button for 1 second to turn
off the output.
1.
2.
3.
Charging from your vehicle’s 12V port
Using the included cables and adapter, attach the cable to
the DC 5521 port on the front of AVIVA M470. Plug into your
vehicle’s 12V port (also known as a cigarette lighter port). You
will know the AVIVA is charging when the icon is flashing on the
display. The AVIVA is fully charged when the battery display
indicator reads 100%.
IMPORTANT NOTICE: It is recommended to use this charging
method only when the vehicle engine is running.
What you can power and charge
Only devices that are 120W with a peak of 240W can be used
to power or charge. This includes many small electronics and
appliances. To determine how long your device will run or how
many charges you can receive from your AVIVA M470, some
math is involved. We recommend an internet search to learn
about the relation of energy (Wh) and the consumption of
watts (W) by your device.
+more
14 15

DC6530 port appliances
such as DC fans, LED
lights, ets. (limit current
<6A, peak: 10A)
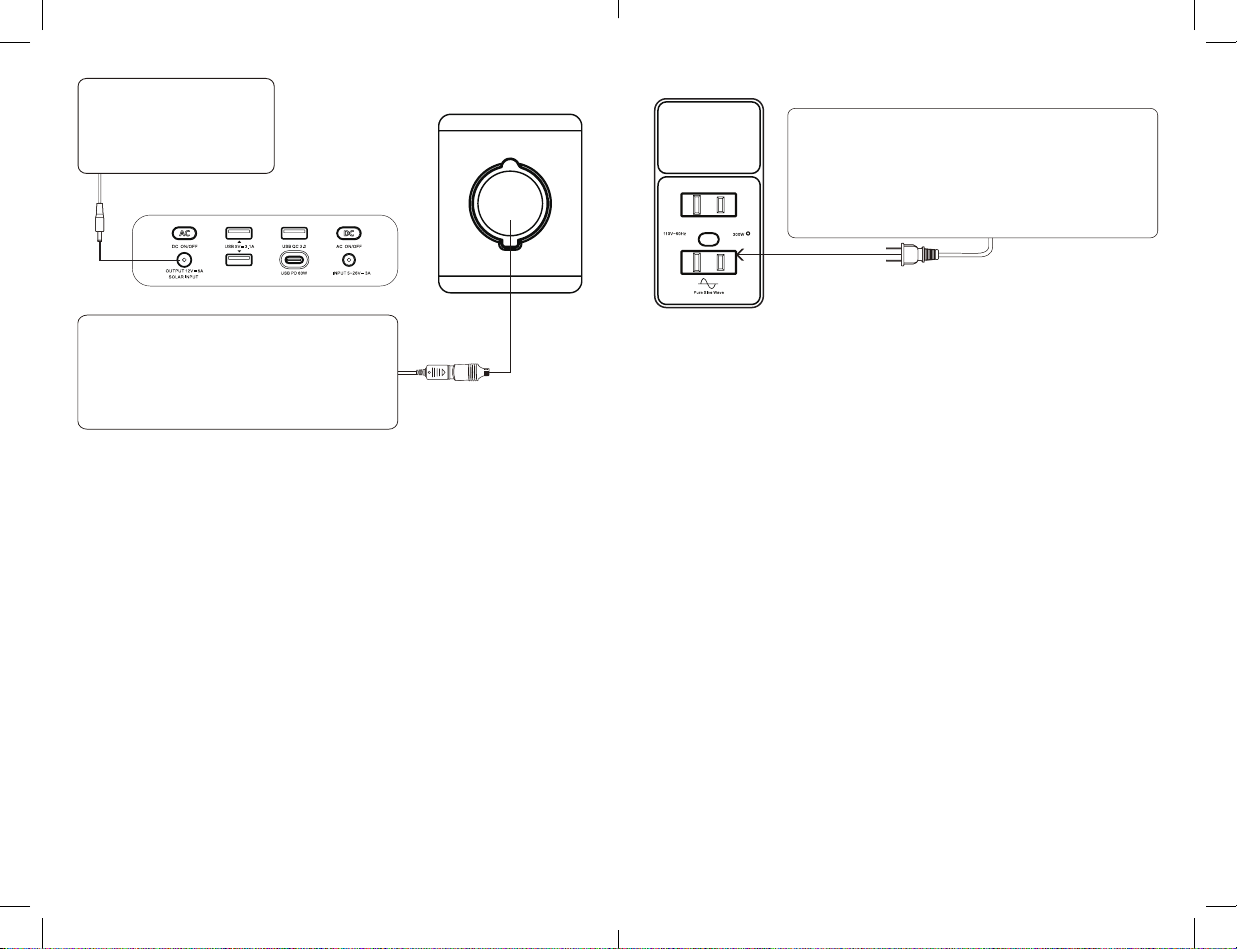
Connecting a 6.5mm DC cigarette lighter
holder can be used for vehicle tools, such
as vacuum cleaners, air pumps, electric
wrenches, and cae refrigerators. (limit
current <8A, peak: 10A)
For electrical products with a power of less than 300 watts, such
as electric lights, televisions, game consoles, etc., please turn on
the power switch before use. A short circuit in the AC output or
the power of the load appliance exceeds the AC output power
of the product will trigger the product to start short circuit
protection or overpower protection, eliminate the short circuit or
remove the electrical equipment, restart the machine to restore
the AC output
Battery Protection Method
Short circuit / overpower protection: If the DC output is shorted,
the device will shut down for protection. The DC output voltage
range of this power station is 9V – 12.5V, the rated current is 8A
and the maximum output current is 10A. Because batteries are
chemicals, the DC output voltage will decrease as the battery
capacity decreases. If the DC 12V device you are connecting
does not regulate the charging voltage, the device may shut
down or suspend charging due to the low input voltage.
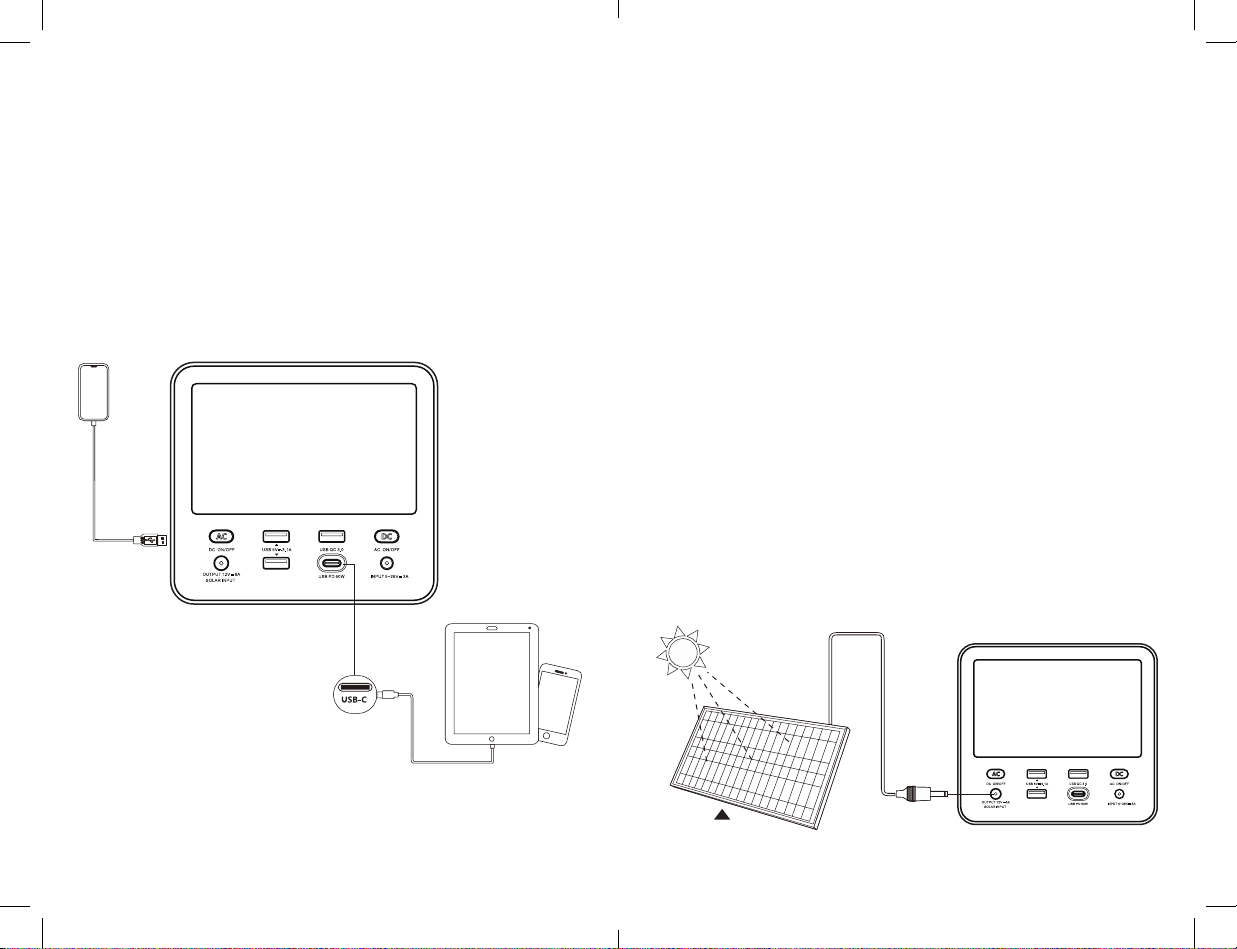
How to use this product to power AC devices
Connect the plug of the power cord of the device to the AC
output of the power station, and then press and hold the AC
button for 1 second to activate power to the device. Press and
hold the AC button for 1 second to turn off the AC output.
If the AC output is shorted or the load’s electrical power exceeds
the AC output power of the product. The power station will
trigger a short circuit protection or overpower protection. To
eliminate the short circuit, disconnect the attached device, and
then restart the power station to restore AC output.
Press and hold the DC and AC buttons at the same time to
turn off all system outputs and enter the sleep state, thereby
saving energy
Battery Management - Protection Mode:
Short circuit / overpower protection: If the AC output has a
short circuit or the output is overpower (i.e. the load is >240W),
the unit will turn off the AC.
Output for protection, please troubleshoot and press the AC
output button again to achieve AC output. Some electrical
equipment, such as refrigerators, ice makers, laser printers
may require a peak power to start-up or may occur during its
usage. Though the peak power time may be short, this peak
power may exceed 240W or higher, which will result in the unit’s
overpower protection mode. Such a device is not compatible
with the unit. Press the AC button of the unit to reset and
activate the AC output.
[ left view ]
[ right view ]
[ front view ]
16 17

How to use this product to power USB digital devices
Connect the standard USB cable of the digital device to the USB
interface of this product, and click the DC button to activate
power to the USB ports. The USB of this device will provide
power for the digital device. After the device is removed, the
product will automatically hibernate after 60 seconds.
SAFETY AND MAINTENANCE
This product may become warm to hot during charging,
this is normal. Please be careful when handling.
Avoid storing this device nearby coins, jewelry, keys, and
other metal objects. This has a negative effect on the
battery and may cause damage.
Do not place the unit near or under intense heat or fire.
The unit is not waterproof, avoid water and other liquids.
Store the unit in a cool, dry place, and avoid highly humid,
dusty environments.
Do not disassemble this device without permission.
Do not drop, nor place heavy objects on or strongly
impact the product.
Do not cover this product with objects, such as towels,
clothing during use.
Do not charge longer than the time required to charge
this product.
After the device plugged into the unit is fully charged,
disconnect it from the AVIVA M470.
1.
2.
3.
4.
5.
6.
7.
8.
9.
10.
[ front view ]
18 19

© 2020 All Rights Reserved. GoodWorks Global LLC. All
trademarks cited herein are the property of their respective
owners. The information contained herein is subject to change
without notice. The only warranties for AVIVA products and
services are set forth in the warranty statements accompanying
such products and services. AVIVA shall not be liable for
technical or editorial errors or omissions contained herein.
AVIVA Power warrants to the original consumer purchaser that
the AVIVA product will be free from defects in workmanship
and material under normal consumer use during the applicable
warranty period identified in the ‘Warranty Period’ section
below, subject to the exclusions set forth below. This warranty
statement sets forth AVIVA’s total and exclusive warranty
obligation. We will not assume, nor authorize any person to
assume for us, any other liability in connection with the sale of
our products.
Warranty Period
The warranty period is 12 months. In each case, the warranty
period is measured starting on the date of purchase by the
original consumer purchaser. The sales receipt from the first
consumer purchase, or other reasonable documentary proof,
is required in order to establish the start date of the warranty
period.
Remedy
AVIVA will repair or replace (at AVIVA’s option) any AVIVA
product that fails to operate during the applicable warranty
period due to defect in workmanship or material. If a valid
claim is made during the applicable period, AVIVA, at its option,
will either (1) replace the product, or (2) exchange the product
with a product that is of equal value. A replacement product
assumes the remaining warranty of the original product or
60 days from the date of replacement, whichever is greater.
Customer is responsible for the return shipping costs.
Limited to Original Consumer Buyer
The warranty on AVIVA’s product is limited to the original
consumer purchaser.
First Edition: 07012020.
Document Part Number: Aviva-M470-UM-V1.
IMPORTANT NOTICE:
The pictures in this manual are for reference only. If some
pictures do not match the actual product, the actual
product shall prevail.
The AC power socket and AC voltage and frequency of
this product vary from country to country, please refer to
the actual product.
1.
2.
LIMITED WARRANTY
20 21

Exclusions
AVIVA’s warranty does not apply to (1) any product that is
misused, abused, modified, damaged by accident, or used for
anything other than normal consumer use as authorized in
AVIVA’s current product literature, or (ii) any product purchased
through an online auction house. AVIVA’s warranty does not
apply to the battery cell unless the battery cell is fully charged
by you within seven days after you purchase the product and
at least every 6 months thereafter.
HOW TO RECEIVE SERVICE
To obtain warranty service, you must contact our customer
service team via telephone at (888) 123-4567, or via email
at support@avivapower.com. If our customer service team
determines that further assistance is required, they will give
you a Return Material Authorization (“RMA”) number and
will provide you with return instructions. You must properly
package the product, clearly marking the RMA number on the
package and including proof of your purchase date with the
product. We will process your return and send your repaired
or replacement product to you in North America. For product
purchased or being shipped outside of North America, please
contact the local distributor from whom you purchased the
product or email support@avivapower.com to obtain further
information.
EXCLUSIVE REMEDY; LIMITATION OF LIABILITY
The foregoing provisions state AVIVA’s entire liability, and your exclusive
remedy, for any breach of warranty, express or implied. IN NO EVENT
WILL AVIVA BE LIABLE FOR ANY CONSEQUENTIAL OR INCIDENTAL
DAMAGES ARISING FROM ANY USE OR MALFUNCTION OF ANY
AVIVA PRODUCT, OR FROM ANY BREACH OF WARRANTY, INCLUDING
DAMAGE TO OTHER DEVICES. IN NO EVENT WILL AVIVA’s LIABILITY
FOR ANY CLAIM, WHETHER IN CONTRACT, WARRANTY, TORT
(INCLUDING NEGLIGENCE AND STRICT LIABILITY) OR UNDER ANY
OTHER THEORY OF LIABILITY, EXCEED THE AMOUNT PAID BY YOU
FOR THE AVIVA PRODUCT. Some states do not allow the exclusion
or limitation of incidental or consequential damages, so the above
limitation or exclusion may not apply to you.
22 23

www.avivapower.com
This manual suits for next models
1
Other AVIVA Portable Generator manuals
Popular Portable Generator manuals by other brands

Behringer
Behringer 903A RANDOM SIGNAL GENERATOR quick start guide

Westinghouse
Westinghouse WGen3600 user manual

Global
Global P-5100 operating manual

Ozone Solutions
Ozone Solutions OUV-2800-HF Operation and maintenance instruction

Hyundai
Hyundai HY3000SI user manual

Bosch
Bosch PST 6000 Series technical information