Avtex W152D User manual

TFT-LCD TV
READ CAREFULLY
BEFORE OPERATION
USER MANUAL
W152D

Before connecting the AC power cord to the DC adapter outlet ,make sure the
voltage designation ofthe LCD TVcorresponds to thelocal electrical supply.
If you are unsure of your power supply , ask your local power company .
Never insert anythingmetallic into the cabinet openingsof the liquidcrystal
display (LCD)TV/monitor;otherwise it may create the danger of electric shock.
To avoid electric shock, Never touch the inside of the LCD TV/monitor and
adapter. Only a qualifiedtechnician should openthe case ofthe LCD TV/
monitor/adapter.
Never use yourLCD TV/monitor/adapter ifthe power cordhas been damaged.
Do not allow anything to rest on the power cord, and keep the cord away from
place where peoplecan trip overit .
Be sure tohold the plug,not the cord,when disconnecting theadapter from an
electric socket.
CAUTION
RISK OF ELECTRIC SHOCK.
DO NOT OPEN.
TO PREVENT ELECTRICAL SHOCK.
DO NOT REMOVE THIS COVER. NO
USER- SERVICEABLE PARTS INSIDE.
REFER SERVICING TO QUALIFIED
SERVICE PERSONNEL.
This symbol indicates
dangerous voltage
inside the product that
presents a risk of electric
shock or personal injury.
This symbol indicates
important instructions
accompanying the
product.
Please read thismanual carefully beforeusing this product.
IMPORTANT SAFETY INSTRUCTIONS
Openings in the LCD TV/monitor/adapter cabinet are provided for ventilation.
To prevent overheating, these openings should not be blocked or covered. Also,
avoid using the LCD TV/monitor on a bed ,sofa ,rug, or other soft surface. Doing
so may block the ventilation openings in the bottom of the cabinet. If you put the
LCD TV/monitor in a bookcase or some other enclosed space, be sure to provide
adequate ventilation.

Do not exposethe LCD TV/monitorto extreme temperatureconditions or to
extreme humidity conditions.
The apparatus shallnot be exposedto dripping orsplashing and thatno objects
filled with liquids, such as vases, shall be placed on the apparatus.
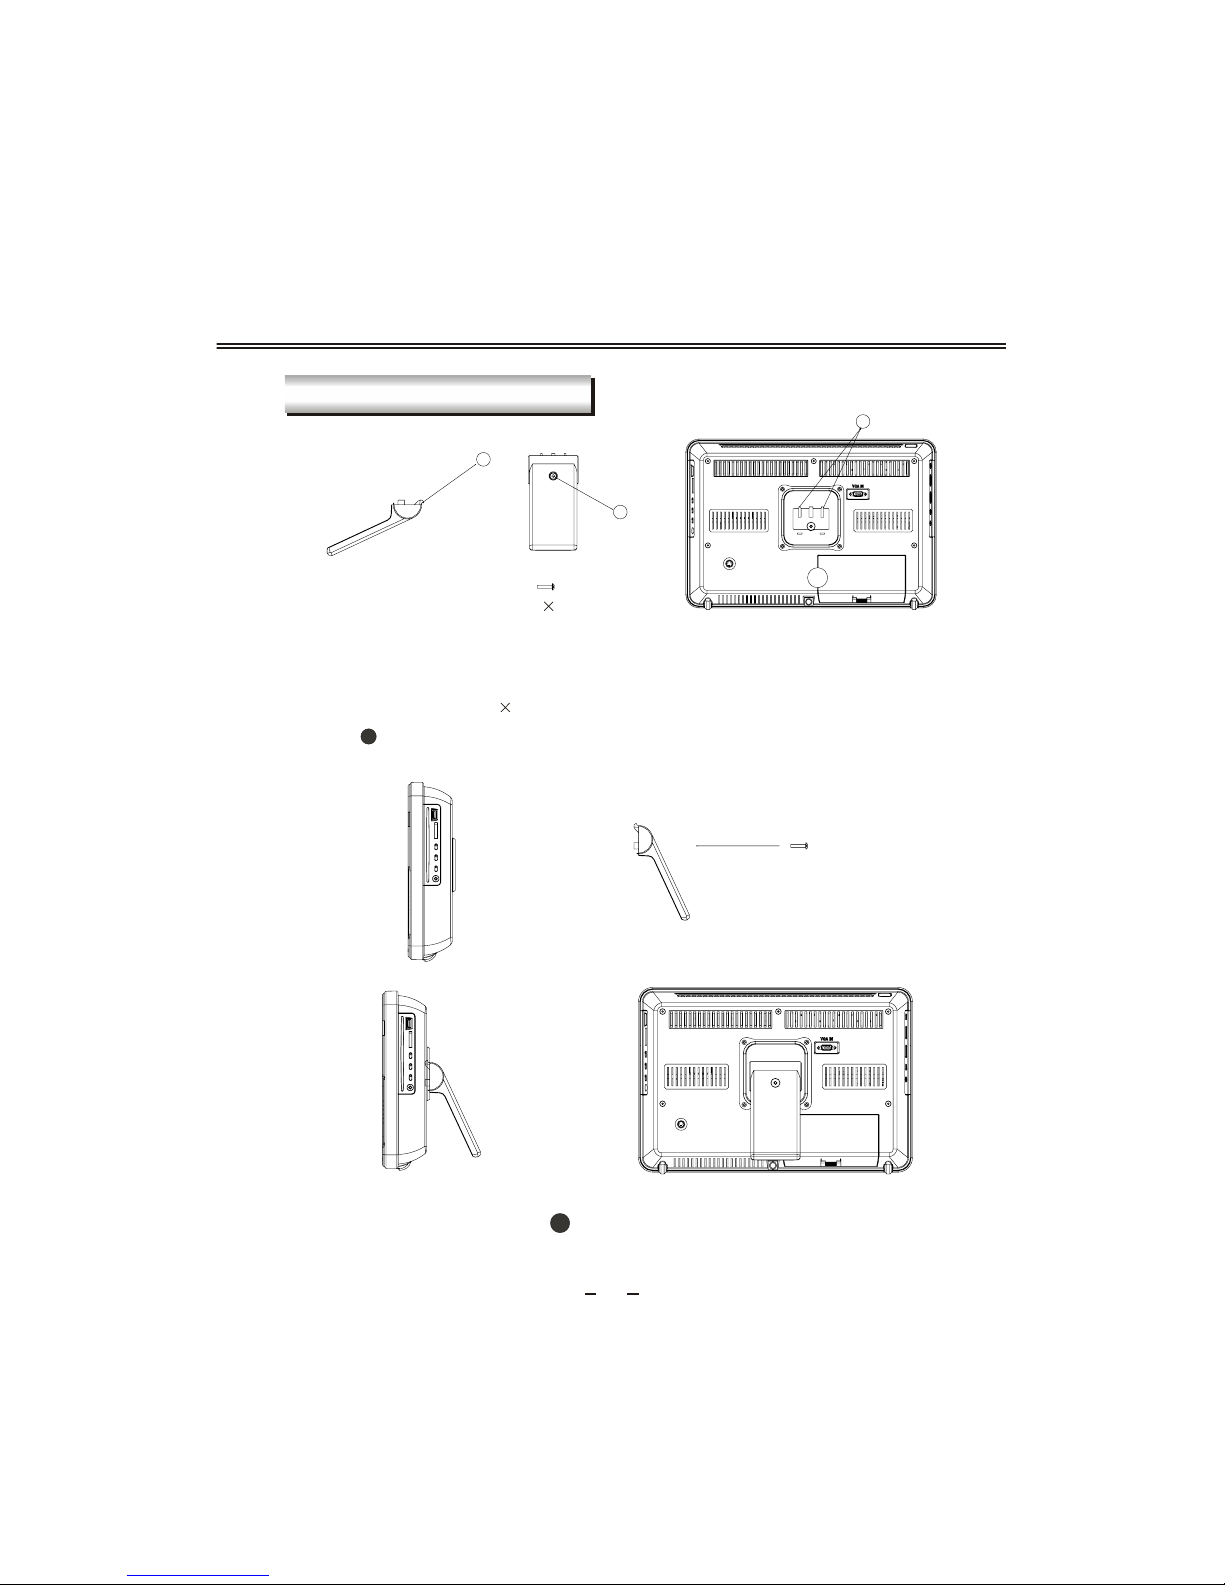
Do not placethe LCD TV/monitoron an unstablecart, stand, tripod,bracket,
table, or floor where it can fall. It is damaged if dropped, hit or scratched. Do
not clean thefront with keton-typematerials (e.g.Acetone ),ethylalcohol,
toluene, ethy lacid,methyl, or chloride-thesemay damage thepanel.
Locate your DCadapter near aneasily accessible ACoutlet.
If your LCD TV/monitor does not operate normally in particular, if there are
any unusual sounds or smells coming from it unplug it immediately and
contact an authorizeddealer or servicecenter.
High temperature cancause problems. Don`tuse your LCDTV/monitor in
direct sunlight, andkeep it awayfrom heaters, stoves,fireplaces, and other
sources of heat.
Unplug the DCadapter when itis going tobe left unusedfor an extended
period of time.
To reduce the risk of fire or electric shock, and annoying interference, use
the recommended accessoriesonly.
If the LCDTV/monitor is broken,do not tryto repair ityourself. Contact
qualified service personnel.
Unplug your DCadapter from theAC outlet beforeany service.
Be sure theservice technician usesauthorized replacement partsor their equi-
valents. Unauthorized parts may cause fire, electrical shook, or other hazards.
Following any serviceor repair, be sure the service technician performs safety
checks to certifythat your TFT-LCDTV/monitor is insafe operating order.
The apparatus with CLASS I construction shall be connected to a MAINS
socket outlet with a protective earthing connection.
IMPORTANT SAFETY INSTRUCTIONS

DVD OPERATION
Brief introduction 22 Comparison between DVD
and other discs 22
Function introduction 22
Features 23
Compatible disc types 24
Playback 25 Volume control 25
CONTENT
AV, S-VIDEO , SCART AND YPbPr SETUP
Video setting menu 17
VGA SETUP
Picture Sound
Monitor setting Function
18
20
19
21
TELETEXT FUNCTION
Teletext display
Mix mode
Page selection
Lock
Zoom in teletext 16
Index
Display mode 16 Colorized buttons 16
15
15
15
15
15
EXTERNAL EQUIPMENT
Connecting figure 4
LET'S START
Change source operation 8
REMOTE CONTROLLER
Remote buttons 5Battery installation 7
TV MENU SETUP
Picture Sound
TV setting System setting
Nicam/bilingual receiving 14
910
11 13
PANELBUTTON FUNCTIONS
Front panel 2Left panel 2
3
Right panel Rear panel 3
INSTALLATION
Normal installation 1

CONTENT
DISPLAY MODE
51
Display mode
SPECIFICATIONS
Specifications 50
TROUBLE SHOOTING
DVD troubleshooting 49
Display troubleshooting Sound and TV troubleshooting 48
48
DVD FUNCTION SETUP
General setup 35
36
Initial setup
Video setup 36
Audio setup 35
Speaker setup 35
TIME SETTINGS
Time setting 40
CARD READERAND USB OPERATION
Usage of USBequipment
and 3-IN-1card reader 38
DVB OPERATION
General setting 42 Adanced setting 43
Auto search 44 Manual search 45
Channel setting 46 EPG 47
DVD OPERATION
Repeat playback 29
Select language/audio 28
Repeat playback ofselected segment 29
34
MPEG4 and JPEGfile playback
Zooming the displayedframe 31
Play from thedesired position 30
Fast playback 30
VCD, SVCD menuplayback 26
Direct play 27
Select track toplay directly
by number button 28
Memory 27

1, Hook the tache (labeled A)of the kickstand on to the slot (labeled C)
2, Tightenthe screws ( M5 28) through the ostium (labeled B).
3, Figure shows the finished installation.
Kickstand
Ostium
M5 28
Screw 1pcs Rear viewing ofLCD TV
1
1
1
INSTALLATION
NORMAL INSTALLATION
A
B
C

2
PANEL BUTTON FUNCTIONS
HD3DSound
FRONT PANEL
LEFT PANEL
Indicator(the indicator isred when instandby
mode, and green when inworking normally)
MENU(Enter or exitTV menu)
CHANNEL(Increase or decrease channel number)
VOLUME(Increase or decrease volume)
SOURCE(Select input source )
STANDBY(To switch instandby mode and power-on
mode. )
IRsensor window

1
PANEL BUTTON FUNCTIONS
RIGHT PANEL
3
USB jack
MEDIACARD socket
STOP button
HEADPHONE jack
REAR PANEL
EJECT button
PLAY/PAUSE button
YPbPr or YCbCr input terminal
1
2 3
Composite video/audioand
S-VIDEOaudioinput
2
PC audioandYPbPr audioinput
3
45
Coaxial digital audiooutput
4
S-VIDEOinput
5
6
SCART connecting terminal
6
7
Rinput terminal
F
7
VGA input terminal
8
8
rr
bb
912V DC input terminal
9

EXTERNAL EQUIPMENT
4
NOTE
CONNECTING DIAGRAM
You shouldinsert all interconnecting cables BEFORE plugging inthe power cord.
Power amplifier (with coaxialdigital audioin)
DVD or VCR player
RL

23
456
789
1
0
REMOTE CONTROLLER
5
REMOTE BUTTONS
EJECT
1
Disc in/out, validinDVD mode.
Number button
5
Toselect program number.
OK button
9
Toconfirm the selections.
17 INDEX/PAGE+
Todisplay maincontent page when playing the
teletext /Change tothe program innext page.
18 SUBPAGE/PAGE-
Todisplay the subpage of the teletext/Change
to the programinprevious page.
19 REVEAL/EPG
Display the hiddenteletext information
/(validin
DVB mode )
Todisplay the program guide
.
20 ZOOM/CYAN
Tozoom inandzoom out to the picture,
validinDVD mode/CYAN button.
SETUP
11
TV or DVDfunction setup.
DISC MENU
12
Togo to the menu of DVD menu, validinDVD
mode.
LANGUAGE
Toswitch the output language or channel,valid
inDVD mode.
14
15 CARD/DISC
Switches between thecard reader, DVD or
USB mode, validwhileinDVD mode.
1
2
3
4
5
8
9
15
13
11
18
14
7
10
6
12
16
17
19
20
21
7
Todisplay the calendar and settings for timer
of power on/off .
TIMER
13 CHANNEL+/-
Toincrease or decreaseprogram number
validinTV and DVB mode.
Pause playing/steps playback i npause mode,
validwhileinDVD mode.
[ ] button
2
3
Tofast-forwards DVD playback,validinDVD
mode.
[ ] button
[ ] button
4
Toselect the next chapter or track.
DVB MENU
8
Toenter or
.
return to theprevious DVB menu
and screen
10 Left/Right cursor(menu adjustment)
Tomove leftward/ rightwardor adjust the
selected item inthe menu, or adjust sound
volume, validinDVD mode.
16 HOLD/TV/
Tostop teletext on current page/Switch between
TV and radiomodes, validinDVB mode.
21 REPEAT/YELLOW
Torepeat playback ,validinDVD
mode/YELLOW button.
6RETURN
Toexchange channel between the previous
program and thecurrent program, validinTV
or DVB mode.

23
456
789
1
0
6
REMOTE CONTROLLER
SOURCE
Toselect input source: TV,DVB, DVD,AV,
S-VIDEO,SCART, YPBPRand VGA.
27
UP/DOWNcursor
Toselect upward/downward inthe menu or
change the channel,validinTV and DVB mode.
28
Todisplay TV and teletext inthe same time/
Selects the subtitlelanguage or switches to
JPEGdisplay mode,validinDVDand DVB
mode.
MIX/SUBT
35
SIZE/INFO
Tomagnify teletext page/
validinDVD and DVB mode.
Todisplay the
information about channel and program,
37
Volume +/-
31
Toincrease or decreasesound volume.
Toplay from acertaintime point,
validinDVD mode/REDbutton.
GOTO/RED
38
23
22
24
25
27
28
29
26
TEXT/TEXT
34
Toenableor disablethe function of teletext.
A-B/GREEN
Tosegment repeat ,validin
DVD mode/Green button.
39
DISPLAY
Todisplay source information.
29
32 FAVORITE/Q-PLAY
Display your favoritechannel list, validinDVB
mode /Play DVDdirectlyinDVD mode.38
31
30
32
STANDBY
22
Toswitch between standby mode and power-on
mode.
39
37
36
34
35
33
[ ] button
Tofast backward playback,validinDVDmode.
23
26 TWO-DIGITNUMBER BUTTON
Toswitch between one or two-digitprogram
number.
24[ ] button
Toselect the previous chapter or track,validin
DVD mode.
MUTE
Sound mute switch.
30
NICAM/CAP.
33
Switch inNICAM, A2 andmono channel(Itis
effective inTV signal i nput with NICAM or A2
function) /Capturethe currentlyplayed image
and set itas the power-on logo inDVD mode.
CANCEL/AUDIO
Tocancel teletext/
validinDVB
mode
Tochange the audio
language and soundtrack,
.
36
25 [ ] button
Tostop playing, validinDVD mode.

7
REMOTE CONTROLLER
Remove the batterycover. Insert two SUM-4(AAA) batteries matching the -/+ polarities of
the battery tothe -/+ marksinside the battery compartment, as follows:
BATTERYLIFE
Generallyspeaking, the battery may beused for one year, but the battery life isalso
related to the usage times andremote controller operation.
Ifthe remotecontroller isstillinvalidwhen very near to the remote sensor window, please
replace the battery.
Please use SUM-4(AAA) battery.
NOTES
Never use rechargeablebattery.
Never charge, short-circuit, disassembleand heat the battery, or throw itinto fire.
Pay attention not to fall orknock the remotecontroller, which will cause damage or
function failure to it.
Do not use new and oldbattery together.
Ifelectrolyte splashes into body, please cleanitwith water.
CAUTION
Please put batteryinthe placechildren cannot touch. I fswallow by accident, please
contact with thelocal doctor immediately.
BATTERY INSTALLATION
When not usingthe remote controller for along time, please takeout battery to avoid
liquidleakage. Before replacing new battery, please cleanthe electrolyte inthe remote
controller.

LET'S START
You can change input source by usingSource Menu. Press [SOURCE] button or[SOURCE]
key to showthe menu as follows:
The current sourceitem ishighlighted. Through press [ ] buttonon the remote control
or [ CH+/CH-] key on the left side of LCD TV to select your desire, Press [ ] button,
[VOL+/VOL-] key or[OK] button toconfirm your choice .
CHANGE SOURCE OPERATION
TV
DVB
DVD
AV
S-VIDEO
SCART
YPBPR
VGA
8
INDICATOR
STANDBY
After thisunitiswell fixed on thedesk or on the wall,and the cords arewell connected
for input or output, what youshoulddo next is:
First, connect theadapter to the LCD TV, then the unitwill go into standby mode, and you
can see theindicator goes into red.
Second, press [STANDBY] key onthe left sideof the LCD TV or [STANDBY] button on the
remote control tomakethe unitswitch into workingmode, and you will see the indicator
turn green. Nowyou can enjoy all exciting features of the wholenew product.
STANDBY

Item
BRIGHTNESS Toadjust brightness.
CONTRAST Toadjust contrast.
SATURATIONTo adjust color saturation.
Thisproduct can store up to 100-channel programs (0 99). Yo u can select your
favorite channel through[CH+/-] or number buttons, and you can scan and store
all of the channelsthrough manual or automaticmode.
InTV mode, press [SETUP] button into the mainmenu and the mainmenuwill show asfollows:
Through pressing [ ] button onthe remote control,
you can selectmainmenu sections(mainmenu
sections consist of
. Press
[ ] or[OK] button toenter thismenu section.
" PICTURE "," SOUND" ,
" TV SETTING" ," SYSTEMSETTING")
Press [ ] button on theremote control to select
the item, and then press [ ] button toadjust
parameter value. Press[SETUP] button toreturn
to mainmenusections.
Select " " and menu willshow as follows:
Press [ ] button to selectitems and [ ]
button to adjust.
TV MENU SETUP
Description
SELECT RETURNSETUP
TINT
PICTURE
BRIGHTNESS
SATURATION
CONTRAST
50
40
50
50
TINTToadjust picture tint, onlyvalidinN 3.58/N 4.43/PAL60 and display
mode with V-scanning frequency equal 59.94 (please refer to P52).
9
PICTURE
SELECT RETURNSETUP
TINT
PICTURE
50
SATURATION
CONTRAST 40
50
BRIGHTNESS 50
ENTEROK
ADJUST
PICTUREUSER
PICTUREUSER
PICTURE Can be changebetween : "USER","STANDARD "," DYNAMIC"
and "SOFT".

Item
BALANCE
TREBLE
Toadjust balance of left and right channels.
To adjust bass.
To adjust treble.
Press [ ] select " " and press [ ] or [OK]button to enter the following section:
TV MENU SETUP
BASS
Description
SOUNDCan be changebetween USER, NEWS,FILM
MUSIC.
"""STANDARD",""""
and ""
10
SOUND
Press [ ] button to selectitem and press[ ] button to adjust . The following issound
item description.
50
BASS
40
BALANCE
34
TREBLE
SOUND
SELECT RETURNSETUP
ENTEROK
SOUNDUSER
BBEVIVA OFF
BBE VIVA To adjust BBE mode(with bass andtrebleinvalid)

TV MENU SETUP
11
Press [ ] button to selectitem and press[ ] button to adjust or activate.
Item
CHANNELTochange the channel number.
CHANNELEDIT
FINE TUNE Toadjust the channel frequency accuratelyto makethe sound
and picture effect better.
MANUAL SEARCH
Toscan programs by manual.
Description
AUTO SEARCH
Toscan programs and store all of them automatically.
press [ ] select " " item and press [ ] or [OK] button to enter the following section:
TV SETTING
CHANNEL5
CHANNELEDIT
FINE TUNE 168.90MHZ
MANUAL SEARCH
AUTO SEARCH
SELECT RETURNSETUP
TV SETTING
NOTE
During the searching,you can press [SETUP] button to stop.
ENTEROK
Toenter asubmenu to set channel skipand channel swap.
Please refer thenext page.

CHANNELEDIT
SKIP
SWAP
OK
CHANNEL5
NO
?
__
Item
CHANNEL
Description
SKIP
SWAP
OK
Toselect current channel here.
Toselect "Ye s " or "No",youcan select "Ye s " to makecurrent
channel unaccessiblewhileusing [CH+/-] button to browse
channels.
Select or enterthe channel number directlyto swap with current
channel.
Highlight thisoptionand press the [OK] button toconfirm the swap
function.
12
TV MENU SETUP

TV MENU SETUP
Press [ ] to select " " item and press [ ] or [OK] buttonto enter the following section:
13
SYSTEM SETTING
You can setup somesystem configuration here.
Description
COLOR SYSTEM
SOUNDSYSTEM
LANGUAGE
TRANSPARENCY
RESET
Can be changedbetween: "Auto","PA L " and "SECAM".
Can be changedbetween:"BG","DK","I"and "L" .
Select OSD language.
Tochange transparency of OSD.
Toreset all value to default.
NOTES
Which COLOR SYSTEM mode and SOUNDSYSTEM mode to useisrelated toyour
local TV broadcasting system.
""""
SECAM system isonlyused by some European countries and districts, suchas France.
Ifthe local system isSECAM L, the color system must be selected as "SECAM" and sound
system must be selected as "L".
Press [ ] button to selectitem and press[ ] button to adjust or activate.
Item
COLOR SYSTEM
SOUND SYSTEM
LANGUAGE
TRANSPARENCY
RESET
SYSTEMSETTING
SELECT RETURNSETUP
AUTO
I
ENGLISH
OFF
ENTEROK

Nicam/bilingual function isonlyeffective inTV mode whileprogram coming with Nicam/
bilingual.
Ifyou canreceive Nicam/bilingual signal,you can operate as follows to enjoy that.
You can select Nicam stereo,mono channel or bilingual through NICAM button on the remote
control. Ifstereo signal i stoo weak,thisunitwill switch intomono channel automatically.
When selecting monochannel,"MONO" willshow on screen; when selecting bilingual,
"DUAL1" will showon screen; when selecting bilingual II,"DUAL 2" will show on screen
and when selectingstereo, " STEREO" will show on screen.
TV MENU SETUP
14
NICAM/BILINGUAL RECEIVING
NOTE

15
Other manuals for W152D
1
Table of contents
Other Avtex LCD TV manuals