AWA E-6880 User manual


2
CONTENT
PRECAUTIONS.................................................................................................................................7
BEFOREUSE....................................................................................................................................8
HANDLINGRECORDS.......................................................................................................................9
CLEANINGARECORD.......................................................................................................................9
DISCS............................................................................................................................................12
TAPEHEADSMAINTENANCE..........................................................................................................13
CONNECTIONS...............................................................................................................................14
PARTSOFTHETURNTABLE.............................................................................................................15
UNITFUNCTIONS...........................................................................................................................16
REMOTECONTROLUNIT................................................................................................................19
PREPARATIONFORUSE..................................................................................................................22
BASICOPERATION.........................................................................................................................23
LISTENINGTOTHERADIO..................................................................................................................24
AUXINOPERATION............................................................................................................................24
LISTENINGTOTAPE............................................................................................................................25
LISTENINGTOARECORD....................................................................................................................25
LISTENINGTOACD.............................................................................................................................28
DISPLAY..........................................................................................................................................30
REPEATPLAYBACK..........................................................................................................................31
SHUFFLEPLAYBACK........................................................................................................................32
PROGRAMMEDPLAYBACK............................................................................................................33
RECORDINGOPERATIONSTEPS......................................................................................................35
RECORDING........................................................................................................................................36
FINALIZING.........................................................................................................................................40
ERASEORUNFINALIZEACD‐RW........................................................................................................41
ERASEALL...........................................................................................................................................42
SOFTWARE....................................................................................................................................43
USBAUDIORECORDERSOFTWARE................................................................................................43
AUDACITYSOFTWARE...................................................................................................................43
AUDACITYINSTALLATIONANDUSBCONNECTION............................................................................44
AUDACITYFORWINDOWSUSERS......................................................................................................44
CONFIGURINGAUDACITYFORMICROSOFTWINDOWS...............................................................48
AUDACITYCONTROLBUTTONS.....................................................................................................49

3
AUDACITYPREFERENCES...............................................................................................................50
RECORDINGOPERATION................................................................................................................52
GENERALPROBLEMSFORALLWINDOWSVERSIONS...................................................................57
ADJUSTMENTFORWINDOWS7ANDSOMEVISTASYSTEMSONLY.............................................59
PREPARINGTOEXPORTANDSAVEFORMP3FORMAT................................................................63
DIVIDINGTRACKS..........................................................................................................................66
COPYINGTHEMUSICFILETOANMP3PLAYER.............................................................................72
AUDACITYFORMACUSERS...............................................................................................................73
CONFIGURINGAUDACITYFORMAC..............................................................................................74
AUDACITYCONTROLBUTTONS.....................................................................................................75
AUDACITYPREFERENCES...............................................................................................................76
RECORDINGOPERATION................................................................................................................80
EXPORTANDSAVEFILES................................................................................................................87
TROUBLESHOOTINGGUIDE(USB‐PCRECORDING)..........................................................................88
SPECIFICATIONS.............................................................................................................................90
TROUBLESHOOTINGGUIDE(MAINUNIT).......................................................................................92

4
IMPORTANTSAFETYINSTRUCTIONS
FORAUDIOPRODUCTS
READTHOROUGHLY!
Whenusingelectricalproducts,basicprecautionsshouldalwaysbe
followedincluding:
1.ReadInstructions‐Allthesafetyandoperatinginstructionsshouldbe
readbeforetheproductisoperated.
2.RetainInstructions‐ Thesafetyandoperatinginstructionsshouldbe
retainedforfuturereference.
3.HeedInstructions‐ Allwarningsontheproductandintheoperating
instructionsshouldbeadheredto.
4.FollowInstructions‐ Alloperatinganduserinstructionsshouldbe
followed.
5.Cleaning‐ Unplugthisproductfromthewalloutletbeforecleaning.
Donotuseliquidcleanersoraerosolcleaners.Useadampclothfor
cleaning.
6.Attachments‐ Donotuseattachmentsnotrecommendedbythe
productmanufacturerastheymaybehazardous.
7.WaterandMoisture‐Donotusethisproductnearwater‐forexample,
nearabathtub,washbowl,kitchensink,orlaundrytub,inawet
basement,ornearaswimmingpool,Etc.
8.Accessories‐ Donotplacethisproductonanunsteadysurface.The
productmayfall,causingseriousinjurytoachildoranadultand
seriousdamagetotheproduct.Useonlywitha
stand,bracket,ortablerecommendedbythe
manufacturer,orsoldwiththeproduct.Any
mountingoftheproductshouldfollowthe
manufacturer'sinstructions,andshoulduseamountingaccessory
recommendedbythemanufacturer.
9.Transporting‐ Thisproductshouldbemovedwithcaretoavoid
damageorinjury.
10.Ventilation‐ Slotsandopeningsinthecabinetareprovidedfor
ventilation,toensurereliableoperationoftheproductandto
protectitfromoverheating.Theseopeningsmustnotbeblockedor
covered.Theopeningsshouldneverbeblockedbyplacingthe
productonabed,sofa,rug,orsimilarsurface.Thisproductshould
notbeplacedinabuilt‐ininstallationsuchasabookcaseorrack

5
unlessproperventilationisprovidedorthemanufacturer's
instructionshavebeenadheredto.
11.PowerSources‐Thisproductshouldbeoperatedonlyfromthetype
ofpowersourceindicatedonthemarkinglabel.Ifyouarenotsureof
thetypeofpowersupplytoyourhome,consultyourproductdealer
orlocalpowercompany.Forproductsintendedtooperatefrom
batterypower,orothersources,refertotheoperationinstructions.
12.Power‐CordProtection‐ Power‐supplycordsshouldberoutedso
thattheyarenotlikelytobetrappedinanyway.
13.Mainplug‐ Themainplugisusedasthedisconnectdevice.The
disconnectdeviceshouldremainreadilyaccessible.
14.Lightning‐ Foraddedprotectionforthisproductduringalightning
storm,orwhenitisleftunattendedandunusedforlongperiodsof
time,unplugitfromthewalloutletanddisconnecttheantennaor
cablesystem.Thiswillpreventdamagetotheproductdueto
lightningandpower‐linesurges.
15.PowerLines‐ Anoutsideantennasystemshouldnotbelocatedin
thevicinityofoverheadpowerlinesorotherelectriclightorpower
circuits,orwhereitcanfallintosuchpowerlinesorcircuits.When
installinganoutsideantennasystem,extremecareshouldbetaken
tokeepfromtouchingsuchpowerlinesorcircuitsascontactwith
themmightbefatal.
16.Overloading‐ Donotoverloadwalloutlets,extensioncords,or
integralconveniencereceptaclesasthiscanresultinariskoffireor
electricshock.
17.ObjectandLiquidEntry‐ Neverpushobjectsofanykindintothis
productthroughopeningsastheymaytouchdangerousvoltage
pointsorshort‐outpartsthatcouldresultinafireorelectricshock.
Neverspillliquidofanykindontheproduct.Theapparatusshould
notbeexposedtodrippingorsplashing,andnoobjectfilledwith
liquids,suchasvases,shouldbeplacedontheapparatus.
18.Servicing‐Donotattempttoservicethisproductyourselfasopening
orremovingcoversmayexposeyoutodangerousvoltageorother
hazards.Referallservicingtoqualifiedservicepersonnel.
19.DamageRequiringService‐Unplugthisproductfromthewalloutlet
andreferservicingtoqualifiedservicepersonnelunderthefollowing
conditions:
a.Ifthepower‐supplycordorplugisdamaged.
b.Ifliquidhasspilled,orobjectshavefallenintotheproduct.
c.Iftheproducthasbeenexposedtorainorwater.
d.Iftheproductdoesnotoperatenormallybyfollowingthe

6
operatinginstructions.Adjustonlythosecontrolsthatarecovered
bytheoperatinginstructions,asanimproperadjustmentofother
controlsmayresultindamageandwilloftenrequireextensive
workbyaqualifiedtechniciantorestoretheproducttoitsnormal
operation.
e.Iftheproducthasbeendroppedordamagedinanyway,andthe
productexhibitsadistinctchangeinperformance‐thisindicatesa
needforservice.
20.ReplacementParts‐ Whenreplacementpartsarerequired,besure
theservicetechnicianhasusedreplacementpartsspecifiedbythe
manufacturerorhavethesamecharacteristicsastheoriginalpart.
Unauthorizedsubstitutionsmayresultinfire,electricshock,orother
hazards.
21.SafetyCheck‐ Uponcompletionofanyserviceorrepairstothis
product,asktheservicetechniciantoperformsafetychecksto
determinethattheproductisinproperoperatingcondition.
22.Heat‐Theproductshouldbesituatedawayfromheatsourcessuch
asradiators,heatregisters,stovesorotherproducts(including
amplifiers)thatproduceheat.

7
PRECAUTIONS
SafetyInformation‐Caution:
1.Useofcontrolsandadjustmentsorperformanceofproceduresother
thanthosespecifiedhereinmayresultinhazardousradiation
exposure.
2.Ifthisproductdevelopstrouble,contactqualifiedservicecenters,and
donotusetheproductindefectivestates.
SafetyPrecautions
WARNING:
Toreducetheriskoffireorelectricshock,donotexposethisappliance
torainormoisture.
CAUTION
RISKSOFELECTRICSHOCK‐DONOTOPEN!
Toreducetheriskoffireorelectricshock,donotexposethisapparatus
torainormoisture.Also,donotremovethecoverorback.
Nouserserviceablepartsinside.Referservicingtoqualifiedservice
personnel.
Thelightningflashwitharrowheadsymbol,withinan
equilateraltriangle,isintendedtoalertusertothe
presenceofuninsulated“dangerousvoltage”withinthe
product’senclosurethatmaybeofsufficientmagnitudeto
constituteriskofelectricshocktopersons.
Theexclamationpointwithinanequilateraltriangleis
intendedtoalertusertothepresenceofimportant
operatingandmaintenance(servicing)instructionsinthe
literatureaccompanyingtheappliance.
CAUTION:
Forcompactdiscunitsonly:invisiblelaserradiationwhen
openandinterlockfailedordefeated.Avoiddirect
exposuretolaserbeam.
Caution:Topreventelectricshock,matchwidebladeofplugtowideslot,
fullyinsert.

8
BEFOREUSE
1.Beforeuse,pleaseremoveanyadditionaltiedowns,foam,etc.that
wereaddedtomaketheitemsecurewhileshipment.
2.Chooseunitinstallationlocationcarefully.Avoidplacingitindirect
sunlightorclosetoasourceofheat.Alsoavoidlocationssubjectto
vibrationsandexcessivedust,coldormoisture.Keepawayfrom
sourcesthathum,suchastransformersormotors.
3.Donotopenthecabinetasthismightresultindamagetothecircuitry
orelectricalshock.Ifaforeignobjectshouldgetintotheset,contact
yourdealer.
4.Besurenottohandlediscswithdirtyfingers.Neverinsertadiscthat
hasacrackonthesurface.
5.Whenremovingthepowerplugfromthewalloutlet,alwayspull
directlyontheplug,neverpullthecord.
6.Tokeepthelaserpickupclean,donottouchit,anddonotforgetto
closethedisctray.
7.Donotattempttocleantheunitwithchemicalsolventsasthismight
damagethefinish.Useaclean,drycloth.
8.Inordertoshutoffthepowertothisproductcompletely,unplugthe
powercordfromthewalloutlet.Besuretounplugtheunitifyoudo
notintendtouseitforanextendedperiodoftime,suchaswhileon
vacation.
9.Keepthismanualinasafeplaceforfuturereference.
BewareofCondensation
Whentheplayer(oracompactdisc)ismovedfromacoldtoawarm
placeorisusedafterasuddentemperaturechange,thereisadangerof
condensation.Watervaporintheaircouldcondenseonthemechanism
orthelaserpickup.Ifdropletsofwaterformontheseparts,correct
playbackwillbeimpossiblebecausethelasercannotreadthe
informationfromthedisccorrectly.Topreventthis,ifyouaregoingto
usetheplayerinaconditionwherecondensationcouldoccur,you
shouldleavetheplayerfor1or2hoursafterpluggingitintoanACoutlet
dependingontheamountofcondensation.Ifthisisdone,theplayerwill
stabilizeatthetemperatureofitssurroundings.

9
HANDLINGRECORDS
1.Donottouchtherecord'sgrooves.Onlyhandlerecordsbytheedges
orthelabelwithcleanhands.Otherwise,adirtyhandcanleavea
residueontherecodesurfacethatwillgraduallydeterioratethe
qualityofyourrecord.
2.Useasoftanti‐staticclothtogentlywipetherecordsurfaceifthe
recordhasbecomedirty.
3.Keeprecordsintheir“jacket”whennotinuse.
4.Storerecordsuprightontheiredges.Thelevelstorewouldmakeit
becomecurved.
5.Avoidplacingitindirectsunlightorclosetoasourceofheatsuchas
radiators,stoves.Alsoavoidlocationsubjecttovibrationand
excessivedust,heat,coldormoisture.
CLEANINGARECORD
Preparation
Getallyourcleaningmaterialsready,suchasasoftlint‐freecloth
(included)andarecord‐cleaningpad(notincluded).Ifyoudecideona
wet‐cleaning,arecord‐cleaningfluid(notincluded)isrequired.
Tocleanontheturntable
1.Lockthetonearmonthetonearmrest.
2.Washyourhands.
3.Placearecordontheturntable,handlingtherecordbyedgesand
labeledarea.
4.Dry‐cleantherecordifitisnotverydustyandhasbeencleaned
regularly.
5.Followthemanufacturer’sinstructionsforapplyingfluidifyoudecide
towetclean.Besurenofluiddripsintoontheturntable.

10
6.Manuallyrotatetheturntableinaclockwisedirectionwhilecleaning
gentlyintothegrooves.
7.Sweeptheclothupandawayandliftdustfromtherecordsurface.
8.Getridofthedustfromclothanddoitawayfromtheturntable.
9.Repeatuntilyouseenodustontherecord.
Tocleanonthepad(notincluded)
1.Washyourhands.
2.Placethepadonadryflatsurface.
3.Placearecordonthepad,handlingtherecordbyedgesandlabeled
area.
4.Dry‐cleantherecordifitisnotverydustyandhasbeencleaned
regularly.
5.Followthemanufacturer’sinstructionsforapplyingfluidifyoudecide
towetclean.Besurenofluiddripsintoontheturntable.
6.Gentlywipethegroovesoftherecordinaclockwisedirection.
7.Sweeptheclothupandawayandliftdustfromtherecordsurface.
8.Getridofthedustfromclothanddoitawayfromtherecordandpad.
9.Repeatuntilyouseenodustontherecord.

11
HOWTOREPLACETHESTYLUS(NEEDLE)
Caution:
Checkthestylustoseeifitisinthemiddlecenter.
NOTE:Followthirdphotowhichiscorrect.
•Donotremoveorbendthestylus.
•Donottouchtheneedleasitcouldinjureyourhand.
•Don’tletthestylustouchtheturningturntablewhenthereisno
record.
•Turnofftheunit'spowerbeforeyoureplacethestylus.
Removingoldstylus
1.Setascrewdriveratthetipofthestylusandpush
downinthedirection“A”.
2.Removethestylusbypullingitforwardanddown.
Installinganewstylus
1.Holdthetipofthestylusandinserttheotheredgeby
pressinginthedirection“B”.
2.Pushupthedirection“C”untilitlocksatthetip.

12
DISCS
•Dependingonthequalityofthediscandtheconditionofthe
recording,someCD‐R/CD‐RWdiscmaynotbeplayable.
•Alwaysplacethedisconthedisctraywiththelabelfacing
upward.(Compactdiscscanbeplayedorrecordedonlyononeside)
•Tomoveadiscfromitsstoragecase,pressdownonthecenterofthe
caseandliftthediscout,holdingitcarefullybytheedges.
•Ifthediscbecomesdirty,wipethesurfacefromthecenterhole
outwardtowardstheouteredgewithasoft,drycloth.
•Neverusesuchchemicalsasrecordspray,antistaticspraysorfluid,
benzineorthinnertocleanthediscs.Suchchemicalswilldo
irreparabledamagetothedisc'splasticsurface.
•Discsshouldbereturnedtotheircasesafterusetoavoiddustand
scratchesthatcouldcausethelaserpickup“skip”.
•Donotexposediscstodirectsunlightorhighhumidityand
temperatureforextendperiods.Longexposuretohightemperatures
willwarpthedisc.
•PrintableCD‐RandCD‐RWdiscsarenotrecommended,asthelabel
sidemightbestickyanddamagetheunit.
•Useasoftoil‐basedfelt‐tippedpentowritetheinformationonthe
labelside.Neveruseaball‐pointorhard‐tippedpen,asthismay
causedamagetotherecordedside.
•DonotuseCDswithan
irregularshape(octagonal,
heartshaped,businesscard
size,etc).CDsofthissortcandamagetheunit.
•IfyouhaveanydoubtsofusingCD‐R/CD‐RWdisc,readthe
precautionssuppliedwiththedisc,orcontactthediscmanufacture
directly.

13
TAPEHEADSMAINTENANCE
Whenthesoundisdistortedorfaint,useaspecialcleaningtapetoclean
theoxidesanddustdepositionthoroughlytomaintainsmoothheadand
extenditslife.
Steps:
1.Dropthecleanseronthecottonfilminthetape.
(Seetherightillustration.)
2.Loadthecleaningtapeintothecassetteslot
(locatedonthesideoftheunit).Cleaningwill
automaticallybegin.Takethecleaningtapeout20
secondslater.
3.Whentheoxidesanddustdepositonthecottonfilm,youcanreplace
thecottonfilmbyatweezers.

14
CONNECTIONS
Caution:
zSwitchoffthepowerofallequipmentsbeforemakingconnections.
zReadtheinstructionsofeachcomponentyouintendtousewiththis
unit.
zBesuretoinserteachplugsecurely.Topreventhumandnoise,avoid
bundlingthesignalinterconnectioncablestogetherwiththeAC
powercord.
AFMAntenna
WhileinFMmode,tuneinanFMstationandextendtheleadtofindthe
bestpositionforthereception.Thisantennamayneedtobe
repositionedifyoumoveyourunittoanewlocation.
BACPowerCord
PlugthispowercordintoanACwallsocket.

15
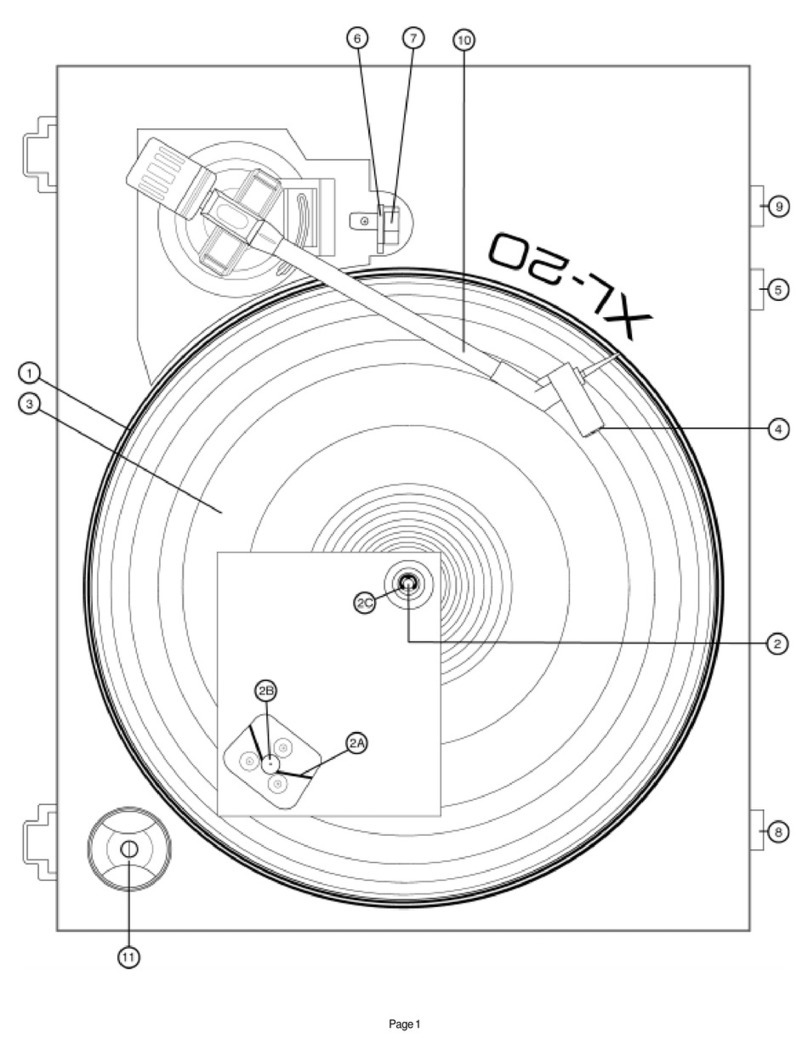
PARTSOFTHETURNTABLE
A45RPMadaptor
BScrewfixingtheturntablefortransportation
zWhenyoutransporttheunit,turn
thescrewcounterclockwisetosecure
theturntable.
zBeforeuse,turnthescrewclockwise
withacoinorscrewdriver.
CReturnindicator
Theindicatorwilllightupwhenthetonearmreturntothetonearm
rest.
DCue‐level
Usethislevertoliftandlowerthetonearm.
ETonearmrest
FSpeedselector
GTonearm
Beforeuse,completelyloosenthetonearmholder.
HStylus
ITurntable

16
UNITFUNCTIONS
1RECLEVEL‐button/RECLEVEL+button
Inrecordpausemode,usethesebuttonstoadjusttherecording
level.
2FINALIZEbutton/ERASEbutton
UseFINALIZEbuttontofinalizeaCD‐R/CD‐RWdisc.
UseERASEbuttontoeraseorunfinalizeaCD‐RWdisc.
3TRACKINCREMENTbutton/AUTO/MANUALbutton
Duringrecording,useTRACKINCREMENTbuttontodividetracks.
UseAUTO/MANUALbuttontoselectthemodeoftracknumber
assignment.
4VOLUME
Turnthisknobtoadjustthevolume.
5DISCTray
6SPEAKERS
7PHONEjack
Forprivatelistening,firstreducethevolumeleveltominimum.

17
TheninserttheplugofyourheadphonesintothePHONESjack,
andadjustthevolumebyturningtheVOLUMEknob.Thesound
fromspeakerswillbecutoffwhiletheheadphonesareplugged
in.
8AUXINJack
UsetheAUXINJacktolistentotheexternalsource.
9Display
10 STOP
Usethisbuttontostopplaybackorrecording.
11 Fastreverse
PresstheF.Rbuttononcetogobacktothestartofthecurrent
track.PresstheF.Rbuttontwicetogobacktothestartofthe
previoustrack.
12 Fastforward
PresstheF.Fbuttononcetogothestartofthenexttrack.
13PLAY/PAUSE
Usethisbuttontostartplayback/pauserecording,finalizingand
erasing.
14OPEN/CLOSE
InCD,PHONOorAUXmode,usethisbuttontoopenandclose
thedisctray.
Thisbuttondoesn'tworkinFMorAMmode.
15RemoteSensor
Whenoperatingtheremotecontrolunit,pointittowardsthe
REMOTESENSOR.
16POWER
Pressthisbuttontoturntheunitonoroff.
NOTE:Ifyouexperienceamalfunctionduringoperation,youmay
powerofftheunitandre‐start.
17TUNING
InFMorAMmode,turnthisknobtotuneinastation.
18AUXbutton/AM/FMbutton
PresstheAUXbuttonandselectAUXtolistentotheexternal
sourceconnectedtotheAUXINjack.
PresstheAM/FMbuttononceortwicetoselectAMorFMband.
19PHONObutton/TAPEbutton
PressthePHONObuttonandselectPHONOtoplayarecord.
PresstheTAPEbuttontoplaythecassette.
20RECbutton/CDbutton
Usethisbuttontoenterrecordpausemode.
PresstheCDbuttontoplayaCD.

18
21TUNED/STindicator
Itlightsgreenwhenastationiscorrectlytunedinorwhenthe
receptionisstrong.
Itlightsredwhenthereceptionispoor.
Itlightsorangewhenastationisfoundbutnotproperlytunedin.
22USBOUTjack
23CASSETTEEJECT/FASTFORWARD
PresstheCASSETTEEJECT/FASTFORWARDbuttonhalf‐wayto
FastForwardtheTape.Pressbuttonlightlyandplaybackwill
resume.PressbuttonallthewaytoendplaybackandejectTape.
24CASSETTEDECK

19
REMOTECONTROLUNIT
RemoteControlUnitcanoperatetheunitfromadistance.
Whenoperatingtheremotecontrolunit,pointittowardsthefrontpanel
oftheunit.
zEveniftheremotecontrolunitisoperatedwithintheeffectiverange,
remotecontroloperationmaybeimpossibleifthereareany
obstaclesbetweentheunitandtheremotecontrol.
zIftheremotecontrolunitisoperatednearotherapplianceswhich
generateinfraredrays,orifotherremotecontroldevicesusing
infraredraysareusedneartheunit,itmayoperateincorrectly.
Conversely,theotherappliancesmayoperateincorrectly.
BATTERYINSTALLATION
1.Removethebatterycompartmentcover.
2.Inserttwo“AAA”batteries.Makesurethat
thebatteriesareinsertedwiththeirpositive
“+”andnegative“‐“positionedcorrectly.
3.Closethecover.
BatteryReplacement
Ifthedistancerequiredbetweentheremotecontrolunitandmainunit
decreases,thebatteriesareexhausted.Inthiscase,pleasereplacethe
batterieswithnewones.
Precautionsconcerningbatteries
zBesuretoinsertthebatterieswithcorrectpositive+andnegative‐
polarities.
zUsebatteriesofthesametype,neverusedifferenttypesofbatteries
together.
zRechargeableandnon‐re‐chargeablebatteriescanbeused.Referto
theprecautionsontheirlabels.
zWhentheremotecontrolunitisnottobeusedforalongtime(more
thanamonth),removethebatteriesfromtheremotecontrolunitto
preventthemfromleaking.Iftheyleak,wipeawaytheliquidinside
thebatterycompartmentandreplacethebatterieswithnewones.

20
zDonotheatordisassemblebatteriesandneverdisposeofold
batteriesbythrowingtheminafire.
REMOTECONTROL
A. OPEN/CLOSE
InCD,PHONOorAUXmode,usethis
buttontoopenandclosethedisctray.
ThisbuttondoesnotworkinFM/AM
mode.
B. CD
PresstheCDbuttontoplayaCD.
C. REPEAT
InCDmode,usethisbuttontoselecta
repeatModeofCD.
D. PROGRAM
InCDmode,usethisbuttontoprogram
tracks.
E. SHUFFLE
InCDmode,usethisbuttonforshuffle
playback.
F. DISPLAY
InCDmode,usethisbuttontochangethedisplay.
G. TRACKINCREMENT
Duringrecording,usethisbuttontodividetracks.
H. MANUAL/AUTOINCREMENT
Usethisbuttontoselectthemodeoftracknumberassignment.
I. Record
UsethisbuttontorecordCD.
J. RECVOL+/RECVOL‐
Usethesebuttonstoadjusttherecordvolume.
K. FINALIZE
UsethisbuttontofinalizeaCD‐R/CD‐RWdisc.
L. ERASE
UsethisbuttontoeraseaCD‐RWdisc.
M. Clear
InCDmode,usethisbuttontoclearprogrammedtracks.
N. PHONO
PressthePHONObuttonandselectPHONOtoplayarecord.
O. AUX
Table of contents
Other AWA Turntable manuals
