Award VKC30SB User manual

0
Wine / Beverage Preservation
Technology
INSTRUCTION MANUAL
Model list
VKC30SB
VKI45SI
VKI90DI
VKC40DS/VKC40DB/VD40DB
VKC60SB
VKC60DS/VKC60DB/VD60DB/VKI60DI
VS130SS/VS130SB
VS130DS/VS130DB
VS170SS/VS170SB
VS170DS/VS170DB
VS200SB-R/VS200SB-L
VD180SB
VD180DB
VKI180DI/VKB180DS/VKB180DB
VKI130DI/VKB130DS/VKB130DB
VKI60SI/VKB60SS/VKB60SB
Thanks for buying our Wine Cooler/Beverage Cooler, Hope our
advanced product will give your wine a different joyful taste. Before
use, please read and follow all safety rules and operating instructions.

1
WARNING!
The information in this document is subject to modification without
any prior notice.
Some models are available in dedicated countries only.
We offers no guarantee for our wine cellar if it is being used for any
purpose other than that for which it was specifically designed. We
cannot be held responsible for any error in this manual. is not
responsible or liable for any spoilage or damage to wines or any other
contents incidental or consequential to possible defects of the wine
cellar. Warranty applies to the wine cellar only and not to the content
of the wine cellar.
This appliance is not intended for use by persons (including children)
with reduced physical, sensory or mental capabilities, or lack of
experience and knowledge, unless they have been given supervision
or instruction concerning use of the appliance by a person being
responsible for their safety. Children shall not play with the appliance.
Cleaning and user maintenance shall not be made by children without
supervision.
Children should be supervised to ensure that they do not play with the
appliance.
Please don't put such as acidic items, flammable and explosive goods
into wine cooler.
This equipment is intended for the storage and display of non-
potentially-hazardous
bottled or canned products only.
This appliance is intended to be used in household and similar
applications such as
•Staff kitchen areas in shops, offices and other working
environments;
•Farm houses and by clients in hotels, motels and other residential
type environments;
•Bed and breakfast type environments;
•Catering and similar non-retail applications.

2
DANGER: Risk of child entrapment. Before you throw away your
old wine chiller:
•Take off the doors;
•Leave the shelves in place so that children may not easily climb i
nside;
•When disposing of the appliance, do so only at an authorized
waste disposal centre.
R600a WARNINGS:
For your safety observe the following recommendations.
•This appliance contains a small quantity of R600a refrigerant
which is environmentally friendly, but flammable. It does not
damage the ozone layer, nor does it increase the greenhouse
effect.
•During transportation and installation, ensure that the tubing of
the refrigerant circuit is not damaged.
•Avoid using or manipulating sharp objects near by the appliances.
•Leaking refrigerant can ignite and may damage the eyes.
•In the event any damage does occur, avoid exposure to open fires
and any device which creates a spark. Disconnect the appliance
from the mains power.
•Thoroughly ventilate the room in which the appliance is located
for several minutes.
•Notify Customer Service for necessary action and advice.
•The room for installing the appliance must be at least 1 cubic
metre per 8 grams of refrigerant. The refrigerant quantity
contained in this appliance is listed above in grams; it is also
noted on the Rating Plate of the appliance.
•WARNING: To avoid a hazard due to instability of the
appliance, it must be fixed in accordance with the instructions.
•The symbol is a warning and indicates the refrigerant and
insulation blowing gas are flammable.
•Warning: Risk of fire / flammable materials
•WARNING —Do not store explosive substances such as
aerosol cans with a flammable propellant in this appliance.

3
•WARNING —When positioning the appliance, ensure the supply
cord is not trapped or damaged.
•WARNING —Do not locate multiple portable socket-outlets or
portable power supplies at the rear of the appliance.
•WARNING —The refrigerant and insulation blowing gas are
flammable. When disposing of the appliance, do so only at an
authorized waste disposal centre. Do not expose to flame.
It is hazardous for anyone other than an Authorised Service
Person to carry out servicing or repairs to this appliance.
•WARNING: Keep clear of obstruction all ventilation openings
in the appliance enclosure or in the structure for building-in.
•WARNING: Do not use mechanical devices or other means to
accelerate the defrosting process, other than those recommended
by the manufacturer.
•WARNING: Do not damage the refrigerant circuit.
•WARNING: Do not use electrical appliances inside the food
storage compartments of the appliance, unless they are of the
type recommended by the manufacturer.
•WARNING: If you do not use the machine for a long time,
please unplug the power plug from the socket or switch off the
power supply.
•WARNING:Children should be supervised to ensure that they do
not play with the appliance;
•WARNING:Do not use extension cords or ungrounded (two pron
g) adapters;
•WARNING:If the supply cord is damaged, it must be replaced by
the manufacturer,
•Its service agent or
similar qualified person in order to avoid hazard.
Allow 24 hours before switching on the wine cellar. During this
time we recommend that you leave the door open to clear any
residual odors.

4
BEFORE LOADING & PLUGGING IN THE WINE CELLAR
Important: All models without front venting (air opening) are strictly for free
standing only. (See technical chart)
Recommendations:
The location you have selected for your wine cellar should:
●be unencumbered and well ventilated;
●be well away from any heat source and direct sunlight;
●not be too damp (laundry, pantry, bathroom etc.);
●have a flat floor;
●have a standard and reliable electricity supply (standard socket to country standards,
linked to the ground), it is NOT recommended to use a multi-socket or extension
lead;
●have a surge protector fitted to the electrical outlet;
●Away from the microwave oven. Certain microwave ovens do not have wave
interference shield. When placed within 1 meter vicinity of the wine cabinet, they
may affect the operation of the wine cabinet.
Notes:
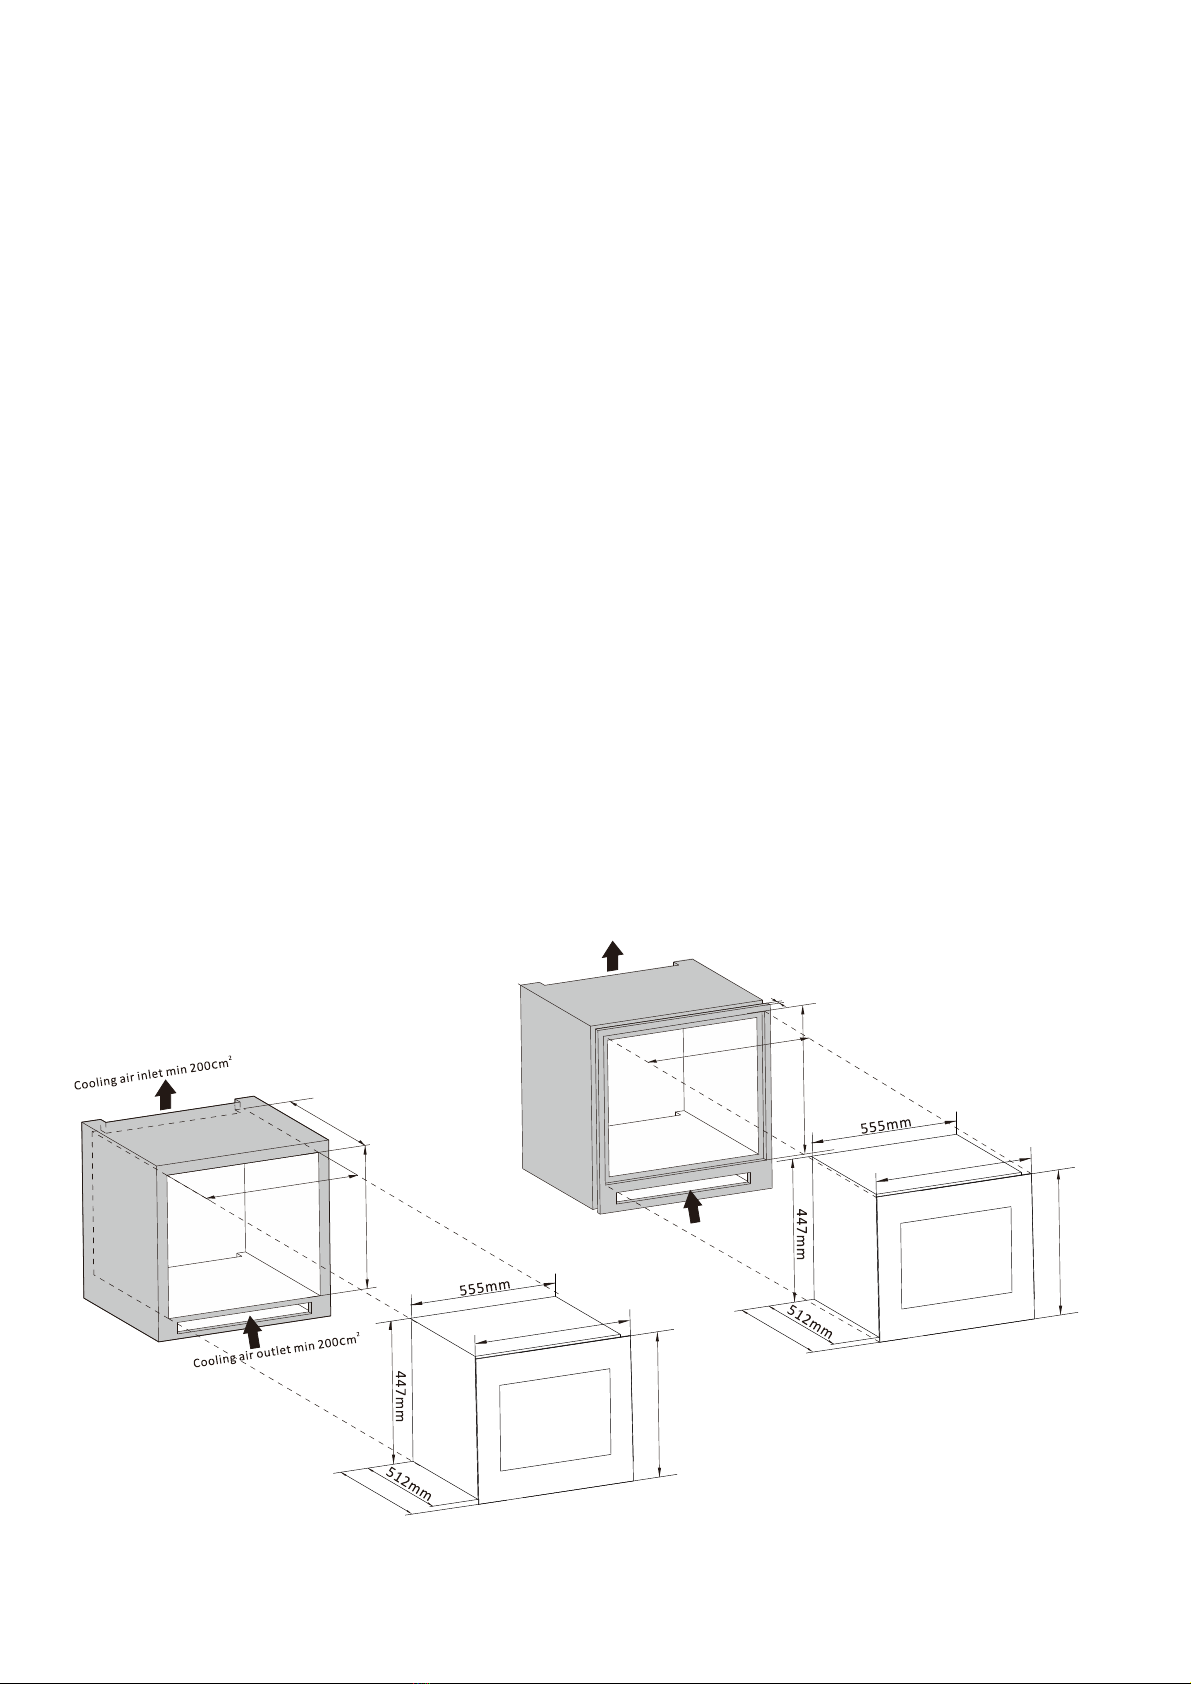
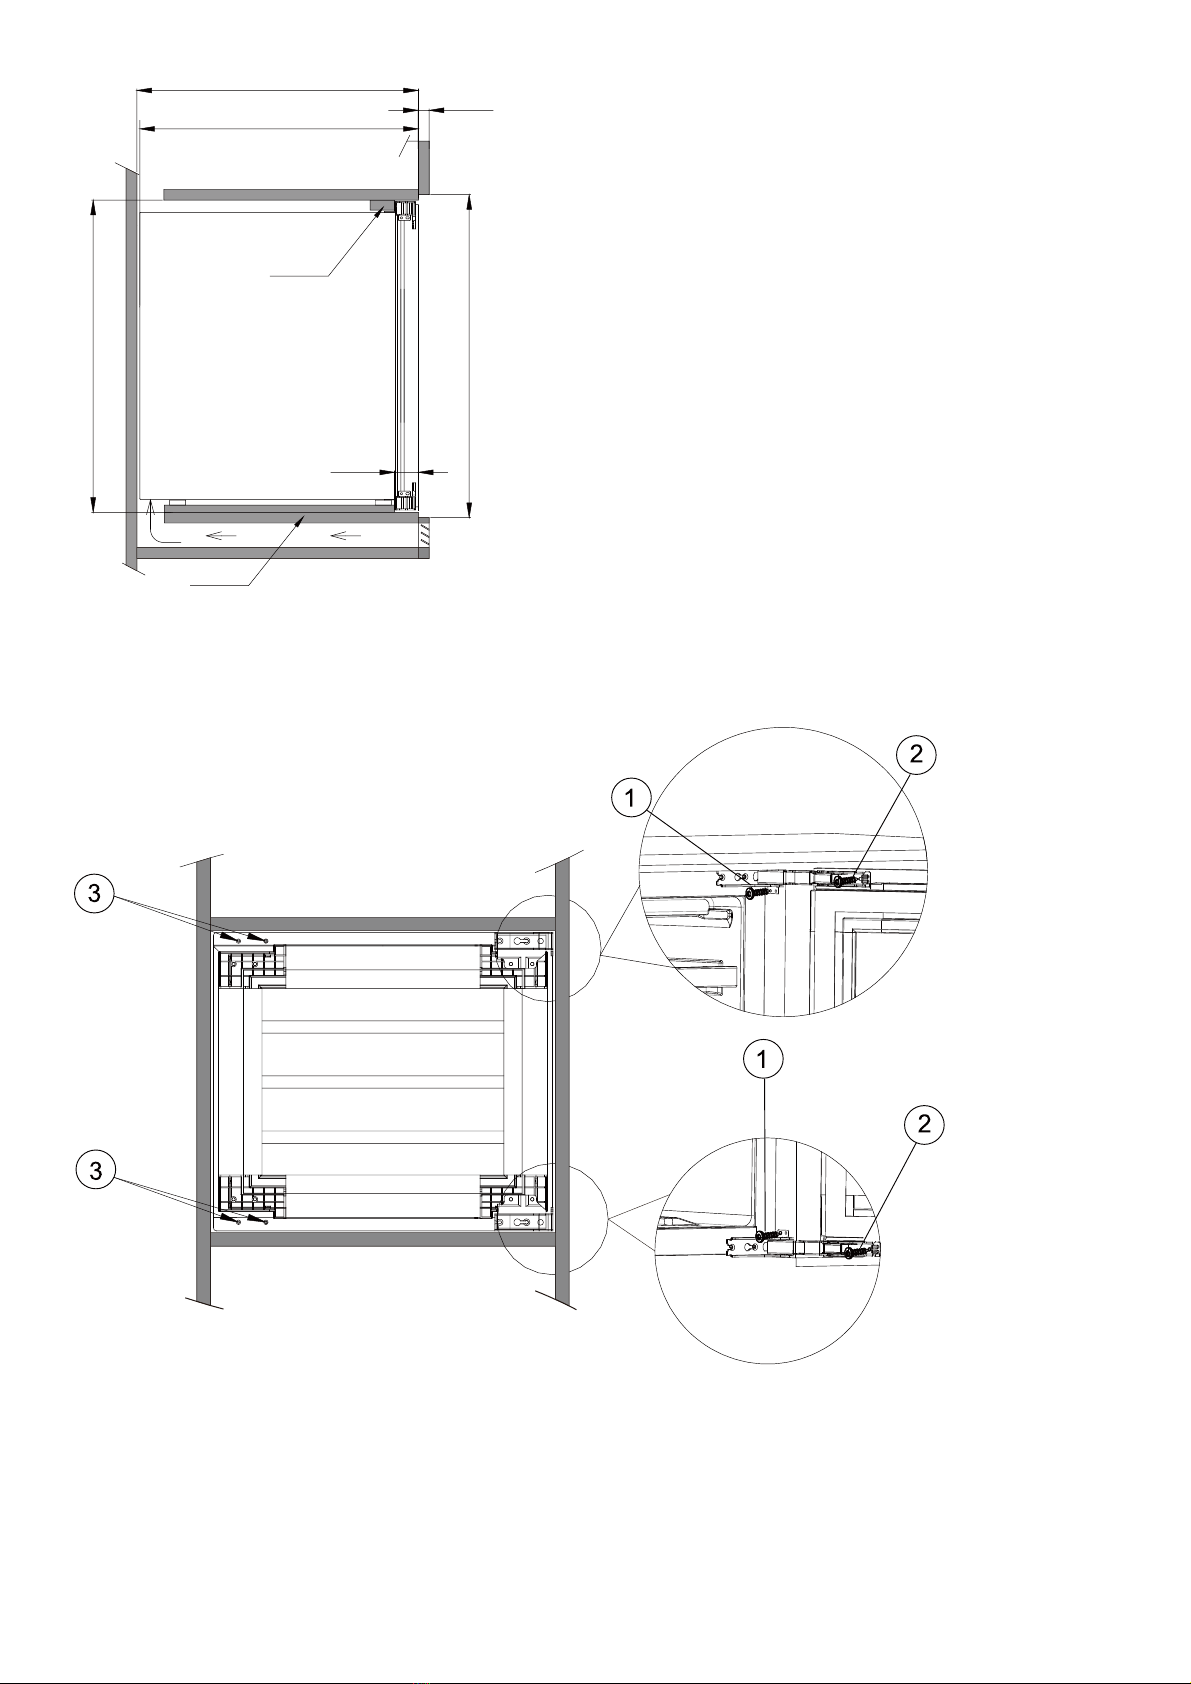
●VKI45SI,VKI90DI,VKI180DI,VKB180DS,VKB180DB,VKI130DI,VKB130DS,
VKB130DB,VKI60SI,VKB60SS,VKB60SB models are for built-in ONLY,
●VKC30SB,VKC40DS,VKC40DB,VD40DB,VKC60SB,VKC60DS,VKC60DB,
VD60DB,VKI60DI, VS130SS,VS130SB,VS130DS,VS130DB,VS170SS,VS170SB,
VS170DS,VS170DB,VD180SB,VD180DB models are Both built-in and free-standing
type as per the drawings thereafter.
●VS200SB-R,VS200SB-L models are for free-standing ONLY.
Wine cellar should be placed where the ambient temperature is proper (Please view the
end of Manual). If the temperature is above or below this range, it will affect the
performance of the cellar. Placing in cold or hot temperature conditions may cause cellar's
temperatures fluctuating, and it will not reach the ideal one.
Grounding instructions:
The wine cellar must be grounded in case of wire leakage. Grounding reduces the risk of
electrical shock. The wine cellar is equipped with a power cord having a grounding wire
and plug. The wine cellar plug must be plugged into a properly affixed and grounded
electrical outlet.
Note: In locations where there is frequent lightning, it is advisable to use surge protectors.
Improper use of the grounding plug can result in the risk of electric shock. Consult a
qualified electrician or service person if the grounding instructions are not completely
understood.
If the supply cord is damaged, it must be replaced by a qualified person in order to avoid
electrical hazard.

5
INSTALLING YOUR WINE CELLAR
Unpack and remove all of the protection and adhesive strips from the packaging around
and inside the wine cellar.
The wine cellar must be positioned such that the plug is accessible. Release the power
cord. Move your wine cellar to its final location. The wine cellar should be installed in a
suitable place where the compressor will not be subject to physical contact.
Leveling your wine cellar: Wine cellar must be leveled BEFORE loading your wines.
Your wine cellar is equipped with 4 adjustable feet to facilitate easy leveling. We
recommends that you tighten the back feet to the maximum and adjust the front feet to
level the wine cellar.
INSTALLATION INSTRUCTIONS FOR BUILT IN WINE CELLARS:
(UNDERBENCH OR IN COLUMN) FRONT VENTING WINE CELLARS ONLY.
VS200SB-R,VS200SB-L models are free standing only. Any built in voids
the warranty
1. “Built in” wine cellars are front venting but are not designed to be fully integrated
behind a joinery door.
2. Please follow the installation diagram when installing built-in wine cellars. No less than
the minimum installation dimension, or it will affect the venting of cellar.
3. Built-in wine cellars draw air from right of ventilation frame(VKC30SB,VKC40DS,
VKC40DB,VD40DB from the rear) and expel through left of ventilation frame under the
front door.
4. “Built in” wine cellars have a power switch located on the control panel so power point
location is not critical.
5. The wine cellar requires a standard 240 volt/10 amp power point. (Or according to
different countries specifications).
6. The power cord is 2.0m in length and is fixed on the right side at the back when looking
from front of cabinet.
7. As with most appliances of today, the wine cellar has sensitive electronic components
which are susceptible to damage through lightning and electricity supply faults. It is
therefore advised to use a power surge protector to avoid problems of this nature.

6
8. Air vent on door must be provided for built-in wine cellars when a wood door installed.
In Hot climate zone, an air vent or grid, with a minimum ventilation size of 200mm x
40mm MUST be cut out at the rear top of the back partitioning or at the top of either side
of the partitioning, allowing cool fresh air full access to flow into the 30mm gap located at
the rear of the cabinet.
This air vent or grid must not be opened on the same side as other appliances such as
ovens or an area that is sealed and without access to fresh cool air. Failing to comply with
the above specifications could result in WARRANTY void.
INSTALLATION DRAWINGS FOR BUILT IN WINE CELLARS:
(UNDERBENCH OR IN COLUMN) FRONT VENTING WINE CELLARS ONLY.
Note: The appliance must be positioned so that the plug is accessible after installed.
DIMENSIONAL DRAWINGS:
It is built-in model inside cabinet, the cabinet should come with good ventilation space and
no backplane, otherwise it will affect the wine cooler working normally. (Installation
drawing as below)
VKI45SI model
Decorativepanel
thickness<22mm
De co ratio n pa nel
hol e hei gh t ≥520mm
Decorativepanel
holewidth≥600mm
541mm
487mm
559mm
I nst all ation h ole
he ig ht ≥495mm
Installationhole
depth≥575mm
541mm
487mm
559mm
Installationhole
width≥565mm

7
Installation hole depth ≥ 575mm Decorative panel
thickness<22mm
Decoration panel hole
height ≥520mm
A 20~22mm thickwood board
shall be placed at the bottom.
Installation hole height ≥495mm
Nail a 20~22mm thick
wood board at the front
of the top.
559mm
49mm
VKI90DI model
Installationhole
depth≥575mm
Installation hole height ≥910mm
541mm
917mm
559mm
Installationhole
width≥565mm
Decorativepanel
thickness<22mm
Decoration panel
hole height ≥970mm
917mm
541mm
559mm
Decorativepanel
holewidth≥600mm

8
A 20~22mm thickwood board
shall b e placed a t the bottom.
Nail a 20~22mm thick
wood board a t the
front of the top.
Installation hole depth ≥575mm Decorative panel
thickness<22mm
Decoration panel hole height ≥950mm
Installation hole height ≥925mm
559mm
49mm
VKI60SI models
Decorativepanel
thickness<22mm
De co ratio n pa nel
hole hei ght ≥660mm
Decorativepanel
holewidth≥600mm
541mm
629mm
569mm
595mm
Coolingairinletmin200cm2
Coolingairoutletmin200cm2
I nsta lla ti on hole
height ≥637m m
Installationhole
depth≥575mm
541mm
629mm
569mm
Installationhole
width≥565mm
595mm

9
Installation h ole depth ≥575mm Decorative panel
thickness<22mm
Installation hole height ≥637mm
Decoration panel hole
height ≥660mm
569mm
49mm
A 12~15mm thickwood board
shall be placed at the bottom.
Nail a 20~22mm thick
wood board at t he front
of the top.
VKI45SI/VKI60SI/VKI90DI models
Fixing in the niche
After installing the door panel, push the appliance into the niche, adjust the position, open
the door, and fix the appliance into the niche with 2 screws ①through the holes on the
hinges of the upper and lower doors from the accessories package. Fix the upper and lower
door hinges on the wood board with two screws②.Then take out 2 screws from the
accessories, and fix the upper and lower fixing plates on the board with screws ③on the
left side of the appliance.

10
VKB60SS/VKB60SB models

11
VKB60SS/VKB60SB models Installation Instruction:
1.Put the wine cooler into the cabinet, then adjust the wine cooler to make it steady. Open
the door, take out the fixed plate , 2pcs Inner Hexagon Screws ,and Inner Hexagon
Screwdriver from accessory bag , then use the inner hexagon screwdriver to tighten the
fixed plate on the lower left side of wine cooler.
2.Take out 3pcs Phillips screws from accessory bag , use Phillips screwdriver to tighten
the fixed plate on the lower left side of wine cooler(1pcs screw) , then tighten the other
2pcs Phillips screws on the upper door hinge and lower door hinge.

12
VKI130DI model
Decorative panel
thickness<22mm
Decorativepanelholewidth≥605mm
Decoration panel hole height ≥1285mm
Coolingairinletmin200cm2
Installation hole height ≥1240mm
Coolingairoutletmin200cm2
Installationholewidth≥565mm
Installationhole
depth≥611mm
1 220mm
Installation hole depth ≥611mm
Ventilation opening
width≥40 mm
Decorative panel
thickness<22mm
Installation hole height ≥1240mm
Ventilation opening
width≥40mm
1220mm
1230mm
1271mm

13
VKB130DS/VKB130DB models
Decorative panel
thickness<22mm
Decorativepanelholewidth≥605mm
Decoration panel hole height ≥1285mm
Coolingairinletmin200cm2
Installation hole height ≥1240mm
Coolingairoutletmin200cm2
Installationholewidth≥565mm
Installationhole
depth≥611mm
Installation hole depth ≥611mm
Ventilation opening
width≥40 mm Decorative panel
thickness<22mm
Installation hole height ≥1240mm
Ventilation opening
width≥40mm
1271mm
1230mm

14
VKB180DS/VKB180DB models

15
VKI180DI model

16
Fixing bracket installation
1.Level the wine cooler, take 2 fixing brackets ①2 x 5*16 flat head screws ②and 4
screw covers ③from the polybag. Remove 4 trunk-nails on the left side frame, fix the
brackets ①on the left side of with a philips screwdriver.
2.Take 4 X 4*12 self-tapping screws ④from the polybag, fix the bracket ①on left side of
kitchen cabinet with a philips screwdriver. And take another 4 X 4*12 self-tapping screws
④, fix the right side door hinges to the kitchen cabinet with these screws.
Installation method of door plank
The wine cabinet door has the function of fine-tuning wood board:
1. Take out the bracket ⑦, two 5 * 35 large flat screws and two 5 * 25 large flat screws ⑥
from the accessories package, fix the bracket on the upper and lower sides of the door

17
panel with 4 * 12 self tapping screws ④according to the dimensions shown in the figure,
pre hit two 5 * 35 screws on the bracket, hang the door panel on the door body, place the
screws in the oval groove in the door frame, realize left and right adjustment, and screw up
and down with a screwdriver.
After the approximate position of the door panel is adjusted, screw two 5 * 25 screws
through the oval hole of the positioning support ⑦and into the middle hole of the door
frame lining iron according to the figure, and tighten the screws to prevent the door body
from loosening. (see Figure 1.2)
2. After the door panel is fully adjusted, take out six 5 * 45 ⑧long self tapping screws
from the accessories package, uncover the door seal, drill the screws through the screw
holes in the left and right door frames, and tighten the door panel (see Figure 3).
3. Finally, use 4 * 12 self tapping screws ④to pass through the holes on the upper and
lower door hinges and fix them on the door panel (see Fig. 4).
51 mm
51 mm
4
4
6
8
7
4
567
Fig 1
Fig 2
Fig 3
Fig 4

18
VKC40DS/VKC40DB/VD40DB models
VKC30SB model

19
VKC60SB/VKC60DS/VKC60DB/VD60DB models
VKI60DI model
After adjusting the door panel, take out 4pcs 5*35 self-tapping screws from the accessory
bag, open the door seal, drill the screws through the screw holes in door frames, and
tighten the door panels.
This manual suits for next models
31
Table of contents
Other Award Refrigerator manuals