Axon bavarianDEMON User manual

BEDIENUNGSANLEITUNG
I N S T R U C T I O N S

QUICK INTRODUCTION
Installation Page 4
Preparing the remote control Page 4
Connection Page 5
LED Display Page 6
Setup / Adjustment Page 7
Tuning Page 8
Bank switching Page 8
Tai gyro optimization Page 9
Head gyro optimization Page 10
Trimming Page 11
APPENDIX
Troubleshooting Page 17
Saftey recommendations,
Disclaimer, Warranty Page 18
Accessory Page 19
Service and Inquiries, Imprint Page 20
PRELIMINARY INFORMATION
Features, technical specication, scope of delivery Page 3
Horizon and Rescue options Page 12
Governor Page 15
Vibration Analysis Page 16
SPECIAL FEATURES
CONTENT
2

3
FEATURES
Congratulations on owning a bavarianDEMON stabilization system.
This system enables huge performance from your model. The head gyro eliminates all undesired ybarless head characteristics,
resulting in optimal control and precision. By incorporating the latest generation of high-quality MEMS gyros, this system offer full 3D
capability, whilst boasting a top-quality, ultra-fast tail gyro. In addition, it has in-built symmetrical torque control (revo mix). This results
in a further increase in ‚lock-in‘ ability, made possible by coupling the tail gyro internally with the coll.pitch data of the rotor head control.
With this latest generation system, the AXON increases the existing performance to a new level, not only in regards to the additional
horizon and rescue features, but with the enhanced overall feature and characteristic set.
Of course, the AXON remains perfectly suitable for all kinds of helicopter, no matter whether ybared or ybarless, trainer or scale
helicopter (twin- and multi-bladed), as well as ybarless helicopters such as turbine powered trainers, etc.. The AXON can be used
without limit for all different power unit types, no matter whether electric, nitro or gas, as well as for gas turbines too.
Supported servo types include all analog, digital and brushless servos, including narrow-pulse servos (760µs) on the tail at 500Hz.
Moreover, all current swashplate variants, including four swashplate servos and virtual swash rotation, CCPM/H1, H3-90°, H3-120°,
H3-140°, H4-90°, H4-90°+45° are supported.
Direct USB connection for fast programming (via Win and MacOS software as well as Android- and iOS Apps in combination with the
Bluetooth module, available separately), bank switching of complete parameter sets, as well as clear separation of the gain (sensitivi-
ty) settings for head and tail gyro in independent auxiliary channels, reduce the setup work to a minimum. The absolutely independent
Horizon channel provides activation and tuning of the multiple Horizon and rescue modes.
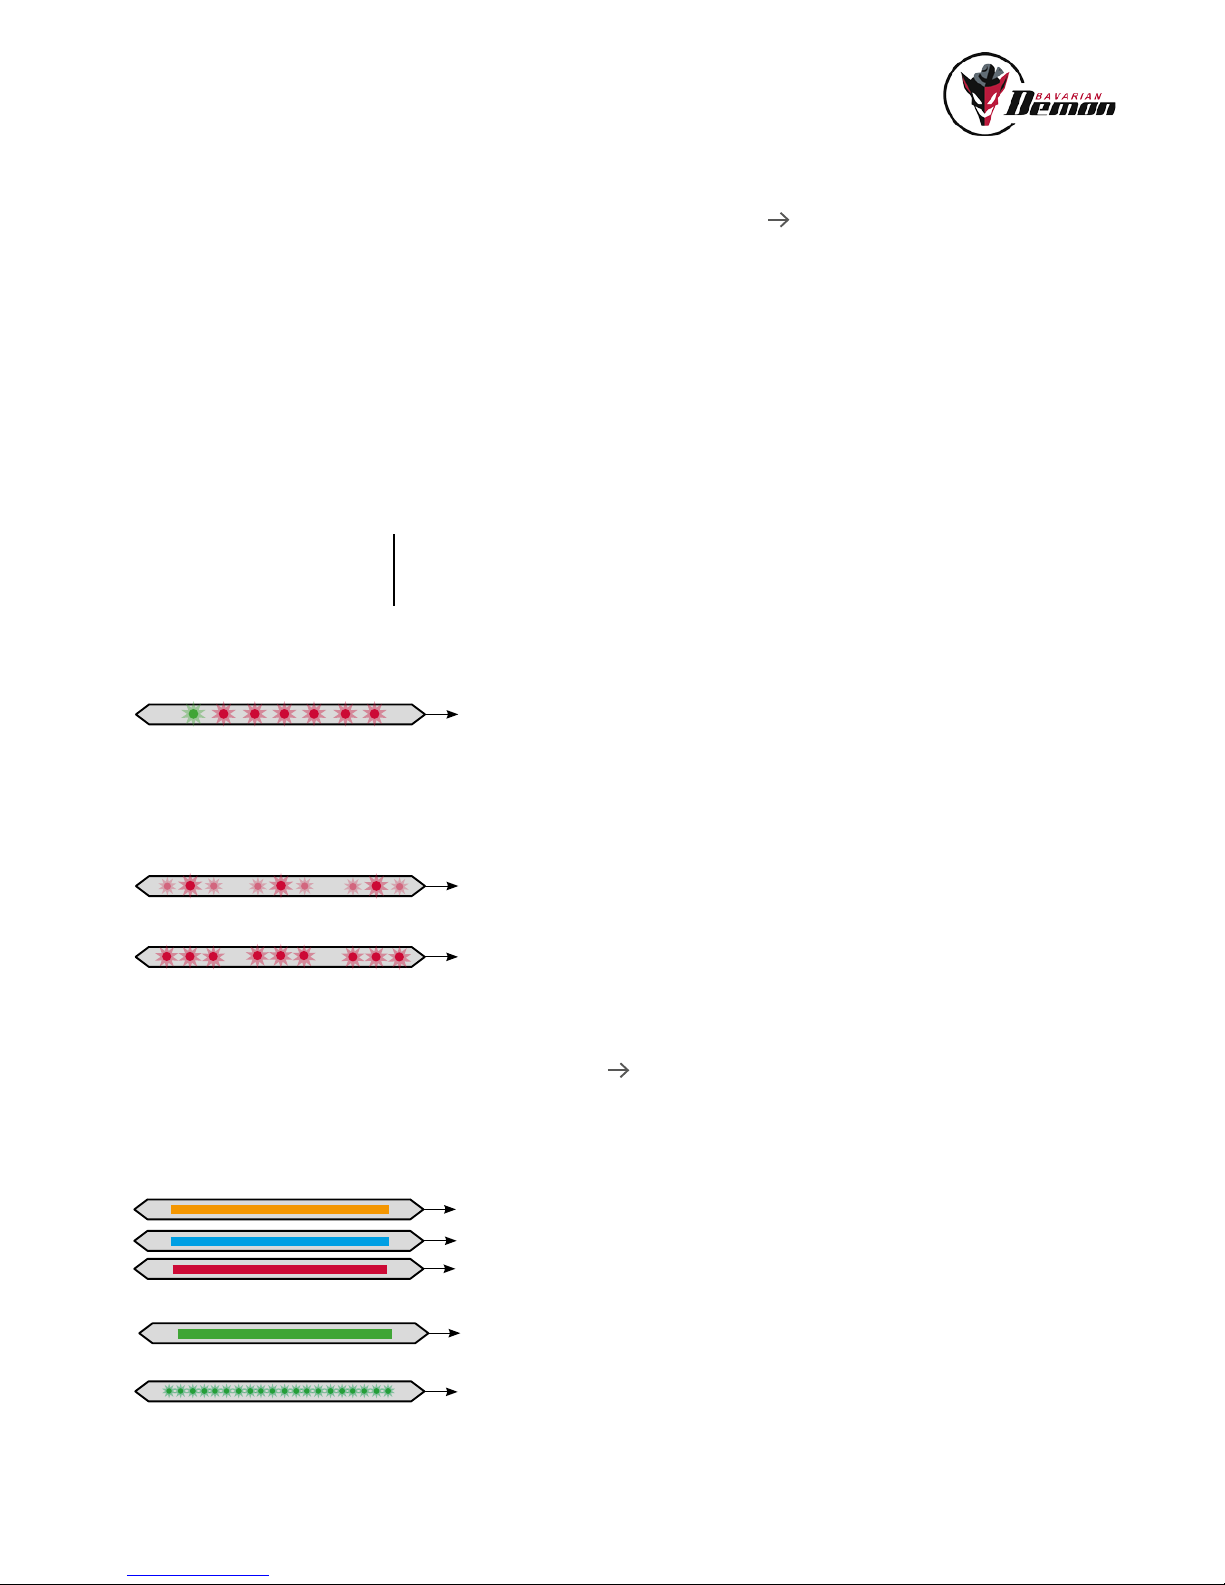
The AXON’s rmware can be updated online quickly and simple via the internet. For hints and instructions, please see the software.
TECHNICAL SPECIFICATION
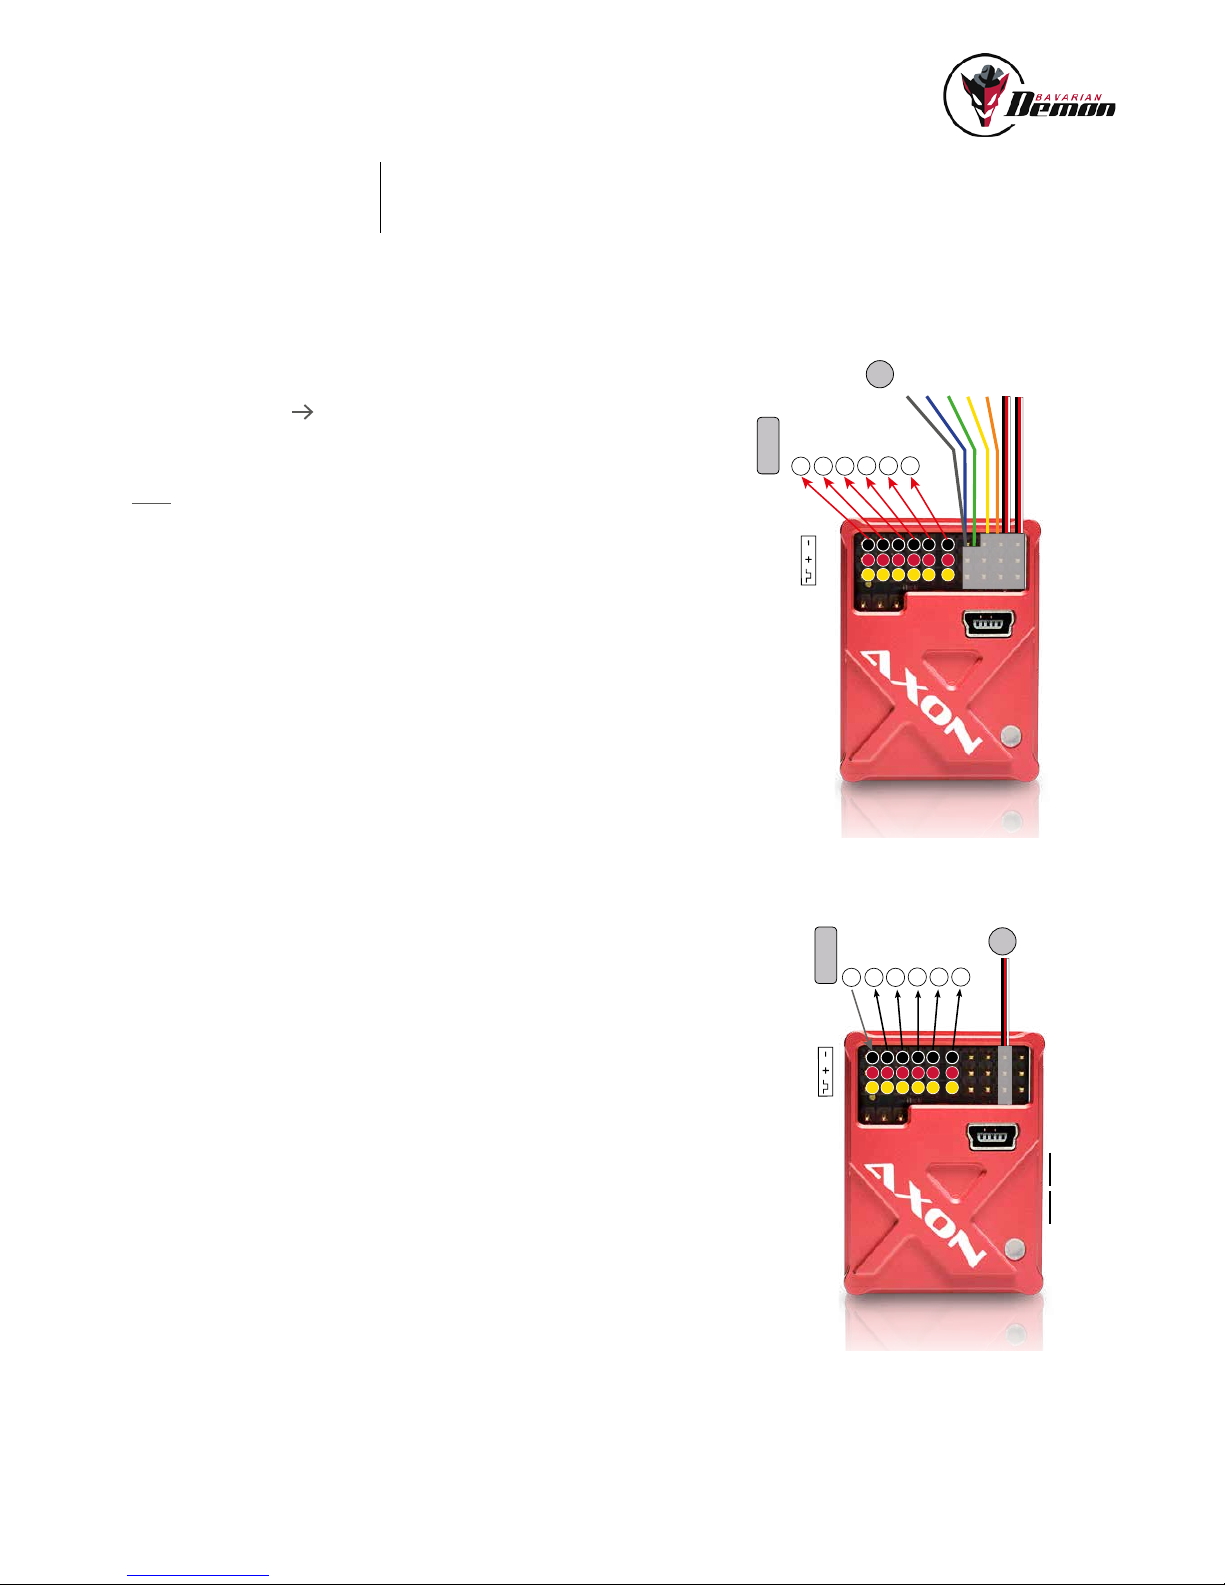
Dimensions: 40 x 30 x 14mm
Supply voltage: 4…10V (2S-LiPo-compatible, min. 5.5V using Spektrum satellites)
Max. roll & pitch rotational speed: 500°/s
Max. tail rotational speed: 650°/s
Tail servo output: Analog (55Hz) / Digital1 (166Hz) / Digital2 (220Hz) / Digital3 (333Hz) / 760µs (500Hz)
Head servo output: Analog (55Hz) / Digital1 (166Hz) / Digital2 (220Hz) / Digital3 (333Hz)
Maximum combined servo currents: total 15A (continuous load, 18A short time load)
Weight: approx. 27g (without cable loom)
Length of connecting cables to receiver: 150mm (longer cable optionally available, see “accessories”)
SCOPE OF DELIVERY
• Main unit (sensor)
• One mounting pad each, ‘Acro’ and ‘Soft’ ACP
• Cable loom for receiver connection (150mm)
• Mini USB cable
• Product information
Software (Win / MacOS) available for download at www.bavarianDEMON.com. Apps (iOS / Android) in the designated stores.
PRELIMINARY INFORMATION

QUICK INTRODUCTION
MOUNTING POSITION
Important is an orientation exactly aligned with the level of the main rotor or rotor shaft in all 3 axes, i.e. the assembly surface must
be orthogonal (90°) or parallel to these. Contrary to normal tail gyros, this is particularly important to ensure that the head stabilization
maintains constant attitude, even during pirouettes. All four main orientation directions are possible (see software), plus mounting it
inverted or even vertical. So alltogether, 24 options for the installation orientation are possible.
AVOIDING VIBRATIONS
The mounting surface must be sturdy and vibrate as little as possible. The closer the unit is tted to the rotor shaft, the less vibrations
is usually present.
In the case of internal combustion engines, it is particularly important to take care with this issue to reduce invisible vibrations. If the
housing should noticeably vibrate extremely while the engine is running, we recommend choosing a different installation position that
is protected better against vibrations.
AVOID CLOSE PROXIMITY TO HEAT SOURCE
Keep a distance from the exhaust tube, ESC and motor. Using the system inside a fuselage, make sure to supply plenty of fresh air.
USE THE SUPPLIED MOUNTING TAPE
Clean the mounting surface properly. Use the thicker and softer tape for internal combustion engines only, and the thin tape for all
other models.
Do not additionally lash the housing as this will restrict the damping effect of the foam tape. For the same reason, do not tightly lash the
connecting cables (servos and receiver) and do not lay them under tension in a straight line, but in a gentle bend leading to the system.
Switch off ALL mixers in the transmitter. The swash type / mixer is set only in the system and in accordance with the linkage type. In
the transmitter, select an unmixed standard program (CCPM/H1), and disable the collective-to-tail mix.
All functions like gyro menu, AVCS menu and pitch-throttle curve remain in the transmitter. Moreover, Expo and Dual Rate settings are
allowed to be used in the transmitter, but only after the initial setup has been completed.
SERVO ENUMERATION
The following diagrams show the enumeration of the servos, and thus the correlation in connecting them to the AXON, dependent on
the swash type. Note: 3-servo swash types may have the center servo linkage located either to the front or rear of the main shaft. The
servo enumeration remains the same: #1 is left, #2 is right, and #3 is center.
H3-120° H3-140° H3/H4-90° H4-90°+45°
4
PREPARING THE REMOTE CONTROL
INSTALLATION

VIA CABLE LOOM (STANDARD RECEIVER, PWM SIGNALS)
Connect each cable of the cable loom to the appropriate channel on the receiver, accor-
ding to the diagram.
Example: Yellow cable Rx port for tail servo
Connect servos to ports 1-5. Throttle/ESC stays with the Rx. Leave unused channels
unplugged.
Note: Single-line cables must be plugged into „signal pulse“.
VIA SERIAL INPUT (SEE SOFTWARE FOR OPTIONS)
If the receiver features a serial output, it can be connected via this port, so only one patch cable is
needed. Setting the designated signal type is done via software. In this case, the throttle channel
is looped through by the system, its output supplied at port 6, according to the diagram.
A further channel is available on port A (AUX, e.g. for illumination accessories or retractable gear).
VIA SATELLITE RECEIVERS (SPEKTRUM)
Up to 2 (diversity) receivers can be connected on the side of the system. If only one satellite is used
(technically possible, but not recommended), the port closer to the LED is to be used (Master).
Setting this input type, as well as binding the receivers to the radio, is carried out via the software.
No main receiver is needed to bind or use the satellites directly on the device.
The usual input ports (when using the cable loom) for tail gyro and head gyro as well as horizon
channel must be idle, i.e. not connected to any signal source (see diagram for cable loom con-
nection).
When using Spektrum satellites, the system needs to be supplied with a min. 5,5V. 4,8V batteries
are not sufcient, the receivers may fail under load or not bind at all. We recommend a voltage
controlled output to supply the system, such as a BEC, with a capable LiPo or LiFe pack.
CONNECTION NOTES
As high servo currents can occur, a voltage supply should be routed directly to the device, this
is also the case with a master-slave supply (BEC with 2 or more supply cables, all routed to the
device). In this way the receiver will be supplied via the system, and not vice versa.
When using the supplied cable loom and an ESC’s internal BEC, which must be connected to the
receiver’s throttle output, the power supply via the cable loom is sufcient. In this case any slave
supply should be routed to the receiver, not split between receiver and device.
Use one of the following options to supply power directly to the unit:
a) All output ports 1-6
b) Ports A and B, if a serial input is used
In both cases, and if the number of available ports is not enough, make use of a Y cable to achieve
the power source connection.
CONNECTION
ANSCHLUSS KABELBAUM
Roll/Ail
Nick/Elev
Pitch
Heck/Rud
Kopf-/Head Gyro
Horizont
Heck-/Tail Gyro
1
2
3
6
5
4
Servo 1
Servo 2
Servo 3
Servo 4
Heck/Rud
Gas/Thr/ESC
SERVO
RX
1
2
3
6
5
4
Servo 1
Servo 2
Servo 3
Servo 4
Heck/Rud
Gas/Thr/ESC
SERVO
RX
ANSCHLUSSSUMME-IN/SUMME-OUT
5
Slave
Master

• Do not connect servos until the device has been set to the correct servo type via software.
• Do not move the model/device for the rst few seconds after powering on (LED ashes red). The system runs a self-test and needs
standstill to perform this, as otherwise it will not initialize, activate the servos, and start to ash 3x red power-cycle.
• When using the cable loom: route all cables as a common bundle. Single wires must not lie separately.
• The additional channels for head gyro, tail gyro, and horizon modes serve to set the respective gain (sensitivity) and mode in ight.
A potentiometer or slider on the transmitter should be assigned one each for the gain channels. As an alternative, and recommended
for nal set-up, a xed value can be programmed on a switch, the radio’s gyro menu can be used, or the values can be set in the
software (in this case, the corresponding channel must not see a transmitter input).
OPERATION
Do not move model and sticks during initialization after power-on.
The status of initialization can be seen on the servo‘s reaction: are
these not following any Tx inputs, or does the LED not light up cons-
tantly, one of the following errors shows up:
Waiting for input signal: LED pulses red
Failure: system not initialized due to movement!
After successful initialization, servos respond to stick inputs and gyro
corrections when tilting the helicopter.
Constant LED light ready for operation
GYRO MODE
Bank yellow
Bank blue
Bank red
Horizon mode: contant green LED light
Rescue mode: LED ickers green
LED DISPLAY
6

After installation, the device must be tuned to both the helicopter and transmitter, which rst includes adaptation of the transmitter to the sys-
tem,followedbysettingupthesystem tothemodel.Thesoftwareincludesasetupwizardguidingyou swiftlyandeasilythroughalltherequi-
redstepswithout missingany.Additionallythereis helpfulinformationavailable foreach parameterinthe ‘I’on thetopright ofevery window.
At this point, please install and open the software and start the setup wizard.
Prior to this, do read the following notes!
1. IMPORTANT BEFORE FIRST FLIGHT AND AFTER ANY CHANGES!
EXTENDED CONTROL CHECK INCLUDING A DIRECTION TEST FOR ALL 3 GYRO DIRECTIONS
a) When the model is ready to y, check the neutral position and direction of all stick functions and servos. If the swashplate shows
an increasing tilt while increasing the head gyro gain, this must be related to inaccurate transmitter neutral trim.
Check in DIAGNOSE page.
b) Check directions of all three sensor axes, as an incorrect direction would denitely result in a crash.
Briey tilt and turn the model in the directionof all three axis. The swashplate and tail must initially respond with the opposite
action. In the event of this not happening correctly, incorrect programming is the source of the error, either in the direction of the
bars in the DIAGNOSE menu or in the mounting orientation setting.
c) RC range check.
2. DASHBOARD MENU: BACKUP OF ALL SETTINGS IN THE PC
Data backup is optional, since all settings are stored permanently in the device, unless they are overwritten by new
values or are subject to a factory reset.
It does, however, make sense to save settings when carrying out tests with various parameters. If the result is not satisfactory, then it
is easily possible to restore the previous data by loading the backup into the device.
In this case, the bank switching is very helpful too. Dene one main parameter set and conduct any testing using the other 2 banks
only, so that it is easy to switch back to the “safe” bank at all times. Whichever bank you use as the “safe” bank is up to your preference.
SETUP / ADJUSTMENT
7

! It is mandatory to have tested all sensor directions!
! At rst, y with considerably moderate gain settings for tail and head gyro (35-45% recommended).
! Control check prior to every lift-off. Never lift off before the servos respond correctly to stick inputs, as only in this case has the
initialization been successfull.
PAY ATTENTION DURING LIFT-OFF
! In general, pay attention to the horizontal position of the swashplate.
Similar to a tail gyro, it may happen that slight, inadvertently issued stick deections are amplied by the stabilization before the
model is in the air.
! Especially on 3D acro helis with hard head-damping, these helis must not be spooled up on, and lifted off from hard asphalt, unless
the skids are dampened. Otherwise, while the motor is spooling up, resonances can occur, risking the heli tilting over, because in
this state it cannot correctly follow the system‘s control commands.
TUNING
BANK SWITCHING
The AXON includes the option of up to 3 banks of different parameter sets. This means that not only can head gain and tail gain be
adapted from the radio, but complete parameter sets can be dened and accessed via the head gain channel’s position. This includes
all parameters from the HEAD/TAIL menu, and also the governor’s gain control (separate bank buttons for the two menus).
Therefore, the software contains bank buttons „yellow“, „blue“ and „red“ for HEAD/TAIL as well as GOVERNOR menu.
Every single button opens the available parameter for the chosen bank separately, i.e. all settings, for example, made while the blue
bank is active are only saved under the blue bank. When switching to another bank, the corresponding parameters for this bank are
visualized and subject to change.
The banks are engaged via head gyro channel as follows:
Bank red Default bank, also available if no signal is received via the head gyro channel.This is otherwise triggered by a center signal
on the head gyro channel.
Note: the head gain needs to be set in software only for this bank.
Attention: when activating bank red (neutral signal on the head gyro channel), the internal gyro gain value in the HEAD menu is valid,
although the Diagnose shows the current signal status ‚0‘!
Bank yellow Activated by supplying a negative signal to the head gyro channel. The signal’s travel setting (servo travel) denes
the head gain.
Bank blue Activated by supplying a positive signal to the head gyro channel. The signal’s travel setting (servo travel) denes the
head gain.
Examples:
1) Signal -57% = Bank yellow, 57% head gain
2) Signal +73% = Bank blue, 73% head gain
3) Signal 0% (Center) = Bank red, head gain dened via head gain parameter in the software
The tail gain is always dened by the tail gain channel from the radio, also for bank red, as long as a signal is provided via the radio.
If there is no signal from radio to tail gain channel, the tail gain is dened in the software, and for all three banks separately.
8

+ 100%
Heading
Hold
10%
gain
Normal
- 100%
SENSITIVITY (GAIN) SETTING
As usual, set the gyro gain as high as possible, at which point the tail does not yet tend to oscillate, not even at high ight speed. The
tendency to oscillate, and thus the holding force, mainly depends on the speed of the tail servo, but also on a mechanism free of play,
with an easy moving linkage, as well as an optimum drive (without belt slipping, or breakdown of the motor controller at full coll.pitch,
etc.). You can additionally optimize the gyro‘s performance to the model by tuning further parameters of the TAIL menu. In the case of
high-performance acro helicopters, the following tuning procedure has proven successful:
P-GAIN
Search for the setting at which the tendency to oscillation is at its lowest (referred to the same tail gain),
and you may then further increase the overall gain to some extent.
• You prevent fast oscillations (ne dithering) by a lower tail gain.
• You prevent slow oscillations (wag) and bouncing back by a higher P gain.
LOCK-IN DELAY
Use this parameter to optimize the lock-in behavior when the stick is released quickly, with the result that the tail stops without boun-
cing back or overshooting. Before adjusting the delay, adjust the tail gyro gain to the highest possible value.
REVO MIX
Improve tail stability (particularly with slower tail servo) by generating a direct anticipated correction for the tail with every torque
change caused by increasing coll.pitch, even before any measurable drift occurs, which the gyro would have to rst detect in order
to counter-act.
For Revo mix you can select:
• for 3D-ying symmetrical pitch curve
• for scale ying, with coll.pitch hover position at stick center asymmetrical coll.pitch curve
Optimize Revo mix with reduced gyro sensitivity as an initial test: give sharp coll.pitch inputs and see what the tail does. If it can’t hold the
increasing torque, i.e. moves in the opposite direction to the main rotor rotation, then increase the Revo mix amount. After nding the best
setting, increase the gyro gain again.
OPTIMIZING THE ESC
If the tail moves clearly after a coll.pitch change, the source mostly is a sluggish responding motor controller that does not allow to
keep the rpm up at maximum torque and accelerates too late, thus applying a high load to the tail. In this case, generally, an impro-
vement is achieved by increasing the overall rpm.
TAIL GYRO CHANNEL HEAD GYRO CHANNEL
+ 100%
0%
1,5 ms
- 100%
100%
RIGID
20%
gain
RIGID
100%
100%
ON
0%
HOR OFF
100%
HOR +
Coll.Pitch
Act.
RIGID-MODE HOR-MODE
9
TAIL GYRO OPTIMIZATION
9

The attitude stabilization („head gyro“) for the ybarless head maintains any attitude and prevents disturbances, such as ballooning,
if the pilot does not apply any further control input. On the ground, the function is visible on the swashplate: when giving control input
and subsequently letting go of the stick, the swash moves slowly back to level, maybe even staying in the controlled position for a
short moment.
This head gyro function can also be used for ybared heads, to assist the the mechanical stabilization, but with a caution not to set the
gain too high. An unmatched interaction between mechanical and electronic stabilization is denitely not desired.
AN EFFICIENT WAY TO OPTIMIZE THE RIGID SETTINGS
• We suggest to initially use a pot or slider on the radio for gain tuning. Use the head gyro channel or, in case no signal is supplied
from the radio, the corresponding gain parameter in the HEAD/TAIL menu, to set the gain as high as possible, approx 5-10% below
any oscillations occurring. For safety reasons, begin with low values. Too high a gain may provoke oscillations, for example like a shiver
on aileron or a fast wobble on elevator.
• Then set the desired agility in the software.
• Usually at this point, the performance is close to the optimum or even perfect. If further improvement is necessary, you can test sudden
stops (lock-in) after abrupt and fast stick control stops:
In case of a tendency of wagging in elevator axis:
• increase ‚Elevator Filter‘.
In case of slight bounce-back after abrupt stick control stop:
• Reduce ‚Direct Control Portion‘, increase head gain.
In case the tail continues to move on a short while, even after the end of stick input:
• for avoiding a sluggish reaction: increase ‚Direct Control Portion‘, possibly also increase the head gain and/or carefully increase the travels
in the SERVO TRAVEL menu.
• for avoiding harsh reactions: reduce ‚Agility‘ in the HEAD menu, and carefully increase the travels in the SERVO TRAVEL menu.
If aileron and elevator impulses cause mixed movements, this might be caused by an incorrect ‚Swash Phasing‘ setting. Test with
reduced head gain. For example, if the tail moves downwards when ‚right‘ aileron is input, then increase ‚Swash Phasing‘ in the
positive direction.
Test response to long stick inputs
• In the case of a fast rst reaction and then decreased turn rate: reduce ‚Direct Control Portion‘ and, if needed, increase ‚Agility‘.
Test high-speed ight
• Against slow ballooning or undercutting: reduce or respectively increase ‚Decay Rate‘.
• Against temporary nose-up („dolphin“) during sharp coll.pitch inputs: increase head gain as far as possible.
Make sure the servo travel is set optimally (value between 65 and 85 in SERVO TRAVEL menu).
• Against lasting ballooning after hard coll.pitch input: use ‚Attitude Hold Range‘.
In case of tilting or tumbling motion during pirouettes:
• Align the sensor perfectly in all 3 axes.
Trim the swashplate exactly level while there is a connection to the DIAGNOSE/TRIM menu (necessary to have all servos at
neutral), and trim the heli mechanically to the optimum during the rst ight.
HEAD GYRO OPTIMIZATION
10

TRIMMING
Using an electronic head stabilization, trim adjustment on the transmitter is not allowed (and not necessary). The system interprets
any trim as a control input.
Helicopters equipped with ybar, even though they would not need an electronic head stabilization, can still use it in order to correct
any minor trim differences and drifts. To do so, start with very low head gain and increase carefully.
11

Important: no exceptions are allowed regarding the setup of Horizon and Rescue modes, in particular:
• The coll.pitch travel must reach its 100% marks as displayed in the DIAGNOSE menu, positive and negative, with correct signal
direction.
• For using the horizon modes ‘Acro’ and ‘Upright’ and the corresponding rescue modes, the main blades’ angle of attack must be
set to exactly 0° when connected to the DIAGNOSE/TRIM menu, otherwise the proper function of the system’s horizon and rescue
features cannot be ensured.
Self-leveling can be used for various purposes: primarily as a training aid (“safety net”) for beginners, but is also useful for advanced
pilots. Self-leveling remains useful from the initial learning phase right up to practicing to master complex maneuvers. Self-leveling
stabilization may be used wither purely as a „rescue switch“ in an emergency, or in a permanently activated (“Coax mode”) state.
Self-leveling can act as an invaluable support during aerial photography ights, for example, particularly at greater distances, as an
in-real-life orientation-training tool, or in deed in many other ways.
HOW TO ACTIVATE THE HORIZON STABILIZATION
First optimize the head gain setting. We suggest using a pot or slider on the transmitter for instant adjustment access in tuning.
This should only be done with deactivated Horizon modes, as these would interact in such that a perfect head tuning would not be
possible.
Now choose the desired option from the HORIZON/RESCUE menu. Afterwards you can tune the gain (assistance) and engage the
desired mode of the Horizon stabilization via the Horizon channel in ight.
It is recommended to use a switch for the Horizon channel, to activate and switch between modes.
Note: in ‘Acro’ and ‘Upright’ mode the mode (Horizon or Rescue) depends on the signal’s polarity (direction) on the Horizon channel
(see next page for more details).
FLYING WITH HORIZONTAL STABILIZATION
Begin with a low stabilization gain and increase carefully. Too high a gain may increase the tendency to oscillate. A very hard set up
head stabilization can also increase the tendency to oscillate in Horizon modes.
Usually lift-off and landing is possible with activated self-leveling. This should be tested rst at a gain not higher than 30%, and deni-
tely not in Rescue mode. The tendency to oscillations may also be increased before lift-off, if standing on a hard surface, and during
high speed ight.
IMPORTANT
When ying with permanently engaged self-leveling, do not reduce servo travels for aileron and elevator at the transmitter too much
(no exessively low Dual Rate setting), otherwise, the priority of the manual control (override) may get lost.
The Horizon stabilization can also make pirouettes out-of-round, since it wants to bring the main rotor disc into its neutral hover
attitude.
SPECIAL FEATURES
HORIZON AND RESCUE OPTIONS
12

Explaining the options:
1 [SCALE] LED green = ON, red/yellow/blue = OFF
Not suitable for 3D ying and allowed only for helicopters which, due to their coll.pitch range (asym-
metric), are not capable of inverted ight. Here, the Horizon channel works similarly in both direc-
tions, no matter whether either a negative or positive signal is supplied, i.e. +50% = -50%.
The following modes provide the option for Rescue functions. These options are allowed only if the
model is set up with a symmetric coll.pitch range (e.g. -12° to +12°, center 0°).
2 [ACRO] LED green = ON, red/yellow/blue = OFF
The most recommended option for 3D ying with highest accuracy. The model will be self-leveled
to the closer horizontal attitude (normal or inverted).
For activation choose [ACRO] mode and apply a positive signal to the Horizon channel, i.e. signal
travel to the right according to the DIAGNOSE menu, and in between 10% to 100%. The higher the
gain value, the stronger the stabilization.
2b [ACRO+coll.pitch] LED ickering green = ON, red/yellow/blue /green = OFF
Similar to [ACRO] mode, but additionally coll.pitch will automatically be applied and set for climbing
(“escape into the sky”).
For activation choose [ACRO] mode and apply a negative signal of -100% (or higher) to the Hori-
zon channel, i.e. signal travel to the left according to the DIAGNOSE menu
3 [UPRIGHT] LED green = ON, red/yellow/blue = OFF
Always levels the heli in upright attitude, even if initially fully inverted.
For activation choose [UPRIGHT] mode and apply a positive signal to the Horizon channel, i.e.
signal travel to the right according to the DIAGNOSE menu, and in between 10% to 100%. The
higher the gain value, the stronger the stabilization.
3b [UPRIGHT+coll.pitch] LED ickering green = ON, red/yellow/blue /green = OFF
Similar to [UPRIGHT] mode, and additionally coll.pitch will automatically be applied and set for
climbing (“escape into the sky”).
For activation choose [UPRIGHT] mode and apply a negative signal of -100% (or higher) to the
Horizon channel, i.e. signal travel to the left according to the DIAGNOSE menu.
13
HORIZON/RESCUE MENU
Select the desired mode of operation using the ‘Horizon Options’.
‘Rescue Climb Rate’ denes the climb speed in Rescue modes. The higher this value, the more coll.pitch is applied for rescue (only
available for ‚Acro‘ and ‚Upright‘).

AUTOMATIC COLL.PITCH
The automatic coll.pitch action of the rescue feature overrides the coll.pitch stick commands more and more with increasing gain
setting on the Horizon channel. A signal of -100% (according to DIAGNOSE menu) completely overrides the coll.pitch stick, which is
the highly recommended setup. Furthermore, the rescue mode should be triggered only by a spring loaded momentum switch, so that
the pilot re-gains full control by releasing the switch.
NOTE ABOUT THE HORIZON MODE’S RESCUE OPTIONS
The described rescue options provide an extremely high reliability, even during extreme 3D and acro maneuvers, based on following our
rules for setup and handling.
We see this feature as a highly efcient rescue option, as well as a training aid for new maneuvers.
However, we warn against taking any uncalculated risks, particularily against activating the rescue modes for test ying without sufcient
safety altitude, unless in a real emergency situation. Likewise, nobody would use an emergency-only parachute for regular skydiving. As with
any complex system, even in model ight, unpredictable inuences have to be accounted for at any moment.
Also, naturally, please note that the self-leveling cannot perform a stop from high speed. The heli may climb sidewards in a slightly tilted way.
14

15
GOVERNOR
The AXON includes an internal governor, suitable for electric and gasser/nitro use, which takes over the rpm control from the external
governors/ESCm and is able to do this with high efciency due to additional information about the current ight status.
For use with electric helis, either a special, separately available sensor (see accessories) needs to be used, which will simply be run
over one of the motor wires, or use a standard hall sensor with corresponding magnet.
For use with gasser/nitro helis, always use a standard hall sensor.
The parameter „Control gain“ is banked and thus can be set separate for each bank in the software.
ATTENTION: in combination with a Kontronik ESC, this needs to be set to Mode 2 (normal throttle mode), as otherwise parts in the
ESC’s control may act strangely.
Conguration options in the software
The governor can be activated and deactivated as well as congured via software.
Waiting Time (Electric only):
Time that the external ESC needs to spool up. Needs to be set so that it matches the ESC‘s spool-up time from powering on until
achieving the dened rpm.
Important:
The heli must not be lifted off before the dened rpm is reached and therefore the internal rpm logging process has acknowledged
the rpm. Too early a load, and the resulting drop in rpm, would lead to an inaccurate detection and the internal governor might not
work correctly.
Stop Position (Electric only):
Denes the motor‘s OFF position.
Spool-Up Time:
With gasser/nitro (or ESC without own soft start), this is where you dene the spool-up time, meaning the time from powering on until
reaching the set rpm.
Important:
This is mandatory for gasser/nitro, no delay must be used from the radio! A signal jump must be detected.
Increased Idel Position (gasser/nitro only):
At this point the internal ramp-up will be started, as dened in ‚Spool-Up Time‘.

VIBRATION ANALYSIS
This page shows the result of the vibration analysis, divided into head, tail and motor sections.
If all sections are green, no critical vibration has been detected.
If critical vibration is detected, the section with the highest vibration will be marked rst.
Example:
Tail and head have too high a level of vibration, but the tail is worse. In this case tail would be marked rst (yellow or red, depending on the
strength of the vibration). Once this issue is solved, in the next step the head would be marked. Once all issues are solved, this will be shown
by all sections marked green.
This is how to use this feature: the heli must be own for 30-60 seconds. It is sufcient to hover or do slow ying. Then connect the system to
the software, open the vibration analysis and see the result, as explained above.
Important:
Do check the vibration analysis in the software prior to the next lift-off, as data will be overwritten with the new ight‘s data at this time.
16

TROUBLESHOOTING
SERVOS DO NOT RUN AND LED FLASHES RED
See chapter LED
FINE MOVEMENTS WITH DIGITAL SERVOS ARE HEARD
No problem, these result from the control loop, made audible by modern super-fast servos.
JERKINESS OF TAIL SERVO
If the tail gyro‘s auxiliary channel is at neutral position, it will stay around the switching point between heading hold and normal mode,
and may randomly switch it on and off. Use either a positive or a negative signal in the tail gyro channel to dene the mode and obtain
a “useful” gyro gain.
NO CALM FLIGHT ATTITUDE ON THE TAIL AND/OR HEAD
Extreme vibrations (visible or tangible only) on the housing (especially with gasser/nitro motors) → Observe installation notes. Or
non-correct center signals (check in DIAGNOSE).
TILTING DURING PIROUETTES (LURCHING OR TUMBLING MOTION)
• Housing not mounted exactly perpendicular (or aligned with) to the rotor shaft?
• With a neutral signal (when in DIAGNOSE), swashplate not levelled exactly perpendicular to the rotor shaft?
• Self-leveling active?
TILTING DURING PIROUETTES, ONLY DURING STRONG WIND OR IN HIGH SPEED
• Equalize aileron and elevator travel.
• Use similar gain setting for aileron and elevator.
WEAK HOLDING TAIL
• Travel limit and gyro gain correctly set?
• Rpm high enough?
TAIL UNEXPECTEDLY SWINGS OUT TO THE SIDE
• Tail drive (belt or shaft) slipping?
• Too high an angle of attack on tail (stall)?
• Enough power on the tail (rpm high enough)?
APPENDIX
17

WE RECOMMEND FOR YOUR SAFETY
• Always observe a sufcient safety distance from persons and objects, including yourself.
• Do not underestimate the inertia and momentum of rotating rotor blades.
• Always observe legal regulations.
• Keep your distance from radar stations, transmission masts and other radio interference sources.
• When passing on the model to third parties, always pass on these warning notes as well!
DISCLAIMER
Installation, adjustment and operation of the autopilot and a helicopter require appropriate skills. Errors and lack of attention can result in ac-
cidents involving severe personal injury and/or property damage, or even trafc accidents. As the manufacturer and seller have no inuence
on correct handling, these risks are expressly pointed out. Liability for all manner of damage resulting from operation, even due to disruptions
of the built-in instruments or signal transmission, is fundamentally ruled out, insofar as legally possible.
WARRANTY
We assume a warranty of 24 months for this device.
Any repairs performed will not extend the warranty period. During the warranty period, we will remedy any occurring malfunctions or ma-
nufacturing or material aws free of charge. Further claims, e.g. in the event of consequential damages, will be ruled out. The unit must be
transported to us at no expense to us, and it will also be returned at no expense to us. We cannot accept unpaid consignments. We cannot
assume any liability for transportation damage and loss of your consignment. We recommend appropriate insurance.
THE FOLLOWING PREREQUISITES MUST BE MET FOR PROCESSING OF YOUR WARRANTY CLAIMS:
• Purchase receipt included with the consignment.
• The devices have been operated in compliance with the operating instructions.
• The device has not suffered any moisture damage, unauthorised tampering, excess voltages, overloads or mechanical damage.
• If possible, include a description or symptoms of the perceived fault.
NOTE
This document contains legally protected information. All rights reserved.
The content of this document can be amended or adapted without prior announcement.
The bavarianDEMON may be modied at any time on the basis of ongoing tests and resulting improvements. Please inform yourself regularly
about current versions of the instructions, bavarianDEMON rmware and any software.
The manufacturer provides no warranty for operability and usefulness in specic applications
The manufacturer is not liable for errors in this documentation and resulting damages in connection with equipment, performance
or use of the material.
18

Foam tape ‚Acro‘ ACP (3 pcs) No. 96097
Foam tape ‚Soft‘ ACP (3 pcs) No. 96098
Cable loom L150 ACP (150mm) No. 96099
Cable loom L250 ACP (250mm) No. 96100
Governor sensor (electric, in development) No. xxxxx
Bluetooth module (in development) No. xxxxx
ACCESSORY
19

SERVICE AND INQUIRIES
and lists of authorised dealers, e-mail contact, etc.: see our webpage www.bavarianDEMON.com
CAPTRON Electronic GmbH
Johann-G.-Gutenberg-Str. 7
D-82140 Olching
Germany
Fon +49 8142 4488 -0
Fax +49 8142 4488 -100
VERSION 1.2
Hiermit erklärt die CAPTRON Electronic GmbH, dass sich dieses Gerät in Übereinstimmung mit den grundlegenden Anforderungen
und anderen relevanten Vorschriften der entsprechenden CE Richtlinien bendet. Die Original-Konformitätserklärung nden Sie
im Internet unter www.captron.com
CAPTRON Electronic GmbH hereby declares that this device conforms to the basic requirements and other relevant regulations of
corresponding CE directives. The original Conformity Declaration can be found on the Internet at www.captron.com.
Par la présente, la Sté CAPTRON Electronic GmbH, declare que cet appareil répond aux exigences fondamentales et à d’autres
prescriptions signicatives des directives CE correspondantes de la Communauté européenne. L’original de la declaration de
conformité se trouve dans l’Internet sur le site www.captron.com.
CAPTRON Electronic GmbH, declara que este aparato cumple con las exigencias básicas y otros reglamentos relevantes de la
norma CE correpondiente. La declaración de conformidad original, la puede encontrar en internet en www.captron.com.
Con la presente, la CAPTRON Electronic GmbH dichiara che questo apparecchio è conforme con i requisiti e le altre disposizioni
essenziali della direttiva CE corrispondente. La dichiarazione originale di conformità è disponibile all‘indirizzo www.captron.com.
Firma CAPTRON Electronic GmbH tímto prohlašuje, že tento p ístroj je v souladu se základními požádavky a jinými relevantními p
edpisy odpovídajících sm rnic CE. Originální prohlášení o konformit naléznete v internetu pod adresou www.captron.com.
D
GB
F
E
I
CSZ
IMPRINT
20
Table of contents