Aycorn AY-L1-10-UK User manual

Magnetic
Safety Locks
Model AY-L1-10-UK
Instruction Manual | Mode d’emploi
Bedienungsanleitung | Manuale di istruzioni
Manual de instrucciones
Important Instructions - retain for future use
Thank you for choosing to purchase a product from Aycorn.
Please read the entire manual carefully prior to first use and
keep in a safe place for future reference.

2
To be installed on the door/drawer of your furniture.
Zur Installation an der Tür/Schublade Ihrer Möbel.
Da installare sull’anta/cassetto del tuo mobile.
Para instalar en la puerta/cajón de sus muebles.
À installer sur la porte/tiroir de votre meuble.
Te monteren op de deur/lade van je meubilair.
Installeras på luckan/lådan till dina möbler.
10 x locks/Schlösser/serrature/cerraduras/sécurités
To be installed inside your furniture.
Zum Einbau in Ihre Möbel.
Da installare all’interno dei tuoi mobili.
Para instalar dentro de sus muebles.
À installer à l’intérieur de votre mobilier.
Te installeren in je meubilair.
För att installeras inuti dina möbler.
Contents
Place on the outside of your cabinet to unlock your locks.
NOTE: Remove the key from the key holder before use.
An der Außenseite Ihres Schranks befestigen, um die Schlösser zu entriegeln.
HINWEIS: Entfernen Sie den Schlüssel vor Gebrauch aus dem Schlüsselhalter.
Posizionale all’esterno del tuo armadio per sbloccare le serrature.
NOTA: Rimuovere la chiave dal portachiavi prima dell’uso.
Colóquelas en el exterior de su armario para desbloquear sus cerraduras.
NOTA: Saque la llave del porta llaves antes de usarla.
À placer à l’extérieur de l’armoire pour déverrouiller vos serrures.
REMARQUE: retirez la clé du porte-clés avant utilisation.
Connected to the magnetic keys – remove before using the keys.
An die Magnetschlüssel angeschlossen – vor Verwendung der Schlüssel entfernen.
Collegato alle chiavi magnetiche - rimuovere prima di utilizzare le chiavi.
Conectados a las llaves magnéticas - quitar antes de usar las llaves.
Connectés aux clés magnétiques - à retirer avant d’utiliser les clés.
Verbonden met de magnetische sleutels - verwijder deze voordat je de sleutels gebruikt.
Ansluten till magnetnycklarna - ta bort dem innan du använder nycklarna.
10 x catches/Verschluss/fermi/pestillos/crochets
2 x magnetic keys/Magnetschlüssel/chiavi magnetiche/llaves magnéticas/
clés magnétiques/magnetische sleutels
2 x key holders/Schlüsselhalter/portachiavi/llaveros/porte-clés
3

English | 54
To be used if the adhesive is damaged.
Wird verwendet, wenn der Klebstoff beschädigt ist.
Da utilizzare se l’adesivo è danneggiato.
Para usar si el adhesivo está dañado.
À utiliser si l’adhésif est endommagé.
Te gebruiken als de lijm beschadigd is.
Används om limmet är skadat.
Spare 3m adhesive/Ersatz 3m-Kleber/Adesivo di ricambio da 3 m/Adhesivo de
repuesto de 3m/Adhésif de rechange 3m
To help with installation.
Zur Hilfe bei der Installation.
Per facilitare l’installazione.
Para ayudar con la instalación.
Pour faciliter l’installation.
Ter ondersteuning van de installatie.
För att hjälpa till med installationen.
1 x applicator/Applikator/applicatore/aplicador/applicateur
Safety Instructions
CAUTION:
• This product is not a toy.
• Please stop using if broken or damaged.
• Product is a deterrent and not a replacement for adult supervision.
• Check product regularly to ensure safety is maintained.
• Keep magnetic key stored away from the reach of children.
• Strong magnet – keep away from credit cards, digital storage devices
and pacemakers.
Welcome to your new Aycorn magnetic safety lock system!
Nearly all problems with child-proofing locks are due to incorrect installation,
but we are here to help. Please view our installation video by scanning the QR
code below or visiting www.aycorn.com/user-guide, and read these instructions
carefully before installing your locks.
If you continue to have any problems, please contact our customer care team
Scan to watch our installation video.
Installation tips:
Before installation
Important: this product can be installed on most cabinets and drawers, but each
piece of furniture is slightly different. Please check and understand your furniture
before you start:
Magnetic Safety Locks
Important Instructions - Keep for future use

6 | English English | 7
Door/drawer closes on the inside of the frame
Install lock flush to the edge
x
x
Cabinet Style 2: INSET
On inset cabinets, the doors/drawers sit inside the furniture (see image below).
When installing on inset cabinets, use a ruler to measure the thickness of the
door/drawer and install the catches the same distance away from the edge
of the furniture.
• Your locks will work when installed in three directions (see image).
• For best results on thicker doors, please install vertically with the hook
facing upwards.
• Your magnetic keys will work on doors up to 38mm thick (1.5”). Please check
that the magnet works through your door before beginning.
• Your locks have a LOCK and UNLOCK mode. They will arrive in UNLOCK mode.
To push the locks into LOCK mode, push the hook down, away from you,
until it clicks. In LOCK mode, the magnetic key can move the hook.
• The hook and the catch should have a small space between them when
locked to ensure there is enough space for the hook to “detach” when
unlocked.
Installation
Step 1: Clean & dry the installation area.
Step 2: Ensure the lock is in the ‘UNLOCK’ position. The magnetic key should NOT
be able to move to lock.
Cabinet Style 1: OVERLAY
On overlay cabinets, the doors/drawers sit in front of the furniture wall (see image
below). When installing on overlay cabinets, ensure the locks are installed flush
to the edge of inside of the furniture.

8 | English English | 9
2
Step 4: Clip the catch face down into the top of the applicator.
Step 5: Remove the film from the adhesive on the back of the lock and the back
of the catch.
Step 6: Firmly press the side with the catch to the inside of the cabinet. Ensure
that when the door closes, the side with the lock will stick to the door. For overlay
cabinets ensure that it is flush to the edge so that the locks stick to the inside of
the cabinet door. For inset cabinets, begin by measuring the thickness of your
door. Ensure the catch is placed this measurement away from the edge so that
the cabinet door will be able to close properly.
Step 7: Open the door. The lock should be attached to the inside of the door. If
the lock is not attached to the door, the catch and applicator were placed too
far back inside the cabinet. Move the catch closer to the edge of the cabinet.
Step 3: Insert the lock into the applicator provided.
Overlay Cabinets: Flush to
the edge
Inset Cabinets: Door width
measurement gap

10 | English English | 11
Step 10: Close the door/drawer. Do not leave the magnetic key inside.
Your cupboard is now locked shut and safe.
Note: for best results please leave the locks in
UNLOCKED mode for 24hrs before using to allow
the adhesive to fully set.
Note: screws are not required for standard installation as the adhesive is very strong.
24h
To open your locks, simply place the magnetic key over the lock and pull the
door/drawer simultaneously.
If the door does not open, check:
1. The magnetic key is being placed in the correct location. Your pack
includes small padlock stickers to stick on the outside of your
door/drawer as a reminder of where the lock is located.
2. The door is not thicker than the maximum dimensions supported
(38mm/1.5”).
Key storage
Your magnetic key can be stored safely on most surfaces. To install:
• Remove the label from the back of the key holder.
• Place the key holder high and safe from access by children.
• Attach the key by placing it against the holder and gently rotating
it clockwise.
Scan me
For more information on installation visit aycorn.com/user-guide or contact
Step 9: Engage the hook on your lock to the LOCK position. This will allow
the magnetic key to move the hook.
Step 8: Remove the applicator from the catch. Opening the door
Important: Your magnetic key is attached to a key holder. Twist the key to remove
it before use to increase the magnetic reach.

12 | Deutsche Deutsche | 13
VORSICHT:
• Dieses Produkt ist kein Spielzeug.
• Verwenden Sie es bitte nicht mehr, wenn es kaputt oder beschädigt ist.
• Das Produkt dient der Abschreckung und ist kein Ersatz für die
Beaufsichtigung durch Erwachsene.
• Überprüfen Sie das Produkt regelmäßig, um die Sicherheit zu gewährleisten.
• Bewahren Sie den Magnetschlüssel außerhalb der Reichweite von Kindern auf.
• Starker Magnet – Halten Sie ihn von Kreditkarten, digitalen Speichergeräten
und Herzschrittmachern fern.
Willkommen zu Ihrem neuen magnetischen Aycorn-Sicherheitsschloss!
Fast alle Probleme mit Kindersicherungen sind auf eine fehlerhafte Installation
zurückzuführen, aber wir sind hier, um Ihnen zu helfen. Sehen Sie sich unser
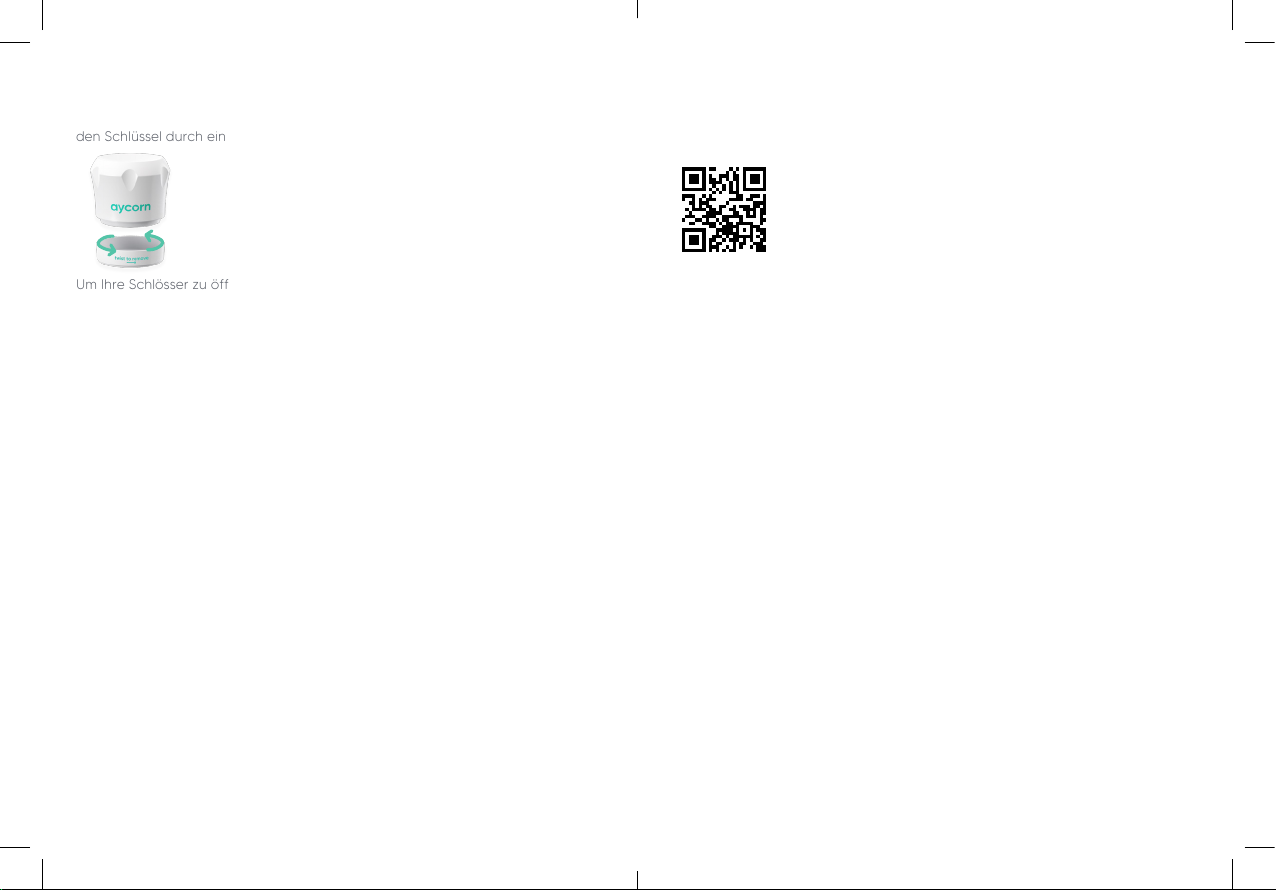
Installationsvideo an, indem Sie den folgenden QR-Code scannen oder unter
www.aycorn.com/user-guide, und lesen Sie diese Anweisungen sorgfältig durch,
bevor Sie Ihre Schlösser installieren.
Wenn Sie weiterhin Probleme haben, wenden Sie sich bitte per E-Mail
Magnetische Sicherheitsschlösser
Wichtige Anweisungen - Für zukünftige Verwendung aufbewahren
Sicherheitshinweise
Scannen Sie, um unser Installationsvideo zu sehen.
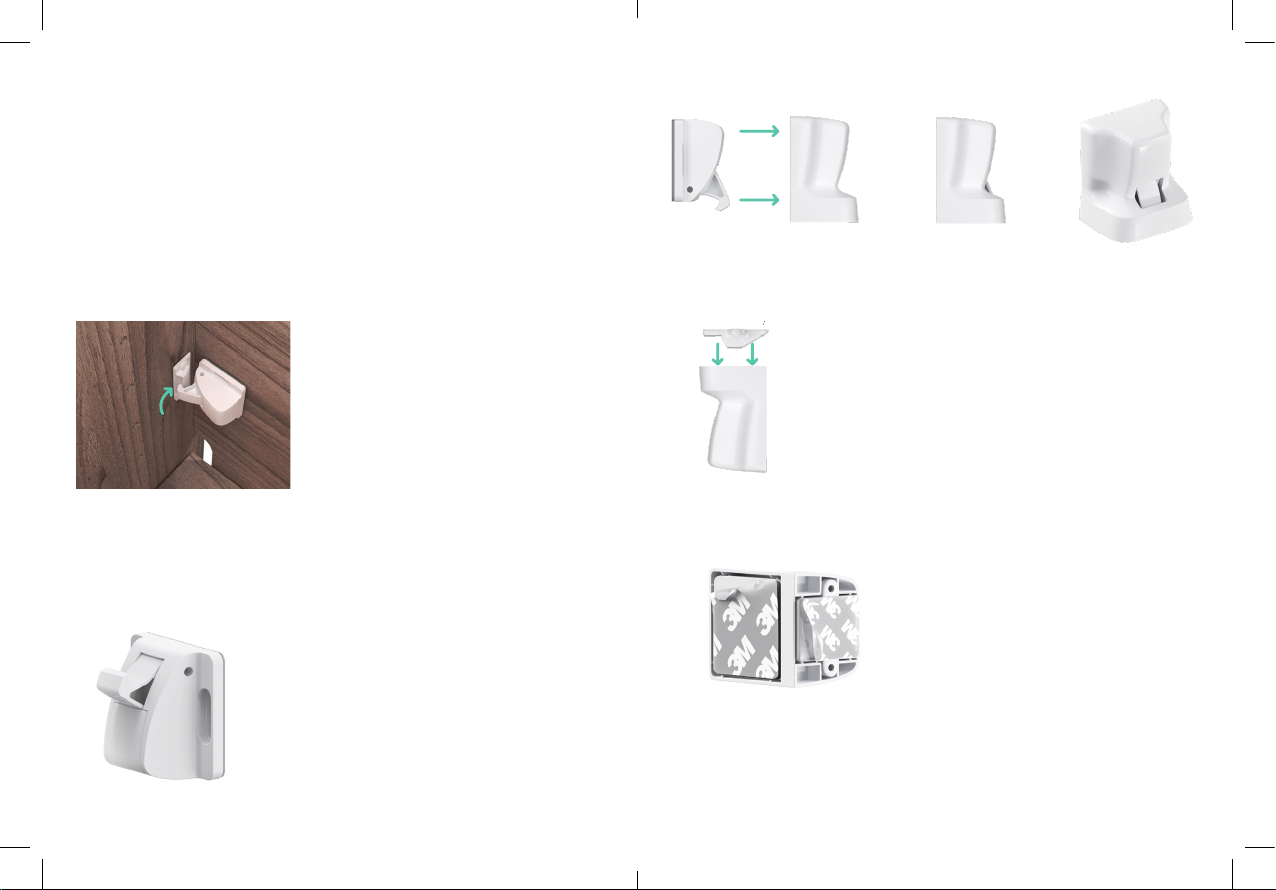
Installationstipps:
Vor der Installation
Wichtig: Dieses Produkt kann in den meisten Schränken und Schubladen installiert
werden, aber jedes Möbelstück ist unterschiedlich. Bitte machen Sie sich vor dem
Beginn mit Ihrem Möbelstück vertraut.
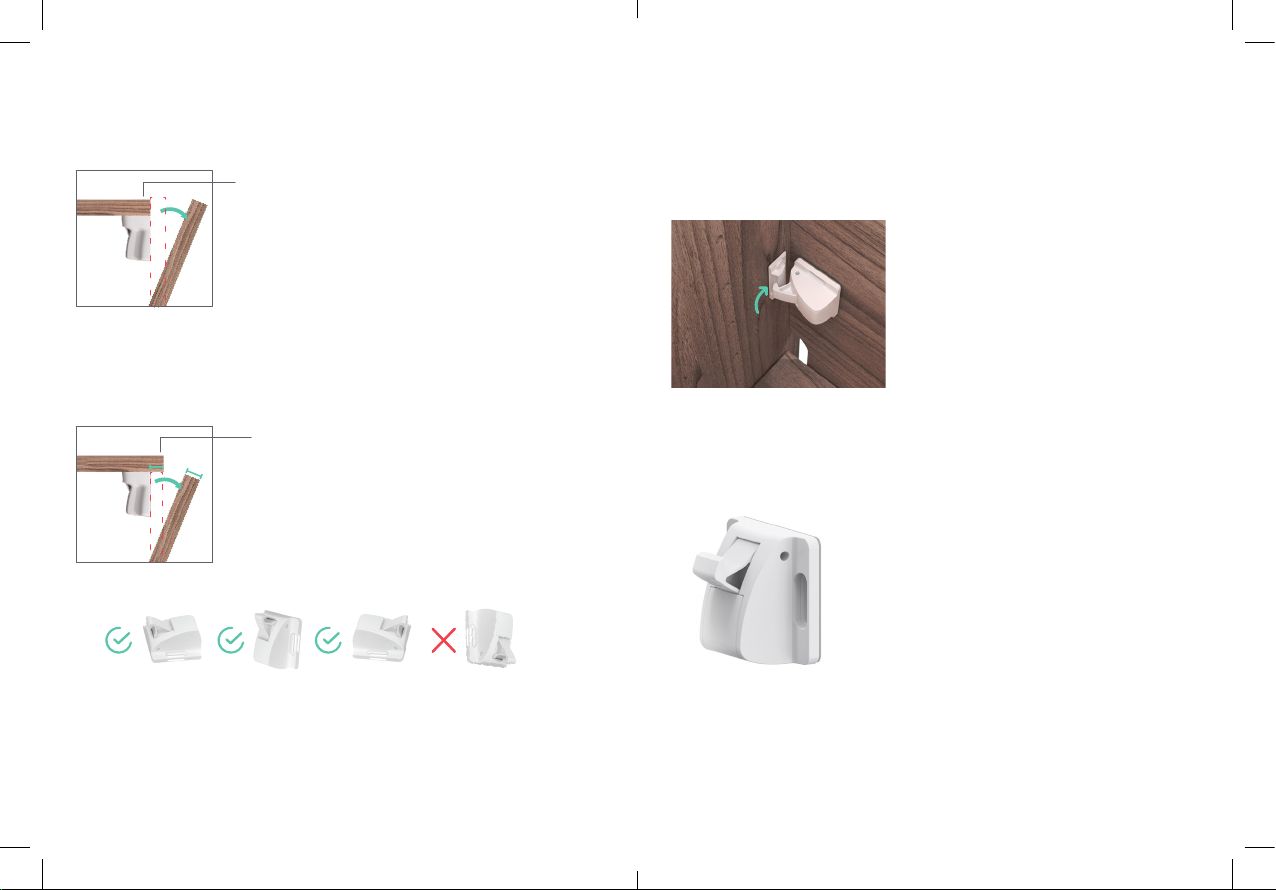
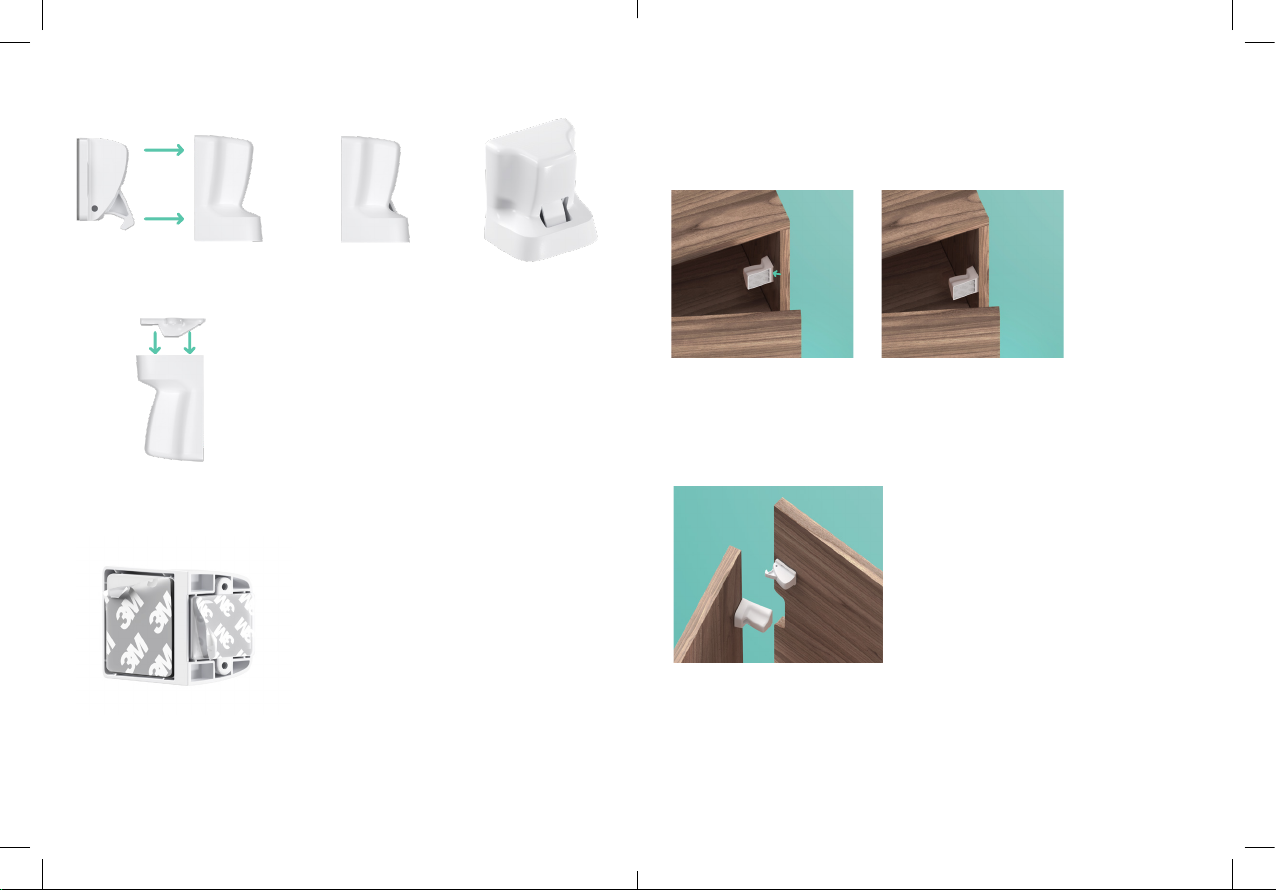
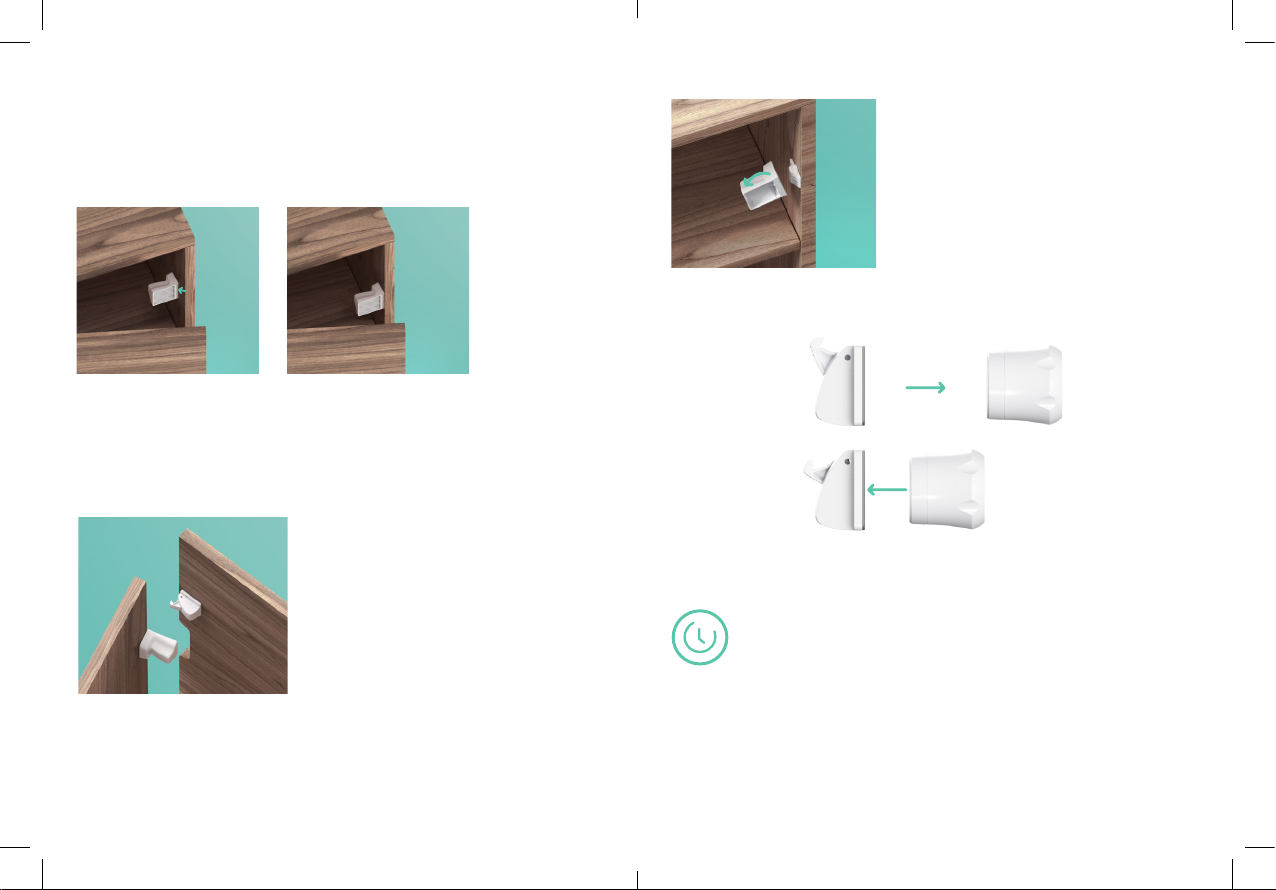
Schranktyp 1: OVERLAY
Bei Overlay-Schränken decken die Türen/Schubladen die Möbelwand ab (siehe
Bild unten). Stellen Sie bei der Installation in Overlay-Schränken sicher, dass die
Schlösser bündig mit der Innenseite des Möbels installiert sind.
Tür/Schublade schließt bündig mit der Innenseite des
Rahmens
Installieren Sie das Schloss bündig mit der Kante
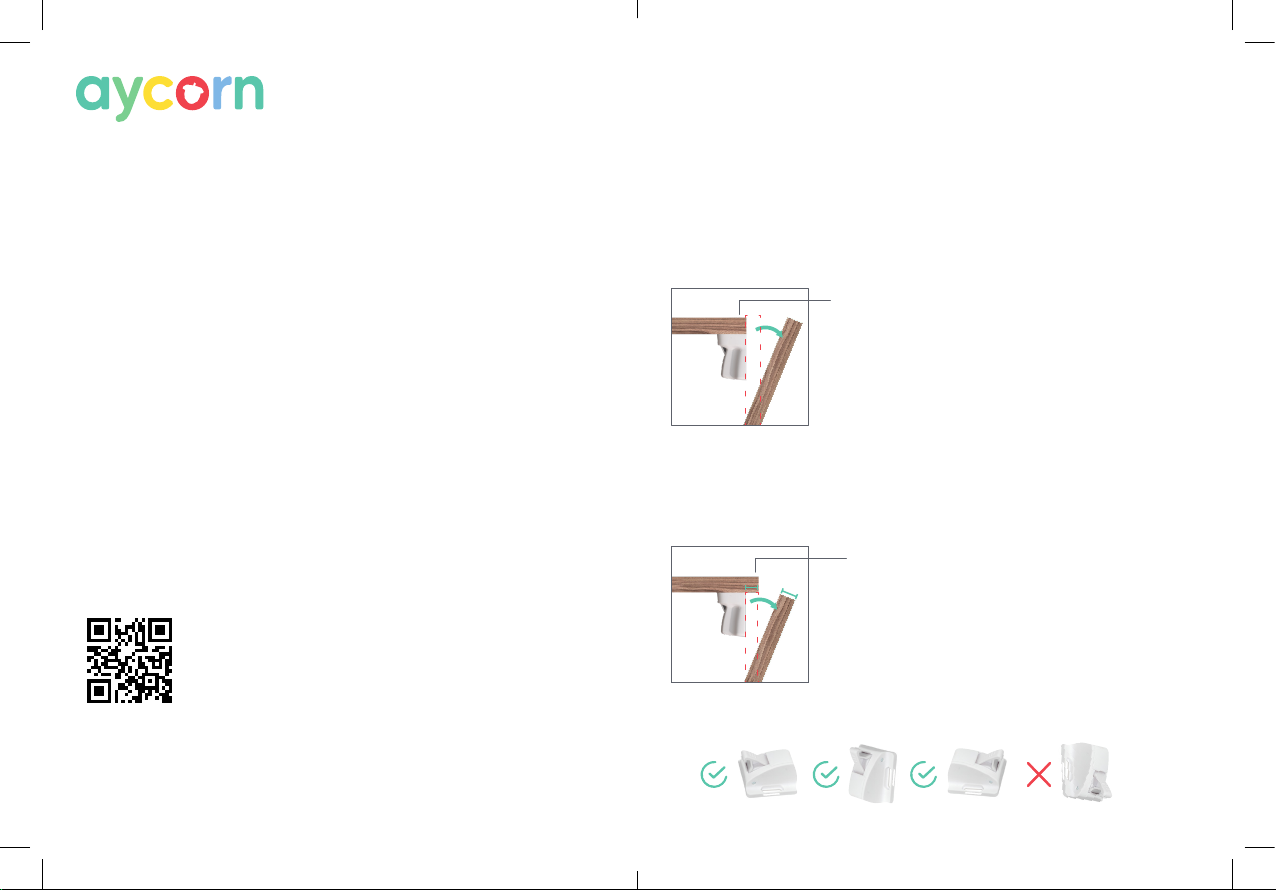
Schrankstil 2: EINSCHUB
Bei Einschubschränken sitzen die Türen/Schubladen im Inneren der Möbel (siehe
Bild unten). Messen Sie bei der Installation in Einschubschränken mit einem Lineal
die Dicke der Tür/Schublade und installieren Sie die Verschlüsse im gleichen
Abstand vom Rand des Möbelstücks.
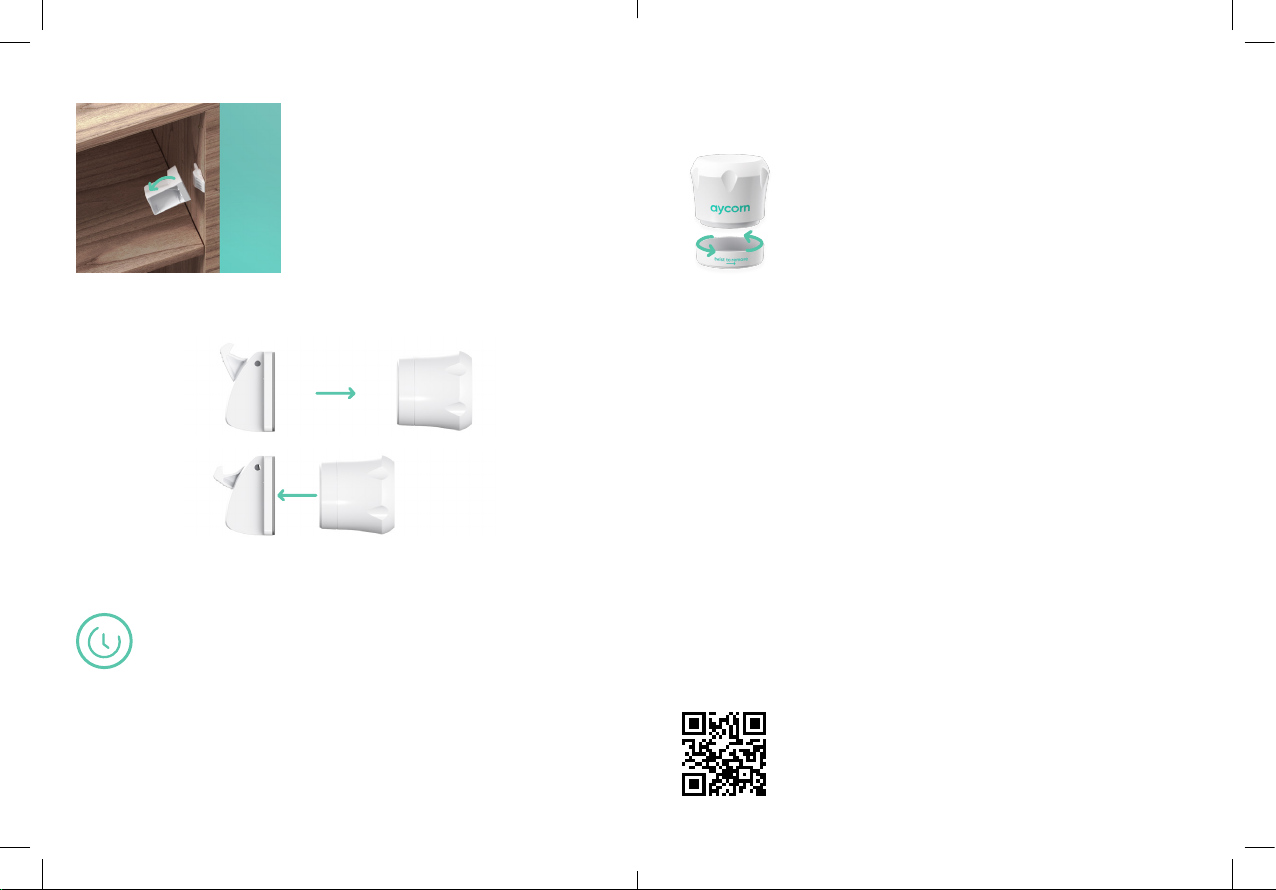
• Ihre Schlösser funktionieren, wenn sie in einer der folgenden Ausrichtungen
installiert werden (siehe Abbildung).
x
x

14 | Deutsche Deutsche | 15
Schritt 1: Reinigen und trocknen Sie den Installationsbereich.
Schritt 2: Stellen Sie sicher, dass sich das Schloss in der Position ‘UNLOCK’
befindet. Mit dem Magnetschlüssel sollte man die Verriegelung NICHT bewegen
lassen.
• Auf dickeren Türen sollten Sie die Schlösser vertikal installieren, mit dem
Haken nach oben.
• Ihre Magnetschlüssel funktionieren an Türen mit einer Dicke von bis zu
38 mm (1,5”). Bitte überprüfen Sie, ob der Magnet durch Ihre Tür funktioniert,
bevor Sie beginnen.
• Ihre Schlösser haben einen LOCK- und UNLOCK-Modus. Sie werden
im UNLOCK-Modus geliefert. Um die Schlösser in den LOCK-Modus
zu schieben, drücken Sie den Haken nach unten, von Ihnen weg, bis Sie
ein Klicken hören. Im LOCK-Modus kann der Haken mit dem Magnetschlüssel
bewegt werden.
• Zwischen Haken und Verschluss sollte im verriegelten Zustand ein kleiner
Abstand bestehen, damit genügend Platz vorhanden ist, damit sich der
Haken beim Entriegeln „lösen“ kann.
Installation
Schritt 3: Setzen Sie das Schloss in den mitgelieferten Applikator ein.
Schritt 4: Klemmen Sie den Verschluss mit der Vorderseite nach unten in die
Oberseite des Applikators.
Schritt 5: Entfernen Sie die Folie vom Kleber auf der Rückseite des Schlosses und
der Rückseite des Verschlusses.

16 | Deutsche Deutsche | 17
Schritt 6: Drücken Sie die Seite mit der Raste fest in das Gehäuseinnere. Stellen
Sie sicher, dass beim Schließen der Tür die Seite mit dem Schloss an der Tür
haften bleibt. Bei aufliegenden Schränken auf Kantenbündigkeit achten, damit
die Schlösser an der Innenseite der Schranktür haften bleiben. Beginnen Sie bei
Einbauschränken damit, die Dicke Ihrer Tür zu messen. Stellen Sie sicher, dass die
Sperre dieses Maß von der Kante entfernt platziert ist, damit die Schranktür richtig
schließen kann.
Schritt 7: Öffne die Tür. Das Schloss sollte an der Innenseite der Tür angebracht
werden. Wenn das Schloss nicht an der Tür befestigt ist, wurden der Verschluss
und der Applikator zu weit hinten im Schrank platziert. Schieben Sie die Sperre
näher an die Schrankkante.
Schritt 8: Entfernen Sie den Applikator aus der Halterung.
Schritt 9: Rasten Sie den Haken an Ihrem Schloss in die Position LOCK ein.
Dadurch kann der Magnetschlüssel den Haken bewegen.
Schritt 10: Schließen Sie die Tür/Schublade. Lassen Sie den Magnetschlüssel nicht
im drinnen liegen. Ihr Schrank ist jetzt verschlossen und sicher.
Hinweis: Um beste Ergebnisse zu erzielen, lassen Sie die Schlösser
vor der Verwendung 24 Stunden lang im UNLOCKED-Modus,
damit der Klebstoff vollständig aushärten kann.
Hinweis: Für die Standardinstallation sind keine Schrauben erforderlich, da der
Klebstoff sehr stark ist.
24h
Overlay-Schränke:
Randbündig
Einschubschränke: Türbreite
Messspalt

18 | Deutsche Deutsche | 19
Die Tür öffnen
Wichtig: Ihr Magnetschlüssel ist an einem Schlüsselhalter befestigt. Entfernen Sie
den Schlüssel durch eine Drehung, um die magnetische Reichweite zu erhöhen.
Um Ihre Schlösser zu öffnen, legen Sie einfach den Magnetschlüssel über das
Schloss und ziehen Sie gleichzeitig an der Tür/Schublade.
Wenn sich die Tür nicht öffnet, überprüfen Sie folgendes:
1. Der Magnetschlüssel wurde an der richtigen Stelle verwendet. Im
Lieferumfang sind kleine Vorhängeschloss-Aufkleber enthalten, die an der
Außenseite Ihrer Tür/Schublade angebracht werden, um daran zu erinnern,
wo sich das Schloss befindet.
2. Die Tür ist nicht dicker als die maximal zulässige Stärke 38 mm/1,5 Zoll).
Schlüsselaufbewahrung
Ihr Magnetschlüssel kann auf den meisten Oberflächen sicher aufbewahrt
werden. Installation:
• Entfernen Sie das Etikett von der Rückseite des Schlüsselhalters.
• Bewahren Sie den Schlüsselhalter an einer hohen, schwer erreichbaren
Stelle auf, wo er sich außerhalb der Reichweite von Kindern befindet.
• Befestigen Sie den Schlüssel, indem Sie ihn gegen den Halter legen und
ihn vorsichtig im Uhrzeigersinn drehen.
Scanne mich
Weitere Informationen zur Installation erhalten Sie unter aycorn.com/user-guide

20 | Italiano Italiano | 21
Consigli per l’installazione:
Prima dell’installazione
Importante: il prodotto può essere installato sulla maggior parte degli armadi
e dei cassetti, ma ciascun mobile è leggermente diverso.
Si prega di controllare e comprendere i mobili prima di iniziare:
Armadio Stile 1: SOVRAPPOSIZIONE
Sugli armadi sovrapposti, le ante/cassetti si trovano davanti alla parete del
mobile (vedi immagine sottostante). Quando si procede con l’installazione
in armadi sovrapposti, assicurarsi che le serrature siano installate a filo con
il bordo interno del mobile.
Installazione della serratura a filo con il bordo
L’anta/cassetto si chiude all’interno del telaio
Armadio stile 2: A INCASSO
Negli armadi a incasso, le ante/cassetti si trovano all’interno del mobile (vedi
immagine sottostante). Quando si procede con l’installazione in armadi a incasso,
utilizzare un righello per misurare lo spessore della porta/cassetto e installare
i fermi alla stessa distanza dal bordo del mobile.
x
x
ATTENZIONE:
• Il prodotto non è un giocattolo.
• Interrompere l’utilizzo del prodotto se presenta segni di rottura o di
danneggiamento.
• Il prodotto è un deterrente e non un sostituto della supervisione di un adulto.
• Controllare regolarmente il prodotto per garantire il mantenimento della
sicurezza.
• Conservare la chiave magnetica lontano dalla portata dei bambini.
• Forte magnete: tenere lontano da carte di credito, dispositivi di
archiviazione digitale e pacemaker.
Benvenuto nel tuo nuovo sistema di chiusura magnetica di sicurezza Aycorn!
Quasi tutti i problemi con le serrature a prova di bambino sono dovuti
a un’installazione errata, noi però, siamo qui per aiutarti. Guarda il nostro video
di installazione scansionando il codice QR che trovi qui sotto o visitando
www.aycorn.com/user-guide e leggi attentamente le presenti istruzioni prima
di installare le serrature.
Serrature magnetiche di sicurezza
Istruzioni importanti - Conservare per un utilizzo futuro
Istruzioni di sicurezza
Se il problema persiste, contatta il nostro team di assistenza clienti inviando
Scansiona per vedere il nostro video di installazione.

22 | Italiano Italiano | 23
Installazione
Passaggio 1: Pulire e asciugare l’area di installazione.
Passaggio 3: Inserire il blocco nell’applicatore fornito.
Passaggio 4: Fissare il fermo a faccia in giù nella parte superiore dell’applicatore.
Passaggio 2: Assicurarsi che il lucchetto sia in posizione “UNLOCK”. La chiave
magnetica NON deve essere in grado di muoversi per bloccare.
• Le serrature funzioneranno se installate in tre direzioni (vedi immagine).
• Per ottenere i migliori risultati su porte più spesse, installare verticalmente
con il gancio rivolto verso l’alto.
• Le chiavi magnetiche funzionano su porte di spessore massimo fino
a 38 mm (1,5”). Prima di iniziare, verificare l’effettivo funzionamento
del magnete attraverso l’anta.
• Le serrature hanno modalità LOCK e UNLOCK. Verranno fornite in modalità
UNLOCK. Per spostare le serrature in modalità LOCK, spingere il gancio
verso il basso, allontanandolo fino a quando non scatterà. In modalità
LOCK, la chiave magnetica può spostare il gancio.
• Quando sono in posizione di blocco, tra il gancio e il fermo deve
intercorrere un piccolo spazio di tolleranza. Ciò serve a garantire la
presenza di uno spazio sufficiente a consentire il “distacco” del gancio
quando viene sbloccato.

24 | Italiano Italiano | 25
Passaggio 8: Rimuovere l’applicatore dal fermo.
Passaggio 7: Apri la porta. La serratura deve essere fissata all’interno della
porta. Se la serratura non è fissata alla porta, il fermo e l’applicatore sono stati
posizionati troppo indietro all’interno dell’armadio. Avvicinare il fermo al bordo
dell’armadio.
Passaggio 5: Rimuovere la pellicola dall’adesivo sul retro della serratura e sul
retro del fermo.
Passaggio 6: Premere con decisione il lato con il fermo all’interno dell’armadio.
Assicurarsi che quando la porta si chiude, il lato con la serratura aderisca alla
porta. Per gli armadi sovrapposti assicurarsi che sia a filo con il bordo in modo
che le serrature aderiscano all’interno dell’anta dell’armadio. Para gabinetes
superpuestos, asegúrese de que esté al ras del borde para que las cerraduras
se adhieran al interior de la puerta del gabinete. Per gli armadi a incasso, inizia
misurando lo spessore della tua porta. Assicurarsi che il fermo sia posizionato a
questa misura lontano dal bordo in modo che lo sportello dell’armadio possa
chiudersi correttamente.
Armadi a sovrapposizione:
A filo fino al bordo
Armadi a incasso: Distanza
di misurazione della
larghezza della porta

26 | Italiano Italiano | 27
Per aprire le serrature, è sufficiente posizionare la chiave magnetica sopra
la serratura e tirare contemporaneamente l’anta/cassetto.
Se l’anta non si apre, controllare che:
1. La chiave magnetica sia stata collocata nella posizione corretta.
La confezione include piccoli adesivi per lucchetto da applicare all’esterno
dell’anta/cassetto per ricordare dove è stata posizionata la serratura.
2. L’anta non sia di spessore maggiore rispetto alle dimensioni massime
supportate (38 mm/1,5”).
Conservazione delle chiavi
La chiave magnetica può essere riposta in modo sicuro sulla maggior parte
delle superfici. Installazione:
• Rimuovere l’etichetta che si trova sul retro del portachiavi.
• Posizionare il portachiavi in alto e lontano dall’accesso dei bambini.
• Attaccare la chiave posizionandola contro il supporto, facendola ruotare
delicatamente in senso orario.
Scansionami
Per ulteriori informazioni sull’installazione, visitare aycorn.com/user-guide
24h
Passaggio 10: Chiudere l’anta/cassetto. Non lasciare la chiave magnetica
all’interno. Il tuo armadio è ora chiuso a chiave e al sicuro.
Nota: per ottenere i migliori risultati, lasciare lasciare le serrature
in modalità UNLOCKED per 24 ore prima dell’uso per consentire
all’adesivo di fissarsi completamente.
Nota: per l’installazione standard non è necessario applicare alcuna vite,
in quanto l’adesivo è molto forte.
Apertura dell’anta
Importante: La chiave magnetica è attaccata a un portachiavi. Per aumentare
la portata magnetica, ruotare la chiave per rimuoverla prima dell’uso.
Passaggio 9: Attaccare il gancio della serratura nella posizione LOCK.
Ciò consentirà alla chiave magnetica di spostare il gancio.

28 | Español Español | 29
Consejos de instalación:
Importante: este producto se puede instalar en la mayoría de los armarios
y cajones, pero cada mueble es único y requiere una instalación ligeramente
diferente. Por favor revise y comprenda sus muebles antes de comenzar.
Hay dos estilos principales de muebles:
Estilo de armario 1: SUPERPUESTO
En los armarios superpuestos, las puertas/cajones se colocan frente a la pared
de los muebles (vea las imágenes a continuación). Cuando instale en armarios
superpuestos, asegúrese de que las cerraduras estén instaladas al ras del borde
del interior de los muebles.
Instale la cerradura al ras del borde
La puerta/cajón se cierra dentro del marco
x
x
Estilo de armario 2: EMPOTRADO
En los armarios empotrados, las puertas/cajones se colocan dentro de los
muebles (vea las imágenes a continuación). Cuando instale en armarios
empotrados, use una regla para medir el grosor de la puerta/cajón e instale
los pestillos a la misma distancia del borde del mueble.
PRECAUCIÓN:
• Este producto no es un juguete.
• Déjelo de usar si está roto o dañado.
• El producto disuade pero no reemplaza la supervisión de un adulto.
• Compruebe el producto con regularidad para garantizar que se mantenga
la seguridad.
• Mantenga la llave magnética guardada fuera del alcance de los niños.
• Imán potente: manténgalo alejado de tarjetas de crédito, dispositivos
de almacenamiento digital y marcapasos.
¡Bienvenido a su nuevo sistema de bloqueo magnético de seguridad Aycorn!
Casi todos los problemas con las cerraduras a prueba de niños se deben a una
instalación incorrecta, pero estamos aquí para ayudarlo. Vea nuestro video de
instalación escaneando el código QR a continuación o visitando www.aycorn.
com/user-guide, y lea estas instrucciones detenidamente antes de instalar sus
cerraduras.
Cerraduras de seguridad magnéticas
Instrucciones importantes - Conservar para uso futuro
Instrucciones de seguridad
Si continúa teniendo problemas, comuníquese con nuestro equipo de atención
Escanee para ver nuestro video de instalación.

30 | Español Español | 31
Instalación
Paso 1: Limpiar y secar el área de instalación.
Paso 2: Asegúrese de que la cerradura esté en la posición ‘DESBLOQUEO’. La
llave magnética NO debe poder moverse para bloquear.
Paso 3: Inserte la cerradura en el aplicador provisto.
Paso 4: Sujete el pestillo boca abajo en la parte superior del aplicador.
• Sus cerraduras funcionarán cuando se instalen en tres direcciones
(ver imagen).
• Para obtener mejores resultados en puertas más gruesas, instale
verticalmente con el gancho hacia arriba.
• Sus llaves magnéticas funcionarán en puertas de hasta 38 mm de grosor
(1,5”). Verifique que el imán atraviese su puerta antes de comenzar.
• Tus cerraduras tienen un modo de BLOQUEO y DESBLOQUEO. Llegarán
en modo DESBLOQUEO. Para empujar las cerraduras al modo BLOQUEO,
empuje el gancho hacia abajo, lejos de usted, hasta que haga clic. En el
modo BLOQUEO, la llave magnética puede mover el gancho.
• El gancho y el pestillo deben tener un pequeño espacio entre ellos cuando
estén bloqueados para garantizar que haya suficiente espacio para que
el gancho se “suelte” cuando se desbloquee.

32 | Español Español | 33
Paso 7: Abre la puerta. La cerradura debe estar unida al interior de la puerta.
Si la cerradura no está unida a la puerta, el pestillo y el aplicador se colocaron
demasiado atrás dentro del gabinete. Mueva el pestillo más cerca del borde del
gabinete.
Paso 8: Retire el aplicador de la captura.
Paso 5: Retire la película del adhesivo en la parte posterior de la cerradura y la
parte posterior del pestillo.
Paso 6: Presione firmemente el lado con el pestillo hacia el interior del gabinete.
Asegúrese de que cuando la puerta se cierre, el lado con la cerradura se pegará
a la puerta. Para gabinetes superpuestos, asegúrese de que esté al ras del borde
para que las cerraduras se adhieran al interior de la puerta del gabinete. Para
gabinetes empotrados, comience midiendo el grosor de su puerta. Asegúrese
de que el pestillo esté colocado a esta medida del borde para que la puerta del
gabinete pueda cerrarse correctamente.
Armarios superpuestos: Al
ras hasta el borde
Armarios empotrados:
Espacio de medición del
ancho de la puerta

34 | Español Español | 35
Para abrir sus cerraduras, simplemente coloque la llave magnética sobre
la cerradura y tire de la puerta/cajón simultáneamente.
Si la puerta no se abre, compruebe:
1. La llave magnética se coloca en la ubicación correcta. Su paquete incluye
pequeñas pegatinas de candado para pegar en el exterior de su puerta/
cajón como recordatorio de dónde se encuentra la cerradura.
2. La puerta no es más gruesa que las dimensiones máximas admitidas de
38 mm/1,5 ”.
Almacenamiento de llaves
Su llave magnética se puede almacenar de forma segura en la mayoría de las
superficies. Para instalar:
• Retire la etiqueta de la parte posterior del llavero.
• Coloque el llavero en un lugar alto y protegido del acceso de los niños.
• Fije la llave colocándola contra el soporte y girándola suavemente en el
sentido de las agujas del reloj.
Escanéame
Para obtener más información sobre la instalación, visite aycorn.com/user-guide
Paso 10: Cierre la puerta/cajón. No deje la llave magnética dentro. Su armario
ahora está cerrado con llave y seguro.
Nota: para obtener los mejores resultados, deje las cerraduras
en modo DESBLOQUEADO durante 24 horas antes de usarlas
para permitir que el adhesivo se seque por completo.
Nota: no se requieren tornillos para la instalación estándar ya que el adhesivo es
muy fuerte.
Abriendo la puerta
Importante: Su llave magnética está unida a un llavero. Gire la llave para quitarla
antes de usarla para aumentar el alcance magnético.
24h
Paso 9: Enganche el gancho de su candado en la posición BLOQUEO.
Esto permitirá que la llave magnética mueva el gancho.

36 | Français Français | 37
Astuces :
Avant l’installation
Important: ce produit convient à la plupart des armoires et tiroirs, mais chaque
meuble est unique et peut nécessiter une installation légèrement différente.
Veuillez examiner vos meubles avec attention avant de commencer.
Il existe deux catégories de meubles:
Modèle armoire 1: MEUBLES SUPERPOSÉS
Sur des meubles de rangement superposés, les portes/tiroirs se trouvent devant
le mur de soutien (voir images ci-dessous). Le cas échéant, veillez à placer
le système de fermeture à fleur du bord intérieur du meuble.
La porte/tiroir se ferme à l’intérieur du cadre
Installez la serrure au ras du bord
Modèle d’armoire 2: MEUBLE ENCASTRÉ
Dans les meubles encastrés, les portes/tiroirs se trouvent à l’intérieur (voir images
ci-dessous). Lors de l’installation, mesurez l’épaisseur de la porte/du tiroir à l’aide
d’une règle et installez les loquets à la même distance du bord du meuble.
x
x
x
x
ATTENTION:
• Ce produit n’est pas un jouet.
• Cessez de l’utiliser s’il est cassé ou endommagé.
• Ce produit est un moyen de dissuasion. Il ne remplace en aucun cas
la surveillance d’un adulte.
• Vérifiez régulièrement le produit pour en garantir l’efficacité.
• Conservez la clé magnétique hors de portée des enfants.
• Aimant puissant - tenir éloigné des cartes de crédit, des périphériques
de stockage numériques et des stimulateurs cardiaques.
Découvrez votre nouveau dispositif de sécurité magnétique Aycorn !
La plupart des problèmes que posent les systèmes de sécurité pour enfants résultent
d’une mauvaise installation, mais nous sommes là pour vous aider. Merci de consulter
notre vidéo de présentation en scannant le code QR ci-dessous ou en vous rendant
sur notre site www.aycorn.com/user-guide, et de lire attentivement ces instructions
avant de procéder à l’installation du dispositif.
Dispositifs de sécurité magnétiques
Instructions importantes - Conserver pour un usage ultérieur
Consignes de sécurité
Si le problème persiste, veuillez contacter notre service clientèle en envoyant
Scannez pour regarder notre vidéo d’installation.

38 | Français Français | 39
Étape 2: Assurez-vous que le dispositif se trouve en position « UNLOCK ». La clé
magnétique ne doit PAS pouvoir bouger pour verrouiller.
Étape 3: Insérez le verrou dans l’applicateur fourni.
Étape 4: Clipsez le crochet face vers le bas dans le haut de l’applicateur.
• Une fois installé, le dispositif sera opérationnel, dans trois directions
(voir image).
• Pour un résultat optimal sur des portes plus épaisses, installer le dispositif
verticalement, avec crochet vers le haut.
• Vos clés magnétiques fonctionneront sur des portes jusqu’à 38 mm
d’épaisseur (1,5 “). Veuillez vérifier que l’aimant fonctionne à travers votre
porte avant de commencer.
• Il existe deux positions : LOCK et UNLOCK. Le dispositif vous est fourni
en position UNLOCK. Pour passer en position LOCK, poussez le crochet
vers le bas, éloignez-vous, jusqu’à ce qu’il s’enclenche. En position LOCK,
la clé magnétique peut déplacer le crochet.
• Le crochet et le loquet doivent être séparés par un petit espace en position
LOCK. Ainsi, le crochet dispose de suffisamment d’espace pour
se « détacher » s’il est déverrouillé.
Installation
Étape 1: Nettoyez et séchez la zone d’installation.
Table of contents
Languages: