azuga SafetyCam AI User manual

SafetyCam AI
Auxiliary Camera
Installation Guide

1. In-Vehicle installation of Auxiliary Camera
……...…..……………………....…………...……………………Page 2
2. Connect the auxiliary camera to SafetyCam AI
...……….….………………………………………………………Page 3
© 2021 Azuga, Inc. All rights reserved.

In-Vehicle installation of Auxiliary Camera
Note: The auxiliary rear camera requires 12V DC input and has
a rating of IP66 for exterior installation. We would recommend
the installation should be performed by a professional.
Camera wire description:
A single wire from the rear camera splits into 3 different connectors:
Power connector:This is a round power barrel connector socket to power the
camera. Ideally, this requires 12V DC power supply - 5.5 x 2.1mm (no pin)
© 2021 Azuga, Inc. All rights reserved.

Ethernet connector :This is used to connect the camera with an ethernet
connector and which can be removed if needed.
(Note: Cutting the ethernet connector cable must be done after the point where
the initial cable splits into 3 cables).
The device should be connected to a 12V power source which is switched
ON only when ignition power is ON (not constant power)
Restore button:Once powered on, hold the restore button down for 10
seconds to reboot the aux camera to reset the settings to factory default. The
restore button cable must not be removed as it is the only way to return the
camera to factory default on occurrence of an issue.
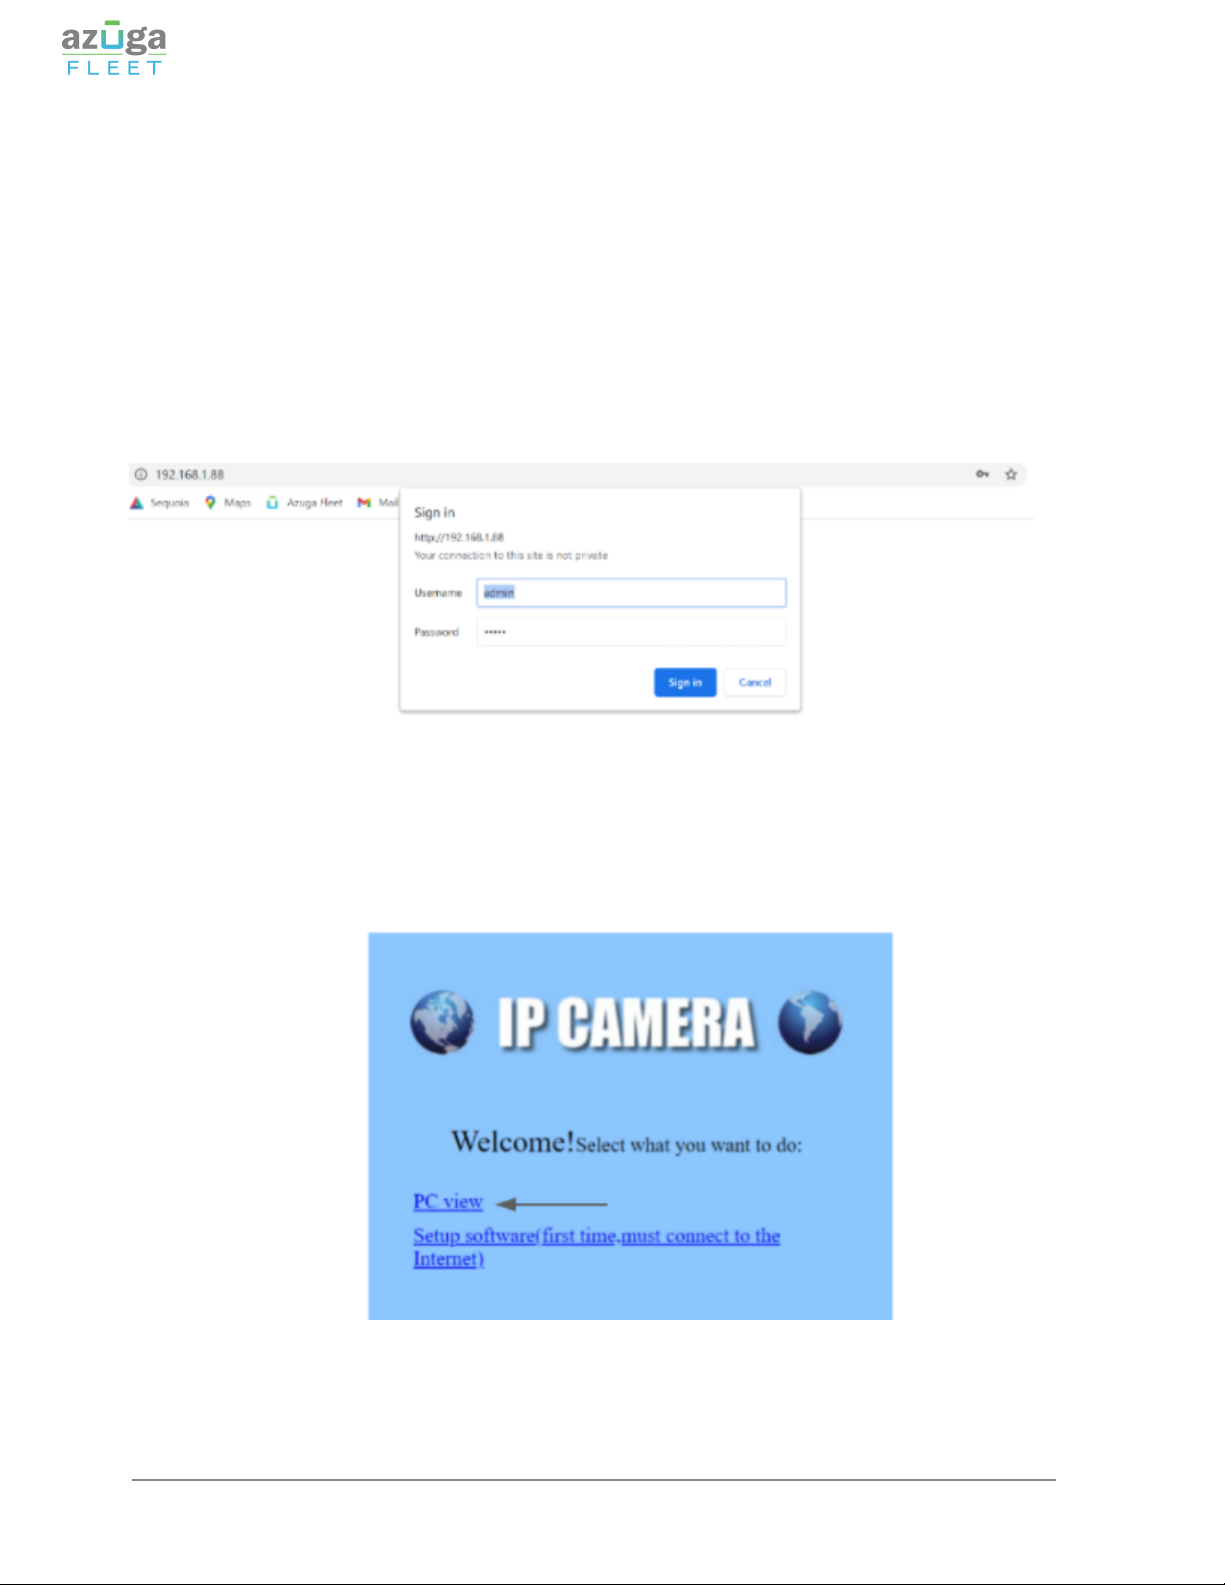
2.Connect the Auxiliary Camera to SafetyCam AI
(using a web browser)
To connect auxiliary cameras to AI camera please follow the below
steps:
Note: To connect an auxiliary camera to WiFi, you need to have
access to the auxiliary camera, a power source, and a computer
or mobile device such as a smartphone or tablet.
1. Ensure the main camera is powered on.
2. Hold down the restore button from the auxiliary camera for 10 sec to reset
the Aux camera.
3. Go to Settings>>WiFi and ensure that Mobile Hotspot is turned On.(Note
the name of camera (i.e. Dash-6154 - the numbers are the last four
numbers of your dashcam's IMEI number, Password 12345678).
© 2021 Azuga, Inc. All rights reserved.

4. Connect the auxiliary camera to a 12V power source.
5. Open the Internet Browser on your device (mobile/computer), and then go
to your wireless connections and wait until IPCAM-XXXX shows up (this
might take up to a minute).
6. Connect to ‘IPCAM-XXXX’ WiFi. Enter the password 01234567.
7. Once the connection is established, type 192.168.1.88 into your Internet
browser.
8. Enter admin in the username and admin in the password fields and click
Login. The auxiliary camera dashboard opens.
9. Click PC View.
© 2021 Azuga, Inc. All rights reserved.

10. To check if the camera video recording angle is correct, from the Settings
bar, click Media and then click on Image to view the live feed of the
connected Auxiliary camera.
11. The video player will display the live video feed from the auxiliary camera.
a) If the camera recording angle is tilted on the screen, please adjust
the camera position by manually adjusting the Auxiliary camera
position.
b) If the camera recording is flipped, please adjust the camera position
manually or Select/Deselect the Flip option to rotate the camera
angle by 180°.
© 2021 Azuga, Inc. All rights reserved.

12. To connect the main camera with the Auxiliary camera, Click Network in
the sub-menu and then click Wireless.
13. In the SSID text area, click on the search button and search for the main
camera name and Click Join to connect.
(Dash-XXXX - The default hotspot consists of 'Dash’ and the last 4 digits
of the IMEI can be found on the main camera's sticker.).
© 2021 Azuga, Inc. All rights reserved.

14. Click Apply after entering the security key WPA2-PSK. WPA Algorithm to
AES, enter the camera's default WiFi hotspot password:12345678.
(Note: Wait up to a minute until right panel of screen turns grey, this
signifies that the install is completed)
© 2021 Azuga, Inc. All rights reserved.

15. Once the connection of the main camera with the Auxiliary camera is
established on the Web portal. Please have the vehicle driven around the
block for a couple of yards to ensure that the Auxiliary camera is
transmitting data to the main camera.
16. To confirm the connection has been established, go to the main camera
screen and click on Settings and then click More Info and scroll down to
see the number of auxiliary cameras connected.
© 2021 Azuga, Inc. All rights reserved.
Other manuals for SafetyCam AI
1
Table of contents
Other azuga Dashcam manuals