B. Braun Omnitest plus User manual

Omnitest®plus
Blood Glucose
Monitoring System
www.omnitest.bbraun.com

The Omnitest®plus system provides a quick and easy way to
measure the blood glucose level. Omnitest®plus could be used for
self-monitoring of blood glucose level by diabetes patients.
It should be used only for testing blood glucose (sugar) and only
with fresh capillary whole blood samples. It should not be used for
the diagnosis of diabetes or for the testing of newborns (neonates).
Do not use Omnitest®plus system for any purpose other than blood
glucose test. The Omnitest®plus system is intended for use outside
the body (in vitro diagnostic use only).
Before using Omnitest®plus meter, read all instructions in
this manual and the additional information given in instruc-
tions for use of the test strips. Practice for accurate and safe
test. You should have commentary recommendation from
your diabetes care professional for the proper use of this
meter and daily management of your diabetes.
Do not change your therapy due to blood glucose results of the
Omnitest®plus system without prior consulting your physician.
Warning
2 3
Important information Content
Omnitest®plus Blood Glucose Monitoring System 4
The Meter, Display Segments 6
Quick Reference 8
Omnitest®plus Blood Glucose Test Strip 12
Code the Meter 14
Battery 16
Checking the Meter Display 17
Check Strip 18
Using Control Solution 19
Set the Meter 24
Set the Buzzer 25
Set the 12 Hour or 24 Hour mode 25
Set the Date and Time 26
Set the Test Result Unit (mg/dL or mmol/L) 27
Set the Temperature Unit (°C or °F) 27
Set the Average Day 28
Set the Alarm 29
Reviewing Your Results 30
Deleting Test Results 31
Collecting a Drop of Blood Sample 32
Testing Your Blood Glucose 35
Maintain Your Blood Glucose Monitor System 44
Troubleshooting 46
Specifications 50
Transfer Test Results to a Computer 53
Blood Glucose Conversion Table 54

5
!Omnitest®plus meter
"One 3V Li-battery (CR2032)
#Check strip
$Omnitest®plus test strips
(may be sold separately)
%Omnitest®plus Control
control solution
(sold separately)
4
Omnitest®plus Blood Glucose Monitoring System
Check your Omnitest®plus system to contain all parts
shown at the outer packaging. If anything is missing,
please return your system to the place of purchase or
contact your nearest B. Braun representative.
!
#
$%
"
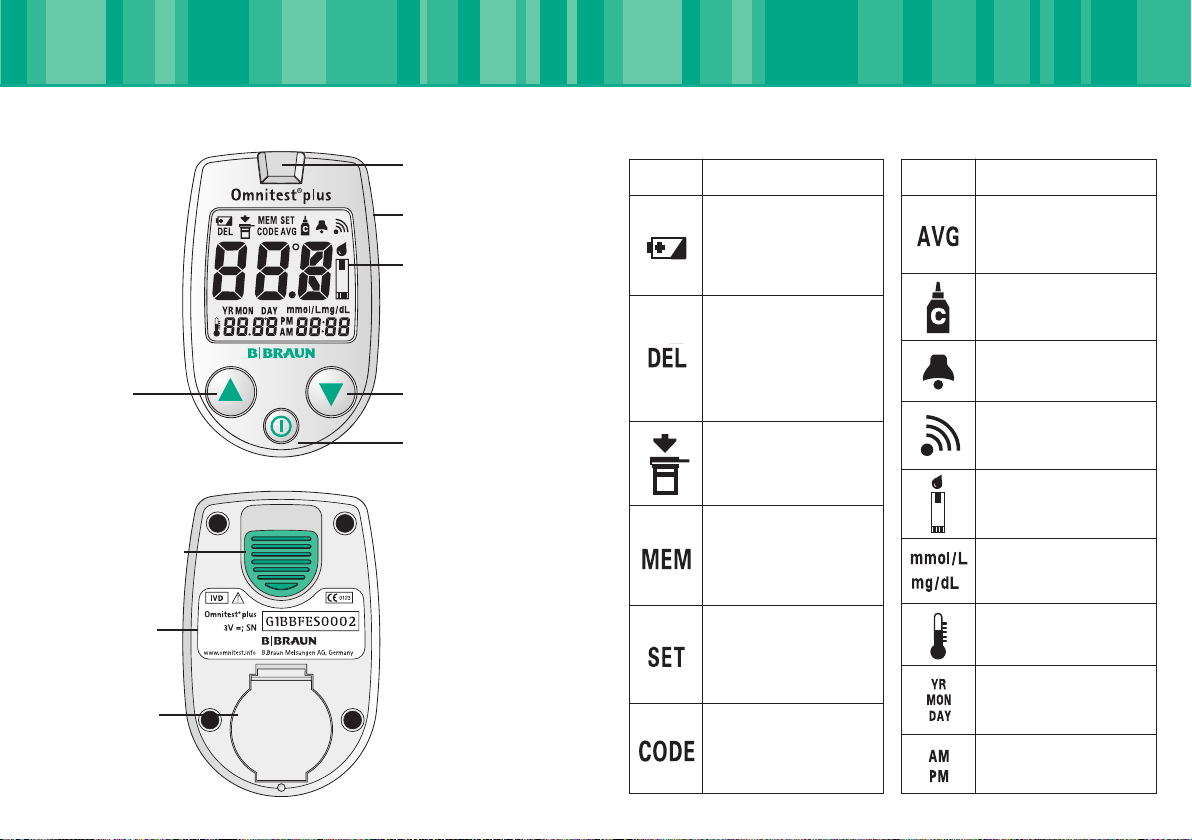
7
Display Segments
6
The Meter
The battery symbol means
the battery is low and
should be changed soon.
The “DEL” mark will
display when you can
delete results from the
meter memory.
Close the test strip
vial cap.
The “MEM” mark will
display while reviewing
the results.
The “SET” mark will
display during ALL meter
setting.
The “CODE” mark will
display while coding the
meter.
Test strip ejector
Test strip port
Product label
Data transfer port
LCD display
Down button
Power +
Select button
Up button
Battery cover
Segment Meaning Segment Meaning
“AVG” is displayed when
average results are shown.
Control solution symbol
Alarm symbol
Buzzer symbol
Sample applying symbol
Test result unit
Temperature symbol
Year
Month
Day
0-12o'clock
12 - 24 o'clock

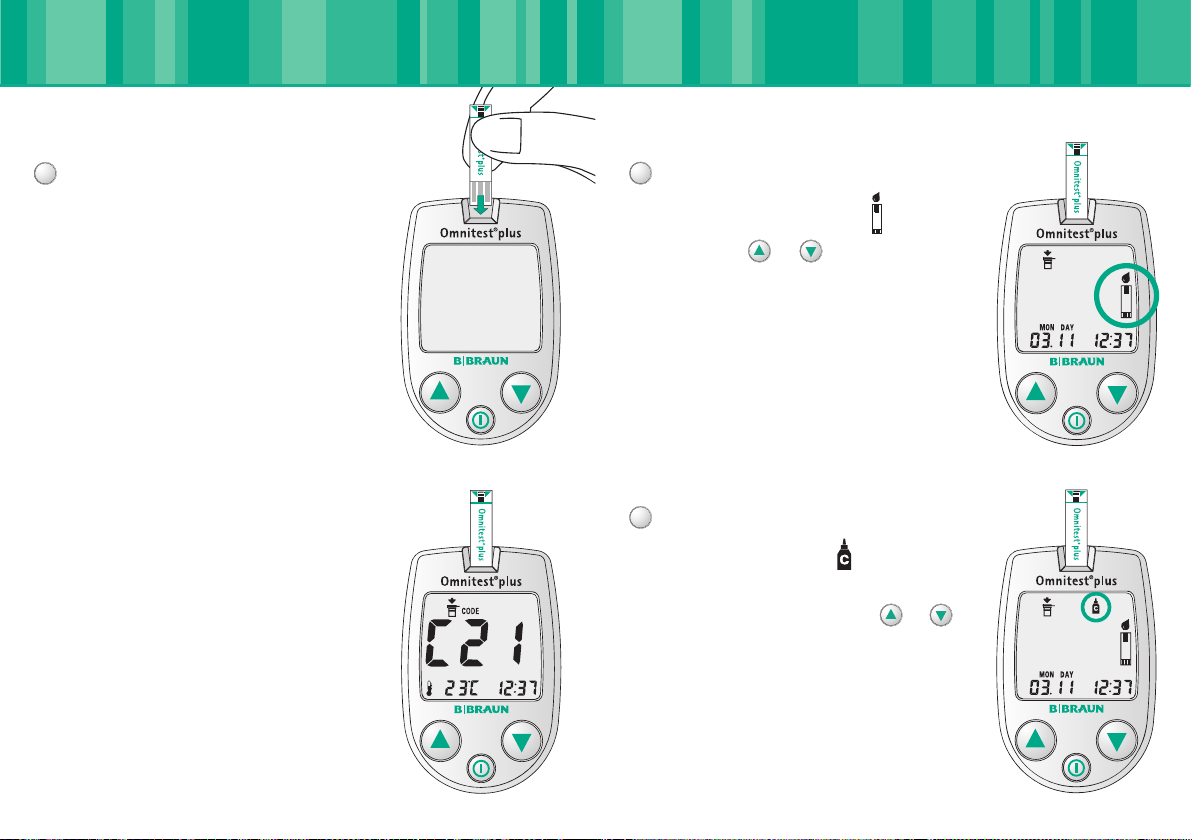
98
Quick Reference
CODE?
1 2
34
3
sec
.
✔

c)
b)
1110
Quick Reference
7 8
5
6
a)
e)
d) f)

Omnitest®plus test strips are only to be used with Omnitest®plus
meter for accurate analysis of your blood glucose level.
Use the test strip exactly as described in the user’s manual for
Omnitest®plus test strips.
13
Storage and Handling:
■Prior to first use. Check that the vial is undamaged and closed.
■Store the Omnitest®plus test strip vials in a cool, dry place
between 2 - 30 °C (36 - 86 °F). Do not refrigerate or freeze. Keep
out of direct sunlight. Do not use test strips which had been sto-
red under inappropriate conditions.
■Store test strips in its original vials only. Do not put the test
strips in new vials or in any other container.
■Close the vial cap tightly immediately after removing an
Omnitest®plus test strip. This keeps the strips fully functional
right up to the expiry date.
12
Omnitest®plus Blood Glucose Test Strip
Please refer to the user’s manual for Omnitest®plus blood
glucose test strip for additional information.
Note
Opening of the
measurement
chamber
Confirmation window
Meter
contacting leads
■Use test strip immediately after removing it from the vial.
■Do not use test strips after the expiration date printed on the
package or vial since it may cause inaccurate results.
■Make a notation of the date on the vial label when you first open
it. Discard remaining Omnitest®plus test strips 3 months after first
opening the vial.
■Avoid getting dirt, food or water on the test strip. Do not handle
test strips with wet hands. All parts of the test strip could be
touched with dry and clean fingers.
■Do not bend, cut, or alter an Omnitest®plus test strip.
■Omnitest®plus test strips are for single use only.
■Do not perform blood glucose tests at temperature below +10 °C
(50 °F) or above +40 °C (104 °F), above 90 % relative humidity.
■Warning! Keep the test strip bottle away from children. A child
could choke on the cap or the test strips. The test strip and the
vial wall contains agents that may be harmful if swallowed.

Code numbers are used to calibrate the Omnitest®plus meter for
accurate results. You must confirm the code number of the test strip
vial with the number shown on the meter, before using Omnitest®
plus test strips.
Insert Omnitest®plus test strip to turn on the meter. The code
number will appear on the display for 3 seconds. Compare the code
number (example; C25) on the meter’s display with the code num-
ber on the test strip vial. If these two code numbers match, you can
start testing. If these two code numbers do not match, you must
code the meter according to the test strip vial code number.
1514
Code the Meter
Without matching the code numbers, you will not get accu-
rate test results of your blood glucose level.
Caution
?
Press button to increase the code number or button to
decrease the code number. The number increases or decreases by
one digit every time you press or button while the code
number appears on the display. The code number increases or
decreases automatically and fast while holding to press or
button.
If you missed to set the right code
number, insert the test strip again.
✔

17
Checking the Meter Display
Each time you enter a new battery, all segments of the display will
appear for 3 seconds. The numbers displayed later are only meant
for internal tests of the electronics.
The following picture shows all possible display segments, so that
you could check that the display is working properly.
16
Change the battery when the battery
icon appears on the display or when
the meter does not power on by any
means.
The meter needs only one 3V Li CR2032
battery. One battery is provided with
the Omnitest®plus meter system. When
changing battery, pay attention to the
polarity, which is printed in the battery
holder of the meter. The plus of the bat-
tery has to face up.
If the new battery is inserted, at first all
segments of the display will be shown.
Thereafter an internal check of the elec-
tronic takes place in the following
seconds.
Correct the date and time setting after
the battery change.
Battery

The check strip is used to prove that the Omnitest®plus meter is
working properly. Insert check strip into meter, facing “
<<<
” up.
Meter will be automatically turned on.
19
Using Control Solution
The Omnitest®plus Control solution is used to check
that the blood glucose monitoring system consisting
of the meter and the test strips is working correctly.
Use only Omnitest®plus Control solution for the
Omnitest®plus monitoring system.
The control solution should be used
■Whenever you suspect the meter or test strip is not
functioning properly.
■If your blood glucose test results are not consistent
with your symptoms or if you think they are not accurate.
■If you have dropped the meter.
■For quality control in the point of care usage.
■For teaching or learning the system.
To perform a control solution test, follow the same test procedure
as for a blood glucose test, substituting control solution for the
drop of blood. For detail instruction, see page 35 “Testing Your
Blood Glucose”.
18
Check Strip
Meter
is ok.
Meter
is not ok.
If an error message is displayed, repeat 2 or 3 times. If it is still not
ok, do not use the meter for blood glucose monitoring. Please con-
tact your local distributor for warranty services. It is recommended
to do this test before first use and always if you suspect the meter
is not properly working.
Insert Test Strip
If the control solution is cold, do not use
until the solution has warmed up to
room temperature. Control solution tests
have to be done in a temperature range
20 – 25 °C (68 - 77 °F). Insert a test strip.
Push the test strip until it will go no fur-
ther without bending the strip. The me-
ter will turn on automatically. Match the
code number to the code printed on the
test strip vial.
1
Control Solution Test Mode
When blood and test strip symbol
appears, press or button to mark
the test as a control solution test in the
meter memory.
Control solution symbol appears on
the display. If you decide not to do a
control solution test, press the or
button again to remove control solution
symbol from the display.
2
3
2120
Using Control Solution
2322
Using Control Solution
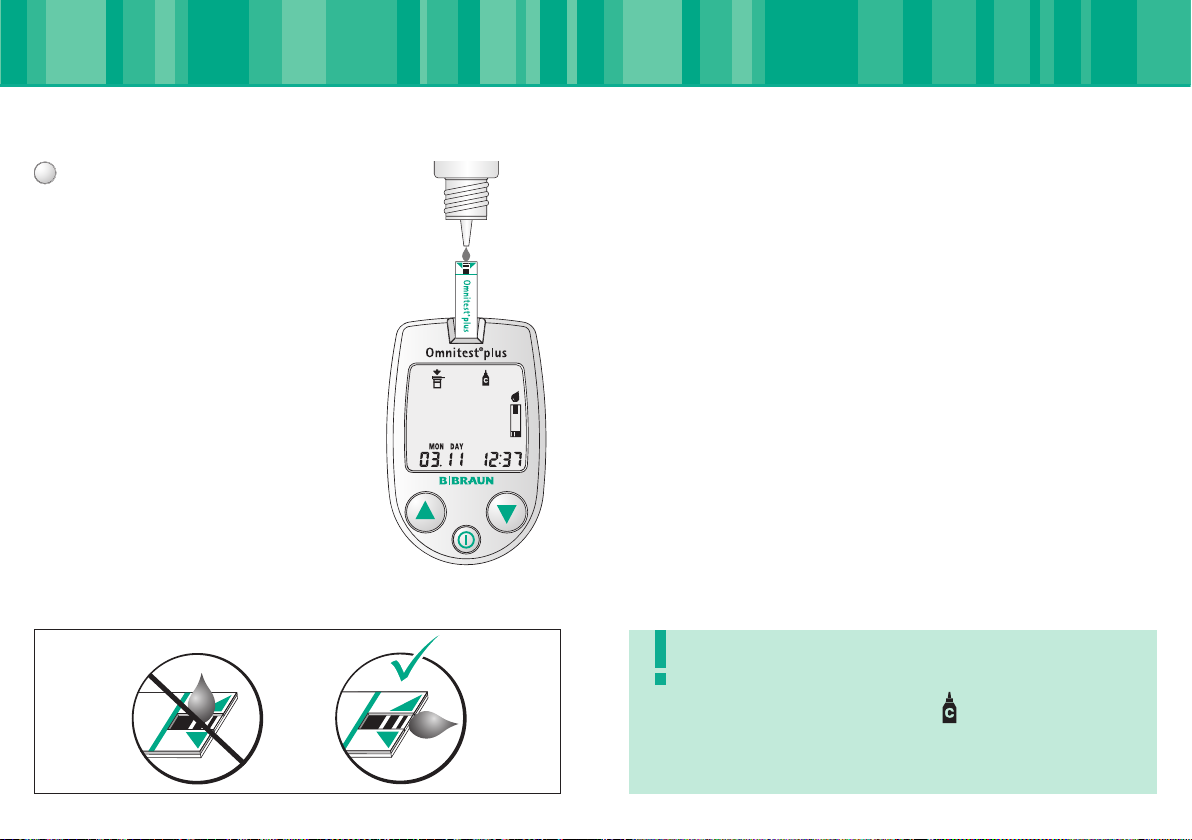
Apply Control Solution
Shake the control solution vial gently.
Remove the cap. Squeeze the vial, discard
the first drop, and wipe off the dispenser
tip with a clean tissue to ensure an accu-
rate result. Squeeze the vial again to get
a drop. Apply the hanging drop to the tip
of the test strip until the drop is drawn
into the test strip. Once you hear the
“beep”, it means the test strip is comple-
tely filled. The meter begins to count down
5 to 1 and then the result is displayed.
Compare the result displayed with the
range printed on the test strip vial.
The result should fall within the range.
4
Comparing Control Solution Results
If test results fall outside the range, repeat the test. Out-of-range
results may be caused by one or more of the following causes:
■Error in performing the test.
■Failure to shake the control solution vial gently.
■Expired or contaminated control solution.
■Control solution that is too warm or too cold.
■Failure to discard the first drop of control solution and
wipe the dispenser tip clean.
■Contamination of the control solution e.g. if the drop of the
control solution is taken back into the control vial.
■Improper coding of the meter.
■Meter malfunction.
■Test strip deterioration.
Do not use the system to test your blood glucose until you get a
control solution test result that falls within the range.
Mark all control solution tests with symbol to distinguish
from blood glucose tests in the meter memory. Marked con-
trol solution test results will not be included in your averages.
Note
buzzer
12 hour/24 hour
date and time
test result unit (mg/dL or mmol/L)
temperature unit (°C or °F)
average day
alarm
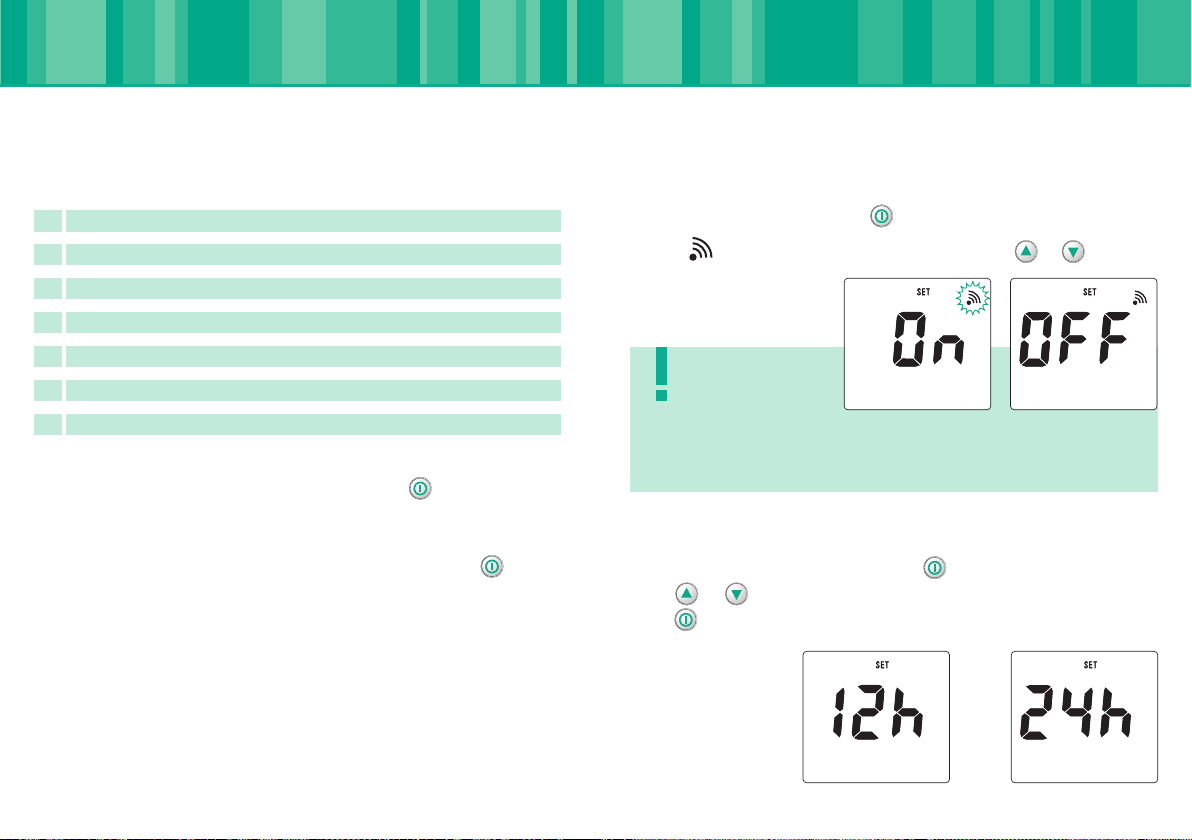
The Omnitest®plus meter has 7 functional setting modes
If you need to change any of the above settings, you need to enter
the setting mode. Turn on the meter by pressing button and hold
for 3 seconds. This will initiate the “Set the Meter” mode. SET icon
will appear on the display during the setting.
To leave the “Set the Meter” mode at any time, press the button
for 3 seconds.
If you have missed out a setting, start the “Set the Meter” procedu-
re again.
1
2
3
4
5
6
7
2524
Set the Meter
There is no beep sound during buzzer is OFF when test strip
is inserted and when test result pops up.
Note
Set the Buzzer
Turn on the meter by pressing button and hold for 3 seconds.
Buzzer icon will appear on the display. Press or to select
ON/OFF the buzzer sound.
Set the 12 Hour or 24 Hour mode
After selecting ON or OFF press for hour mode setting.
Press or button to select the proper time system. And then
press button to set the date and time.

Without setting the date properly, the average glucose level
and the results in memory will not show proper value. It is
highly recommended to set the meter before use and to
check the time when a new battery is installed. You can not
test your blood glucose while in the setting mode.
Note
2726
Set the Meter
Set the Temperature Unit
Once the unit of test result is selected, press the button to set
the temperature unit. Press or button to select the proper
temperature unit.
Set the Test Result Unit
Press button to set the test result unit. You should now be at the
unit of measurement selection. Select the proper unit of test result
(mg/dL or mmol/L) for your blood glucose measurement by pressing
the or button.
Set the Date and Time
Press or button to select the year. With the correct year on
display, press the button and the month setting will start fla-
shing. Press or button to select the month and then press
button to set the day. After then press button to set time. Press
or button to select the appropriate hour, press button to
set minutes.
(The year can range from 2005 to 2099, which is not displayed in normal operation)
1) Year setting 2) Month and day setting 3) Time setting
2928
Set the Meter
Note
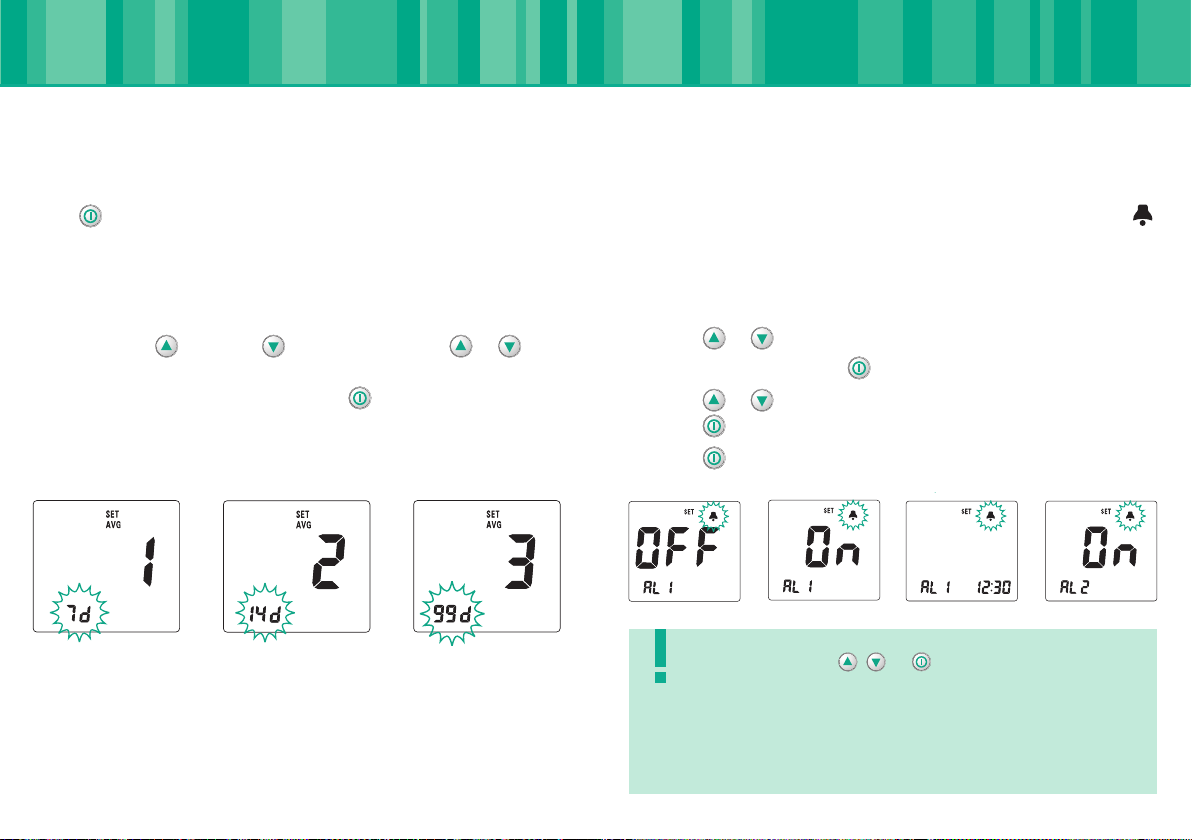
Set the Average Day
Press button to proceed to set the Average Day. Omnitest®plus
will show 3 different average results and the number of days can
range from 1 to 99 days. The setting mode begins with setting the
number of days of which you would like to receive an average cal-
culation of your glucose level. To increase or decrease the number of
days, press the button or button; holding the or but-
ton the value will be increased or decreased at a quick rate. With the
correct number of days displayed, press button to set next ave-
rage day. AVG character will display during the average day setting.
1) First average 2) Second average 3) Third average
setting setting setting
Set the Alarm
Omnitest®plus has 5 different alarm settings. The bell icon
will be displayed during the alarm setting. Alarm setting order is
AL1 ➠AL2 ➠AL3 ➠AL4 ➠AL5. If the AL2 is OFF the rest of
AL3 ~AL5 is all OFF.
!Press or button to select the ON/OFF of alarm function.
"If you choose ON, press button to set the time for alarm.
#Press or button to set the proper alarm time (hour),
press button to set minutes.
$Press button to set next alarm.
!"#$
Press either , or button to stop the alarm.
The alarm will not work during the testing
of blood glucose. The loudness of the alarm is
intended to remind you at a glucose measurement
but not to wake you up from deep sleep.
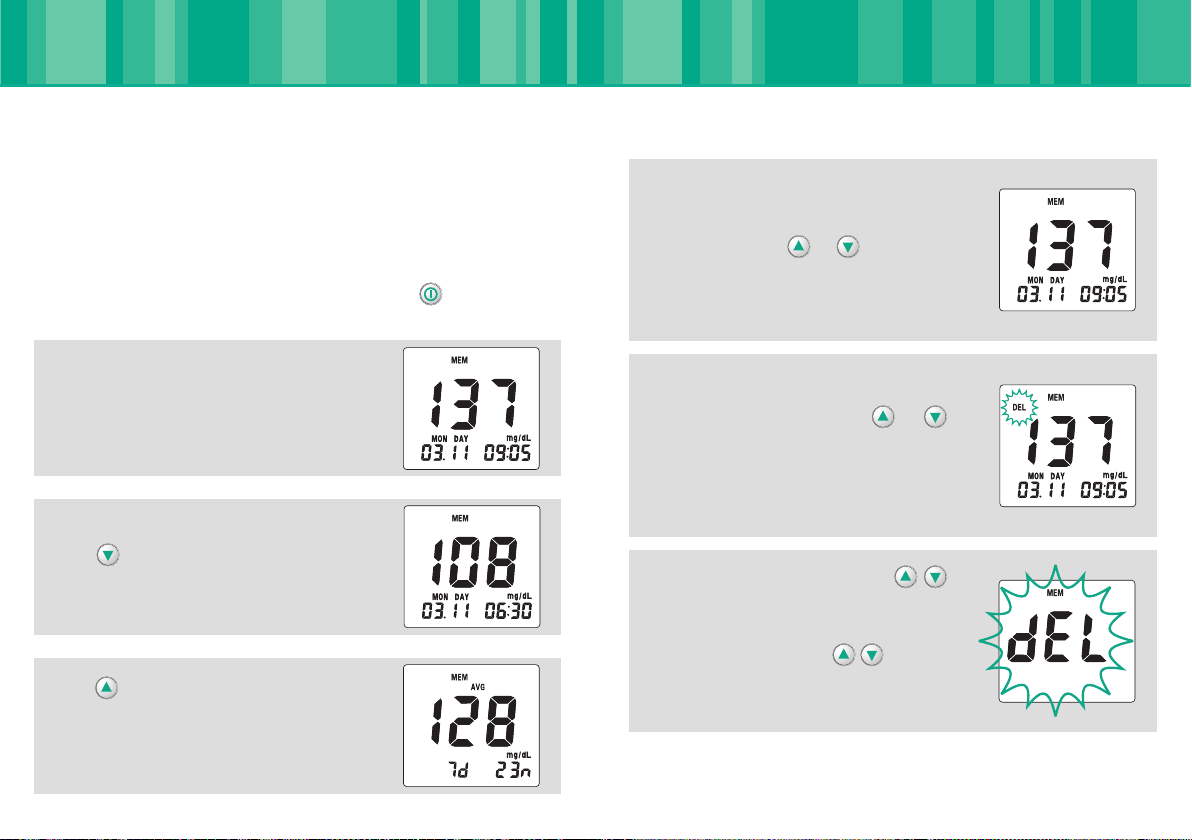
To delete any individual test result in
the memory press or button for
3 seconds.
To delete all test results press
buttons at the same time for 2 seconds
and then big dEL character will be dis-
played. Keep on pressing buttons
until 2 beeping sounds will be heared
and dEL disappears from the display.
Small DEL icon will be shown on the
left-up of the display. Press or
button until 2 beeping sounds will be
heared and the test result disappears
from the display.
Press to see the individual test
results.
The first display shows the latest test
result.
Press button to see the average
results. Small AVG icon will be shown on
the display (7d = 7 days average; 23n =
23 results taken for average calculation).
Omnitest®plus saves up to 250 test results in built-in memory and
3 different average glucose levels are calculated and saved. These
values will appear on the display by recalling anytime you like to see
them. The latest result will replace the oldest beyond 250 data.
The meter enters “Memory” mode by pressing the button shortly.
Average results (AVG) can not be deleted, because they are calcula-
ted from the remaining test results in the memory.
31
Deleting Test Results
30
Reviewing Your Results

3332
Collecting a Drop of Blood Sample
The comfort tip offers 5 different
levels of skin penetration.
To select best depth:
1-2 for soft or thin skin
3 for average skin
4-5 for thick or calloused skin
To select a desired depth, move the number to match the arrow.
Next hold the tip in one hand and pull
on the sliding barrel with the other
hand. As the ends are pulled apart, the
spring tension increases. When a click
is felt, the spring tension is locked and
the device is ready for use.
Release the sliding barrel. It will auto-
matically move back to its original
position near the trigger hub.
Place Omnilance against the tip of the
finger. Next press the trigger and lift up
the device.
It is less painful to prick you at the side
of the finger tip.
%
&
'
Unscrew the Omnilance tip and insert
a new Omnican®lancet firmly into the
carrier.
Next pinch the lancet and twist off the
protective cover. Replace the threaded
tip of the Omnilance device.
!
"
#
$

Omnican®lancet removal:
Unscrew the Omnilance tip. Push ahead
the lancet ejector with thumb and si-
multaneously pull out the sliding barrel
to dispose the lancet.
(
Cleanliness:
Wash your hands with warm soapy water. Rinse and dry hands tho-
roughly. You may also use an alcohol wipe to clean the puncture
area. Make sure it is completely dry before you obtain the blood
sample. Dirt or perspiration may affect the test result.
Lancing:
Prepare the lancing device and lancet. Insert a clean needle (lancet)
in the lancing device. (Refer to page 32 for more information).
35
Testing Your Blood Glucose
34
Collecting a Drop of Blood Sample
Set aside Omnilance and wait a few seconds for a blood drop
to form. The flow of blood will be helped keeping the hand warm,
by lowering the hand to waist level, and by gentle massage of the
finger.
For safety reasons, and to prevent crosscontamination, discard the
used lancet into an appropriate sharps or biohazard container.
Never allow another person to use a lancet that has already been
used. If the lancing device is to be used by another person, the unit
must be provided with a new tip and sterile lancet.
Taking care of your Omnilance:
Use mild soap and water to wipe the outside of the lancing device.
For more complete cleaning, remove the tip, wash the tip in warm
water and rinse well.
Note Read the additional information given in the
instructions for use of the test strips. Your health-
care professional will advice you on your ideal
blood glucose range. Consult your physician befo-
re making any changes to your diabetes therapy.

Compare the Code Number
The meter will automatically turn on and
display the code number. Make sure the
code number on the display matches the
code number on the test strip vial. If the
code number does not match, code the
meter correctly.
2
3736
Testing Your Blood Glucose
Insert the Test Strip
Remove test strip from the vial. Recap
the vial immediately to prevent moisture
from affecting the other strips. Insert a
test strip. Push the test strip until it will
go no further without bending the strip.
1
If the code number on the display and on the test strip vial
do not match, do the “Code the Meter” procedure, page 14 for
accurate result. If any different message appears on the dis-
play due to several causes and conditions please refer to
“Troubleshooting” page 46. Do not perform blood glucose
tests at temperature below +10 °C (50 °F) or above +40 °C
(104 °F) and above 90% relative humidity.
Caution
?
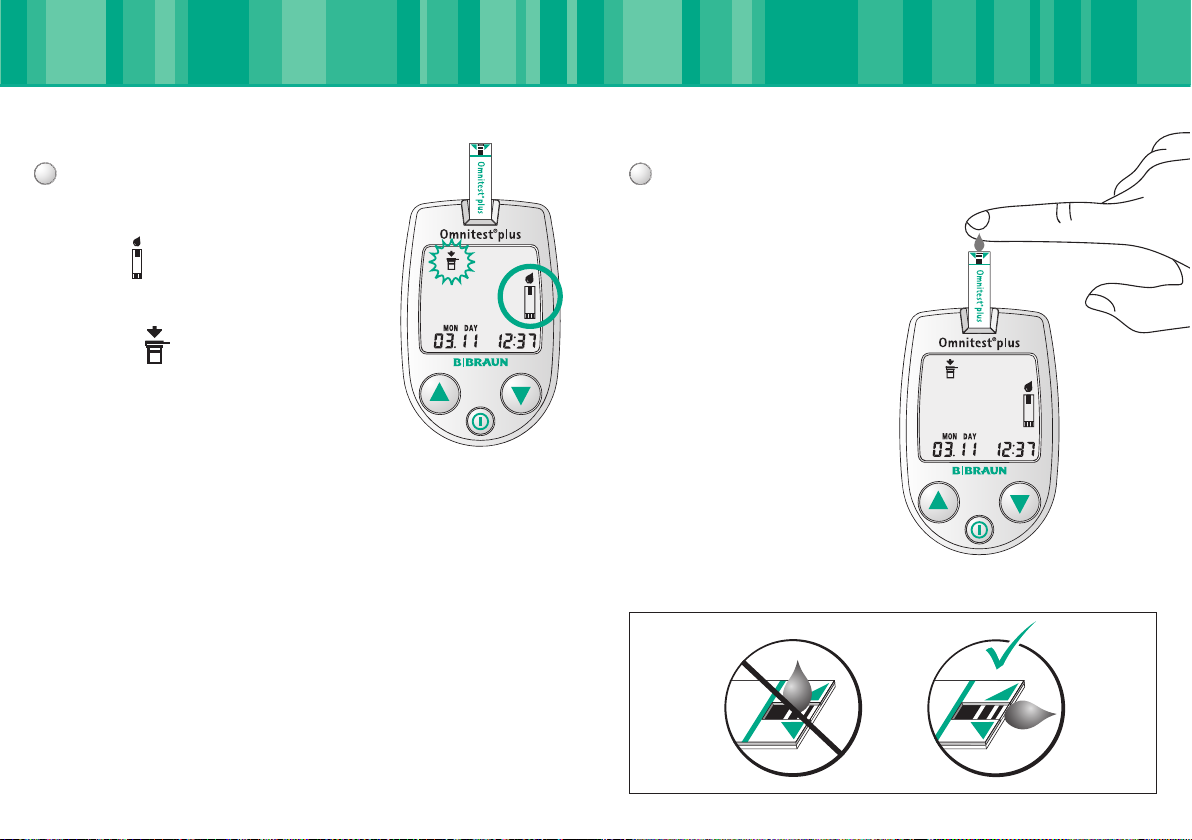
Applying Blood Sample
After 3 seconds of code confirmation
blood icon will be displayed on the
screen. Date and time information are
shown at the bottom.
The blinking reminds you to close
the test strip vial cap immediately.
If you intend to change the code after 3
seconds have passed, pull the test strip
out of the port, and re-start the procedu-
re from the beginning.
Prick the area where you have decided to
obtain the blood.
3
Touch your finger to the tip of
Omnitest®plus test strip.
4
3938
Testing Your Blood Glucose
Table of contents
Other B. Braun Blood Glucose Meter manuals


