B DUTCH BD700.000009 User manual

1
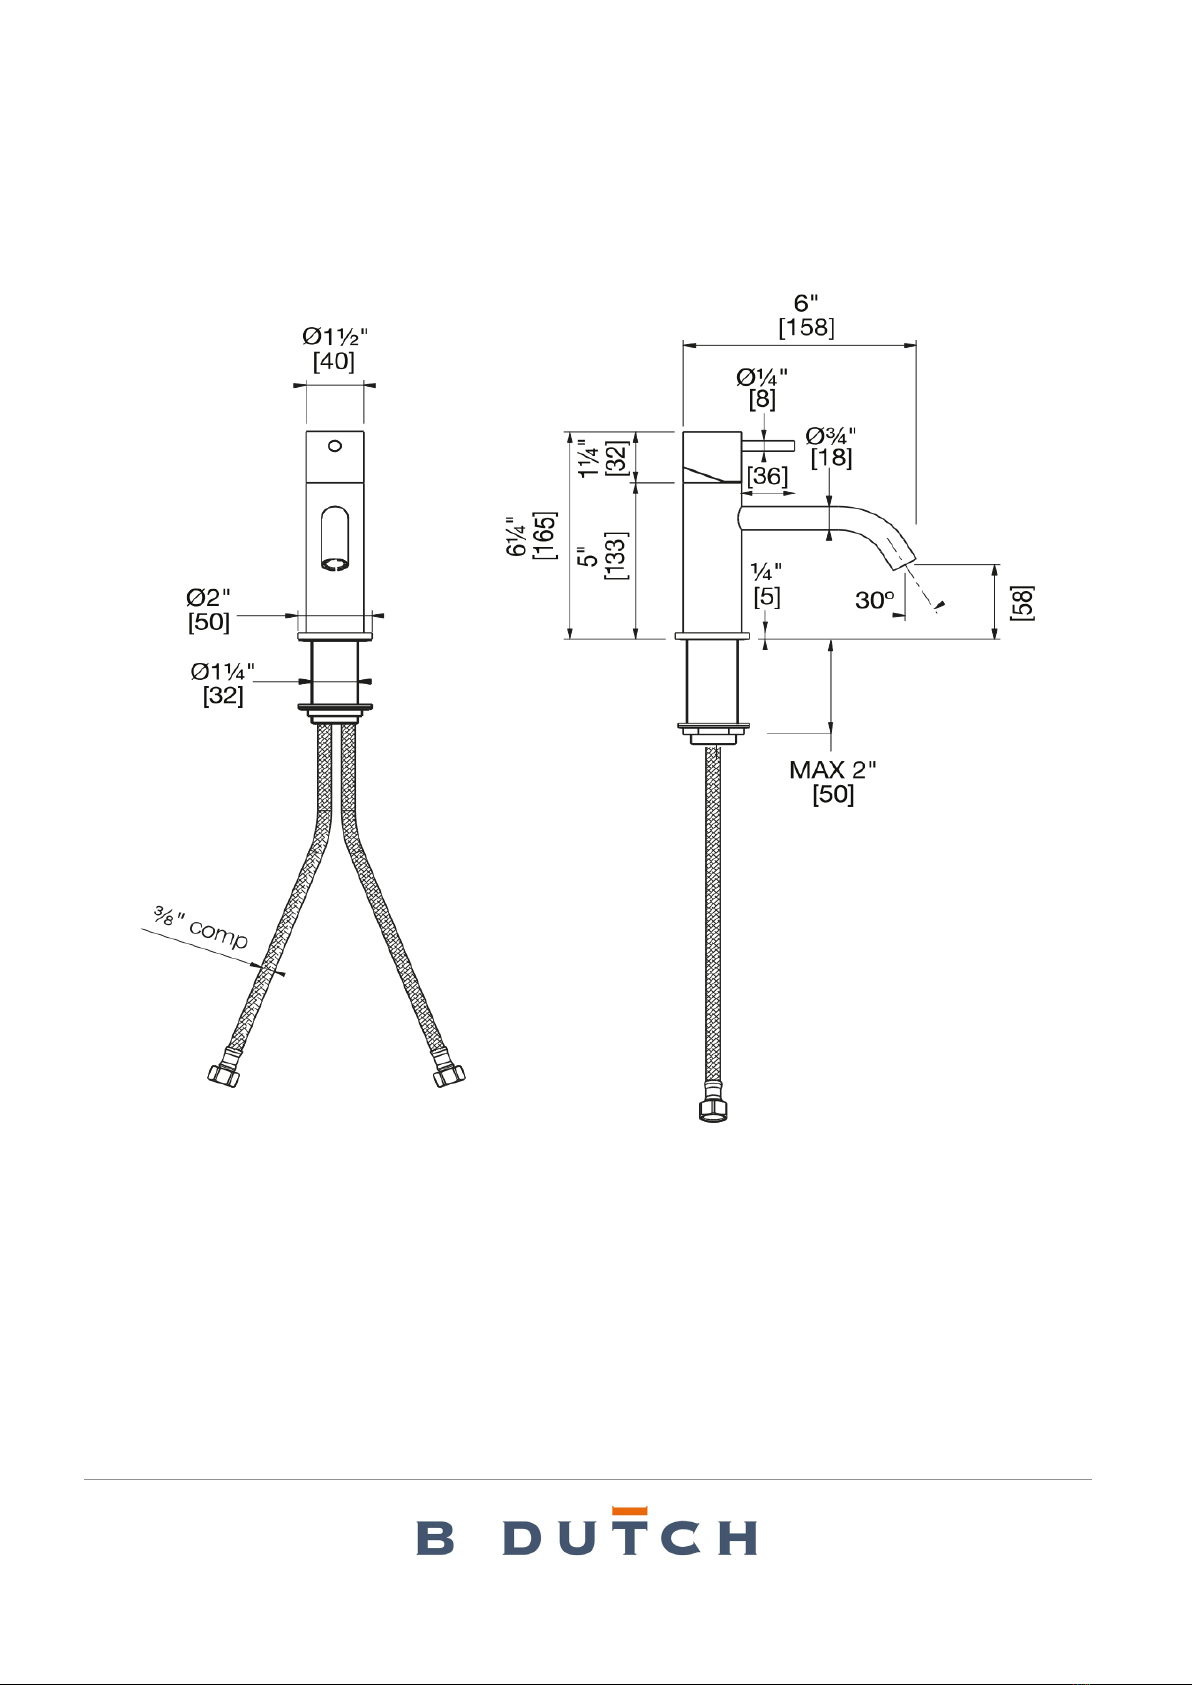
BD700.000009-B DUTCH RVS opbouw wastafelkraan H 165 mm warm/koud
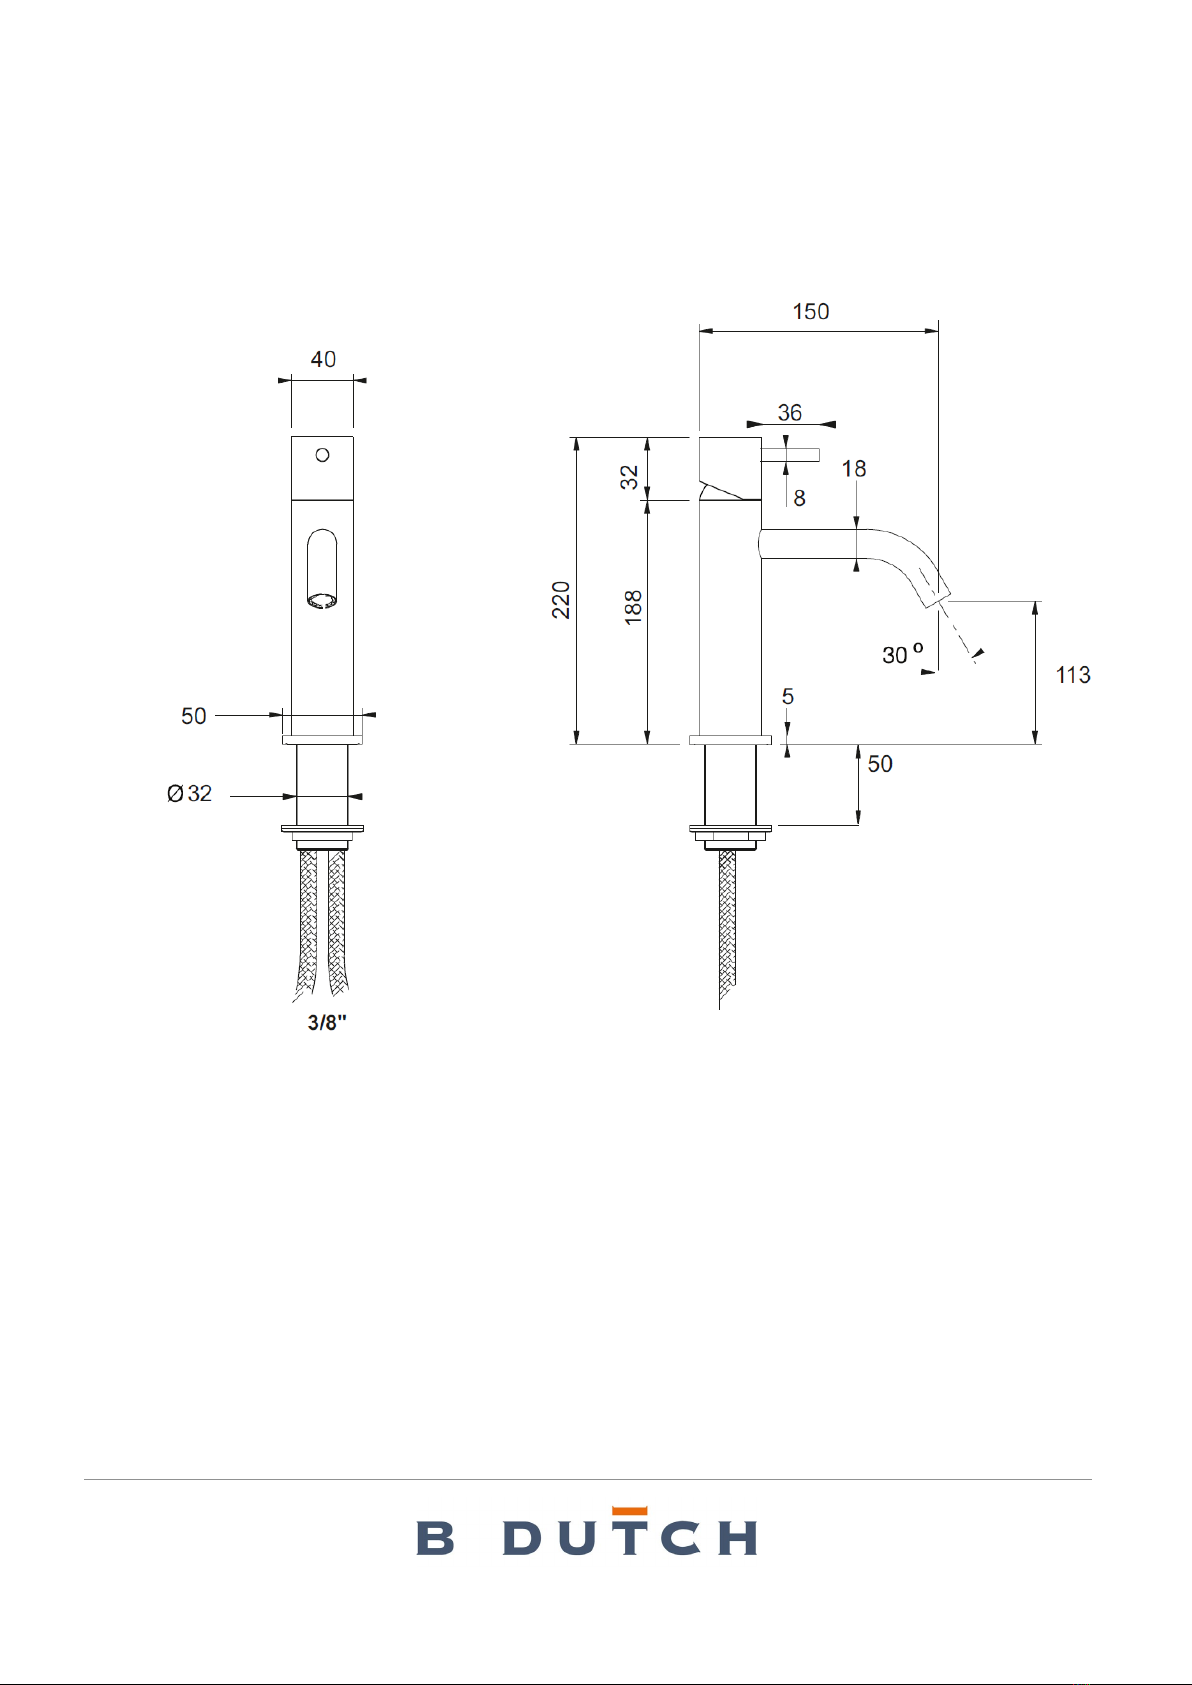
BD700.000011 -B DUTCH RVS opbouw wastafelkraan H 220 mm warm/koud
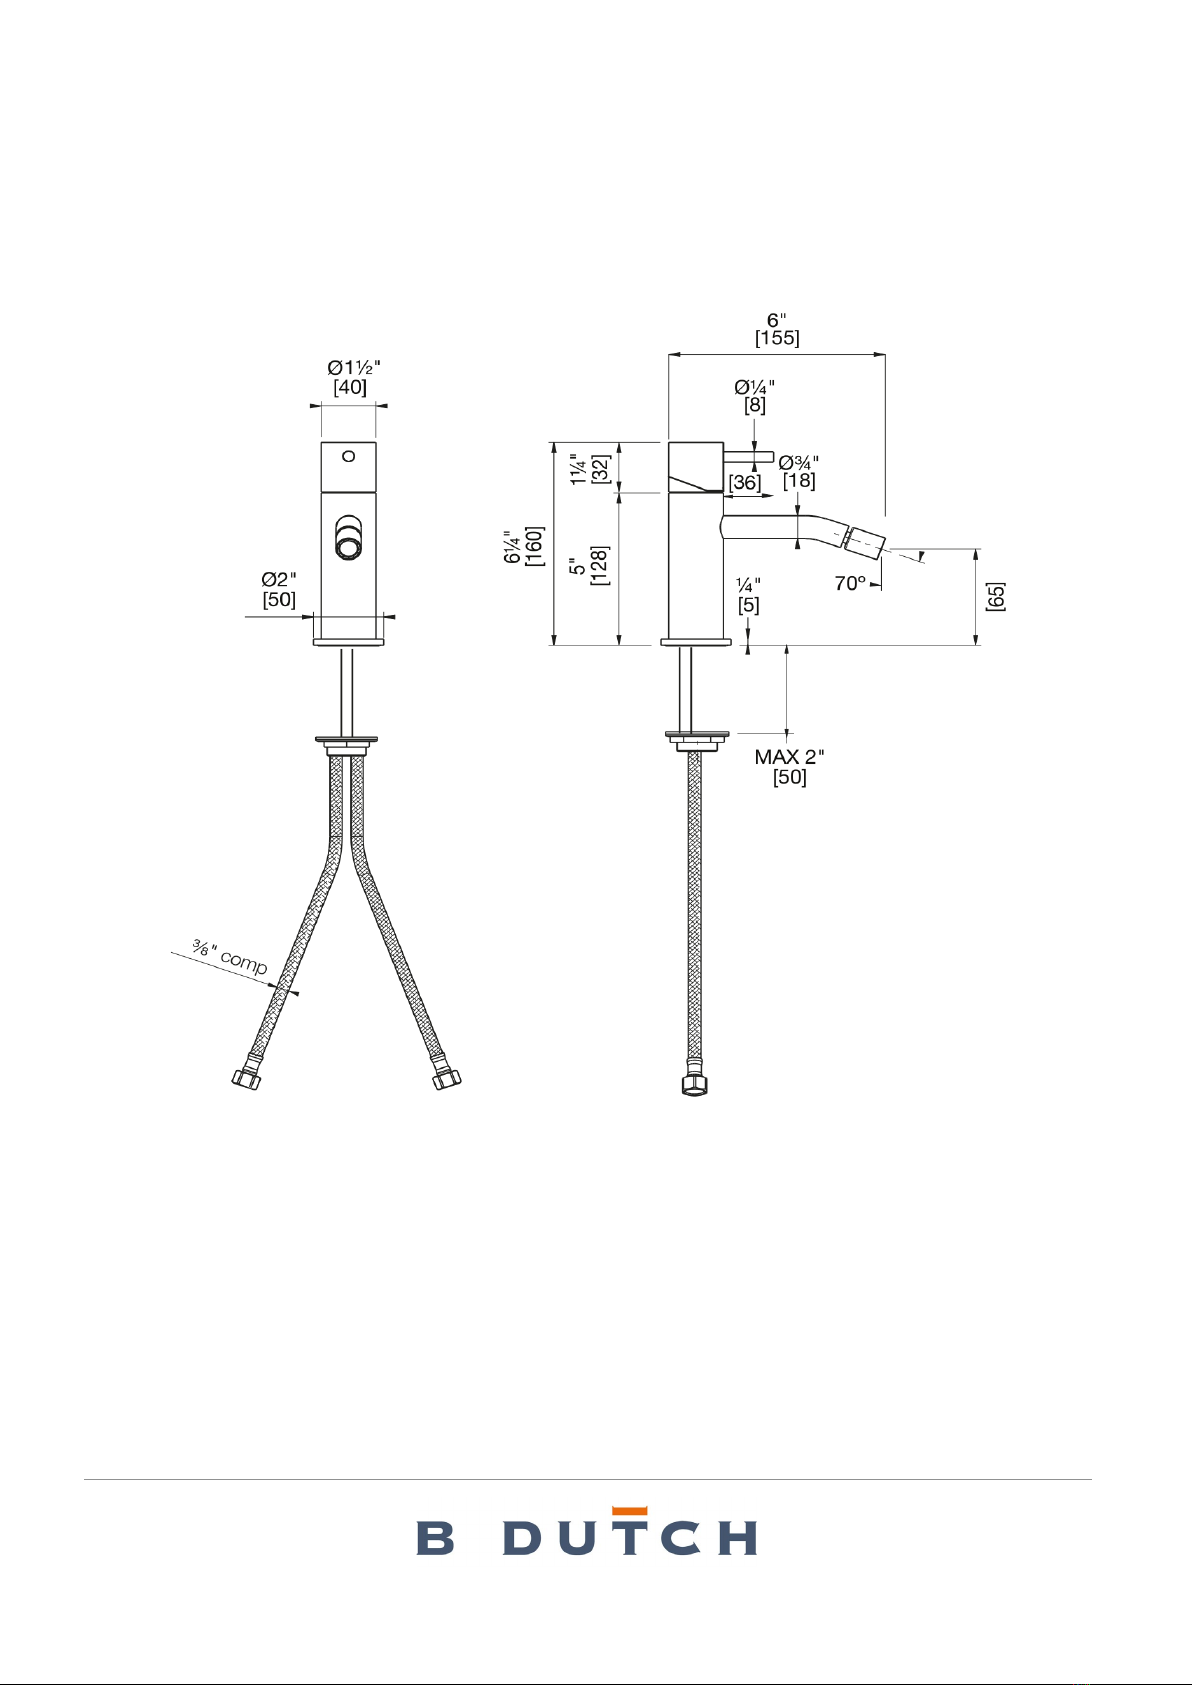
BD700.000029 -B DUTCH RVS geslepen bidetkraan H 160 mm
Installatie handleiding - Installation
LET OP: LEES DEZE INSTALLATIE HANDLEIDING GOED DOOR! BIJ FOUTIEVE
INSTALLATIE, REINIGING EN ONDERHOUD VERVALT DE GARANTIE!
ATTENTION: READ THIS INSTALLATION MANUAL CAREFULLY! THE WARRANTY IS VOID IN
THE EVENT OF ERROR INSTALLATION, CLEANING AND MAINTENANCE!
BD700.000009 BD700.000011 BD700.000029

2
NEDERLANDS
Bij de juiste installatie en het juiste gebruik gaan de B DUTCH RVS kranen vele tientallen jaren mee. De B
DUTCH RVS kranen zijn voorzien van een binnenwerk met een keramische afdichting. Dit binnenwerk is van
topkwaliteit en zorgt voor een lange levensduur van de kraan, maar dit binnenwerk kan niet tegen vuil. Vuil zorgt
ervoor dat de kraan niet meer goed sluit en dan lekt de uitloop. Spoel daarom altijd VÓÓR het plaatsen van het
inbouwdeel de leidingen goed door zodat al het vuil uit de leidingen is. Zet de kraan open en laat het water goed
doorlopen en doorspoelen en monteert de kraan daarna pas. Dit voorkomt dat er vuil tussen de schijven komt.
Om te voorkomen dat er vuil tussenkomt, moet u tijdens de montage ook altijd de witte plastic beschermkap op
het inbouwdeel houden.
Mocht er toch vuil in het binnenwerk zijn gekomen met een defecte kraan als gevolg, dan zit er niets anders op
dan het vervangen van de cartouche. De cartouche vormt één geheel en is niet te openen. Andere benamingen
voor de cartouche zijn cartridge en patroon.
Het inbouwdeel van de B DUTCH kranen kan maar op één juiste manier ingebouwd worden. Let dus goed op
wat de bovenkant is.
Bij alle RVS kranen van B DUTCH wordt ook een rozet meegeleverd, een passende RVS afdekring. Bij het
stucen en betegelen moet u er rekening mee houden dat deze RVS afdekring maar 7,5 mm afdekt ten opzichte
van de plastic beschermkap van het inbouwdeel. Er dient dus strak te worden gestucd of betegeld om het
inbouwdeel heen! Een grotere afdekring past niet bij het minimalistische design van onze RVS kranen.
Attentie - Vóór installatie
1. Inspecteer dit product om er zeker van te zijn dat u alle onderdelen heeft zoals afgebeeld. Deze zijn
nodig voor een juiste installatie.
2. Elk artikel is getest en afgesteld tijdens de productie.
3. Interne componenten hoeven niet gewijzigd of aangepast te worden, gebeurt dat toch dan vervalt
elke garantie.
4. De klepcartridge is in de fabriek getest en afgesteld - NEEM DE CARTRIDGE NIET APART. Als u
het patroon uit elkaar haalt, vervalt de garantie.
5. Zorg ervoor dat zowel de toevoer van warm als koud water goed is aangesloten op de gemarkeerde
lav-aansluiting.
6. Dit product moet worden geïnstalleerd door een professionele installateur.
7. Raadpleeg de bijgevoegde specificatie- en montagetekeningen voor installatie-instructies.
8. Spoel de leidingen goed af en door voordat u het product monteert.
9. Installatie van waterfilters stroomopwaarts van het systeem en installatie van alle filters die daarbij
horen.
10. Stroomdruk - Min. 25 PSI, max. 80 PSI. Aanbevolen druk - 50 tot 60 PSI.

3
Installatie Vereisten
1. Om ervoor te zorgen dat dit product correct wordt geïnstalleerd, moet u deze richtlijnen lezen en
volgen.
2. Zorg ervoor dat het product vóór gebruik correct is geïnstalleerd.
3. Aanbevolen bedrijfsdruk 1,5 a 5 Bar.
4. Vermijd drukschommelingen tussen koud- en warmwateraansluitingen in het geval van statische
druk hoger dan 5 Bar wordt aanbevolen om een debietregelaar te installeren om schade aan de
patroon (cartridge) te voorkomen.
5. Maximum test druk 5 Bar.
6. Maximum warm water temperatuur 80° C.
7. Aanbevolen temperatuur 50°- 60° C.
8. Drukverschil tussen warm en koud water maximaal 1,5 Bar.
9. De eigenaar / gebruiker van de kraan moet deze informatie bewaren voor toekomstige naslag.
10. Zorg ervoor dat uw installatie voldoet aan de lokale vereisten.
11. Raadpleeg de bijgevoegde specificatie- en montage-tekeningen. De kraan wordt gedeeltelijk
gemonteerd verkocht, maar wordt volledig gedemonteerd weergegeven, dit is uitsluitend voor
illustratieve en service doeleinden.
12. Inspecteer dit product om er zeker van te zijn dat u alle onderdelen heeft die nodig zijn voor een
juiste installatie.
13. Gebruik alleen een bandsleutel of een beschermde / gladde steeksleutel op een afgewerkt
oppervlak.
14. Installeer, indien mogelijk, de kraaneenheid op de gootsteen of het montageoppervlak voordat u
deze instelt.
15. Gebruik GEEN stopverf tijdens deze installatie.
N.B.: Als de bovenstaande voorwaarden niet bestaan, werkt het product mogelijk niet efficiënt. Eventuele
gebreken in de oppervlakteafwerking (krassen, enz.) Moeten worden geïdentificeerd voordat het product wordt
geïnstalleerd. Na installatie wordt geen vervanging erkend.

4
ENGLISH
With the correct installation and use, the B DUTCH stainless steel taps last for many decades. The B DUTCH
stainless steel taps have an interior with a ceramic seal. This interior is of top quality and ensures a long
lifespan of the crane, but this interior cannot withstand dirt. Dirt prevents the tap from closing properly and the
spout leaks. Therefore, always flush the pipes well before installing the built-in part so that all dirt is removed
from the pipes. Open the tap and let the water run through and flush and then mount the tap. This prevents dirt
from getting between the discs. To prevent dirt from entering, always keep the white plastic protective cap on
the built-in part during assembly.
If dirt has entered the interior with a faulty faucet as a result, there is no other option than to replace the
cartridge. The cartouche forms one whole and cannot be opened.
The built-in part of the B DUTCH faucets can only be installed correctly. So pay close attention to the top.
All rosettes from B DUTCH also include a rosette, a suitable stainless steel cover ring. When plastering and
tiling, you must take into account that this stainless steel cover ring only covers 7.5 mm compared to the
plastic protective cover of the built-in part. So there must be tight plaster or tiled around the built-in part! A
larger cover ring does not match the minimalist design of our stainless steel taps.
Attention - Before Installation
1. Inspect this product to ensure you have all parts as shown that are required for proper installation.
2. Each article has been tested and adjusted in production.
3. Internal components need not be modified/tampered, in this case the warranties are declined.
4. The valve cartridge has been factory tested and adjusted – DO NOT TAKE THE CARTRIDGE
APART. Taking the cartridge apart will void the warranty.
5. Ensure that both hot and cold water feeds are properly connected to the marked lav connecting.
6. This product must be installed by a professional contractor.
7. Refer to the specification and assembly drawings attached for installation directions.
8. Rinse well the pipes before assembling the product.
9. Installation of water filters upstream of the plant and installation to the product of all the filters that
accompany it.
10. Flow Pressure – Min. 25 PSI, Max. 80 PSI. Recommended pressure – 50 to 60 PSI.

5
Installation Requirements
Please read the instructions carefully so as to avoid any damage to the fixture.
1. To ensure this product is installed properly, you must read and follow these guidelines.
2. Ensure that the product is installed properly before the use.
3. Recommended operational pressure 1,5 a 5 Bar.
4. Avoid pressure swings between cold and hot water fittings in the case of static pressures above 5
Bar is recommended to install a flow reducer to avoid damage to the cartridge.
5. Maximum test pressure 5 Bar.
6. Maximum hot water temperature 80° C.
7. Recommended temperature 50°- 60° C.
8. Pressure difference between hot and cold water max 1,5 Bar.
9. The owner/user of the faucet must keep this information for future reference.
10. Be sure your installation conforms to local codes.
11. Refer to the specification and assembly drawings attached. Faucet is sold partially assembled but
shown fully disassembled for illustrative and service purposes only.
12. Inspect this product to ensure you have all parts required for proper installation.
13. Use only a strap wrench or protected/smooth-jaw wrench on any finished surface.
14. If possible, install the faucet assembly on the sink or mounting surface before setting.
15. Do NOT use putty during this installation.
N.B.: If the above conditions do not exist, the product may not work efficiently. Any flaws in the surface finish
(scratches, etc.) must be identified prior to installation of the product. No replacement will be acknowledged after
installation.

6
NL - INSTALLATIE HANDLEIDING
Draai de borgmoer (1) los, verwijder de roestvrijstalen ring (2) en de rubberen afdichting (3). Zorg ervoor dat
de ring inclusief o-ring op de body van de menger zit (4). Plaats de menger. Breng de rubberen afdichting (3)
en de roestvrijstalen ring (2) op de draadstang (5) aan en zet alles vast met de borgmoer (1). Sluit de warm-
en koudwaterslangen aan op het systeem (6-7). Controleer de juiste werking van de mixer door de hendel in
alle richtingen te bewegen toegestaan. Controleer de dichtheid van de verbindingen.
EN – INSTALLATION GUIDE
Unscrew the locking nut (1), remove the stainless steel washer (2) and the rubber seal (3). Make sure the
washer including o-ring is on the mixer body (4). Position the mixer. Fit the rubber seal (3) and the stainless
steel washer (2) on the threaded stem (5) then tighten everything with the lock nut (1). Connect the water
flexible pipe (6-7) to the system. Check the correct operation of the mixer, moving the lever in all the directions
allowed. Check the tightness of the connections.

7
NL - ONDERHOUD
Draai de hendel (1) en de stifttap (2) los met de meegeleverde inbussleutel (3). Verwijder de handgreep (4).
Draai de ringmoer (5) los met de bijgeleverde sleutel (6). Haal de patroon eruit (7). Voor de montage, gaat u in
omgekeerde volgorde te werk waarbij u ervoor zorgt dat de referentiepennen aan de onderkant van de
patroon (7) correct zijn gepositioneerd in de overeenkomstige zitting binnenin het kraanlichaam (8) en dat het
steunoppervlak zorgvuldig wordt gereinigd (fig. 9). Open de water inlaat en controleer de dichtheid van de
aansluitingen en of de kraan goed werkt.
EN – MAINTENANCE
Unscrew the lever (1) and the grub screw (2) using the supplied allen wrench (3). Remove the handle (4).
Unscrew the ring nut (5) using the supplied key (6). Extract the cartridge (7). To fit, proceed in reverse order,
making sure the reference pins at the bottom of the cartridge (7) are correctly positioned in the corresponding
seat inside the tap body (8) and the support surface is perfectly clean (fig.9). Open the water inlet and check
the tightness of the connections and that the tap works properly.

8
NEDERLANDS
Reinigers voor fittingen en accessoires
Om te voorkomen dat het oppervlak en de werkende componenten van de bevestigingen worden beschadigd,
moeten er bepaalde voorzorgsmaatregelen worden genomen met betrekking tot het gebruik en de
daaropvolgende reiniging, aangezien veel reinigingsmiddelen zuren bevatten voor algemene reiniging en het
verwijderen van kalkaanslag. Let bij de verzorging van uw fittingen en accessoires op het volgende en lees
ook de B DUTCH ONDERHOUDSVOORSCHRIFTEN RVS KRANEN door, zie www.bdutch.nl/downloads:
•Gebruik alleen reinigingsmiddelen die uitdrukkelijk bedoeld zijn voor dit gebruik.
•Gebruik nooit schoonmaakmiddelen die zoutzuur, mierenzuur of azijnzuur bevatten op of nabij de fittingen,
aangezien deze aanzienlijke schade kunnen veroorzaken.
•Gebruik geen schoonmaakmiddelen die fosforzuur, chloorzuur, zoutzuur, fluorzuur of natriumhypochloriet
bevatten.
•Gebruik geen reinigingsmiddelen die chloorbleek oplossingen bevatten.
•Gebruik zeep met neutrale PH of specifiek voor roestvrij staal.
•Meng of combineer nooit reinigingsmiddelen.
•Gebruik geen schurende reinigingsmiddelen en ongeschikte schuurmiddelen zoals schuursponsjes.
•Roestvlekken die het gevolg zijn van per ongeluk langdurig contact met ijzerhoudende voorwerpen of
water met een hoog percentage ijzer en magnesium, kunnen worden verwijderd door ze voorzichtig af te
vegen met een zachte doek die is bevochtigd met een niet-schurend reinigingsmiddel speciaal voor
roestvrij staal.
REINIGING/ONDERHOUD
Was voor een correcte reiniging van de kraan deze alleen met producten zonder oplosmiddelen. Gebruik
GEEN reinigingsmiddelen die bijtende of zure stoffen bevatten (zoutzuur, azijnzuur of fosforzuur),
schuursponsjes en metalen schuursponsjes. Het is raadzaam om specifieke producten voor roestvrij staal te
gebruiken. Onze producten hebben geen specifiek onderhoud nodig, afgezien van periodieke reiniging van de
beluchter die na verloop van tijd vuil en onzuiverheden in de leidingen verzamelt, waardoor een geleidelijke
afname van de stroom wordt veroorzaakt. Ga als volgt te werk: 1- Zorg ervoor dat de kraan gesloten is,
schroef de beluchter (1) los met de meegeleverde speciale sleutel (2). Eenmaal verwijderd, bevrijd het
binnenste filtergedeelte van onzuiverheden met behulp van ontkalkingsoplossingen met (bijvoorbeeld azijn).
Wacht een paar minuten, spoel onder stromend water en plaats de beluchter terug.

9
ENGLISH
Cleaners For Fittings and Accessoires
To avoid damaging the surface and working components of the fittings, certain precautions must be taken in
terms of usage and subsequent cleaning as many cleaning agents contain acids for general cleaning and
removing calcium deposits. When caring for your fittings and accessories, please note the following:
•Only apply cleaners which are expressly intended for the use.
•Never use any cleaner containing hydrochloric acid, formic acid or acetic acid on or near the fitting, as
they can cause considerable damage.
•Do not use cleaners containing phosphoric acid, chloric acid, muriatic acid, fluoric acid, sodium
hypochlorite.
•Do not use cleaners containing chlorine bleach solutions.
•Use soap at neutral PH, or specific for stainless steel.
•Never mix or combine cleaning agents.
•Abrasive cleaners and unsuitable scouring agents such as scouring pads.
For rust stains resulting from the accidental prolonged storage of ferrous abjects or water with a high
percentage of iron and magnesium, they can be removed by wiping gently with a soft cloth dampened with a
cleaning agent in non abrasive cream specific for cleaning stainless steel.
CLEANING/MAINTENANCE
For correct cleaning of the tap, wash it only with solvent-free products. DO NOT use detergents containing
corrosive or acid substances (hydrochloric, acetic or phosphoric acid), abrasive sponges and metallic scouring
pads. It‘s advisable to use specific products for stainless steel. Our products do not require any particular
maintenance, apart from periodical cleaning of the aerator which, over time, collects debris and impurities
present in the pipes, thereby causing a gradual reduction in flow. Proceed as follows: 1- Make sure the tap is
closed, unscrew the aerator (1) using the special wrench (2) supplied. Once removed, free the inner filtering
part of impurities using descaling solutions using (e.g. vinegar). Wait a few minutes, rinse under running water
then refit the aerator.
10
BD700.000009
11
BD700.000011
12
BD700.000029

13
BD700.000009

14
BD700.000011

15
BD700.000029
This manual suits for next models
2
Table of contents
Languages:
Other B DUTCH Plumbing Product manuals

B DUTCH
B DUTCH RVS BD700.000021 User manual

B DUTCH
B DUTCH BD700.000017 User manual

B DUTCH
B DUTCH RVS BD700.000010 User manual

B DUTCH
B DUTCH BD700.000040 User manual

B DUTCH
B DUTCH RVS BD700.000004 User manual

B DUTCH
B DUTCH BD700.000030 User manual

B DUTCH
B DUTCH BD700.000034 User manual

B DUTCH
B DUTCH BD700.000039 User manual

B DUTCH
B DUTCH BD700.000020 User manual

B DUTCH
B DUTCH BD700.000025 User manual


