B LIGHT MEROPE 100 AD User manual

www.b-light.it 1/4
B LIGHT by ADE Elettronica | Via Galvani, 6 - 33083 Villotta di Chions (PN) - Italy | +39 0434 630835
B LIGHT non riconosce valide le condizioni di garanzia e declina ogni responsabilità per danni, qualora l’installazione non venga eettuata nel rispetto del seguente manuale.
B LIGHT will not consider valid the warranty conditions and will decline any responsibility for damage when the installation is not carried out according to this installation manual.
MEROPE 100 AD
67044 8 _ _ _
CONSERVA LE ISTRUZIONI
Leggere attentamente le istruzioni
prima del montaggio e dell’utilizzo
dell’apparecchio e custodirle per
riferimenti futuri.
KEEP THE INSTRUCTIONS
Read the instructions carefully before
the mounting or use of the luminaire
and keep them for future reference.
PULIZIA
La pulizia va eseguita con comuni
detergenti a pH neutro privi di
alcol e non abrasivi. Non utilizzare
idropulitrici.
CLEANING
Cleaning must be done with
neutral pH cleaners, non-abrasive
and alcohol free. Do not use high
pressure water cleaners.
INSTALLAZIONE
L’installazione dell’apparecchio
deve essere eseguita seguendo
le istruzioni, da parte di personale
qualificato.
INSTALLATION
Installation has to be done by fol-
lowing the instructions, and carried
out only by qualified personnel.
VETRO DI PROTEZIONE
Non è consentito l’utilizzo dell’ap-
parecchio con il vetro protettivo
danneggiato o mancante.
PROTECTION GLASS
Do not use the luminaire if the pro-
tection glass is damaged or missing.
SOSTANZE CHIMICHE
Evitare il contatto dell’apparecchio
con sostanze chimiche aggressive
(es. fertilizzanti, diserbanti, calce, ecc).
AGGRESSIVE AGENTS
Avoid contact between the luminaire
and aggressive chemical substances
(e.g. fertilizer, weed-killer, lime).
UMIDITA’
Non installare il prodotto in caso
di pioggia, nebbia o forte umidità
ambientale.
HUMIDITY
Never install the fixture in case
of rain, fog or high evironmental
humidity.
Gli apparecchi devono essere collegati ad alimentazione spenta e tutti i cablaggi e le connes-
sioni devono essere controllate prima che l’alimentazione venga ripristinata.
Luminaires should be wired with power o and all wiring and connections should be complete
and checked before power is switched on.
1. ATTENZIONE WARNING
OFF
IMPORTANTE IMPORTANT
02-2019
5W
Attenzione:
- La rimozione di qualsiasi etichetta presente sul cavo del prodotto comporterà l’annullamento della
garanzia.
- I cavi devono essere uniti con morsetti componibili e, considerando l’ambiente operativo, protetti
contro l’ingresso dell’umidità attraverso un giunto IP68 (vedere required accessories per ogni
apparecchio).
- I cavi di comando devono essere di tipo schermato e non fissati in prossimità di cavi di alimenta-
zione ad alta tensione o di altre sorgenti di interferenza elettromagnetica.
- Gli apparecchi B LIGHT devono essere utilizzati esclusivamente con alimentatori forniti da
B LIGHT.
Warning:
- Do not remove any supplied product cable labels, since warranty is void if labels are removed.
- Cables must be joined with terminal blocks and, considering the operating environment, protected
against moisture ingress with IP68 junction box (see required accessories in each luminaire).
- Control cables should be of a suitable shielded type and not fixed in proximity to high voltage
power cables or other sources of electromagnetic interference.
- B LIGHT luminaires must only be used with B LIGHT power supplies.
Giunto al gel IP68
IP68 junction box
2. LEGGERE PRIMA DELL’INSTALLAZIONE READ BEFORE INSTALLATION
kg
kg
0,85 kg
depending on
housing box
3,5 tonnes

EXTERNAL AIMING SYSTEM
COMPLETE WITH
GRADUATED SCALE
+ / - 20°
www.b-light.it 2/4
B LIGHT by ADE Elettronica | Via Galvani, 6 - 33083 Villotta di Chions (PN) - Italy | +39 0434 630835
B LIGHT non riconosce valide le condizioni di garanzia e declina ogni responsabilità per danni, qualora l’installazione non venga eettuata nel rispetto del seguente manuale.
B LIGHT will not consider valid the warranty conditions and will decline any responsibility for damage when the installation is not carried out according to this installation manual.
MEROPE 100 AD
67044 8 _ _ _
Inserire un cacciavite nell’apposito foro, utilizzare la scala graduata per
regolare l’inclinazione del fascio luminoso
Insert the screwdriver into the corresponding hole, use the graduated scale
to adjust the inclination of the light beam
Inserire la controcassa nel terreno allineando il tappo al pavimento finito.
Predisporre l’uscita cavi e cementare la controcassa.
IMPORTANTE: Rimuovere il tappo solamente al momento dell’installazione
del prodotto per evitare che detriti e sporcizia riempiano la controcassa.
Insert the housing box into the ground aligning the cover to the finished
floor. Prepare the cable outlet and cement the housing box.
IMPORTANT: Remove the cover only when installing the luminaire in
order to avoid concrete or dust to fill the housing box.
Per inserire l’apparecchio, rimuovere la copertura della controcassa.
Remove the cover from the housing box before inserting the luminaire.
3. INSTALLAZIONE DELL’APPARECCHIO LUMINAIRE INSTALLATION
1 2
Fare il collegamento elettrico utilizzando il giunto al gel IP68.
Tramite aspirapolvere pulire accuratamente il fondo della controcassa da
polvere, sassi e residui di cemento.
Make the electrical connection using the IP68 junction box.
Remove dust, gravel and concrete from the bottom of the housing
box using a vacuum cleaner.
3 4
65
Giunto al gel IP68
IP68 junction box
Giunto al gel IP68
IP68 junction box
Livello pavimento finito
Finished floor level
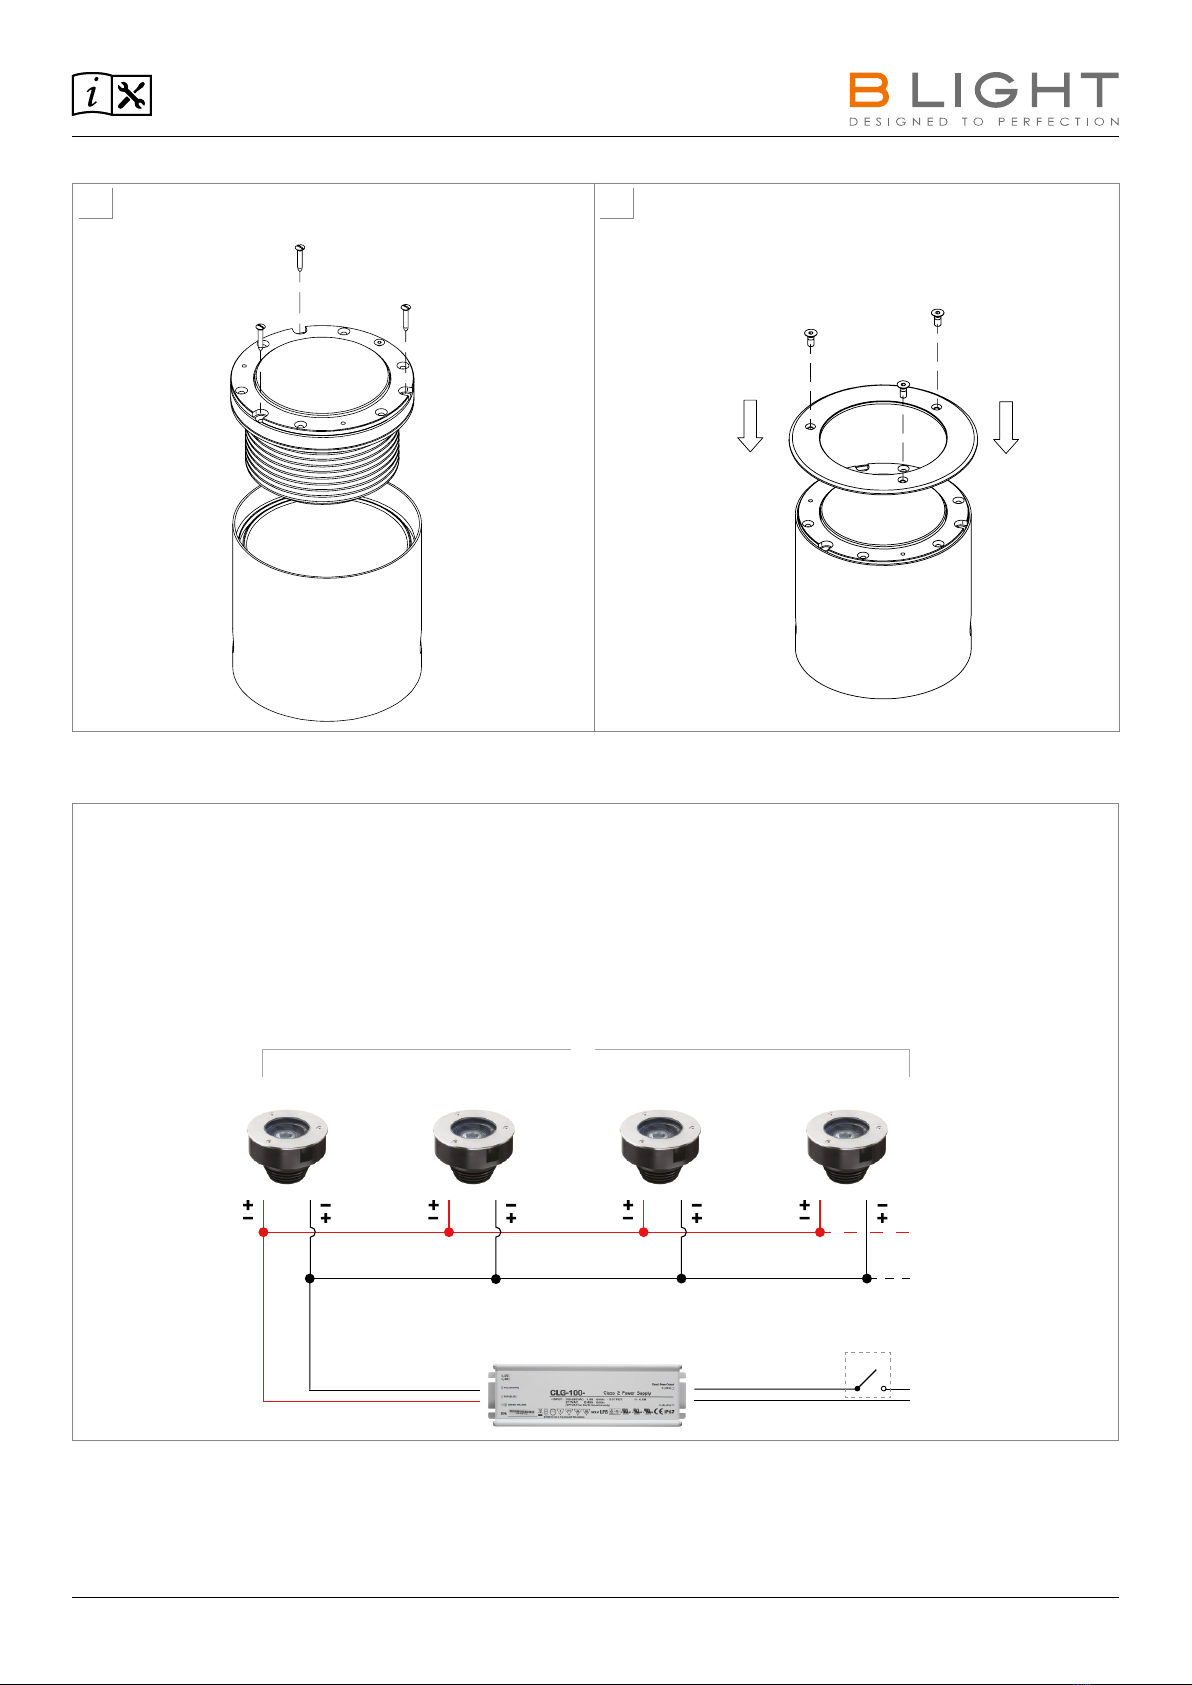
Svitare le viti e sollevare la ghiera.
Unscrew the fixing screws and remove the
frame.
Inserire l’anello distanziatore fornito nel MEROPE
(solo per versione 67044 8_ _B)
Insert the provided ring spacer trough MEROPE
(only for version 67044 8 _ _ B)
Tappo
Cover
www.b-light.it 3/4
B LIGHT by ADE Elettronica | Via Galvani, 6 - 33083 Villotta di Chions (PN) - Italy | +39 0434 630835
B LIGHT non riconosce valide le condizioni di garanzia e declina ogni responsabilità per danni, qualora l’installazione non venga eettuata nel rispetto del seguente manuale.
B LIGHT will not consider valid the warranty conditions and will decline any responsibility for damage when the installation is not carried out according to this installation manual.
MEROPE 100 AD
67044 8 _ _ _
Fissare l’anello distanziatore e il MEROPE alla controcassa avvitando le viti.
Fix the ring spacer and MEROPE to the housing box tightening the screws.
Fissare la ghiera avvitando le viti.
Fix the plate tightening the screws.
7 8
4. SCHEMA DI COLLEGAMENTO ON/OFF: 48V DC WIRING EXAMPLE ON/OFF: 48V DC
01 Interruttore ON/OFF
02 Leggere la sezione “required accessories” per ogni apparecchio e scegliere un alimentatore a 48V DC (tensione costante). Scegliere l’alimentatore considerando il
carico corretto ed aggiungere sempre un margine di sicurezza del 20%.
03 Bipolarità: gli apparecchi B LIGHT funzionano correttamente anche in caso di inversione della polarità (+/-).
04 Apparecchi collegati in parallelo
01 Switch ON/OFF
02 Read section required accessories in each luminaire and choose a 48V DC (constant voltage) power supply. Choose the power supply considering the correct load
and always add a spare 20% as safety margin
03 Unpolarized connection: B LIGHT luminaires do not require to observe the polarity (+/-).
04 Luminaires connected in parallel
04
01
02
03
48V DC *read section
required accessories
in each luminaire
90-305V*

www.b-light.it 4/4
B LIGHT by ADE Elettronica | Via Galvani, 6 - 33083 Villotta di Chions (PN) - Italy | +39 0434 630835
B LIGHT non riconosce valide le condizioni di garanzia e declina ogni responsabilità per danni, qualora l’installazione non venga eettuata nel rispetto del seguente manuale.
B LIGHT will not consider valid the warranty conditions and will decline any responsibility for damage when the installation is not carried out according to this installation manual.
MEROPE 100 AD
67044 8 _ _ _
5. SCHEMA DI COLLEGAMENTO ON/OFF DALI: 48V DC WIRING EXAMPLE ON/OFF DALI: 48V DC
01 Leggere la sezione “required accessories” per ogni apparecchio e scegliere un alimentatore a 48V DC (tensione costante) DALI, IP67. Scegliere l’alimentatore consi-
derando il carico corretto ed aggiungere sempre un margine di sicurezza del 20%. SOLO on / o
02 Bipolarità: gli apparecchi B LIGHT funzionano correttamente anche in caso di inversione della polarità (+/-).
03 Apparecchi collegati in parallelo
01 Read section required accessories in each luminaire and choose a 48V DC (constant voltage) DALI, IP67 power supply. Choose the power supply considering the
correct load and always add a spare 20% as safety margin. on / o ONLY
02 Unpolarized connection: B LIGHT fixtures do not require to observe the polarity (+/-)
03 Luminaires connected in parallel
03
01
02
48V DC 100-305V
7. LUNGHEZZA CAVI WIRING DISTANCE
I dati riguardanti la distanza di cablaggio sotto riportati sono stati ottenuti da test eettuati con alimentatori forniti da B LIGHT.
La performance dei prodotti con alimentatori non forniti da B LIGHT non può essere garantita. Contattare B LIGHT per maggiori informazioni.
The below wiring distance data are produced from testing with B LIGHT supplied power supplies.
Performance of B LIGHT products with other power supplies cannot be guaranteed. Contact B LIGHT for further information.
Alimentatore
Power supply
Dimensioni cavo / lunghezza cavo massima dall’alimentatore all’ultimo apparecchio collegato.
Cable size / max wiring distance from the power supply to the last connected luminaire.
0,5 mm20,75 mm21,0 mm21,5 mm22,5 mm2
20W 50 m 75 m 100 m 150 m 250 m
40W 25 m 38 m 50 m 75 m 125 m
60W 17 m 25 m 35 m 50 m 85 m
100W 10 m 15 m 20 m 30 m 50 m
150W 7 m 10 m 15 m 20 m 35 m
240W 4,5 m 7 m 9 m 14 m 21 m
APPARECCHI 48V DC TENSIONE COSTANTE LUMINAIRES 48V DC CONSTANT VOLTAGE
6. DIMMING 010V O DMX: 48V DC CON CENTRALINA 010V DIMMING OR DMX: 48V DC WITH CONTROL UNIT
Consultare il manuale di installazione della centralina SMART DIMM MASTER 4 o SMART DIMM SLAVE 4.
Read installation manual SMART DIMM MASTER 4 or SMART DIMM SLAVE 4.
Other B LIGHT Outdoor Light manuals


